
What is PSVR?
PSVR, short for PlayStation Virtual Reality, is a virtual reality headset designed specifically for use with the PlayStation 4 and PlayStation 5 gaming consoles. Released by Sony Interactive Entertainment in 2016, PSVR has quickly become one of the leading virtual reality platforms in the gaming industry.
With PSVR, players can immerse themselves in a virtual world and experience games and multimedia content in a whole new way. The headset tracks the player’s head movements and displays a 360-degree view of the virtual environment, creating an incredibly immersive and lifelike experience.
PSVR brings a new level of realism to gaming, allowing players to feel like they are a part of the virtual world. Whether you’re exploring ancient ruins, racing through futuristic cities, or battling hordes of enemies, PSVR adds an extra layer of depth and excitement to your gaming adventures.
One of the standout features of PSVR is its impressive lineup of games and experiences. From thrilling action-adventure titles to heart-pounding horror games, there is a wide range of VR experiences available for PSVR. With a constantly growing library of games, there is always something new and exciting to try.
Beyond gaming, PSVR also offers various multimedia options. You can watch immersive 360-degree videos, experience virtual tours of famous landmarks, or even dive into interactive virtual reality experiences created by talented developers.
Overall, PSVR is an innovative and thrilling way to experience virtual reality. Whether you’re a dedicated gamer or simply curious about the possibilities of VR, PSVR offers a unique and immersive experience that is sure to captivate your senses.
What do you need to connect PSVR to a PC?
While PSVR was initially designed for use with PlayStation consoles, it is possible to connect the headset to a PC for an enhanced virtual reality experience. However, there are a few requirements and additional components you’ll need to make this connection.
First and foremost, you will need a compatible PC that meets the necessary hardware specifications. The minimum requirements usually include a powerful processor, sufficient RAM, and a dedicated graphics card. It’s important to check the specific requirements of the VR software you plan to use to ensure your PC can handle it.
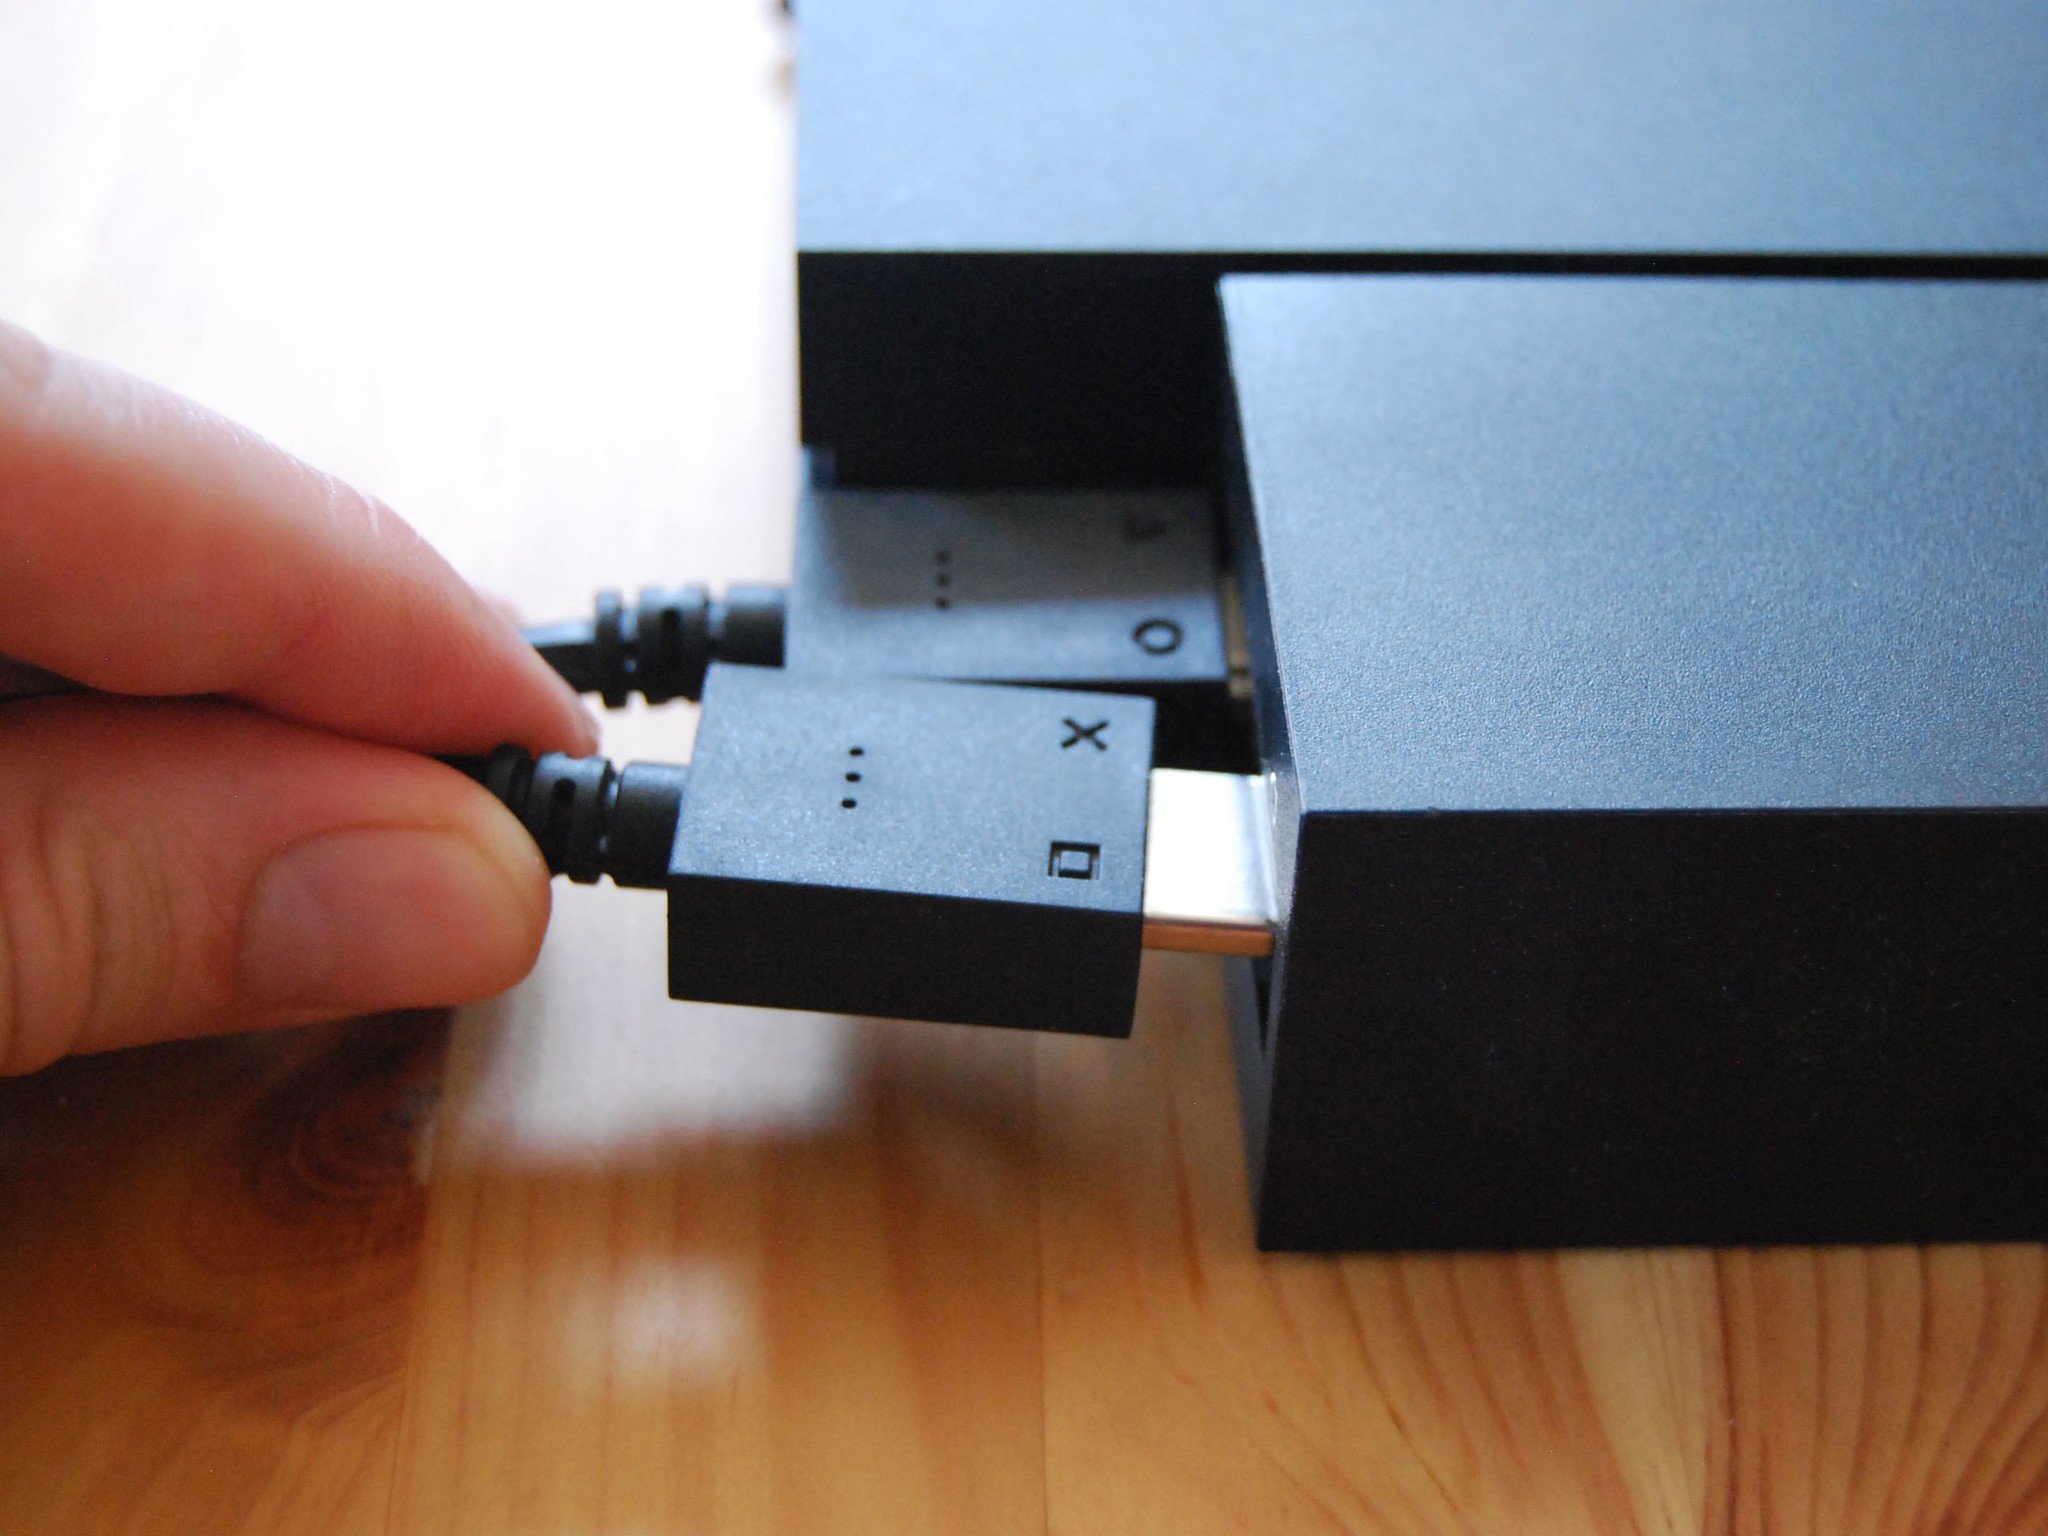
In addition to a capable PC, you will also need a USB 3.0 cable and an HDMI cable to connect the PSVR breakout box to your computer. The breakout box acts as an intermediary device that processes the video and audio signals from the PC to display on the PSVR headset.
Another essential component is the PlayStation Camera, which is used for motion tracking. The camera tracks the position of the VR headset and the PlayStation Move controllers, allowing for accurate and responsive movement in the virtual environment. Make sure you have a PlayStation Camera and connect it to your PC using the USB cable supplied with it.
Furthermore, it’s crucial to install the appropriate PSVR software on your PC. There are several third-party applications available, such as Trinus PSVR and iVRy, that provide the necessary drivers and settings to enable PSVR connectivity with a PC. These software programs act as a bridge between the headset and your computer, facilitating communication and ensuring compatibility.
Lastly, it’s worth mentioning that while you can connect PSVR to a PC, the experience may not be as seamless as using it with a PlayStation console. Not all VR games and applications will be compatible, and some may require additional configurations or adjustments to work correctly.
With the right PC setup and the necessary components, you can unlock a whole new world of virtual reality by connecting your PSVR headset to your PC. Just make sure to follow the setup instructions carefully and explore the compatible software options to enhance your VR experience.
Setting up your PlayStation Camera
Before you can connect your PSVR headset to your PC, you need to set up your PlayStation Camera. The camera plays a crucial role in tracking your movements and positioning in the virtual environment. Here’s a step-by-step guide to help you get started:
- Find an ideal location for your camera: Place your PlayStation Camera on top of or below your monitor, facing towards you. Ensure that it has a clear view of you and the space where you’ll be playing.
- Connect the PlayStation Camera: Use the USB cable provided with the camera to connect it to your PC. Make sure to use a USB port on your PC that provides enough power for the camera to function properly.
- Adjust the camera angle: Tilt and position the camera to optimize its field of view. It’s recommended to have the camera positioned at your eye level and angled slightly downward.
- Configure camera settings: Open the PSVR software on your PC and access the camera settings. Follow the instructions provided to calibrate and adjust the camera for optimal tracking performance.
- Perform the camera calibration: Depending on the software you’re using, you may need to perform a camera calibration process. This typically involves following prompts and moving the headset within the camera’s field of view to ensure accurate tracking.
- Test camera tracking: After setting up the camera and calibrating it, test the camera tracking by moving within its field of view. Ensure that your movements are accurately reflected in the virtual environment.
It’s important to note that proper positioning and configuration of the PlayStation Camera are crucial for optimal tracking performance. Take some time to fine-tune the camera settings and experiment with different positions to find what works best for you.
By following these steps and setting up your PlayStation Camera correctly, you’ll be one step closer to enjoying a seamless and immersive VR experience with your PSVR headset.
Installing the PSVR software
Once you have set up your PlayStation Camera and have all the necessary components for connecting your PSVR headset to your PC, the next step is to install the PSVR software. This software allows your PC to communicate with the headset and ensures compatibility with VR applications. Here’s a guide to help you through the installation process:
- Research and choose the appropriate PSVR software: There are several software options available, such as Trinus PSVR, iVRy, or VRidge, that enable PC connectivity with PSVR. Do some research to find the most suitable software for your needs and download it from a trusted source.
- Run the installation file: Locate the downloaded PSVR software file on your computer and run the installation process. Follow the on-screen instructions to complete the installation.
- Connect the PSVR breakout box: Connect the breakout box to your PC using the USB 3.0 cable. This box acts as the intermediary device that processes the video and audio signals from your PC to display on the PSVR headset.
- Connect the HDMI cable: Use an HDMI cable to connect the breakout box to your PC’s graphics card. This allows the visual output from your PC to be transmitted to the PSVR headset.
- Launch the PSVR software: Once everything is connected, launch the PSVR software on your PC. This software will detect your PSVR headset and establish the necessary connection.
- Follow any additional instructions: Depending on the software you are using, there may be additional steps or settings that need to be configured. Follow any on-screen instructions or prompts to ensure a successful installation.
- Test the software connection: After the installation process is complete, test the software connection by launching a compatible VR application on your PC. Ensure that both the audio and visual output are correctly transmitted to the PSVR headset.
It’s important to note that each PSVR software may have its own installation process and requirements. Be sure to refer to the software’s documentation or website for specific installation instructions and troubleshooting tips.
By following these steps and successfully installing the PSVR software, you’ll be ready to delve into the exciting world of PC virtual reality using your PSVR headset.
Configuring your PC’s settings
Before you can fully enjoy the PC VR experience with your PSVR headset, it’s important to configure your PC’s settings to ensure optimal performance and compatibility. Here are some key settings to consider:
- Graphics settings: Access your PC’s graphics settings and make sure they are optimized for VR. Adjust the graphics quality, anti-aliasing, and other parameters based on your PC’s capabilities and the specific VR applications you’ll be using.
- Refresh rate and resolution: Check the refresh rate and resolution settings of your PC’s graphics card. VR applications typically require a higher refresh rate and resolution for a smooth and immersive experience. Ensure that these settings meet the recommended requirements.
- Windows power settings: Set your Windows power plan to “High Performance” to ensure maximum performance and prevent your PC from entering power-saving modes while using VR. This helps maintain a stable and consistent performance during your VR sessions.
- Disable unnecessary background processes: VR applications demand significant system resources, and having unnecessary background processes running can negatively impact performance. Close any non-essential programs and disable processes that may consume CPU or GPU power.
- Audio settings: Configure your PC’s audio settings to ensure the audio is directed to the PSVR headset during VR sessions. Check that the correct audio output device is selected and that the audio channel mapping is properly configured.
- Network connection: Make sure you have a stable and reliable internet connection for downloading and running VR applications that require online access. Consider using a wired connection for an optimal experience, especially for multiplayer VR games.
- Update drivers and firmware: Regularly update your PC’s graphics card drivers, PSVR software, and any firmware updates for the headset. These updates often include performance improvements and bug fixes that can enhance the overall VR experience.
It’s essential to experiment with these settings and find the optimal configuration that works best for your PC and VR applications. It may require some trial and error to achieve a perfect balance between visuals, performance, and stability.
Remember to consult the documentation or support resources provided by the PSVR software and the VR applications you’ll be using for any additional settings or customization options specific to those platforms.
By configuring your PC’s settings properly, you can unlock the full potential of your PSVR headset and enjoy a smooth and immersive VR experience on your PC.
Connecting the PSVR headset to your PC
Once you have completed the setup and configuration process, it’s time to connect your PSVR headset to your PC. This will allow you to experience VR content on your PC using the PSVR headset. Follow these steps to establish the connection:
- Ensure that your PSVR headset is turned off and disconnected from any other devices.
- Connect the HDMI cable from your PC’s graphics card to the HDMI port on the PSVR breakout box.
- Connect the USB 3.0 cable from your PC to the USB port on the PSVR breakout box.
- Connect the PlayStation Camera to your PC using the USB cable that came with it.
- Turn on your PSVR headset by pressing the power button located on the earpiece.
- Launch the PSVR software on your PC and wait for it to detect the connected headset. Follow any on-screen instructions or prompts, if applicable.
- Put on the PSVR headset and adjust it for a comfortable fit. Ensure that the tracking lights on the headset and PlayStation Move controllers are visible to the PlayStation Camera.
- Make any necessary adjustments to the VR experience settings within the software or VR applications you’ll be using.
- Verify that the headset is displaying the VR content correctly. Look around and move your head to ensure that the tracking is accurate and the visuals are smooth.
It’s important to note that the compatibility and functionality of your PSVR headset when connected to a PC may vary based on the software and VR applications you’re using. Some applications may require additional configurations or adjustments to work optimally.
Always refer to the documentation or support resources provided by the PSVR software and the specific VR applications for instructions on how to navigate and control the VR experiences using your PSVR headset.
Once the connection is established and the PSVR headset is successfully connected to your PC, you can enjoy a wide range of VR content and immerse yourself in captivating virtual worlds.
Calibrating the PSVR headset
Calibrating your PSVR headset is an essential step to ensure accurate tracking and optimal performance during your VR experience. Proper calibration can enhance the immersion and minimize any potential issues. Here’s how to calibrate your PSVR headset:
- Ensure that your PlayStation Camera is properly set up and positioned according to the guidelines provided in the previous section.
- Put on the PSVR headset and adjust it for a comfortable fit. Make sure it sits securely on your head and that the lenses are aligned with your eyes.
- Access the settings or calibration menu within your PSVR software or VR application.
- Follow the instructions provided to start the calibration process. You may be asked to remain still while the software detects the position and movement of the headset.
- Move your head in different directions and follow any prompts to complete the calibration process.
- Ensure that the tracking lights on the headset and PlayStation Move controllers are visible to the PlayStation Camera during the calibration process.
- Once the calibration is complete, perform some head movements to verify that the tracking is accurate. Look around in the virtual environment to ensure that the response to your movements is smooth and accurate.
- If you notice any issues with the tracking or alignment, repeat the calibration process and make any necessary adjustments to improve the accuracy.
It’s important to keep in mind that lighting conditions and environmental factors can affect the tracking accuracy of the PSVR headset. Make sure you’re in a well-lit room and avoid direct sunlight or excessive backlighting that can interfere with the tracking system.
Additionally, some VR applications may have their own calibration options or specific instructions for fine-tuning the headset for their software. Always refer to the documentation or support resources provided by the PSVR software and the specific VR applications for any additional calibration steps or troubleshooting guidance.
By properly calibrating your PSVR headset, you can ensure a more immersive and accurate VR experience, allowing you to fully enjoy the virtual worlds that await.
Testing the PSVR connection
Once you have set up, configured, and calibrated your PSVR headset, it’s crucial to test the connection to ensure everything is functioning correctly. Testing the PSVR connection will help verify that the hardware and software are communicating properly and that you’re ready to enjoy your VR experience. Follow these steps to test the connection:
- Make sure your PSVR headset and all the necessary components are properly connected to your PC, as outlined in the previous sections.
- Launch a compatible VR application or game on your PC that supports PSVR connectivity.
- Put on the PSVR headset and adjust it for a comfortable fit. Ensure that the lenses are aligned with your eyes and that the tracking lights on the headset and PlayStation Move controllers are visible to the PlayStation Camera.
- Look around in the virtual environment and move your head to verify that the headset is tracking your movements accurately. Check for any visual artifacts or abnormalities that may indicate an issue with the connection.
- If you’re using PlayStation Move controllers, test their tracking by moving them within the PlayStation Camera’s field of view. Verify that their movements are accurately reflected in the virtual environment.
- Play and interact with the VR application or game to further test the connection. Ensure that the audio is coming through the PSVR headset and that the visual output is smooth and without any noticeable lag or latency.
- If you encounter any issues during the testing process, refer to the documentation or support resources provided by the PSVR software and the specific VR application for troubleshooting guidance. Check for software updates and ensure that all hardware connections are secure.
- If the connection and performance are satisfactory, congratulations! You can now fully enjoy your PSVR headset with your PC and explore the exciting world of virtual reality.
Remember to periodically check for software updates, firmware updates for your PSVR headset, and updates for the VR applications to ensure you’re utilizing the latest enhancements and improvements.
By testing the PSVR connection and verifying that everything is working correctly, you can dive into immersive VR experiences with confidence and embark on exciting virtual adventures.
Troubleshooting common issues
While connecting and using your PSVR headset with a PC can provide an immersive VR experience, it’s not uncommon to encounter various issues along the way. Here are some common issues that users may face when using PSVR with a PC, along with troubleshooting steps to help resolve them:
- Connection issues: If you’re having trouble connecting your PSVR headset to your PC, double-check all the connections. Ensure that the HDMI and USB cables are securely connected to the breakout box and your PC. Try using different USB ports or HDMI cables to rule out any faulty connections.
- Tracking problems: If you’re experiencing tracking issues, make sure that the PlayStation Camera is properly positioned and that the tracking lights on the headset and PlayStation Move controllers are clearly visible to the camera. Consider adjusting the lighting conditions in the room and avoiding any excessive backlighting or direct sunlight that may interfere with the tracking.
- Audio issues: If you’re not getting audio through the PSVR headset, check the audio settings on your PC. Ensure that the correct audio output device is selected and that the audio channel mapping is properly configured. Testing the audio with different applications can help identify whether the issue is specific to a certain program.
- Performance issues: If you’re experiencing performance-related problems, such as lag or stuttering in VR applications, check the graphics settings on your PC. Make sure that the graphics card drivers are up to date and that the graphics settings are optimized for VR. Consider adjusting the resolution, graphics quality, or disabling any unnecessary background processes that may be taxing your PC’s resources.
- Software compatibility: Not all VR applications or games are fully compatible with PSVR when used with a PC. Check for compatibility lists provided by the PSVR software or the specific VR applications. Some applications may require additional configurations or third-party software to work correctly. Reach out to the software developers or refer to their support resources for guidance.
- Firmware and software updates: Always ensure that you have the latest firmware and software updates for your PSVR headset, PSVR software, and the VR applications you’re using. Updates often include performance improvements, bug fixes, and compatibility enhancements. Check for updates regularly and apply them as needed.
It’s worth noting that troubleshooting steps may vary depending on the specific issue and the PSVR software you’re using. Be sure to consult the documentation or support resources provided by the PSVR software and the specific VR applications for further troubleshooting guidance.
By troubleshooting common issues and finding solutions, you can overcome any obstacles and unlock the full potential of your PSVR headset for an immersive and enjoyable VR experience.
Exploring the options for PC VR gaming with PSVR
Connecting your PSVR headset to your PC opens up a whole new world of VR gaming possibilities. While the PSVR was initially designed for use with PlayStation consoles, it’s now compatible with PC VR applications as well. Here are some exciting options to consider for PC VR gaming with your PSVR:
- SteamVR: Many VR games and experiences are available on the Steam platform, which is widely recognized as a hub for PC gaming. By using third-party software such as Trinus PSVR or iVRy, you can enable SteamVR compatibility with your PSVR headset and access a vast library of VR content.
- Oculus Rift compatibility: Thanks to the compatibility between some PSVR software and Oculus Rift, you can explore VR games and experiences originally designed for the Oculus platform. This provides an opportunity to enjoy a wide range of exclusive and highly acclaimed VR titles.
- Emulators and VR mods: Some gaming enthusiasts have developed emulators and VR mods that enable PSVR users to experience classic games and non-VR games in virtual reality. This expands the gaming library even further and allows for a nostalgic VR gaming experience.
- Virtual Desktop: Virtual Desktop software applications allow you to use your PC’s desktop in a virtual reality environment. This means that you can use your PSVR headset as a virtual screen to play traditional PC games or watch movies in a more immersive way.
- Custom VR experiences: With the availability of VR development tools, you can create or modify existing content to suit your preferences. Whether it’s designing your virtual environments, experimenting with VR game mechanics, or exploring the possibilities of VR storytelling, the PC platform offers a range of tools and resources to fuel your creativity.
The possibilities for PC VR gaming with your PSVR headset continue to expand as new software and applications are developed. Keep an eye on the VR gaming community for updates, new releases, and community-made content that can enhance your VR experience.
Remember to check the compatibility and system requirements for each VR application or game to ensure that your PC meets the necessary specifications. Additionally, explore user forums, VR communities, and online reviews to discover popular and highly recommended VR experiences for PC gaming.
By exploring the options available for PC VR gaming with your PSVR, you can unlock a vast library of immersive experiences and indulge in the limitless possibilities of virtual reality.