
Check your hardware requirements
Before you can connect your iPhone to your Mac, it is essential to ensure that you have the necessary hardware requirements. These requirements include:
- iPhone and Mac models: Check if your iPhone and Mac models are compatible with each other. Ensure that your iPhone is running on a compatible iOS version and your Mac is running on a supported macOS version.
- Lightning cable: You will need a Lightning cable to establish a physical connection between your iPhone and Mac. Make sure you have a genuine and functioning Lightning cable to avoid any connection issues.
- USB port: Check if your Mac has a functional USB port available. Most Mac models come with USB-A ports, while newer models might have USB-C or Thunderbolt 3 ports. In case your Mac does not have a standard USB port, you may need to use an adapter or a compatible cable.
By ensuring that you have the appropriate hardware requirements, you can proceed with confidence to connect your iPhone to your Mac and enjoy seamless data transfer and synchronization.
Update your software
Before connecting your iPhone to your Mac, it is crucial to update both your iPhone and Mac software to the latest versions. This ensures compatibility and smooth functionality between the two devices. Here’s how you can update your software:
- Update your iPhone: Go to the “Settings” app on your iPhone and navigate to “General” > “Software Update”. If a software update is available, tap “Download and Install”. Make sure your iPhone is connected to a stable Wi-Fi network and has sufficient battery charge. Follow the prompts to complete the software update.
- Update your Mac: On your Mac, click on the Apple menu in the top-left corner of the screen and select “System Preferences”. Next, click on “Software Update”. If there is an available software update, click on “Update Now” to download and install it. Make sure your Mac is connected to the internet and plugged into a power source if needed.
By keeping your iPhone and Mac software up to date, you ensure that you have the latest features, bug fixes, and security enhancements. This minimizes any potential compatibility issues and ensures a smoother experience when connecting your iPhone to your Mac.
Connect your iPhone to your Mac using a Lightning cable
To establish a physical connection between your iPhone and Mac, you will need a Lightning cable. Follow these steps to connect your iPhone to your Mac:
- Locate the Lightning port: On your iPhone, find the Lightning port. It is usually located at the bottom of your device.
- Connect the Lightning cable: Take one end of the Lightning cable and insert it into the Lightning port on your iPhone. Ensure that it’s inserted securely.
- Connect the other end of the Lightning cable: Take the other end of the Lightning cable and connect it to an available USB port on your Mac. Use a compatible USB-A, USB-C, or Thunderbolt 3 port, depending on the model of your Mac.
- Wait for the connection: Once the cable is connected, your iPhone should start charging, and a prompt may appear on your Mac’s screen indicating that your iPhone has been detected.
By connecting your iPhone to your Mac using a Lightning cable, you establish a secure and stable connection between the two devices. This allows for data transfer, device synchronization, and access to various features and functions available in macOS.
Trust the computer on your iPhone
When you connect your iPhone to your Mac for the first time, you may need to trust the computer to establish a secure connection. Follow these steps to trust the computer on your iPhone:
- Unlock your iPhone: Unlock your iPhone using your passcode, Face ID, or Touch ID.
- Trust the computer prompt: After connecting your iPhone to your Mac, you may see a prompt on your iPhone’s screen asking if you trust this computer. Tap “Trust” to proceed.
- Enter your device passcode: If prompted, enter your iPhone’s passcode to confirm your trust in the connected computer.
By trusting the computer on your iPhone, you authorize it to access your device’s content and establish a secure connection. This step is essential to ensure the privacy and security of your data while allowing seamless communication between your iPhone and Mac.
Configure your iPhone settings
Before fully utilizing the connectivity between your iPhone and Mac, it is important to configure your iPhone settings to optimize the experience. Here are a few key settings to consider:
- iCloud: Enable iCloud on your iPhone to automatically back up your data, sync your photos, contacts, and other information across your devices. To do this, go to “Settings” > [your name] > “iCloud” and toggle on the desired options.
- Wi-Fi and Bluetooth: Ensure that Wi-Fi and Bluetooth are enabled on your iPhone to allow for wireless connections and file transfers between your iPhone and Mac. You can find these options in the “Settings” menu.
- Personal Hotspot: If you want to use your iPhone’s internet connection on your Mac, you can set up the Personal Hotspot feature. Visit the “Settings” > “Personal Hotspot” menu to configure the hotspot settings and enable it.
- Notifications: Customize your iPhone’s notification settings to control how notifications appear on your device. You can access these settings in the “Settings” > “Notifications” menu.
- Privacy: Review and manage the privacy settings on your iPhone, allowing access to certain apps or features. Navigate to “Settings” > “Privacy” to control permissions for various apps and data.
By configuring your iPhone settings, you can personalize your device’s behavior, enhance privacy and security, and optimize the connectivity with your Mac. Take some time to explore these settings and adjust them according to your preferences and needs.
Enable iPhone syncing on your Mac
To enable syncing between your iPhone and Mac, you need to ensure that the necessary settings are enabled on your Mac. Follow these steps to enable iPhone syncing:
- Open iTunes: Launch the iTunes app on your Mac. If you have macOS Catalina (10.15) or later, you will use Finder instead of iTunes.
- Connect your iPhone: Using the Lightning cable, connect your iPhone to your Mac. Ensure that the cable is securely plugged into both devices.
- Trust the device: If you haven’t already, trust the connected device on your iPhone by following the prompts that appear on your iPhone’s screen. This step authorizes your iPhone to communicate with your Mac.
- Enable syncing: In iTunes or Finder, locate your connected iPhone. You will see a device icon or tab representing your iPhone. Click on it to access the device’s summary page.
- Select sync options: In the sidebar or tabs within iTunes or Finder, you can choose the content that you want to sync between your iPhone and Mac. This may include music, videos, photos, apps, and more. Customize the sync settings according to your preferences.
- Start the sync: Once you have selected the desired sync options, click on the “Apply” or “Sync” button to initiate the syncing process. This will transfer the selected content from your Mac to your iPhone or vice versa.
By enabling iPhone syncing on your Mac, you can easily manage and transfer your data, media, and other content between the two devices. It allows for seamless synchronization and ensures that your iPhone and Mac stay up to date with the same information.
Use Finder to access your iPhone
If you have macOS Catalina (10.15) or later, you can use Finder on your Mac to access and manage the content on your iPhone. Here’s how you can do it:
- Connect your iPhone: Use a Lightning cable to connect your iPhone to your Mac. Ensure that both devices are securely connected.
- Open Finder: Click on the Finder icon in your Mac’s dock or open a new Finder window from the menu bar.
- Locate your iPhone: In the sidebar of the Finder window, you will see your iPhone listed under the “Locations” section. Click on your iPhone’s name to access it.
- View your iPhone’s contents: Once you have accessed your iPhone in Finder, you can navigate through various folders to view and manage your iPhone’s content. You can access photos, videos, music, documents, and more.
- Drag and drop files: In Finder, you can easily transfer files between your iPhone and Mac by simply dragging and dropping them. This allows for quick and convenient file transfers.
- Eject your iPhone: After you have finished accessing your iPhone in Finder, make sure to safely eject it before disconnecting the Lightning cable. To do this, right-click on your iPhone’s name in the sidebar and select “Eject” from the context menu.
By using Finder to access your iPhone, you have a convenient and intuitive way to manage and transfer files between your iPhone and Mac. It provides a seamless experience and allows for easier organization and synchronization of your content.
Import photos and videos from your iPhone to your Mac
Transferring your photos and videos from your iPhone to your Mac is a simple and efficient process. Here are the steps to import your precious memories:
- Connect your iPhone: Use a Lightning cable to connect your iPhone to your Mac. Ensure that both devices are securely connected.
- Open Photos app: The Photos app should automatically open on your Mac when your iPhone is connected. If it doesn’t, you can manually open it from the Applications folder or the Launchpad.
- Select photos and videos: In the Photos app, your iPhone will appear in the sidebar under the “Devices” section. Click on your iPhone’s name to access your device’s content. You can then select the photos and videos you want to import.
- Import selected items: Once you have made your selection, click on the “Import Selected” button in the top-right corner of the Photos app. The selected photos and videos will then be imported to your Mac’s photo library.
- Import all items: If you want to import all the photos and videos from your iPhone, click on the “Import All New Items” button instead. This will import all the new items that haven’t been previously imported to your Mac.
- Review imported items: After the import process is complete, you can review your imported photos and videos in the Photos app. They will be organized by date and accessible in your Mac’s photo library.
- Safely disconnect your iPhone: Once you have finished importing your photos and videos, you can safely disconnect your iPhone from your Mac by clicking on the eject button next to your iPhone’s name in the sidebar.
By following these simple steps, you can effortlessly transfer your memorable moments from your iPhone to your Mac, preserving them and making them easily accessible for editing, sharing, and safekeeping.
Sync your iPhone with iTunes
If you have an older version of macOS or prefer to use iTunes for syncing, you can sync your iPhone with iTunes to manage your content. Here’s how you can do it:
- Connect your iPhone: Use a Lightning cable to connect your iPhone to your Mac. Ensure that both devices are securely connected.
- Open iTunes: Launch the iTunes app on your Mac. If you don’t have iTunes installed, you can download it from the Apple website or the App Store.
- Authorize your computer: If you haven’t already authorized your computer, you may need to do so to enable syncing. Go to “Account” > “Authorization” > “Authorize This Computer” and enter your Apple ID and password.
- Select your device: In iTunes, you will see an icon representing your iPhone at the top-left corner of the window. Click on it to access your device’s summary page.
- Choose sync options: On the left sidebar, you will find different categories such as music, movies, photos, apps, and more. Select the categories you want to sync between your iPhone and iTunes. You can customize the sync settings for each category.
- Start the sync: Once you have selected the desired sync options, click on the “Apply” or “Sync” button in the bottom-right corner of the iTunes window. This will initiate the syncing process.
- Monitor the sync process: During the sync, you can monitor the progress in the iTunes window. You can also view any errors or messages that may arise.
- Eject your iPhone: After the syncing process is complete, make sure to safely eject your iPhone from iTunes before disconnecting the Lightning cable. To do this, click on the eject button next to your iPhone’s name in the left sidebar.
By syncing your iPhone with iTunes, you can manage and transfer your music, videos, apps, and other content between your Mac and iPhone. It provides a comprehensive way to keep your devices in sync and ensures that your digital media is always up to date.
Transfer files between your iPhone and Mac
Transferring files between your iPhone and Mac is essential for seamless data management. There are various methods to transfer files between these devices. Here are a few options:
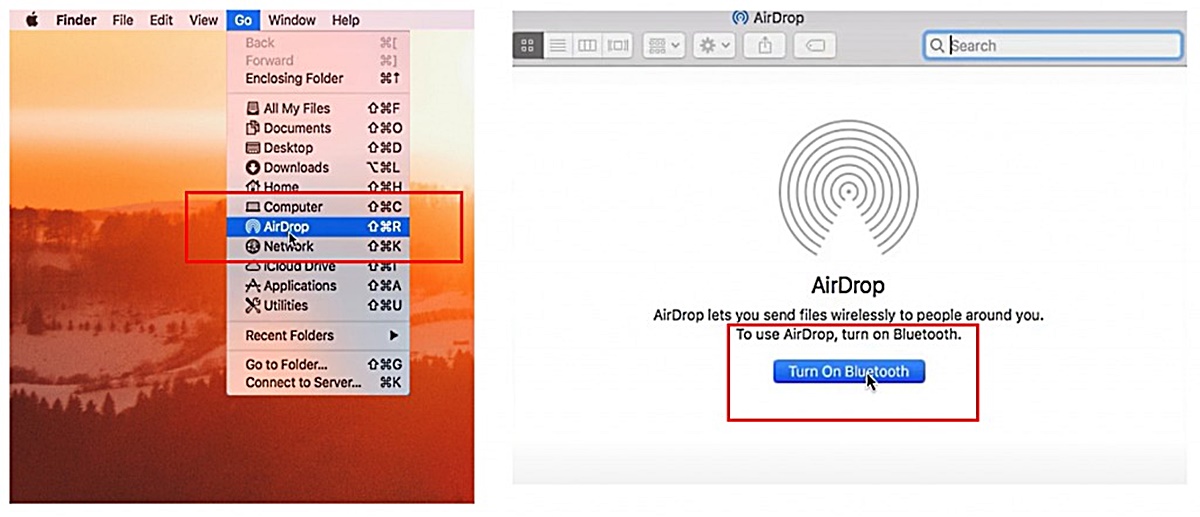
- Using AirDrop: AirDrop allows you to wirelessly transfer files between your iPhone and Mac. Ensure that Wi-Fi and Bluetooth are enabled on both devices. On your iPhone, open the file you want to transfer, tap the Share icon, and select your Mac from the AirDrop options. Accept the transfer on your Mac, and the file will be saved.
- Using iCloud Drive: With iCloud Drive, you can store and access files across your devices. Enable iCloud Drive on both your iPhone and Mac. Save the files you want to transfer to iCloud Drive on your iPhone. Then, access them on your Mac through the iCloud Drive folder or the iCloud website.
- Using Email or Messaging Apps: You can also transfer files through email or messaging apps like iMessage. Simply compose an email or start a conversation on your iPhone, attach the files you want to transfer, and send them to your email address or phone number associated with your Mac. Open the email or message on your Mac to download the files.
- Using Third-party Cloud Storage Services: If you prefer using third-party cloud storage services like Google Drive or Dropbox, install the corresponding apps on both your iPhone and Mac. Upload the files to the cloud storage from your iPhone and access them on your Mac by signing in to the same account.
- Using a USB or Lightning cable: Connect your iPhone to your Mac using a USB or Lightning cable. Unlock your iPhone and trust the connected computer if prompted. On your Mac, open the Finder or iTunes, locate your iPhone, and access the desired files. You can then copy and paste or drag and drop the files between your devices.
These methods provide you with various options to transfer files between your iPhone and Mac. Choose the method that suits your preferences and requirements, and enjoy effortless file management and synchronization.