
Common HDMI Cable Length Limitations
HDMI cables are widely used for transmitting audio and video signals from devices such as DVD players, gaming consoles, and set-top boxes to TVs and monitors. However, these cables have certain limitations when it comes to the maximum length they can effectively transmit signals without quality degradation. Understanding these limitations is crucial for ensuring optimal performance and preventing signal loss over long distances.
One of the primary limitations of HDMI cables is the maximum length specified by the HDMI Forum, which is 15 meters (about 49 feet) for standard HDMI cables. Beyond this length, there is a risk of signal degradation, resulting in reduced video quality or even a complete loss of signal. This limitation is mainly due to the resistance and impedance of the cable itself, which can cause attenuation and signal reflections.
Another factor that affects HDMI cable length is the version of HDMI being used. Older HDMI versions, such as HDMI 1.4 and earlier, have a lower maximum cable length compared to the newer HDMI 2.0 and HDMI 2.1 versions. For example, HDMI 1.4 supports a maximum cable length of 10 meters (about 33 feet) for 4K resolution, while HDMI 2.1 can handle 4K signals up to 25 meters (about 82 feet) without the need for signal boosters or extenders.
Additionally, the quality of the HDMI cable itself can impact its maximum length. Higher-quality cables with thicker conductors and better shielding may be capable of transmitting signals over longer distances compared to cheaper and thinner cables. It’s important to choose HDMI cables from reputable brands and ensure they are certified as “high-speed” or “premium” by the HDMI Licensing Administrator.
One way to overcome the limitations of HDMI cable length is to use HDMI extenders or repeaters. These devices amplify the HDMI signal and allow for longer transmission distances. HDMI extenders can utilize various transmission mediums, such as Cat5e/Cat6 Ethernet cables or fiber optic cables, to transmit HDMI signals over greater distances while maintaining signal integrity.
In summary, the maximum length of HDMI cables and the associated limitations can vary depending on factors such as the HDMI version, cable quality, and the presence of any signal amplification devices. Understanding these limitations is important when planning to connect HDMI devices over long distances to ensure the best possible audio and video quality. By considering alternative transmission mediums and using supporting devices like HDMI extenders, users can overcome the limitations and enjoy seamless connectivity over extended distances.
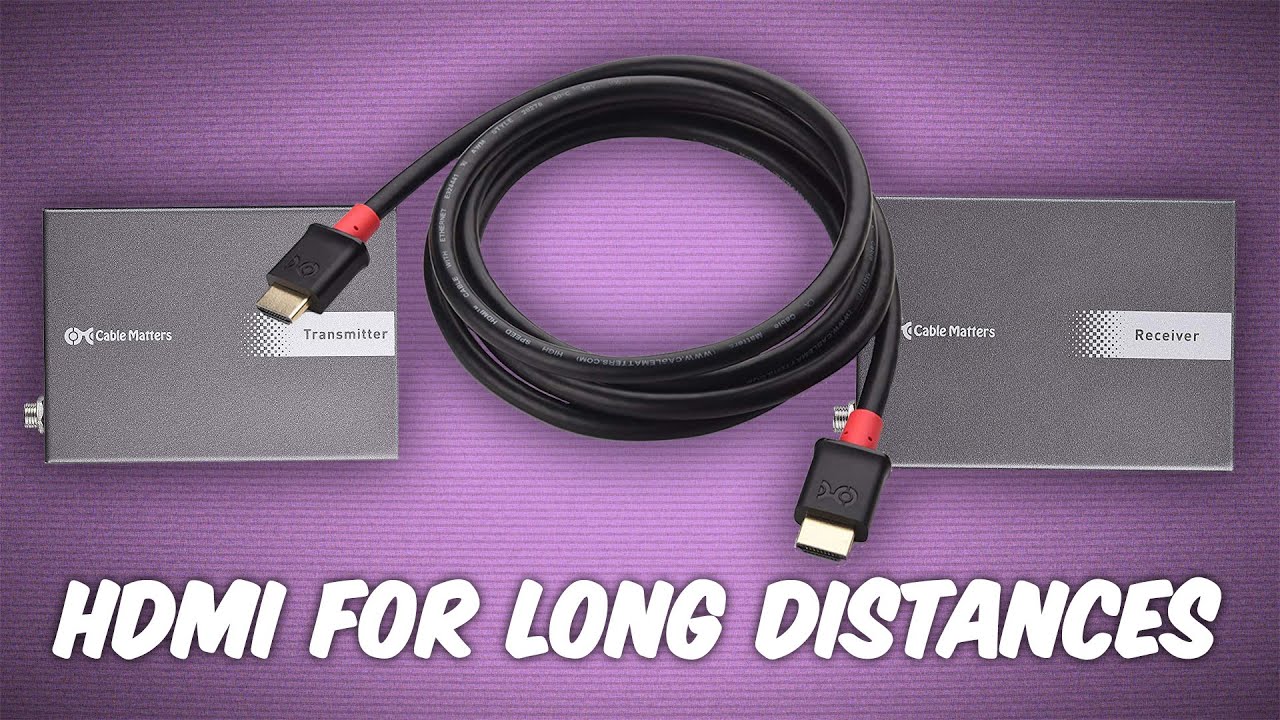
HDMI Extenders: What Are They and How Do They Work?
HDMI extenders are devices designed to overcome the limitations of HDMI cables when it comes to transmitting signals over long distances. They serve as a bridge between the source device and the display, allowing for the extension of HDMI signals beyond the maximum cable length. Understanding the role and functionality of HDMI extenders is key to achieving extended HDMI connectivity for optimal audio and video performance.
HDMI extenders work by converting the HDMI signal from the source device into a format that can be transmitted over a different medium, such as Cat5e/Cat6 Ethernet cables or fiber optic cables. The extender then converts the signal back to HDMI format at the display end, allowing for seamless transmission over long distances without signal degradation.
There are different types of HDMI extenders available, each with its own method of signal transmission. Cat5e/Cat6 HDMI extenders utilize Ethernet cables to transmit the HDMI signal. These extenders convert the HDMI signal into a compatible format that can be transmitted over the Ethernet cables, which are readily available and cost-effective. At the receiving end, the signal is converted back to HDMI for seamless connection to the display.
Fiber optic HDMI extenders, on the other hand, use fiber optic cables for transmission. Fiber optic cables offer the advantage of longer transmission distances, higher bandwidth, and immunity to electromagnetic interference. These extenders convert the HDMI signal into light signals that can be transmitted through the fiber optic cables. At the receiving end, the light signals are converted back into an HDMI signal for display connection.
Wireless HDMI extenders are another type that utilizes wireless technology for signal transmission. These extenders eliminate the need for physical cables, offering greater flexibility in terms of installation and positioning. Wireless HDMI extenders use radiofrequency or Wi-Fi signals to transmit the HDMI signal from the source device to the display. However, they may be susceptible to interference from other wireless devices or obstacles in the signal path.
In summary, HDMI extenders are essential devices for extending HDMI connectivity over long distances. They convert the HDMI signal into a compatible format for transmission through different mediums such as Ethernet cables, fiber optic cables, or wirelessly. By using HDMI extenders, users can overcome the limitations of HDMI cables and enjoy uninterrupted audio and video performance across extended distances.
How to Choose the Right HDMI Extender
Choosing the right HDMI extender is crucial to ensure seamless and reliable long-distance HDMI connectivity. With various options available in the market, it’s important to consider certain factors to make an informed decision. Here are some key factors to keep in mind when selecting an HDMI extender.
1. Transmission Distance: Determine the required transmission distance for your setup. Different HDMI extenders have different maximum transmission distances, so choose one that meets your specific needs. Consider factors such as the distance between the source device and the display, as well as any potential obstacles or signal loss along the way.
2. Transmission Medium: HDMI extenders utilize different transmission mediums, such as Ethernet cables, fiber optic cables, or wireless technology. Consider the advantages and disadvantages of each medium. Ethernet and fiber optic cables generally offer better signal quality and longer transmission distances, while wireless HDMI extenders provide more flexibility in terms of installation.
3. Signal Quality: Look for HDMI extenders that support high-definition resolutions, such as 1080p or 4K. Ensure that the extender can deliver the required video and audio quality without signal degradation, especially for devices with high bitrate content such as Blu-ray players or gaming consoles.
4. Compatibility: Check if the HDMI extender is compatible with the HDMI version of your source device and display. HDMI 1.4 and HDMI 2.0 are common versions, but newer devices may require HDMI 2.1 compatibility to support higher resolutions or advanced features such as HDR or Dolby Vision. Ensure that the extender supports the necessary HDMI version for seamless connectivity.
5. Ease of Installation: Consider the ease of setting up the HDMI extender. Some extenders may require additional power sources or complex wiring, while others offer plug-and-play functionality. Evaluate your installation requirements and choose an extender that suits your setup.
6. Brand and Reviews: Opt for HDMI extenders from reputable brands known for their quality and reliability. Research customer reviews and ratings to get an idea of the performance and durability of the extender. Genuine customer feedback can help you make an informed decision and avoid potential compatibility or performance issues.
By considering these factors and conducting thorough research, you can select the right HDMI extender that aligns with your specific needs. Whether it’s for a home theater setup, conference room, or digital signage display, choosing the right HDMI extender is essential for uninterrupted audio and video transmission over long distances.
How to Extend HDMI Using Cat5e/Cat6 Ethernet Cables
Extending HDMI signals using Cat5e/Cat6 Ethernet cables is a popular and cost-effective method, allowing for long-distance transmission while maintaining signal quality. To successfully extend HDMI using Ethernet cables, follow these steps:
1. Choose an HDMI Extender: Select an HDMI extender specifically designed to work with Cat5e/Cat6 Ethernet cables. These extenders come with two units: a transmitter that connects to the source device and a receiver that connects to the display.
2. Connect the Transmitter and Receiver: Connect the HDMI output of the source device, such as a Blu-ray player or PC, to the HDMI input of the transmitter unit. Then, connect one end of the Ethernet cable to the transmitter unit and the other end to the receiver unit. Finally, connect the HDMI output of the receiver unit to the HDMI input of the display.
3. Power the Extender: Most HDMI extenders require power to function properly. Connect the power adapters provided with the extender units to a power source and plug them in. Ensure that both the transmitter and receiver units receive power.
4. Check Video and Audio Settings: Make sure the source device is set to the appropriate video and audio settings for your display. This includes selecting the correct resolution and audio format to ensure optimal playback.
5. Test the Connection: Once everything is connected, turn on the source device and the display. Verify that the HDMI signal is successfully transmitted to the display. If there are any issues, double-check the connections, power supply, and settings.
6. Consider Signal Boosters: If you encounter signal degradation or loss over long distances, you may need to use signal boosters or repeaters to enhance the HDMI signal strength. These devices amplify the signal before it reaches the receiver unit, ensuring a stable and clear transmission.
It’s important to note that using Cat5e/Cat6 Ethernet cables to extend HDMI signals may have limitations based on the HDMI version in use. HDMI 1.4 typically supports a maximum range of 50-75 feet, while HDMI 2.0 can extend up to 150-200 feet. Beyond these distances, the signal may require additional signal boosters or alternative methods.
In summary, extending HDMI using Cat5e/Cat6 Ethernet cables is an effective way to transmit HDMI signals over long distances. By carefully following the steps outlined above and considering the limitations of HDMI versions, users can successfully extend HDMI connectivity and enjoy high-quality audio and video performance at remote displays or devices.
Using Fiber Optic Cables for Long Distance HDMI Transmission
When it comes to extending HDMI signals over long distances without signal loss or degradation, fiber optic cables provide a reliable and efficient solution. Fiber optic cables offer several advantages over traditional copper cables, making them ideal for long-distance HDMI transmission. Here’s how to utilize fiber optic cables for extending HDMI signals:
1. Select the Right Fiber Optic HDMI Extender: Choose an HDMI extender specifically designed for fiber optic cables. Look for extenders that support the HDMI version you require, such as HDMI 2.0 or HDMI 2.1 for higher resolutions and advanced features. This will ensure compatibility and optimal performance.
2. Connect the Transmitter and Receiver Units: Connect the HDMI output of the source device to the HDMI input of the transmitter unit. Then, connect the fiber optic cable to the transmitter unit, ensuring a secure connection. Next, connect the other end of the fiber optic cable to the receiver unit. Finally, connect the HDMI output of the receiver unit to the HDMI input of the display.
3. Power the Extender: Most fiber optic HDMI extenders require power to function properly. Connect the power adapters provided with the extender units to a power source and plug them in. Ensure that both the transmitter and receiver units receive power.
4. Check Video and Audio Settings: Make sure the source device is set to the appropriate video and audio settings for your display. This includes selecting the correct resolution and audio format to ensure optimal playback.
5. Test the Connection: Once everything is connected, turn on the source device and the display. Verify that the HDMI signal is successfully transmitted to the display. If there are any issues, double-check the connections, power supply, and settings. Fiber optic cables provide excellent signal integrity and minimal loss, ensuring a reliable and high-quality transmission.
One of the key advantages of using fiber optic cables for HDMI transmission is their ability to transmit signals over significantly longer distances compared to traditional copper cables. With fiber optic cables, users can extend HDMI signals up to several hundred meters without the need for signal boosters or repeaters. This makes them suitable for a wide range of applications, including large venues, conference rooms, or digital signage installations.
Another advantage of fiber optic HDMI transmission is immunity to electromagnetic interference. Unlike copper cables, fiber optic cables are not affected by electrical noise or nearby electrical sources, ensuring a clean and stable signal. This is particularly important in environments with high levels of electromagnetic interference, such as industrial settings or areas with a lot of electronic equipment.
In summary, utilizing fiber optic cables for long-distance HDMI transmission offers numerous benefits, including extended range, signal integrity, and immunity to electromagnetic interference. By following the steps outlined above and selecting the right fiber optic HDMI extender, users can extend HDMI signals over long distances while maintaining optimal audio and video performance.
Wireless HDMI Solutions for Long Distance Connectivity
When it comes to extending HDMI signals over long distances without the need for physical cables, wireless HDMI solutions offer a convenient and flexible option. These solutions utilize wireless technology to transmit HDMI signals from the source device to the display, eliminating the limitations and constraints of traditional wired connections. Here’s how wireless HDMI solutions can be used for long-distance connectivity:
1. Select a Wireless HDMI Transmitter and Receiver: Choose a wireless HDMI kit that consists of a transmitter and a receiver unit. These units wirelessly connect to each other, allowing for the transmission of HDMI signals. When selecting a kit, consider factors such as the maximum transmission distance, video resolution compatibility, and any additional features you may require.
2. Set Up the Transmitter and Receiver: Connect the HDMI output of the source device to the HDMI input of the transmitter unit. Place the transmitter unit near the source device and ensure a clear line of sight to the receiver unit. Connect the HDMI output of the receiver unit to the HDMI input of the display. Note that some wireless HDMI solutions may require external power sources for both the transmitter and receiver units, so ensure they are properly powered.
3. Pair and Configure the Transmitter and Receiver: Follow the manufacturer’s instructions to pair the transmitter and receiver units. This typically involves pressing a button or entering a code on both units to establish the wireless connection. Additionally, check the settings on both units to ensure they are configured for the desired video and audio formats.
4. Test the Wireless HDMI Connection: Turn on the source device and the display, and verify that the HDMI signal is being transmitted wirelessly. Keep in mind that wireless HDMI signals can be susceptible to interference from other wireless devices or physical barriers. If you experience any issues, try placing the transmitter and receiver units in different locations, away from potential sources of interference.
Wireless HDMI solutions offer the advantage of flexibility and convenience, allowing for easy installation and repositioning of devices. They are particularly useful in scenarios where running physical cables is not feasible or desired, such as wall-mounted displays, projector setups, or temporary installations. However, it’s important to note that the maximum transmission distance of wireless HDMI solutions may vary depending on factors such as the wireless technology used and the presence of obstructions.
When selecting a wireless HDMI solution, consider factors such as the range, video resolution support, latency, and any additional features offered by the kit. Read reviews and check the specifications provided by the manufacturer to ensure compatibility with your specific requirements.
In summary, wireless HDMI solutions provide a convenient and flexible way to extend HDMI signals over long distances without the need for physical cables. By selecting a reliable wireless HDMI kit and following the proper setup and configuration steps, users can enjoy seamless wireless connectivity for their audio and video needs, even in scenarios where wired connections are not feasible or desirable.
Factors to Consider When Extending HDMI over Long Distances
Extending HDMI signals over long distances requires careful consideration of various factors to ensure optimal performance and signal integrity. By taking these factors into account, users can choose the appropriate method and equipment for their specific requirements. Here are some key factors to consider when extending HDMI over long distances:
1. Transmission Distance: Determine the required transmission distance between the source device and the display. This will help determine the appropriate solution, as different methods have varying limitations in terms of maximum transmission distances.
2. HDMI Version: Take into consideration the HDMI version of the devices being connected. HDMI 1.4, HDMI 2.0, and HDMI 2.1 have different capabilities in terms of resolution support, color depth, and other features. Ensure that the method chosen supports the required HDMI version to maintain compatibility and optimal performance.
3. Signal Quality: Consider the desired video and audio quality for your application. Higher resolutions, such as 4K or Ultra HD, may require methods with higher bandwidth capabilities. Ensure that the chosen method can maintain the desired signal quality over the intended distance without degradation or loss.
4. Medium and Equipment: Evaluate the available options for extending HDMI signals, such as HDMI extenders using Ethernet or fiber optic cables, or wireless HDMI solutions. Each option has its own benefits and limitations. Consider factors such as budget, installation requirements, and the environment in which the system will be deployed.
5. Budget: Determine the budget allocation for extending HDMI signals over long distances. Different methods and equipment can vary in cost, so it’s important to strike a balance between affordability and performance.
6. Futureproofing: Anticipate the future needs of the HDMI system. If there are plans to upgrade to higher resolutions or newer HDMI versions, choose a method that can support these advancements to avoid the need for additional upgrades or replacement in the near future.
7. Installation Ease and Flexibility: Consider the ease of installation and flexibility in terms of cable routing and device placement. Some methods, such as wireless HDMI solutions, offer more flexibility in terms of device positioning, while others may require more complex wiring and setup.
8. Signal Boosting: Evaluate the need for signal boosters or repeaters based on the length of the transmission distance and the chosen method. Signal boosters can enhance signal strength and clarity, ensuring a stable connection over long distances.
By carefully considering these factors, users can make informed decisions and select the most suitable method and equipment for extending HDMI signals over long distances. This will result in reliable, high-quality audio and video transmission, meeting the specific requirements of their application.
Troubleshooting Common HDMI Connectivity Issues
While HDMI provides a convenient and high-quality audio and video connection, it can sometimes encounter connectivity issues. Fortunately, many common HDMI connectivity issues can be resolved with some troubleshooting. Here are some common issues and troubleshooting steps to help resolve them:
1. No Signal: If you are not getting any signal on your display, check if the HDMI cable is securely connected to both the source device and the display. Try unplugging and re-plugging the cable to ensure a proper connection. Additionally, make sure the correct HDMI input is selected on the display.
2. Poor Video Quality: If the video quality is subpar, check if the HDMI cable is damaged or of low quality. Replace the cable if necessary, and make sure it is certified as “high-speed” or “premium” by the HDMI Licensing Administrator. Also, ensure that the HDMI output settings on the source device match the capabilities of the display.
3. No Audio: If there is no audio output, verify that the audio settings on the source device are correctly configured. Check if the sound is muted or the volume is turned down. You may also need to ensure that the correct audio output source is selected on the display.
4. HDCP Error: If you encounter an HDCP error message, it typically indicates a compatibility issue with the HDMI signal’s copy protection. In this case, ensure that all devices in the HDMI chain support HDCP, including the source device, cables, and the display. If the issue persists, try power cycling the devices or using a different HDMI port.
5. Interference: HDMI signals can be susceptible to interference from other electronic devices. If you experience flickering or a loss of signal, try moving any nearby devices that could be causing interference, such as speakers or wireless routers. Additionally, using high-quality shielded HDMI cables can help minimize interference.
6. Unsupported Resolutions or Refresh Rates: If the display is not showing the desired resolution or refresh rate, ensure that the display and the source device support the specific resolution or refresh rate. Check the user manuals or specifications of the devices to determine their capabilities. If necessary, adjust the settings to match the supported options.
7. Firmware Updates: Occasionally, HDMI connectivity issues can be resolved by updating the firmware of the devices involved. Check the manufacturer’s website for any available firmware updates for your source device, display, or HDMI switcher/splitter. Follow the provided instructions to update the firmware to the latest version.
8. Try Different Ports and Devices: If all else fails, try testing different HDMI ports on the display and using different HDMI cables and devices. This will help identify if the issue lies with a specific port or device. Sometimes, a faulty HDMI port or incompatible device can cause connectivity issues.
By following these troubleshooting steps, users can often identify and resolve common HDMI connectivity issues. If the issue persists or requires further assistance, consulting the technical support of the respective devices may be necessary.