Troubleshooting Bluetooth Connectivity Issues with Bose Headphones
Bluetooth connectivity issues can be frustrating when trying to connect your Bose headphones to your PC. However, there are several troubleshooting steps you can take to resolve these issues and get your headphones connected successfully.
The first step in troubleshooting Bluetooth connectivity issues is to ensure that both your Bose headphones and PC are in pairing mode. Put your headphones in pairing mode by pressing and holding the Bluetooth button until the LED light starts flashing. On your PC, go to the Bluetooth settings and make sure it is turned on and discoverable.
If the pairing process fails, try resetting your Bose headphones. To reset them, turn them off, then press and hold the power button for 10 seconds. Release the button, and your headphones should be reset. Try the pairing process again.
It’s also essential to check that your Bose headphones are charged. Low battery levels can sometimes cause connection issues. Connect your headphones to a power source and ensure they are fully charged before attempting to pair them with your PC.
In some cases, clearing the Bluetooth cache on your PC can help resolve connectivity issues. To do this, go to the Bluetooth settings on your PC, locate the connected Bose headphones, and remove them from the list of paired devices. Then, restart your PC and try the pairing process again.
If you’re still experiencing connectivity problems, updating the Bluetooth driver on your PC may be necessary. Visit the manufacturer’s website and search for the latest Bluetooth driver for your operating system. Download and install the driver, then restart your PC and attempt to pair your headphones again.
Additionally, if you have multiple devices connected to your PC via Bluetooth, there may be interference causing connection issues with your Bose headphones. Try disconnecting or turning off other Bluetooth devices and see if that improves the connection.
If none of the above steps resolve the connectivity issues, it may be helpful to seek assistance from Bose customer support. They can provide further guidance and troubleshoot any specific issues you may be facing.
By following these troubleshooting steps, you should be able to overcome Bluetooth connectivity issues and successfully connect your Bose headphones to your PC for an enhanced audio experience.
Pairing Bose Headphones with a PC via Bluetooth
Pairing your Bose headphones with a PC via Bluetooth is a convenient way to enjoy wireless audio and freedom of movement. Here’s a step-by-step guide on how to pair your Bose headphones with your PC:
- Make sure your Bose headphones are properly charged. Low battery levels can affect the pairing process.
- Turn on your Bose headphones by pressing the power button for a few seconds until the LED light turns on.
- On your PC, go to the Bluetooth settings. This can usually be accessed through the system tray or the settings menu.
- Ensure that Bluetooth is turned on and set to discoverable mode on your PC.
- On your Bose headphones, press and hold the Bluetooth button until the LED light starts flashing. This puts the headphones in pairing mode.
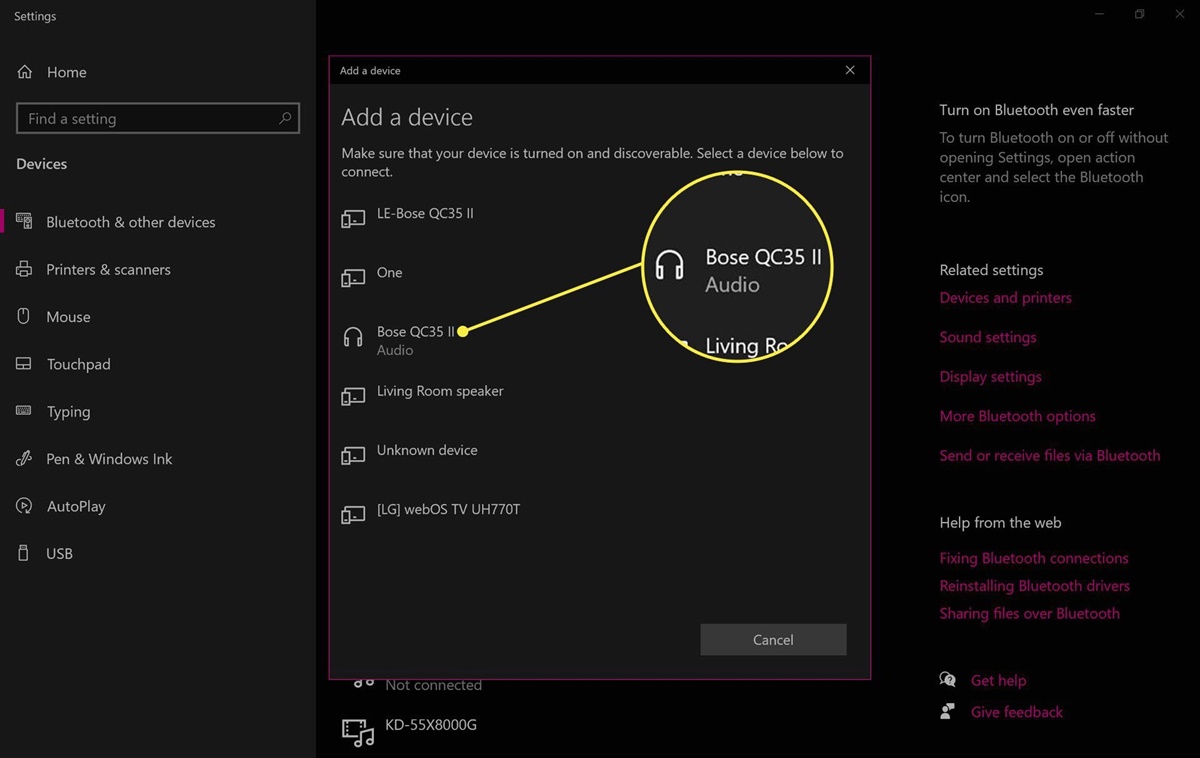
- While in the Bluetooth settings on your PC, click on the option to add a new Bluetooth device.
- Your PC will start searching for nearby Bluetooth devices. After a few seconds, your Bose headphones should appear in the list of available devices.
- Select your Bose headphones from the list and click on the “Pair” or “Connect” button.
- Your PC will establish a connection with your Bose headphones. Once the connection is successful, you’ll see a notification confirming the pairing.
Now that your Bose headphones are successfully paired with your PC, you can start enjoying high-quality wireless audio. Keep in mind that the pairing process may vary slightly depending on the specific model of your Bose headphones and the operating system of your PC.
If you experience any issues during the pairing process, refer to the user manual of your Bose headphones or visit the Bose support website for further assistance. They may have specific instructions or troubleshooting steps tailored to your device.
Pairing your Bose headphones with a PC via Bluetooth opens up a world of possibilities for enjoying your favorite music, movies, and games with the freedom of wireless audio. Follow these steps, and you’ll be on your way to a seamless and immersive audio experience.
Connecting Bose Headphones to a PC using a USB Cable
If you prefer a wired connection or if your PC doesn’t have Bluetooth capabilities, you can connect your Bose headphones to your PC using a USB cable. This method provides a reliable and direct connection for audio playback. Here’s how to connect your Bose headphones to a PC using a USB cable:
- Ensure that your Bose headphones are powered off before starting.
- Take the USB cable that came with your Bose headphones and locate the USB Type-A end.
- Insert the USB Type-A end into an available USB port on your PC. It’s usually located on the front or back of the computer.
- Locate the USB Type-C or Micro-USB end on the other side of the cable, depending on the model of your Bose headphones.
- Connect the USB Type-C or Micro-USB end to the corresponding port on your Bose headphones. Ensure a secure connection.
- Power on your Bose headphones. The LED light may indicate that the headphones are charging while connected.
- Your PC should automatically recognize the connected Bose headphones as a USB audio device.
- Adjust the audio settings on your PC to set the Bose headphones as the default playback device. This can typically be done through the sound settings in your operating system.
- You can now play audio on your PC, and it will be routed through your Bose headphones via the USB connection.
Connecting your Bose headphones to a PC using a USB cable is a straightforward process that ensures a stable and high-quality audio connection. It eliminates any potential Bluetooth connectivity issues and provides a reliable option for enjoying your favorite multimedia content.
If you encounter any difficulties during the connection process, refer to the user manual of your Bose headphones for specific instructions or visit the official Bose support website for further assistance.
Whether you prefer a wireless or wired connection, Bose headphones offer exceptional audio performance on a PC. By connecting your headphones using a USB cable, you can enjoy uninterrupted audio playback and immerse yourself in your favorite media.
Adjusting Audio Settings on a PC for Bose Headphones
After connecting your Bose headphones to your PC, it’s essential to adjust the audio settings to optimize your listening experience. Here’s how you can adjust the audio settings on your PC for Bose headphones:
- Right-click on the volume icon in the system tray of your PC’s taskbar.
- Select “Playback devices” from the context menu that appears.
- In the “Playback” tab of the Sound settings, you should see your Bose headphones listed.
- Click on your Bose headphones to select them as the default playback device.
- Click the “Set Default” button and then click “Apply” to save the changes.
- Now, all audio output from your PC will be directed to your Bose headphones.
- If you want to adjust the audio volume, you can either use the volume control buttons on your headphones or adjust the volume slider in the system tray of your PC.
- For more advanced audio settings, you can access the sound settings within the control panel of your operating system. Here, you can fine-tune the audio balance, equalizer settings, and other audio enhancements according to your preferences.
By adjusting the audio settings on your PC for your Bose headphones, you can ensure that you’re getting the best sound quality and performance from your headphones. It allows you to immerse yourself in your favorite music, movies, or games with optimal audio playback.
Remember that the available audio settings and customization options may vary depending on your operating system and audio driver. If you need further guidance or encounter any issues, refer to the user manual of your Bose headphones or consult the official Bose support website for specific instructions.
Take the time to experiment with different audio settings to find the combination that suits your preferences and enhances your listening experience. With the right adjustments, you can unlock the full potential of your Bose headphones on your PC.
Configuring Sound Output Options for Bose Headphones on a PC
When using Bose headphones on your PC, it’s important to configure the sound output options to ensure optimal audio performance. By adjusting these settings, you can customize the sound output according to your preferences. Here’s how you can configure the sound output options for Bose headphones on a PC:
- Right-click on the volume icon in the system tray of your PC’s taskbar.
- Select “Playback devices” from the context menu that appears.
- In the “Playback” tab of the Sound settings, locate your Bose headphones.
- Right-click on your Bose headphones and select “Properties.”
- In the properties window, you’ll find various tabs with sound output options.
- General tab: Here, you can view information about your Bose headphones and adjust the volume levels.
- Levels tab: This tab allows you to further fine-tune the headphone volume and adjust the balance between the left and right channels.
- Enhancements tab: Depending on your audio driver and operating system, you may have options to apply audio enhancements such as bass boost or virtual surround sound. Experiment with these enhancements to enhance your listening experience.
- Advanced tab: In this tab, you can modify sampling rate and bit depth settings. It’s recommended to keep these settings at their default values for optimal audio performance.
By configuring the sound output options for your Bose headphones on your PC, you can personalize your audio experience and tailor it to your specific preferences. Experiment with different settings to find the combination that provides the best sound quality and immersion.
Keep in mind that the available sound output options and customization settings may vary depending on your operating system, audio driver, and the specific model of your Bose headphones. If you encounter any difficulties or need further guidance, consult the user manual of your headphones or visit the official Bose support website for specific instructions.
Take the time to explore the sound output options on your PC to unlock the full potential of your Bose headphones. With the right configuration, you can enjoy rich, immersive audio that enhances your multimedia experience.
Using Bose Connect App with Bose Headphones on a PC
The Bose Connect app is a powerful companion tool that enhances the functionality and customization options of your Bose headphones. While the app is primarily designed for mobile devices, it is possible to use it with your Bose headphones on a PC. Here’s how you can utilize the Bose Connect app on your PC:
- Ensure that your Bose headphones are connected to your PC either via Bluetooth or USB cable.
- Download and install an Android emulator software on your PC. Popular options include Bluestacks, Nox Player, and Andy.
- Launch the Android emulator and set it up by following the provided instructions.
- Access the Google Play Store within the Android emulator and search for the Bose Connect app.
- Install the Bose Connect app on the emulator, just like you would on a mobile device. Make sure you sign in with your existing Bose account or create a new one.
- Once installed, open the Bose Connect app within the Android emulator on your PC.
- Follow the on-screen prompts to connect your Bose headphones to the app. The process may involve putting your headphones in pairing mode or selecting them from a list of available devices.
- Once your Bose headphones are connected to the app, you can access a range of features and customization options.
- With the Bose Connect app, you can control various settings, including noise cancellation levels, volume levels, and EQ settings.
- Additionally, the app provides firmware updates to ensure your headphones are running on the latest version.
- Explore the app’s other features, such as intuitive controls, music sharing, and personalized settings, to enhance your listening experience.
Using the Bose Connect app on your PC offers a convenient way to access additional features and fine-tune the settings of your Bose headphones. While the experience may differ slightly from using the app on a mobile device, you can still enjoy a range of customization options.
It’s important to note that not all features available on the mobile version of the Bose Connect app may be accessible on the PC version. Additionally, the compatibility of the Android emulator with the Bose Connect app may vary. If you encounter any issues, refer to the emulator’s documentation or the official Bose support website for further assistance.
Make the most of your Bose headphones by utilizing the Bose Connect app on your PC. Explore its features, customize your listening experience, and stay up-to-date with the latest firmware updates for optimal performance and functionality.
Updating Bose Headphones Firmware on a PC
Keeping your Bose headphones up to date with the latest firmware ensures that you have access to the latest features, improvements, and bug fixes. While firmware updates are typically performed through the Bose Connect app on mobile devices, it is also possible to update the firmware on your Bose headphones using a PC. Here’s how you can update the firmware on your Bose headphones using a PC:
- Connect your Bose headphones to your PC using a USB cable or ensure that they are paired via Bluetooth.
- Make sure your headphones are turned on and properly connected to your PC.
- Open a web browser on your PC and visit the official Bose website.
- Search for the support or downloads section on the Bose website.
- Look for firmware update files specifically designed for your Bose headphones model.
- Download the firmware update files to your PC.
- Once the download is complete, locate the downloaded firmware file.
- Double-click on the firmware file to start the update process.
- Follow the on-screen instructions and prompts provided by the firmware update utility.
- The utility will guide you through the firmware update process, which may involve selecting your Bose headphones from a list of available devices.
- Do not interrupt or disconnect your headphones during the firmware update process.
- Once the update is complete, you will see a notification indicating successful firmware installation.
- Disconnect the USB cable if you used one for the update.
- Restart your Bose headphones to finalize the firmware update process.
Updating the firmware on your Bose headphones using a PC ensures that you have access to the latest enhancements and fixes provided by Bose. It’s important to regularly check for firmware updates to ensure the optimal performance and functionality of your headphones.
If you encounter any issues or have questions during the firmware update process, refer to the instructions provided by Bose or visit their official support website for further assistance. They may have specific instructions or troubleshooting steps tailored to your headphones model and firmware update process.
By keeping your Bose headphones up to date with the latest firmware, you can enjoy improved performance, enhanced features, and a better overall listening experience.
Using Bose Noise Cancelling Headphones on a PC
Bose noise cancelling headphones offer a fantastic way to enjoy immersive audio while eliminating background noise. While primarily designed for mobile devices, you can also use Bose noise cancelling headphones on a PC to enhance your audio experience. Here’s how you can use Bose noise cancelling headphones on a PC:
- Connect your Bose noise cancelling headphones to your PC using a USB cable or pair them via Bluetooth.
- Make sure your headphones are turned on and properly connected to your PC.
- Open the audio settings on your PC and select your Bose headphones as the default playback device.
- If you have the Bose Connect app installed on your PC, open the app and explore the noise cancelling settings. Adjust the noise cancelling level according to your preference.
- If your headphones have physical controls, locate the noise cancellation button or switch and activate it to enable noise cancellation.
- While using your Bose noise cancelling headphones on a PC, you can listen to various audio sources such as music, movies, or video calls with reduced background noise.
- Enjoy the enhanced audio quality and immersive experience that noise cancelling technology provides, allowing you to focus on your audio content without distractions.
- Remember to recharge your headphones regularly if they are battery-powered to maintain optimal noise cancelling performance.
Using Bose noise cancelling headphones on a PC can greatly enhance your audio experience, especially in noisy environments. Whether you’re working, gaming, or simply enjoying multimedia content, noise cancelling technology allows you to immerse yourself fully in the audio without being disturbed by external sounds.
If you encounter any issues while using your Bose noise cancelling headphones on a PC, refer to the user manual or visit the official Bose support website for troubleshooting steps. They may have specific guidance for using the headphones with a PC or addressing any connectivity or compatibility issues you may face.
Experience the power of noise cancellation on your PC by using Bose noise cancelling headphones. Escape distractions and enjoy high-quality audio with an immersive listening experience.
Enhancing the Sound Quality of Bose Headphones on a PC
Bose headphones are known for their exceptional sound quality, but there are ways to further enhance the audio experience when using them on a PC. By implementing a few techniques and settings adjustments, you can maximize the sound quality of your Bose headphones. Here’s how:
- Verify that your headphones are properly connected to your PC via USB or Bluetooth.
- Access the audio settings on your PC and make sure your Bose headphones are set as the default playback device.
- Adjust the volume levels on your headphones using the onboard controls or the volume slider on your PC. Find the perfect balance based on your preference.
- Explore the equalizer settings on your PC. Many operating systems provide an equalizer that allows you to fine-tune the sound according to your preferences. Experiment with different presets or manually adjust the sliders to enhance specific frequencies.
- Consider installing audio enhancement software or plugins on your PC, such as a virtual surround sound software or an audio equalizer plugin for media players. These tools can further enhance the sound quality and create a more immersive audio experience.
- Ensure that your media player or streaming service is set to output the highest quality audio available. Check the settings of the application you’re using and set it to the highest audio quality setting supported.
- If your Bose headphones have noise cancellation capabilities, activate noise cancellation to eliminate background noise and enhance audio clarity, especially in noisy environments.
- During media playback, avoid using audio enhancements or equalizers that may come with system-wide effects. These effects can sometimes degrade the sound quality and should be disabled for the best audio experience with your Bose headphones.
- Regularly update the firmware of your Bose headphones to ensure you’re benefiting from the latest improvements and optimizations offered by Bose.
By implementing these techniques and settings adjustments, you can enhance the sound quality of your Bose headphones when using them on a PC. The steps may vary slightly depending on your operating system and specific model of Bose headphones.
Keep in mind that personal preferences for sound quality can vary, so take the time to experiment and find the settings that suit your taste and listening preferences the best. Don’t hesitate to reference the user manual of your headphones or the official Bose support website for specific guidance.
Unlock the full potential of your Bose headphones on a PC by enhancing the sound quality. Immerse yourself in high-quality audio, whether you’re enjoying music, gaming, or watching movies, for a truly captivating audio experience.
Disconnecting Bose Headphones from a PC
When you’re done using your Bose headphones with your PC, it’s important to properly disconnect them to ensure their longevity and to avoid any potential issues. Here’s how you can disconnect your Bose headphones from a PC:
- If you’re using Bluetooth connectivity, open the Bluetooth settings on your PC.
- Locate your Bose headphones in the list of connected devices.
- Click on your Bose headphones and select the option to disconnect or remove them from the list of paired devices.
- This will disconnect your Bose headphones from your PC, and they will no longer be able to receive audio from the computer.
- If you’re using a USB connection, safely disconnect your Bose headphones by following these steps:
- Locate the USB icon in the system tray of your PC’s taskbar.
- Click on the USB icon to display the list of connected USB devices.
- Find your Bose headphones in the list and click on the option to safely remove or eject the headphones.
- Once you receive a notification indicating that it’s safe to remove the USB device, unplug the USB cable from your PC.
- Power off your Bose headphones if you don’t plan to use them for an extended period.
- Store your Bose headphones in a safe and dry place to protect them from any potential damage.
Properly disconnecting your Bose headphones from your PC helps maintain their performance and ensures a smooth transition to the next time you use them. Following these steps will also prevent any audio disruption or potential issues when using your Bose headphones with other devices.
It’s worth noting that the process may differ slightly depending on your specific operating system, so it’s essential to become familiar with the instructions specific to your PC.
By taking a moment to properly disconnect your Bose headphones from your PC, you can extend their lifespan and continue enjoying their exceptional audio performance for many more uses to come.