
Overview
Connecting a Surface Pro to a monitor is a great way to expand your display and improve productivity. Whether you want to give a presentation on a larger screen or simply enjoy a more immersive viewing experience, the process is relatively straightforward. In this guide, we will walk you through the steps to connect your Surface Pro to a monitor.
Before you begin, it’s important to ensure that your Surface Pro and the monitor are compatible. Check the ports on both devices and make sure they are compatible with each other. This will allow for a seamless connection and optimal performance.
Once you have determined that your Surface Pro and the monitor have compatible ports, you will need to gather the necessary cables and adapters. These will depend on the specific ports available on your devices. We’ll discuss this in more detail later in the guide.
Once you have the required cables and adapters, it’s time to connect your Surface Pro to the monitor. This involves physically connecting the two devices using the appropriate cables and ensuring a secure connection. We will provide step-by-step instructions on how to do this to help you get started quickly.
After connecting your Surface Pro to the monitor, you may need to adjust the display settings to optimize the viewing experience. This can include adjusting the resolution, orientation, or extending the display to allow for multitasking. We’ll show you how to access these settings and make the necessary adjustments.
If you encounter any issues during the setup process or with the display settings, don’t worry. We have included troubleshooting tips to help you resolve common problems and ensure a successful connection between your Surface Pro and the monitor.
By following the steps outlined in this guide, you’ll be able to connect your Surface Pro to a monitor with ease. With an expanded display, you can enjoy enhanced productivity, improved visuals, and a more immersive viewing experience for work or entertainment purposes. Let’s get started!
Step 1: Check the Ports
Before you can connect your Surface Pro to a monitor, it’s essential to check the ports on both devices to ensure compatibility. By matching the available ports, you can easily establish a seamless connection between the two devices.
On your Surface Pro, you will typically find a USB-C port or a mini DisplayPort. These ports may vary depending on the model of your Surface Pro, so it’s important to verify which type of port your device has.
Next, inspect the ports on your monitor. Most monitors have a range of ports, including HDMI, DisplayPort, DVI, or VGA. It’s crucial to identify which port options are available on your monitor, as this will determine the type of cable or adapter you need to connect it to your Surface Pro.
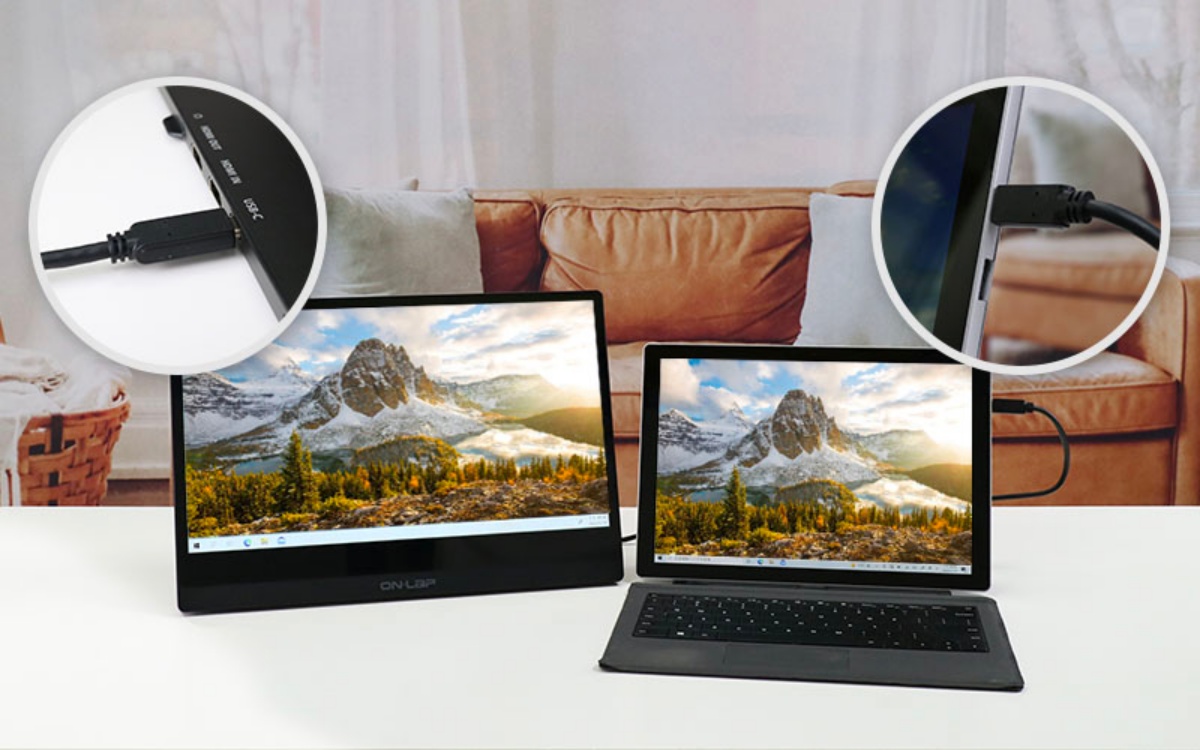
If both your Surface Pro and monitor have a USB-C port, you’re in luck. USB-C ports are incredibly versatile and allow for direct connection using a USB-C to USB-C cable. This method provides excellent quality and supports various video resolutions.
If your monitor has an HDMI port, you can connect it to your Surface Pro using an HDMI to mini DisplayPort cable or an HDMI to USB-C adapter, depending on the available ports on your Surface Pro.
For monitors with a DisplayPort or DVI port, you can use a mini DisplayPort to DisplayPort cable or a mini DisplayPort to DVI cable to establish the connection.
Lastly, if your monitor only has a VGA port, you will need an active adapter such as a mini DisplayPort to VGA adapter or a USB-C to VGA adapter to connect it to your Surface Pro.
Remember, it’s crucial to ensure that the cable or adapter you choose matches both the port on your Surface Pro and the port on your monitor. This will guarantee a smooth connection and optimal performance. Once you have confirmed the compatibility of the ports and chosen the right cable or adapter, you are ready to proceed to the next step.
Step 2: Gather the Necessary Cables and Adapters
Now that you have checked the ports on your Surface Pro and monitor, it’s time to gather the necessary cables and adapters to establish the connection. The specific cables and adapters you will need depend on the available ports on both devices.
If your Surface Pro and monitor have compatible USB-C ports, you can use a USB-C to USB-C cable to connect them. This cable offers a direct and easy connection, providing high-quality video and audio transmission.
If your monitor has an HDMI port and your Surface Pro has a USB-C port, you will need an HDMI to USB-C adapter or cable. This adapter allows you to connect the HDMI output of your monitor to the USB-C port on your Surface Pro. Ensure that the adapter is compatible with the HDMI version supported by your monitor.
For monitors with a DisplayPort or DVI port, you will need a mini DisplayPort to DisplayPort cable or a mini DisplayPort to DVI cable, depending on the ports available on your Surface Pro. Both options provide reliable connections and support high-definition video and audio.
In the case of a monitor with a VGA port, you will require an active adapter such as a mini DisplayPort to VGA adapter or a USB-C to VGA adapter. These adapters convert the digital signal from your Surface Pro to analog for compatibility with VGA monitors.
It’s important to note that some adapters may require additional power, so ensure that you follow the manufacturer’s instructions for proper usage.
When selecting cables and adapters, it’s recommended to choose ones from reputable brands to ensure optimal performance and reliability. Additionally, consider the length of the cable or the flexibility of the adapter if you need to keep your Surface Pro at a distance from the monitor.
Now that you have gathered the necessary cables and adapters, you are one step closer to connecting your Surface Pro to a monitor. It’s time to move on to the next step and establish the physical connection between the two devices.
Step 3: Connect the Surface Pro to the Monitor
With the necessary cables and adapters at hand, you’re ready to connect your Surface Pro to the monitor. Follow these step-by-step instructions to establish the physical connection:
- Start by shutting down your Surface Pro and the monitor.
- Locate the appropriate ports on your Surface Pro and the monitor.
- Insert one end of the cable or adapter into the corresponding port on your Surface Pro.
- Connect the other end of the cable or adapter to the matching port on your monitor.
- Ensure a secure connection by gently twisting the connector or pushing it in firmly until it clicks into place.
- Once the physical connection is established, power on your Surface Pro and the monitor.
After powering on both devices, your monitor should recognize the connection automatically. However, in some cases, you may need to manually select the input source on your monitor. Use the monitor’s menu or input button to switch to the correct input source, such as HDMI, DisplayPort, or VGA, depending on the cable or adapter you used.
If the connection is successful, you should see your Surface Pro’s display mirrored or extended on the monitor. By default, it will usually mirror the primary display, but you can adjust the settings later to extend the display if desired.
It’s important to note that different monitors may have varying settings or options for displaying the content from your Surface Pro. Consult the manufacturer’s documentation for your monitor if you need further guidance on configuring the display settings.
Now that you have connected your Surface Pro to the monitor, you can move on to the next step and adjust the display settings to optimize your viewing experience.
Step 4: Adjust Display Settings
Once you have successfully connected your Surface Pro to the monitor, it’s time to adjust the display settings to ensure optimal viewing experience. Follow these steps to customize the display settings:
- On your Surface Pro, right-click on the desktop and select “Display settings” from the context menu.
- In the Display settings window, you will see a visual representation of your monitors. Identify the monitor that corresponds to your connected external display.
- Select the external monitor from the list and scroll down to find the “Multiple displays” section.
- Choose the display configuration that suits your needs:
- Extend these displays: This option allows you to extend your desktop across both the Surface Pro and the external monitor. It’s ideal for multitasking or working with multiple windows simultaneously.
- Duplicate these displays: This option mirrors the content of your Surface Pro’s screen on the external monitor. It’s useful for giving presentations or displaying the same content on both screens.
- Show only on 1 or 2: This option displays the content only on the selected display, either the Surface Pro or the external monitor.
- Adjust the resolution: Select the “Resolution” drop-down menu and choose the resolution that best suits your monitor. It’s recommended to set it to the native resolution of your external monitor for optimal clarity and quality.
- Make additional adjustments: Depending on your preferences, you can modify other display settings such as orientation, scaling, brightness, and color calibration.
- Preview and apply the changes: Click on “Apply” to preview the changes on your external monitor. If you are satisfied with the new configuration, click “Keep changes” to apply them permanently.
By adjusting these display settings, you can ensure a seamless and optimized viewing experience on your connected monitor. Take some time to explore different configurations and settings to find the setup that works best for your needs.
If you encounter any challenges or issues with the display settings, refer to the user manual of your Surface Pro or consult the support documentation provided by the manufacturer.
Now that you have adjusted the display settings, you are ready to use your Surface Pro with the connected external monitor. Enjoy the expanded workspace and enhanced productivity!
Step 5: Troubleshooting Tips
While connecting your Surface Pro to a monitor is generally a straightforward process, you may encounter some common issues along the way. Here are some troubleshooting tips to help you resolve them:
- Check the cable connections: Ensure that all cable connections are secure and properly inserted into their respective ports. Sometimes, a loose or faulty connection can cause display issues.
- Update graphics drivers: Outdated or incompatible graphics drivers can lead to display issues. Visit the website of your graphics card manufacturer to download and install the latest drivers for your Surface Pro.
- Restart your devices: Restarting both your Surface Pro and the monitor can sometimes resolve connectivity issues and refresh the display settings.
- Try another cable or adapter: If you’re experiencing issues with a specific cable or adapter, try using a different one to determine if the problem lies with the cable or adapter itself.
- Try another monitor: If possible, connect your Surface Pro to another monitor to see if the issue persists. This can help determine if the problem is specific to the monitor or the Surface Pro.
- Adjust display settings on the monitor: Some monitors have built-in display settings that can affect the visual output. Consult the monitor’s user manual or menu options to adjust settings like sharpness, contrast, or color if needed.
- Update your Surface Pro: Keeping your Surface Pro up to date with the latest system updates can often resolve compatibility or performance issues. Check for updates in the Windows Update settings.
- Reset display settings: If you’ve made changes to the display settings that are causing issues, you can reset them to the default settings. In the Display settings, click on the “Reset” button to revert back to the original configuration.
- Check for physical damage: Inspect the cables, adapters, and ports for any physical damage or debris that may be hindering the connection. Clean the ports if necessary and replace any damaged cables or adapters.
- Contact support: If you have tried all troubleshooting steps and are still experiencing issues, it’s recommended to reach out to the support team of your Surface Pro or monitor manufacturer for further assistance.
With these troubleshooting tips, you can tackle common issues and ensure a successful connection between your Surface Pro and the monitor. Don’t hesitate to explore these solutions or seek professional help if needed. Enjoy your expanded display and maximized productivity!