
The Raspberry Pi Zero
The Raspberry Pi Zero is a small, affordable, and powerful single-board computer developed by the Raspberry Pi Foundation. It is designed for embedded systems and DIY projects that require a compact and versatile computing platform. Despite its size, the Raspberry Pi Zero is equipped with impressive features, making it suitable for a wide range of applications.
Powered by a Broadcom BCM2835 processor clocked at 1 GHz, the Raspberry Pi Zero offers enough processing power to handle basic computing tasks and even more demanding projects. It comes with 512MB of RAM, which is sufficient for most applications, and has a microSD card slot for storage. Additionally, it features a mini-HDMI port for video output and a micro-USB port for power.
One of the key advantages of the Raspberry Pi Zero is its size. With dimensions of just 65mm x 30mm x 5mm, it can easily fit into small enclosures and be integrated into various projects. Whether you’re building a portable gaming console, a media center, or a home automation system, the Raspberry Pi Zero provides a compact and powerful foundation.
Furthermore, the Raspberry Pi Zero is compatible with various operating systems, including Raspbian, a Debian-based Linux distribution specifically designed for Raspberry Pi devices. Raspbian offers a user-friendly interface and a vast ecosystem of software, making it easy to get started and expand your project.
What is a USB Hub?
A USB hub is a device that allows multiple USB devices to be connected to a single USB port on a computer or another USB host device. It expands the number of available USB ports and enables users to connect a wide range of peripherals simultaneously.
USB hubs come in various configurations, ranging from small, portable units with a few additional ports to larger hubs with multiple ports and additional features like power delivery or data transfer speeds. They are typically equipped with a USB connector that plugs into the computer or host device and multiple USB ports into which you can connect your peripherals.
When using a USB hub, it is essential to consider the power requirements of your devices. While USB hubs can provide power to some low-powered peripherals like mice or keyboards, they may not be able to deliver sufficient power to more power-hungry devices like external hard drives or smartphones. In such cases, it is recommended to use a powered USB hub that comes with its own power supply to ensure stable and reliable performance.
USB hubs also offer the convenience of expanding the connectivity options of your computer or host device. With a USB hub, you can connect devices such as external hard drives, printers, scanners, cameras, game controllers, and more. This eliminates the need to constantly plug and unplug devices, making it easier to manage multiple peripherals at once.
Moreover, USB hubs are compatible with various USB standards, including USB 2.0, USB 3.0, and USB-C, providing different data transfer speeds and charging capabilities. USB 3.0 hubs, for example, offer faster data transfer rates compared to USB 2.0 hubs, making them ideal for transferring large files or streaming high-definition media.
Things You Will Need
Before you can connect a Raspberry Pi Zero to a USB hub, you will need a few essential items. Here is a list of things you will need to get started:
- Raspberry Pi Zero: Make sure you have a Raspberry Pi Zero board, the central component that you will be connecting to the USB hub.
- USB Hub: You will need a USB hub with an adequate number of USB ports to connect your desired peripherals. Choose a powered USB hub if you plan to use devices that require more power.
- USB Cable: Ensure that you have a USB cable to connect the Raspberry Pi Zero to the USB hub. The type of USB cable you need will depend on the USB ports available on your USB hub and the Raspberry Pi Zero.
- Power Supply: If you are using a powered USB hub, make sure you have a compatible power supply to connect to the hub. This will provide the necessary power to the hub and any connected devices.
- Peripherals: Identify the peripherals you want to connect to the USB hub, such as a keyboard, mouse, external storage, or any other USB devices you plan to use with the Raspberry Pi Zero.
- Operating System: Ensure that you have installed an operating system on the Raspberry Pi Zero’s microSD card. Raspbian is a popular choice for Raspberry Pi devices, but you can choose any supported operating system that suits your project.
- MicroSD Card: Have a microSD card with the appropriate operating system installed and inserted into the Raspberry Pi Zero.
By having these items ready, you will be well-prepared to connect your Raspberry Pi Zero to a USB hub and start expanding the capabilities of your project.
Step 1: Prepare the Raspberry Pi Zero
Before connecting the Raspberry Pi Zero to a USB hub, it is important to ensure that the board is properly prepared. Follow these steps to prepare the Raspberry Pi Zero:
- Attach the MicroSD Card: Insert the microSD card with the operating system into the microSD card slot on the Raspberry Pi Zero. Make sure it is securely inserted.
- Connect the Power: Connect your power supply to the micro-USB port on the Raspberry Pi Zero. Ensure that you are using a power supply suitable for the Raspberry Pi Zero’s power requirements.
- Attach Peripherals: If you plan to use peripherals like a keyboard or mouse, connect them to the available USB ports on the Raspberry Pi Zero.
- Connect to Display: If desired, connect the Raspberry Pi Zero to a display device using a mini-HDMI to HDMI cable. This will allow you to view the output from the Raspberry Pi Zero on the display.
- Power On: Once everything is connected, power on the Raspberry Pi Zero. You should see the system boot up and display the operating system on the connected display device.
By following these steps, you will have prepared the Raspberry Pi Zero for connecting it to a USB hub. Ensure that all connections are secure and the Raspberry Pi Zero is functioning properly before proceeding to the next step.
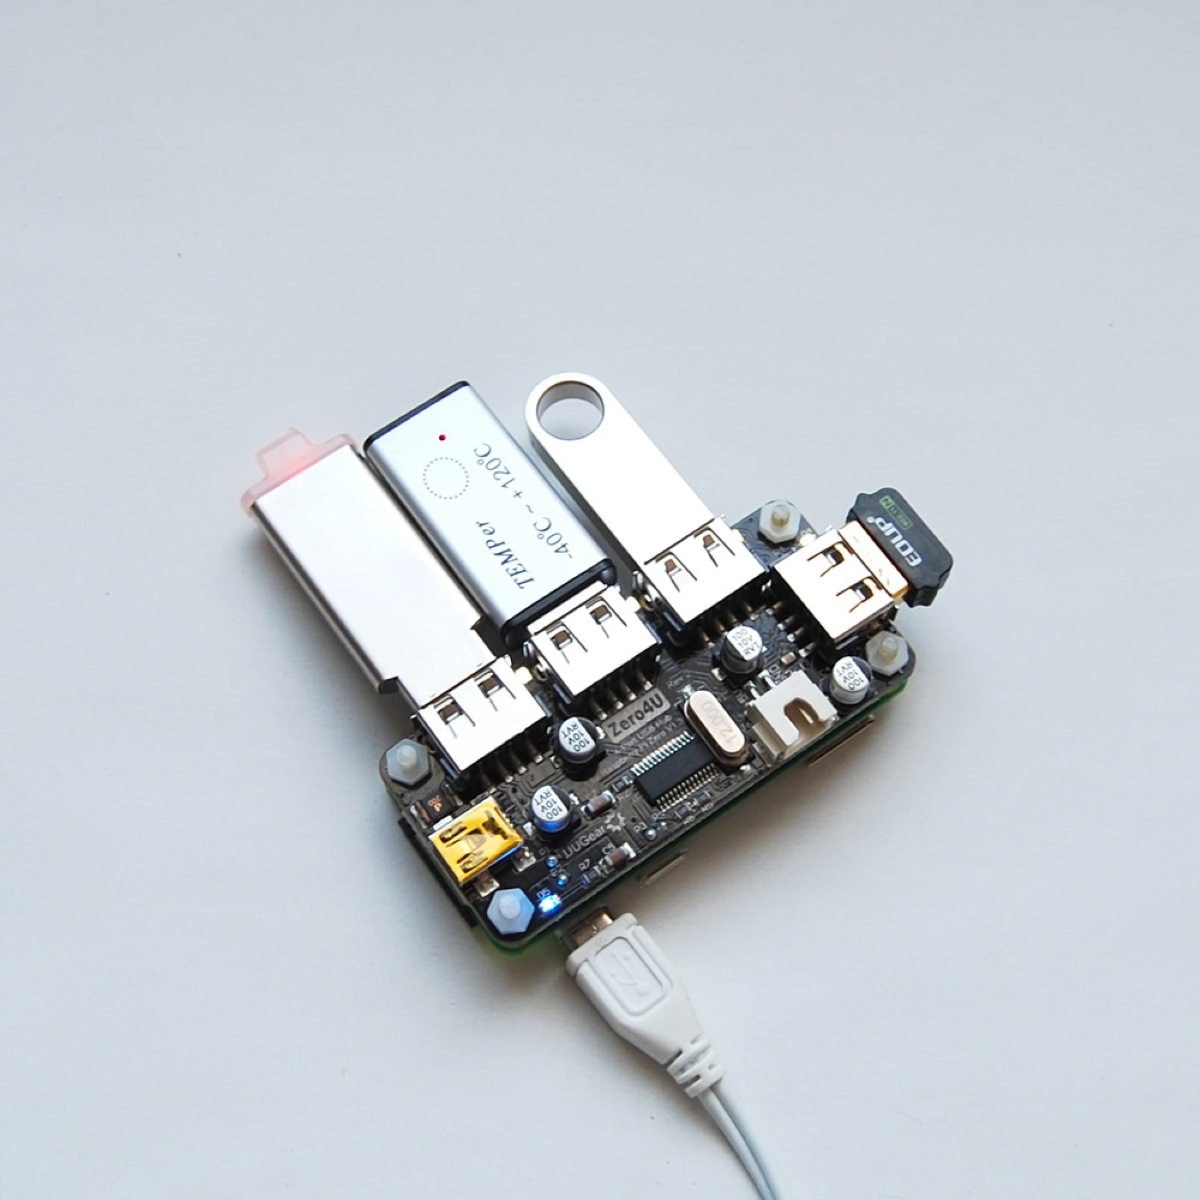
Step 2: Connect the USB Hub to the Raspberry Pi Zero
Now that you have prepared the Raspberry Pi Zero, it’s time to connect it to the USB hub. Follow these steps to connect the USB hub to the Raspberry Pi Zero:
- Locate the USB Port: Identify the available USB port on the Raspberry Pi Zero. It is usually located near the micro-USB power port.
- Connect the USB Cable: Take the USB cable and insert one end into the USB port on the Raspberry Pi Zero. Ensure that the connection is secure.
- Connect the Other End to the USB Hub: Take the other end of the USB cable and connect it to an available USB port on the USB hub. Again, ensure that the connection is secure.
- Verify the Connection: Double-check that the USB hub is properly connected to the Raspberry Pi Zero by ensuring that both ends of the USB cable are securely plugged in.
Once you have completed these steps, the USB hub should be physically connected to the Raspberry Pi Zero. This connection will allow you to expand the number of available USB ports on the Raspberry Pi Zero, enabling you to connect multiple peripherals simultaneously.
Step 3: Power the USB Hub
After connecting the USB hub to the Raspberry Pi Zero, the next step is to provide power to the USB hub. This ensures that the hub and any connected peripherals receive the necessary power to function correctly. Follow these steps to power the USB hub:
- Check Power Requirements: Determine the power requirements of your USB hub and connected peripherals. Some USB hubs may require an external power source, while others can draw power directly from the Raspberry Pi Zero.
- Choose a Power Source: If your USB hub requires external power, use the included power supply or any compatible power adapter. Make sure to connect it to the power input port on the USB hub.
- Connect the Power Source to the USB Hub: Plug the power source into a power outlet or power strip, ensuring that it is securely connected to the USB hub. This will supply power to the hub and any peripherals connected to it.
- Ensure Proper Power Delivery: Confirm that the USB hub and connected peripherals are receiving power by checking for LED indicators or any device-specific indications. If all devices are receiving power, you’ve successfully powered the USB hub.
It’s important to note that if you are using a powered USB hub, it may require a higher current power supply to support multiple devices. Ensure that the power supply you are using adequately meets the power requirements of your USB hub and connected peripherals.
By following these steps, you will have successfully powered your USB hub, enabling it to provide power to any connected peripherals and function properly in conjunction with the Raspberry Pi Zero.
Step 4: Check the Connection
After connecting the USB hub to the Raspberry Pi Zero and providing power, it is crucial to check the connection to ensure that everything is functioning as expected. Follow these steps to verify the connection:
- Inspect the Physical Connection: Examine the cables connecting the Raspberry Pi Zero and the USB hub to ensure they are securely plugged in. Make sure there are no loose connections or cable damage.
- Confirm Power Indicators: Check the LED indicators on both the Raspberry Pi Zero and the USB hub to ensure they are powered on. If the LED indicators are not lighting up, double-check the power connections and make necessary adjustments.
- Connect Peripherals: If you haven’t done so already, connect your desired peripherals to the available USB ports on the USB hub. This can include devices like keyboards, mice, USB drives, or other compatible devices.
- Test Peripheral Functionality: Test the functionality of each peripheral device connected to the USB hub. Verify that they are recognized by the Raspberry Pi Zero and functioning properly.
- Verify Data Transfer: Transfer files or perform tasks that require data exchange between the Raspberry Pi Zero and the connected peripherals. This will help ensure that the communication between devices is functioning as expected.
If you encounter any issues during the connection check, double-check all the connections, ensure power is supplied to the USB hub, and confirm compatibility between the peripherals and Raspberry Pi Zero. Troubleshooting tips can be helpful in resolving common connection issues.
By following these steps and verifying the connection, you will have confidence that the USB hub is properly connected to the Raspberry Pi Zero, and your peripherals are functioning as intended.
Troubleshooting Tips
While connecting a Raspberry Pi Zero to a USB hub is a straightforward process, there may be instances where you encounter issues. Here are some troubleshooting tips to help you resolve common problems:
- Check Cable Connections: Ensure that all cables are securely plugged into their respective ports on the Raspberry Pi Zero and the USB hub. Loose connections can result in intermittent or no connectivity.
- Power Supply Compatibility: Verify that the power supply you are using is compatible with the USB hub and can provide sufficient power to both the hub and any connected peripherals.
- Use a Powered USB Hub: If you are experiencing power-related issues, consider using a powered USB hub. This will provide a dedicated power source for the peripherals, relieving the Raspberry Pi Zero of power demands.
- Check Peripheral Compatibility: Ensure that the peripherals you are connecting to the USB hub are compatible with the Raspberry Pi Zero. Some devices may require specific drivers or firmware updates to work correctly.
- Check for Firmware Updates: If you are encountering compatibility issues with specific peripherals, check for firmware updates for the Raspberry Pi Zero. Updating to the latest firmware version can resolve compatibility issues.
- Verify Software Configuration: Double-check that your operating system and software configuration are correctly set up to recognize and utilize the connected peripherals. Adjust configurations as necessary.
- Try Different USB Ports: If a specific USB port on the USB hub is not functioning correctly, try connecting the peripherals to different ports to determine if the issue lies with a specific port or the entire hub.
- Inspect for Physical Damage: Check the USB hub and cables for any physical signs of damage. Bent or broken connectors, frayed cables, or damaged ports can hinder proper connectivity.
- Restart the Raspberry Pi Zero: Restarting the Raspberry Pi Zero can sometimes resolve connectivity issues by resetting the system and reinitializing the USB hub and connected peripherals.
If you continue to experience difficulties after following these troubleshooting tips, consider seeking assistance from online forums or communities dedicated to Raspberry Pi or USB hub support. These resources can often provide specific guidance for your particular issue.
By utilizing these troubleshooting tips, you can overcome common challenges encountered when connecting a Raspberry Pi Zero to a USB hub, ensuring a smooth and successful setup.