
Step 1: Check the Printer and Laptop Compatibility
Before connecting a printer to your laptop, it is essential to ensure that the printer and laptop are compatible. This will ensure a smooth and hassle-free connection process. Here are some key aspects to consider:
- Printer Compatibility: Check if your printer model is compatible with your laptop’s operating system. Most modern printers are compatible with Windows, macOS, and Linux. However, it is crucial to verify this information by referring to the printer’s user manual or the manufacturer’s website.
- Laptop Compatibility: Confirm that your laptop has the necessary ports and connectivity options to connect the printer. Common printer connection options include USB, Wi-Fi, Ethernet, or Bluetooth. Ensure that your laptop has the corresponding ports or capabilities to establish a connection.
- Operating System Version: Verify that your laptop is running the latest version of the operating system. This is important as printer drivers and software updates are often released to ensure compatibility with the latest operating system versions.
- System Requirements: Check the system requirements for the printer software. Some printers may have specific hardware or software requirements, such as minimum RAM, processor speed, or available disk space. Ensure your laptop meets these requirements to avoid any compatibility issues.
- Printer Connectivity: Determine the type of printer you have and the corresponding connectivity options. USB is the most common and straightforward method, but if you have a wireless printer, ensure that your laptop has Wi-Fi capabilities.
By checking the compatibility between your printer and laptop, you can save time and frustration during the connection process. It is always recommended to consult the user manual or contact the printer manufacturer’s support team for specific compatibility information.
Step 2: Gather the Necessary Cables and Accessories
Once you have ensured the compatibility between your printer and laptop, the next step is to gather the necessary cables and accessories for the connection process. Depending on the type of printer and connectivity options available, you may need the following:
- USB Cable: If you have a printer that connects via USB, you will need a USB cable to establish the connection. Make sure you have a USB cable with the appropriate connectors for your printer and laptop.
- Power Cable: Ensure that you have the power cable for your printer. This cable is used to connect the printer to a power source and provide it with electrical power.
- Network Cable (Ethernet): If your printer supports Ethernet connectivity, you may need an Ethernet cable to establish a wired connection between your printer and laptop. Check if your printer has an Ethernet port and, if so, gather the appropriate cable.
- Wireless Setup: If you plan to connect your printer to your laptop wirelessly, ensure that your printer supports Wi-Fi connectivity. You may need to refer to the printer’s user manual or consult the manufacturer’s website for specific wireless setup instructions.
- Printer Software/Driver: In some cases, you may need to download and install printer software or drivers onto your laptop. This software enables your laptop to communicate with the printer effectively. Visit the printer manufacturer’s website to download the latest software or drivers for your specific printer model.
It is crucial to have all the necessary cables and accessories readily available before starting the connection process. This ensures that you can complete the setup without any interruptions or delays. Take a moment to gather these items and have them within reach.
Step 3: Connect the Printer to Power Source
After gathering the necessary cables and accessories, it’s time to connect your printer to a power source. Follow these steps to ensure a proper connection:
- Locate the Power Input: Look for the power input port on your printer. It is typically located at the back or side of the printer. Once identified, ensure that the printer is turned off.
- Connect the Power Cable: Take the power cable you gathered earlier and insert one end into the power input port of the printer. Make sure it is firmly plugged in.
- Connect to a Power Outlet: Insert the other end of the power cable into a nearby power outlet or surge protector. Ensure that the power source is stable and reliable.
- Turn on the Printer: After connecting the power cable, locate the power button on the printer and press it to turn on the device. Depending on the printer model, it may take a few moments to power up and initialize.
- Check the Power Indicator: Look for a power indicator light on the printer. This light should illuminate, indicating that the printer is receiving power.
By connecting your printer to a power source, you ensure that it has the necessary electrical power to function correctly. It is vital to double-check all connections and ensure that the printer is turned off before connecting or disconnecting power cables.
Once you have connected the printer to a power source, you can proceed to the next step of turning on the laptop and establishing the connection between the printer and laptop.
Step 4: Turn on the Printer and Laptop
With the printer connected to a power source, it’s time to turn on both the printer and your laptop. Follow these steps to ensure a proper startup:
- Printer Startup: If your printer has a power button, locate it on the printer and press it to turn on the device. Allow the printer a few moments to power up and initialize.
- Laptop Startup: Press the power button on your laptop to turn it on. Wait for the operating system to load, and log in using your credentials if required.
- Wait for Full Startup: Give both the printer and laptop a few moments to complete their startup processes. This will ensure that all necessary software and drivers are loaded.
- Ensure Printer Connectivity: Once both devices are powered on, confirm that the printer is properly connected to the laptop via the chosen method (USB, Ethernet, or wireless). Check all cables and connections to ensure they are secure.
- Verify Printer Recognition: Depending on your operating system, your laptop may automatically detect and recognize the printer. Alternatively, you may need to manually install drivers or software to establish the connection. Follow the on-screen instructions or refer to the printer’s user manual for guidance.
Ensuring that both the printer and laptop are turned on and fully started up is essential for a successful connection. This allows the devices to communicate with each other effectively and ensures that any necessary software and drivers are loaded.
Once the printer and laptop are turned on, you can proceed to the next step of connecting the printer to the laptop using the appropriate cable or wireless method.
Step 5: Connect the Printer to the Laptop using USB Cable
Connecting your printer to the laptop using a USB cable is one of the most common and straightforward methods. Follow these steps to establish the connection:
- Locate USB Ports: Identify the USB ports on both your printer and laptop. These ports are typically rectangular in shape and labeled “USB.”
- Connect USB Cable: Take one end of the USB cable and insert it into the USB port on your printer. Ensure that it is securely plugged in.
- Insert the Other End of the USB Cable: Take the other end of the USB cable and insert it into an available USB port on your laptop. Make sure it is firmly connected.
- Wait for Recognition: Once the USB cable is connected, your laptop should recognize the printer automatically and start installing the necessary drivers. Follow the on-screen instructions to complete the installation process.
- Verify Connection: After the driver installation is complete, check the printer settings on your laptop to ensure that the connected printer is detected and set as the default printer, if desired.
- Print a Test Document: To confirm that the connection is successful, try printing a test document. Open a document or image file, select “Print” from the application’s menu, and choose your printer from the list of available printers. If the printer prints the document correctly, the connection is set up properly.
Connecting the printer to the laptop using a USB cable provides a reliable and direct connection. Ensure that the USB cable is not damaged and is of high quality to avoid any connection issues.
If you encounter any difficulties in connecting the printer via USB, refer to the printer’s user manual or contact the manufacturer’s support for further assistance.
Step 6: Install Printer Drivers
After connecting the printer to your laptop, it is essential to install the appropriate printer drivers. Printer drivers are software programs that enable your laptop to communicate with the printer effectively. Follow these steps to install the printer drivers:
- Automatic Driver Installation: In many cases, when you connect a new printer to your laptop, the operating system will automatically detect it and attempt to install the necessary drivers. Wait for the driver installation process to complete. You may be prompted to restart your laptop.
- Manual Driver Installation: If the automatic driver installation does not occur, or if you prefer to install the drivers manually, you can do so by following these steps:
- a. Identify Printer Model: Locate the model number of your printer. You can find this information on the printer itself or in the printer’s user manual.
- b. Visit Manufacturer’s Website: Go to the website of the printer manufacturer. Look for the “Support” or “Downloads” section of the site.
- c. Locate Drivers: Find the drivers for your printer model. Ensure that you select the drivers compatible with your laptop’s operating system.
- d. Download and Install: Download the appropriate printer drivers and follow the instructions provided by the manufacturer to install them on your laptop.
- Restart Your Laptop: After installing the printer drivers, it is recommended to restart your laptop. This ensures that the drivers are fully integrated with the operating system.
- Confirm Driver Installation: Once your laptop restarts, check the device settings to confirm that the printer drivers have been successfully installed. The printer should be listed as an available device in the printer settings.
Installing the correct printer drivers is crucial for proper communication between your laptop and the printer. It allows your laptop to send print requests and control various printer functions effectively.
If you encounter any difficulties during the driver installation process, consult the printer’s user manual or reach out to the manufacturer’s support for further assistance.
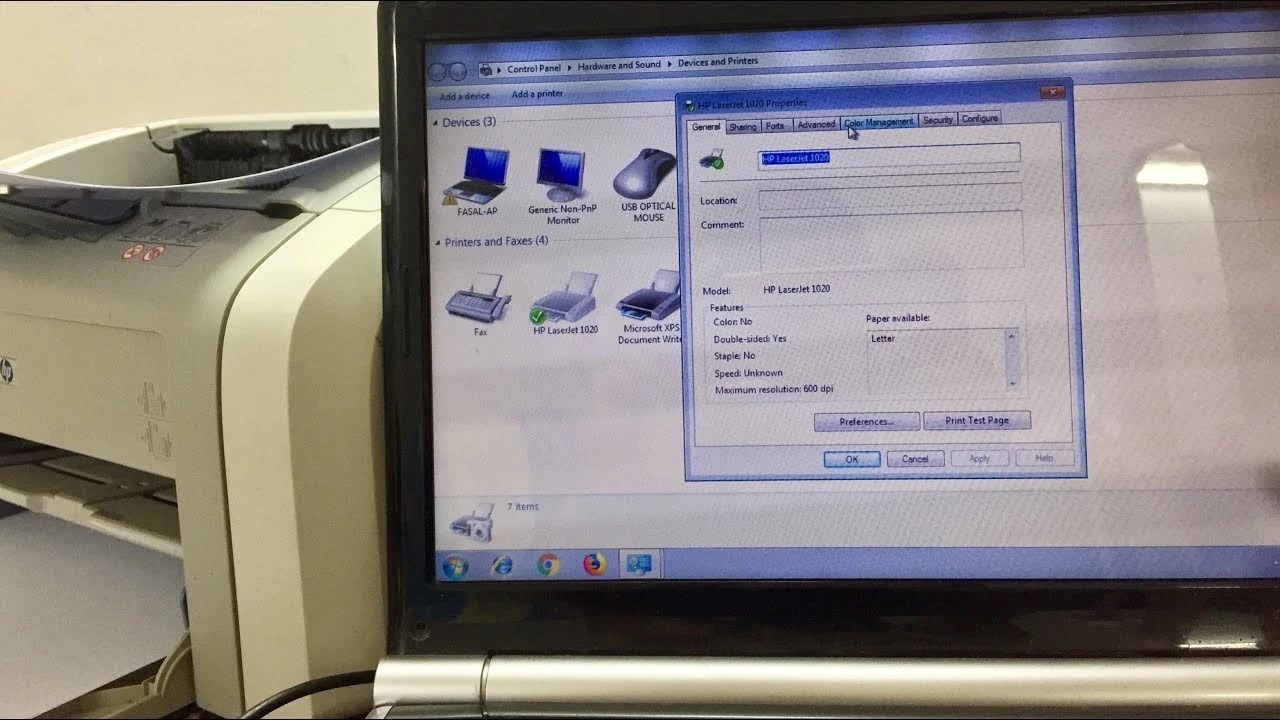
Step 7: Configure Printer Settings
After installing the printer drivers, it’s important to configure the printer settings according to your preferences. Customizing the settings ensures optimal performance and compatibility with your laptop. Follow these steps to configure the printer settings:
- Access Printer Settings: Open the Control Panel on your laptop by clicking on the Start menu and selecting Control Panel (Windows) or System Preferences (Mac). Look for the “Printers” or “Devices and Printers” option.
- Select the Printer: In the Printer settings window, locate your connected printer. It should be listed as the default printer or display your printer model.
- Open Printer Properties: Right-click on your printer and select “Properties” or “Printer Properties” from the context menu. This will open a new window with various tabs and settings specific to your printer.
- Configure Print Quality: In the Printer Properties window, navigate to the “Quality” or “Print Quality” tab. Adjust the print quality settings based on your requirements. You can choose between draft, normal, or high-quality print modes.
- Set Paper Size and Type: Go to the “Paper” or “Paper/Quality” tab in the Printer Properties window. Specify the desired paper size and type, such as letter, legal, A4, or custom size. Ensure that the paper settings match the paper loaded in the printer.
- Enable Duplex Printing: If your printer supports duplex (double-sided) printing and you prefer to save paper, navigate to the “Layout” or “Finishing” tab. Enable the duplex printing option to automatically print on both sides of the paper.
- Adjust Other Settings: Explore the other tabs in the Printer Properties window to configure additional settings. These may include options for paper source, page orientation, color settings, and advanced features specific to your printer model.
- Apply Changes: After adjusting the desired settings, click “Apply” or “OK” to save the changes and exit the Printer Properties window.
Configuring the printer settings ensures that the prints align with your requirements. By customizing the print quality, paper type, and other settings, you can optimize the output and achieve the desired results.
Remember to consult the printer’s user manual or contact the manufacturer if you have any specific questions regarding the available settings and their functionality.
Step 8: Test Print a Document
After configuring the printer settings, it’s crucial to test print a document to ensure that the connection is working correctly and that the printer is functioning as expected. Follow these steps to test print a document:
- Select a Document: Open a document or image file that you want to print. It can be a simple text document, a PDF file, or a digital image.
- Access Print Menu: Click on the “File” menu of the application or document viewer you are using. Select the “Print” option from the drop-down menu. Alternatively, you can press the Ctrl+P (Windows) or Command+P (Mac) shortcut keys.
- Choose Printer: In the print dialog box, ensure that your printer is selected in the “Printer” field. If you have multiple printers connected to your laptop, make sure you choose the correct one.
- Adjust Print Settings (Optional): You can adjust additional print settings such as page range, number of copies, print orientation, or print scale depending on your requirements. Take a moment to review and customize these settings, if needed.
- Preview Print: Many applications provide a preview of the print layout. Take a moment to preview the document to ensure that it appears as desired on the page.
- Initiate Print Process: Once you are satisfied with the print settings and document preview, click on the “Print” button to start the printing process.
- Verify Print Output: After initiating the print process, monitor the printer to ensure that it receives the print command. Listen for any printing sounds or check the printer’s display screen for progress updates.
- Retrieve Printed Document: After the printing process is complete, the printed document should be ejected from the printer’s output tray. Remove the printed document from the tray.
By test printing a document, you can verify that the printer is connected correctly, the print settings are configured accurately, and the printer is capable of producing the desired output. It also allows you to identify and resolve any potential issues or discrepancies before proceeding with regular printing tasks.
If the test print is successful and the document is printed correctly, congratulations! Your printer is ready for use. However, if there are any issues with the test print, refer to the printer’s user manual or reach out to the manufacturer’s support for assistance in troubleshooting the problem.
Step 9: Connect Printer to Laptop via Wireless Network
If you prefer a wireless connection between your printer and laptop, you can connect them using your wireless network. Follow these steps to establish a wireless connection:
- Confirm Printer Wi-Fi Capability: Ensure that your printer supports wireless connectivity. Check the printer’s user manual or the manufacturer’s website for details on Wi-Fi compatibility.
- Connect Printer to Wi-Fi: On your printer’s control panel, navigate to the Wi-Fi settings menu. Select the network name (SSID) of your Wi-Fi network and enter the network password, if prompted. Follow any on-screen instructions to establish the connection.
- Enable Wi-Fi on Laptop: On your laptop, ensure that the Wi-Fi is enabled. Go to the network settings and search for available Wi-Fi networks. Connect to the same Wi-Fi network that your printer is connected to.
- Printer Discovery: Once connected to the same Wi-Fi network, your laptop should detect the printer automatically. If the printer is not detected, you may need to manually add the printer or run the printer’s setup software for the laptop to recognize it.
- Install Printer Drivers: If the necessary printer drivers are not already installed on your laptop, follow the steps mentioned in Step 6: Install Printer Drivers to download and install them.
- Confirm Wireless Connection: Verify that the printer is listed as an available device in the printer settings on your laptop. Ensure that the wireless connection is set as the default connection for printing.
- Test Print: Print a test document from your laptop to check if the wireless connection is functioning correctly. Follow the steps outlined in Step 8: Test Print a Document.
Connecting your printer to your laptop via a wireless network offers the convenience of printing without the need for cables. However, it is crucial to ensure that both the printer and laptop are connected to the same Wi-Fi network for successful communication.
If you encounter any difficulties during the wireless connection setup, consult the printer’s user manual or contact the manufacturer’s support for further assistance.
Step 10: Troubleshooting Common Printer Connection Issues
While setting up a printer connection to your laptop, you may encounter some common issues. Here are some troubleshooting steps to help you resolve these problems:
- Check Connections: Ensure that all cables are securely connected between the printer and the laptop. If using a wireless connection, verify that both the printer and laptop are connected to the same Wi-Fi network.
- Restart Devices: Restart both the printer and laptop. This simple step can often resolve minor connectivity issues.
- Update Drivers: Ensure that you have the latest printer drivers installed on your laptop. Visit the printer manufacturer’s website and download any available updates.
- Disable Firewall/Antivirus: Temporarily disable your firewall or antivirus software as they may sometimes prevent the printer and laptop from establishing a connection.
- Reset Network Settings: If using a wireless connection, try resetting the network settings on both the printer and the laptop. Follow the instructions provided by the printer manufacturer for resetting network settings.
- Use Troubleshooting Tools: Many operating systems have built-in troubleshooting tools for printers. Access these tools through the Control Panel or System Preferences, and follow the prompts to diagnose and resolve any connection issues.
- Remove and Reinstall Printer: Remove the printer from your laptop’s list of devices and reinstall it. This can refresh the connection and resolve any software conflicts or configuration errors.
- Consult User Manual/Support: If none of the above steps solve the issue, refer to the printer’s user manual or contact the manufacturer’s support for further assistance. They may provide specific troubleshooting steps or recommend advanced solutions.
By following these troubleshooting steps, you should be able to resolve many common printer connection issues. However, if the problem persists, it may indicate a more complex issue that requires professional assistance.
Always remember to refer to the printer’s user manual or contact the manufacturer’s support for specific guidance in troubleshooting your particular printer model.