
Gather the necessary supplies
Before you begin the process of cleaning your mechanical keyboard, it’s essential to gather all the necessary supplies. Having the right tools will ensure that you can effectively remove dirt, debris, and grime from your keyboard, restoring its functionality and appearance. Here are the essential supplies you’ll need:
- Isopropyl alcohol: This is a crucial cleaning agent that will help dissolve oils, grease, and residue on your keyboard. Opt for high percentage alcohol, such as 90% or higher, for best results.
- Cotton swabs: These small and pointed tools are perfect for reaching tight spaces, such as between the keys and around the switches. They absorb liquid well, making them ideal for applying cleaning solutions.
- Microfiber cloth: Choose a lint-free cloth that won’t leave behind any fibers. This cloth will be useful for wiping and drying various parts of your keyboard without scratching the surface.
- Keycap puller: This handy tool helps to safely remove the keycaps without damaging them. Keycap pullers come in various designs, such as wire or ring-shaped, so choose one that is compatible with your keyboard’s keycaps.
- Compressed air: A can of compressed air is an effective tool for blowing away dust and debris from the keyboard, especially in hard-to-reach areas. This helps to avoid pushing the dirt further into the keyboard.
- Brush: A soft-bristled brush, such as a clean paintbrush or a toothbrush, is useful for dislodging dirt and debris from the keyboard. Ensure that the brush is clean and dry to avoid introducing moisture.
By gathering these supplies, you will have everything you need to successfully clean your mechanical keyboard. Remember to double-check that you have all the necessary tools before you proceed with the cleaning process.
Unplug and turn off the keyboard
Before you start cleaning your mechanical keyboard, it’s crucial to unplug it from your computer and turn it off. This step is essential to prevent any accidental input or damage while you’re cleaning the keyboard.
Begin by locating the USB cable that connects your keyboard to your computer. Gently unplug the cable from the USB port, ensuring that you don’t tug or twist it to avoid any potential damage.
Next, turn off the keyboard by locating the power switch or button, typically located on the top or side of the keyboard. Slide the switch or press the button to power off the keyboard completely. This will help prevent any electrical issues and ensure your safety while cleaning.
By unplugging and turning off the keyboard, you minimize the risk of accidentally typing or triggering any functions while cleaning. This step is crucial to protect your computer and ensure that the cleaning process goes smoothly.
Remove the keycaps
In order to thoroughly clean your mechanical keyboard, you’ll need to remove the keycaps. This step will allow you to access the area beneath the keys where dirt, dust, and debris tend to accumulate. Here’s how you can safely remove the keycaps:
- Start by finding a keycap puller. This tool is specifically designed to safely lift the keycaps without causing any damage. If you don’t have a keycap puller, you can use a small flathead screwdriver or your fingers, but be extra careful to avoid applying excessive pressure or bending the keycaps.
- Position the keycap puller around the base of a keycap. Ensure that the puller is securely gripped onto the keycap.
- Gently and evenly pull upward on the keycap puller. The keycap should detach from the switch with minimal effort. Repeat this step for all the keycaps you wish to remove.
Note that some keycaps, especially on specialty or larger keys, may have different attachment mechanisms such as clips or stabilizers. Be sure to pay attention to these variations and adapt your keycap removal technique accordingly. Refer to the keyboard’s manual or manufacturer’s website for specific instructions if needed.
Once you’ve successfully removed the keycaps, place them in a safe spot, such as a clean towel or a bowl, to prevent them from rolling away or getting misplaced. Remember the layout and positioning of the keycaps for easy reassembly later on.
With the keycaps removed, you’re now ready to proceed with cleaning the keyboard’s components thoroughly.
Clean the keycaps
After removing the keycaps from your mechanical keyboard, it’s time to give them a thorough cleaning. Keycaps can accumulate dirt, grease, and grime over time, which can affect their appearance and feel. Here’s how you can clean them effectively:
- Fill a bowl or basin with warm water and add a small amount of mild dish soap. Swirl the water gently to create a soapy solution.
- Place the keycaps into the soapy water and let them soak for a few minutes. This will help loosen and dissolve any dirt or debris on the surface.
- Using a soft brush or a toothbrush, gently scrub each keycap to remove any remaining residue. Pay attention to the crevices and corners of each keycap to ensure a thorough cleaning.
- Rinse the keycaps under warm running water to remove any soap residue. Make sure to rinse them thoroughly to prevent any residue from affecting their appearance or functionality.
- Pat dry the keycaps using a clean, lint-free cloth or allow them to air dry completely before reattaching them to the keyboard. Avoid using heat or exposing them to direct sunlight to prevent discoloration or warping.
For stubborn stains or marks on the keycaps, you can use a small amount of isopropyl alcohol on a cotton swab to gently dab and clean the affected areas. Be careful not to oversaturate the keycaps with the alcohol, as it could potentially damage the material.
By cleaning the keycaps regularly, you not only improve the overall cleanliness and appearance of your mechanical keyboard but also maintain a pleasant typing experience.
Clean the keyboard frame
Along with cleaning the keycaps, it’s important to pay attention to the keyboard frame. Dust, dirt, and debris can accumulate in the crevices and edges of the keyboard, impacting its overall cleanliness and functionality. Here’s how you can effectively clean the keyboard frame:
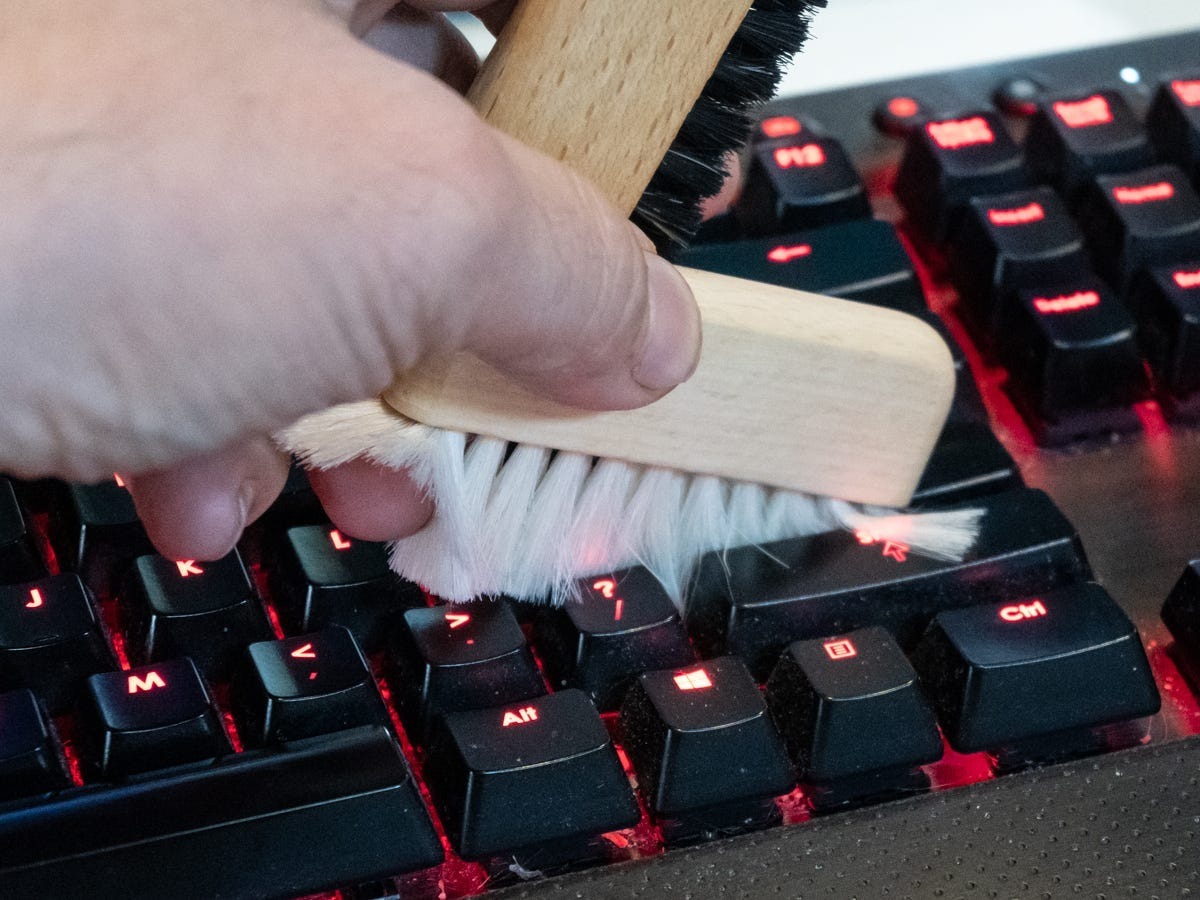
- First, use compressed air to blow away any loose dirt or dust from the keyboard frame. Hold the can of compressed air upright and use short bursts to avoid applying too much pressure and potentially damaging the keyboard.
- Next, use a soft brush, such as a clean paintbrush or a toothbrush, to gently sweep away any remaining dust and debris from the keyboard frame. Pay close attention to the edges, corners, and crevices where dirt tends to accumulate.
- If there are any stubborn spots or marks on the keyboard frame, dampen a microfiber cloth with a small amount of isopropyl alcohol. Gently wipe the affected areas to remove any residue or stains. Make sure the cloth is only slightly damp, not wet, to avoid moisture seeping into the keyboard.
- For keyboards with removable wrist rests or palm rests, clean them separately using the same method as cleaning the keycaps. Soak them in warm, soapy water, scrub gently, rinse, and dry thoroughly before reattaching them to the keyboard.
- Once you’ve finished cleaning the keyboard frame, use a clean, dry microfiber cloth to wipe down the entire surface. This will help remove any remaining moisture or cleaning solution and leave the keyboard looking clean and polished.
Regularly cleaning the keyboard frame not only improves its appearance but also maintains its durability and functionality. It’s important to keep the entire keyboard clean to ensure a pleasant and hygienic typing experience.
Clean the switches
When cleaning a mechanical keyboard, it’s crucial to pay attention to the switches underneath the keycaps. Dust and debris can accumulate in these switches, affecting their performance and responsiveness. Here’s how you can effectively clean the switches:
- Begin by using compressed air to blow away any loose dirt or debris from the switches. Aim the compressed air directly into the switch openings to dislodge any trapped particles. Be sure to hold the can of compressed air upright and use short bursts to avoid applying excessive pressure.
- If there are any visible stains or residue on the switches, dampen a cotton swab with isopropyl alcohol. Gently and carefully rub the swab against the switch housing to remove the dirt. Avoid applying excessive pressure to prevent damaging the switches.
- If the switches require deeper cleaning, you can use a keycap remover tool or a small brush to remove the keycaps and access the switches more easily. Be cautious when removing the keycaps to avoid damaging them.
- Once the keycaps are removed, use the compressed air again to blow away any loosened dirt or debris from the switches. You can also use a small brush to gently sweep away any remaining particles.
- If necessary, lightly dab a cotton swab with isopropyl alcohol and carefully clean the exposed part of the switch stem and surrounding areas. Make sure the swab is only slightly damp, not wet, to avoid moisture seeping into the keyboard.
It’s important to note that the cleaning process for switches should be done with caution and minimal moisture. Excessive force or moisture can damage the switches and compromise their functionality. If you are unsure or uncomfortable with cleaning the switches, it’s advisable to seek professional assistance.
By effectively cleaning the switches, you ensure optimal performance and longevity for your mechanical keyboard. Regular maintenance and cleaning of the switches will contribute to a smooth and enjoyable typing experience.
Remove and clean the stabilizers
In addition to cleaning the keycaps and switches, it’s important to pay attention to the stabilizers. Stabilizers are mechanical components that help stabilize larger keys on a keyboard, such as the spacebar, shift, and enter keys. Over time, dust and dirt can accumulate in these stabilizers, affecting their performance. Here’s how you can remove and clean the stabilizers:
- Start by gently prying off the larger keys, such as the spacebar or shift key, using a keycap puller or your fingers. Be careful not to apply excessive force to avoid damaging the keycap or the stabilizer.
- Once you’ve removed the key, you’ll notice the stabilizer components. There are usually two types of stabilizers: plate-mounted and PCB-mounted. The plate-mounted stabilizers are attached to the keyboard frame, while the PCB-mounted stabilizers are connected directly to the circuit board. Identify which type of stabilizers your keyboard has.
- To remove plate-mounted stabilizers, use a small screwdriver or tweezers to carefully detach them from the keyboard frame. Apply gentle pressure to release the stabilizer clips and lift them out of their slots.
- For PCB-mounted stabilizers, carefully detach them from the circuit board. Apply slight pressure and wiggle the stabilizer gently to release it from its position. Be cautious not to damage any components on the circuit board.
- Once you’ve removed the stabilizers, clean them by rinsing them under warm water or by using a small amount of isopropyl alcohol on a cotton swab. Gently scrub the components to remove any dirt or residue. Rinse them thoroughly if using water and allow them to air dry completely.
- Inspect the stabilizers for any signs of damage or wear. If necessary, apply a small amount of silicone lubricant to the stabilizer wires and joints. This will help reduce friction and ensure smooth movement.
- Once the stabilizers are clean and dry, reattach them to the keyboard. For plate-mounted stabilizers, align the clips with their respective slots and press them firmly into place. For PCB-mounted stabilizers, carefully reinsert them into the correct holes on the circuit board.
By regularly cleaning and maintaining the stabilizers, you can ensure that your larger keys function properly, providing a smooth and consistent typing experience.
Clean the circuit board
When cleaning a mechanical keyboard, it’s important not to overlook the circuit board, as dust and dirt can accumulate on its surface and affect the keyboard’s performance. Cleaning the circuit board requires extra care and attention to prevent any potential damage. Here’s how you can effectively clean the circuit board:
- Start by preparing a clean, dry, and lint-free cloth or an anti-static brush. These tools will help remove dust and debris from the circuit board without causing any damage.
- Gently wipe the surface of the circuit board with the cloth or brush, ensuring you cover all areas. Be cautious not to apply excessive pressure or use any liquids, as this could damage the delicate electrical components on the board.
- If you notice stubborn stains or residue on the circuit board, you can use a small amount of isopropyl alcohol on a cotton swab. Dab the swab lightly on the affected areas, being careful not to oversaturate or allow any liquid to drip onto the board.
- With the alcohol-dampened swab, gently rub the stained areas of the circuit board. Make small, circular motions to lift the residue. Take care not to scrub too hard, as this could potentially damage the circuit traces or solder joints.
- Once you have cleaned the affected areas, use a dry cotton swab or clean cloth to remove any residue or excess moisture left behind. Ensure that the circuit board is completely dry before reassembling the keyboard.
- If you notice any components that are loose or not properly attached to the circuit board, avoid messing with them unless you have the necessary knowledge and skills. It’s best to seek professional assistance in such cases to prevent any potential damage.
Keep in mind that the circuit board is a sensitive part of your keyboard, and improper cleaning techniques can lead to irreversible damage. If you are unsure or uncomfortable with cleaning the circuit board, it’s advisable to seek professional help or consult the manufacturer’s guidelines.
By taking the time to clean the circuit board properly, you can maintain the functionality and longevity of your mechanical keyboard, ensuring an optimal typing experience for years to come.
Put the keycaps back on
After you have thoroughly cleaned your keycaps, switches, stabilizers, and circuit board, it’s time to put the keycaps back on your mechanical keyboard. This step is important to restore the appearance and functionality of your keyboard. Here’s how you can correctly reassemble the keycaps:
- Start by locating the corresponding keycap for each switch. Depending on your keyboard, some keycaps may have different shapes or sizes, so ensure you match them correctly.
- Position a keycap over its corresponding switch and align it properly. The keycap should sit evenly and securely in place without any wobbling or tilting. Make sure the keys are aligned symmetrically to maintain a uniform look.
- Gently press down on the keycap until you hear or feel a click, indicating that it’s securely attached to the switch. Apply even pressure to avoid damaging or misaligning the keycap.
- Continue placing the remaining keycaps one by one, following the same process of aligning and pressing them onto their respective switches. Take your time to ensure each keycap is properly seated.
- For larger keycaps, such as the spacebar or shift keys, they may require additional stabilization. Refer to your keyboard’s manual or manufacturer’s guidelines to properly reattach these keycaps.
- Once all the keycaps are securely attached, test each key to ensure they register keystrokes properly. Gently press each key and verify that it responds as expected.
By correctly putting the keycaps back on your mechanical keyboard, you restore its appearance and functionality. Take your time during this step to ensure a proper and satisfying keycap reassembly.
Now that your keyboard is reassembled, you can enjoy a clean and refreshed typing experience.
Test the keyboard
After cleaning and reassembling your mechanical keyboard, it’s crucial to test it to ensure that everything is functioning properly. Testing the keyboard will help you identify any issues or inconsistencies that may require further attention. Here’s how you can effectively test your keyboard:
- Start by plugging in the keyboard’s USB cable into your computer. Ensure that it is securely connected to the USB port.
- Turn on the keyboard if it has a power switch or button. Make sure the keyboard is powered and ready for testing.
- Open a text editor or any application where you can type to perform a simple typing test. Type a few sentences or paragraphs to check if all the keys are registering accurately and without any delays.
- Test each key on the keyboard, including the modifier keys such as Shift, Ctrl, Alt, and special function keys. Also, check the functionality of the larger keys like the spacebar and enter key.
- If you notice any keys that are not registering or are giving inconsistent responses, double-check that the keycaps are securely attached and properly aligned on their respective switches. Adjust or reattach any loose keycaps as needed.
- If you encounter persistent issues with specific keys, you may need to further clean or inspect those switches or consult with a professional for assistance.
- Perform additional tests, including key combinations, to ensure that all the functionalities of your keyboard, such as media controls or macros, are working correctly.
By thoroughly testing your keyboard, you can identify and resolve any issues that may have arisen during the cleaning process. This will help ensure a reliable and consistent typing experience.
If you encounter persistent or major issues with your keyboard after cleaning and testing, it may be necessary to seek professional assistance or contact the manufacturer for further guidance.