
Safety Precautions
When changing the battery of your Barnes & Noble Nook, it is important to prioritize your safety to prevent any accidents or damages. Follow these safety precautions to ensure a smooth and safe battery replacement process:
- Power Off: Before you begin, make sure to power off your Nook completely. This will prevent any potential electrical shocks or short circuits.
- Use Proper Tools: Ensure that you have the appropriate tools on hand before starting the battery replacement. This usually includes a small screwdriver and a prying tool to remove the back cover.
- Work in a Clean and Well-Lit Area: Find a designated workspace that is clean and well-lit. This will help you see the components clearly and reduce the risk of losing small parts.
- Handle with Care: Handle your Nook with care throughout the battery replacement process. Avoid applying excessive force or bending the device to prevent any accidental damage.
- Disconnect Power Source: Ensure that your Nook is disconnected from any power sources, such as chargers or USB cables, before attempting the battery replacement. This eliminates the risk of electric shock.
- Protective Gear: It is always a good idea to wear protective gear, such as gloves and safety goggles, when working with electronic devices. This will protect you from any potential harm.
- Keep Components Organized: As you disassemble your Nook, keep track of the screws and small parts. Use a tray or a magnetic mat to prevent them from getting misplaced or lost.
- Follow Manufacturer’s Instructions: It is crucial to follow the specific instructions provided by the manufacturer to ensure a successful battery replacement. Consult the user manual or the manufacturer’s website for guidance.
By following these safety precautions, you can ensure a smooth and safe battery replacement process for your Barnes & Noble Nook. When in doubt, consult professional help or seek assistance from customer support to avoid any potential mishaps.
Tools and Materials Needed
Before you begin changing the battery of your Barnes & Noble Nook, make sure you have the following tools and materials ready:
1. Small Screwdriver: You will need a small screwdriver, preferably a Phillips head or a Torx T5, to remove the screws securing the back cover of your Nook.
2. Prying Tool: A prying tool, such as a plastic opening tool or a guitar pick, will come in handy when removing the back cover without damaging the device.
3. Replacement Battery: Obtain a compatible replacement battery for your Barnes & Noble Nook. Ensure that the battery model matches the specifications of your device.
4. Tray or Magnetic Mat: Use a tray or a magnetic mat to keep track of the screws and small parts that you remove during the battery replacement process. This will prevent them from getting lost or mixed up.
5. Gloves and Safety Goggles: Wearing gloves and safety goggles is recommended to protect your hands and eyes while working with delicate electronic components.
6. Clean Cloth: Keep a clean cloth nearby to wipe away any dirt or dust that may have accumulated on the device or the battery compartment.
7. Discharge Static Electricity: To prevent accidental damage to the sensitive electronic components of your Nook, use an anti-static wrist strap or touch a grounded object to discharge any static electricity from your body before handling the device.
Gathering these tools and materials beforehand will save you time and help make the battery replacement process smoother. Ensure that you have everything in place before proceeding to the next steps.
Step 1: Power Off the Nook
Before you start replacing the battery of your Barnes & Noble Nook, it is crucial to power off the device. This will prevent any potential electrical shocks or accidental damage during the battery replacement process. Follow these steps to power off your Nook:
- Save your work: Ensure that you save any open documents or applications and safely exit any active programs on your Nook.
- Press and hold the power button: Locate the power button on your Nook, usually located on the top or the side of the device. Press and hold the power button for a few seconds until you see a menu or a prompt on the screen.
- Select “Power Off”: On the screen, you will see options such as “Power Off,” “Restart,” or “Shut Down.” Use the touch screen or the navigation buttons to select the “Power Off” option.
- Confirm the action: After selecting “Power Off,” the Nook will prompt you to confirm the action. Follow the on-screen instructions to confirm and initiate the shutdown process.
- Wait for the Nook to power off: Give your Nook a few moments to completely shut down. The screen will turn off, and all functionality will cease.
Once your Barnes & Noble Nook is powered off, you can proceed with the battery replacement process without any risk of electrical interference. Make sure the device remains off throughout the entire process to ensure your safety and the integrity of the replacement process.
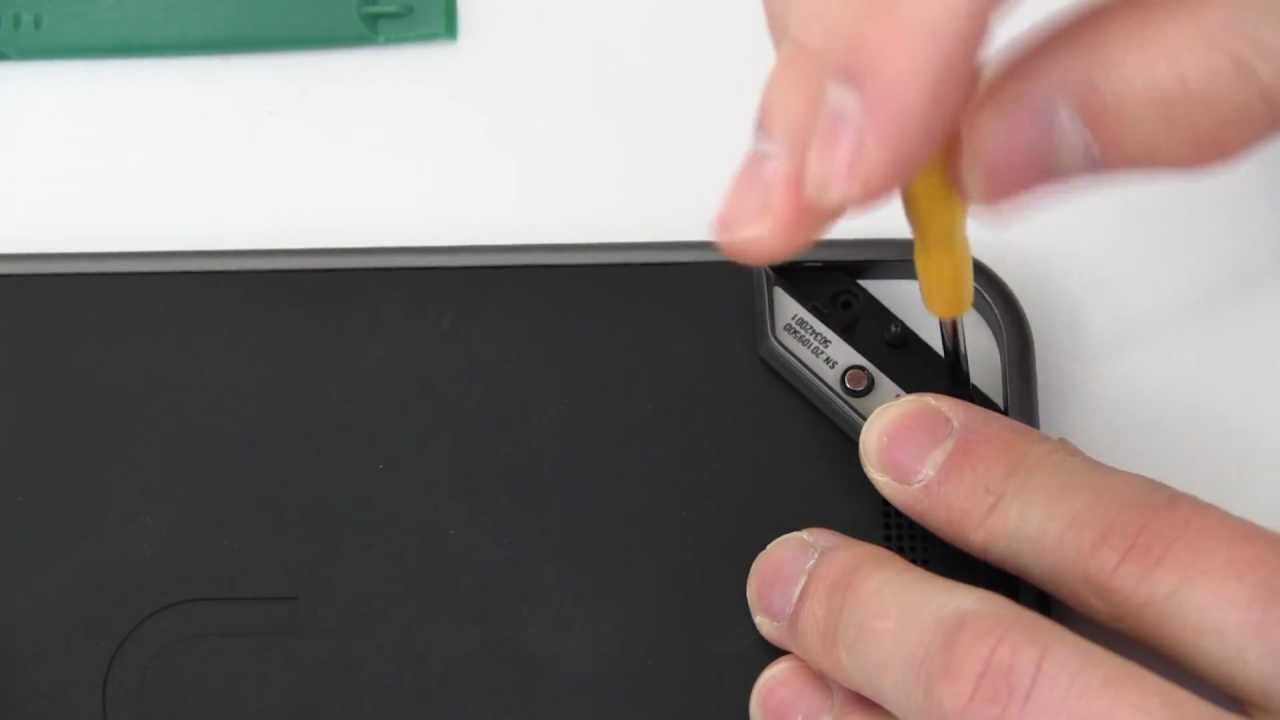
Step 2: Remove the Back Cover
After powering off your Barnes & Noble Nook, the next step is to remove the back cover to gain access to the battery compartment. Follow these instructions to safely remove the back cover:
- Place your Nook on a flat and stable surface: Find a clean and sturdy surface to work on. This will ensure that your Nook remains steady and secure during the back cover removal process.
- Locate the screw(s): Look for the small screws that secure the back cover of your Nook. They are usually located near the corners or along the sides of the device. Use the appropriate-sized screwdriver to remove these screws.
- Pry the back cover: Once the screws are removed, gently insert a prying tool, such as a plastic opening tool or a guitar pick, between the back cover of the Nook and the main body. Apply gentle pressure and carefully work your way around the edges to separate the back cover from the device.
- Remove the back cover: With the prying tool, lift the back cover away from the Nook. Be cautious not to force or bend the cover, as this can cause damage to the device or the cover itself.
As you remove the back cover, be mindful of any cables or connectors that may be attached. Take note of their positions and gently detach them if necessary, ensuring that you remember how they are connected for reassembly later. Place the back cover and the screws in a safe location where they won’t get lost.
By successfully removing the back cover, you have now gained access to the battery compartment of your Barnes & Noble Nook. Proceed to the next step to continue with the battery replacement process.
Step 3: Locate the Battery Connector
After removing the back cover of your Barnes & Noble Nook, the next step is to locate the battery connector. The battery connector is responsible for supplying power to the device and needs to be disconnected before you can proceed with replacing the battery. Follow these instructions to locate the battery connector:
- Inspect the internal components: With the back cover removed, take a moment to familiarize yourself with the internal components of your Nook. Look for the battery, which is a rectangular object usually located near the center or bottom of the device.
- Identify the battery connector: Once you locate the battery, trace the wires or cables connected to it. The battery connector is a small plug or socket typically attached to the wires or cables leading from the battery.
- Take note of the battery connector’s position and orientation: Pay attention to how the battery connector is positioned and oriented in the device. This will make it easier to disconnect and reconnect correctly during the battery replacement process.
It’s important to be gentle and cautious when handling the battery and its connector. Avoid pulling or tugging on the wires to prevent any damage. Take your time to ensure you have a clear understanding of the battery connector’s location and how it is connected to the device.
By successfully locating the battery connector, you are now ready to proceed with the next step, which involves disconnecting the battery connector to safely remove the old battery.
Step 4: Disconnect the Battery Connector
Once you have located the battery connector in your Barnes & Noble Nook, it’s time to disconnect it to safely remove the old battery. Follow these instructions to disconnect the battery connector:
- Ensure the device is powered off: Before proceeding, double-check that your Nook is powered off to avoid any potential electrical shocks or damage.
- Identify the battery connector: Locate the battery connector, which is a small plug or socket connected to the wires or cables attached to the battery.
- Gently unplug the battery connector: Using your fingers or a small tool, carefully unplug the battery connector from its socket. Apply gentle and even pressure to avoid damaging the connector or the socket.
- Verify successful disconnection: Once unplugged, examine the battery connector and ensure that it is completely disconnected from the device. Check that no wires or pins are still inserted in the socket.
Be mindful of the delicate nature of the battery connector. Handle it with care and avoid bending or pulling on the wires. If the connector seems stubborn or difficult to unplug, reassess your approach and ensure you are properly gripping and applying pressure to the connector itself, rather than the wires.
By successfully disconnecting the battery connector, you have completed an important step in the battery replacement process. Proceed to the next step to remove the old battery from your Barnes & Noble Nook.
Step 5: Remove the Old Battery
Now that you have disconnected the battery connector, it’s time to remove the old battery from your Barnes & Noble Nook. Follow these instructions to safely remove the old battery:
- Inspect the battery: Take a moment to examine the old battery. Note its position and how it is secured in place within the battery compartment.
- Identify any securing mechanisms: Look for any clips, adhesive strips, or screws holding the battery in place. These securing mechanisms vary depending on the Nook model, so pay close attention to how the battery is secured.
- Remove the securing mechanisms: If there are any clips or screws, use the appropriate tools to loosen and remove them. If there are adhesive strips, gently peel them off from the battery or the battery compartment.
- Remove the old battery: Once the securing mechanisms are taken care of, carefully lift the old battery out of the compartment. Be cautious not to bend or damage the battery as you remove it from the device.
It is important to handle the old battery with care. Avoid applying excessive force or bending it, as this can lead to battery leakage or damage. Take note of the orientation and position of the old battery for reference when inserting the new battery.
Set the old battery aside in a safe location, away from any flammable objects. Remember to dispose of the old battery properly according to your local regulations and guidelines.
With the old battery successfully removed, you are one step closer to replacing it with a new one. Move on to the next step to learn how to insert the new battery into your Barnes & Noble Nook.
Step 6: Insert the New Battery
Now that you have removed the old battery from your Barnes & Noble Nook, it’s time to insert the new battery. Follow these instructions to properly insert the new battery:
- Prepare the new battery: Take out the new replacement battery from its packaging. Ensure that it matches the specifications and model required for your Nook.
- Align the new battery: Orient the new battery correctly. Make sure the placement and positioning match that of the old battery before it was removed. Check for any labels or markings on the battery indicating the correct orientation.
- Gently place the new battery: Carefully lower the new battery into the battery compartment of your Nook. Ensure that it sits flat and securely within the compartment.
- Secure the new battery: If there were any securing mechanisms, such as clips, adhesive strips, or screws, reapply them to firmly secure the new battery in place. Follow the same steps you took to remove the old battery.
Take your time to ensure that the new battery is properly aligned and securely installed. Avoid forcing or pushing it into place, as this can damage the battery or other components of your Nook.
Double-check the battery’s position and make sure it is oriented correctly. Ensure that all securing mechanisms are tightly fastened to keep the new battery in place during normal usage.
With the new battery successfully inserted, you are on the final stretch of replacing the battery in your Barnes & Noble Nook. Proceed to the next step to reconnect the battery connector.
Step 7: Reconnect the Battery Connector
After inserting the new battery in your Barnes & Noble Nook, it’s time to reconnect the battery connector to restore power to the device. Follow these instructions to safely reconnect the battery connector:
- Locate the battery connector: Find the battery connector that you previously disconnected. It should be a small plug or socket attached to the wires or cables leading from the battery.
- Align the battery connector: Align the battery connector with its corresponding socket in the device. Ensure that the connector is properly aligned both in position and orientation before attempting to reconnect it.
- Insert the battery connector: Gently plug the battery connector back into its socket. Apply even pressure and make sure it is fully inserted, ensuring a secure electrical connection.
- Secure the battery connector: If there are any clips or mechanisms to secure the battery connector in place, latch them or reapply them to ensure the connector remains connected throughout use.
Be careful when reconnecting the battery connector, as it is a delicate component. Ensure that the connector is aligned properly and insert it smoothly without bending or damaging the wires.
Once the battery connector is securely plugged in, double-check that it is properly inserted and making a firm connection. Ensure that no wires or pins are sticking out or misaligned in the socket.
With the battery connector reconnected, you are one step away from completing the battery replacement process. Proceed to the next step to replace the back cover of your Barnes & Noble Nook.
Step 8: Replace the Back Cover
Now that you have completed the battery replacement and reconnection of the battery connector in your Barnes & Noble Nook, it’s time to replace the back cover. Follow these instructions to securely replace the back cover:
- Inspect the back cover: Before placing the back cover back onto your Nook, examine it for any signs of damage or wear. Ensure that there are no loose parts or clips that need repair or replacement.
- Align the back cover: Hold the back cover in your hands and position it correctly, aligning it with the edges and corners of the Nook. Pay attention to any openings or slots where buttons or ports should fit through.
- Press the back cover into place: Starting from one corner, gently press the back cover onto the device. Use even pressure and work your way around, ensuring that the cover is securely snapped or fitted into place.
- Reinstall any screws: If there were screws holding the back cover in place, use the appropriate screwdriver to reinstall them. Tighten them, but not excessively, to secure the back cover in place.
Be mindful of cables or connectors that may be present as you place the back cover back onto your Nook. Ensure that they are properly routed and positioned so they won’t get pinched or damaged.
While placing the back cover, make sure it fits snugly and securely. Avoid using excessive force that may damage the device or cause misalignment. Take your time to align the cover correctly for a seamless fit.
With the back cover successfully replaced, your Barnes & Noble Nook is almost ready for use. Proceed to the final step to power on your device and confirm the battery replacement was successful.
Step 9: Power On the Nook
After replacing the back cover of your Barnes & Noble Nook, it’s time to power on the device and confirm that the battery replacement was successful. Follow these instructions to power on your Nook:
- Hold the power button: Locate the power button on your Nook, usually located on the top or side of the device. Press and hold the power button for a few seconds until you see the device powering on.
- Observe the startup sequence: As the device powers on, keep an eye on the screen. You should see the Barnes & Noble logo or the Nook logo appearing, indicating that the device is booting up.
- Release the power button: Once you see the startup screen, release the power button. Your Nook will continue the booting process and eventually display the home screen.
- Check the battery indicator: Look for the battery indicator on the screen. It should display the battery level or charge status. If the battery icon is indicating a sufficient charge, it means the new battery is functioning correctly.
- Test the device: Navigate through the Nook’s menus and features to ensure that everything is working properly. Open applications, browse through e-books, and perform any necessary tasks to confirm the Nook is functioning as expected.
If your Nook powers on and functions normally, congratulations! The battery replacement process was successful. Enjoy using your Nook with its renewed power and extended battery life.
In the rare case that your Nook does not power on or exhibits any issues, double-check all connections and ensure that the battery is properly inserted. If problems persist, consult professional help or reach out to Barnes & Noble customer support for assistance.
With your Barnes & Noble Nook successfully powered on and functional, you have completed the battery replacement process. Enjoy using your device with its newly installed battery!