
Tools and Materials Needed
When it comes to changing brake pads with an electronic handbrake, there are a few tools and materials you’ll need to have on hand. These essentials will help you complete the task efficiently and safely. Here’s a list of what you’ll need:
- Jack and jack stands: Make sure you have a sturdy jack and a set of jack stands to lift and secure your vehicle.
- Lug wrench: This tool will be necessary for removing the lug nuts that hold the wheels in place.
- Socket set: A socket set with various socket sizes will be used to remove the brake caliper bolts.
- C-clamp or brake caliper compressor tool: You’ll need this tool to compress the brake caliper piston and make room for the new brake pads.
- New brake pads: It’s essential to have the correct brake pads for your vehicle make and model.
- Brake caliper grease: This lubricant is crucial for ensuring smooth movement of the brake caliper and preventing noise or squealing.
- Brake cleaner: Use brake cleaner to clean the brake caliper, rotor, and other components for optimal performance.
- Torque wrench: A torque wrench is necessary to tighten the lug nuts and brake caliper bolts to the recommended specifications.
- Protective gloves and safety glasses: It’s important to protect your hands and eyes while working on your vehicle.
Having these tools and materials ready before starting the brake pad replacement process will save you time and ensure that you have everything you need. Now that you’re equipped with the necessary essentials, it’s time to move on to the next steps and begin changing your brake pads with an electronic handbrake.
Step 1: Safety Precautions
Before starting any maintenance or repair work on your vehicle, it’s essential to prioritize safety. Here are some important safety precautions to follow:
- Park your vehicle on a flat and level surface: Ensuring that your vehicle is on a stable and even ground will prevent it from rolling or slipping while you work.
- Engage the parking brake: Even though we’ll be working on the handbrake, engaging the parking brake adds an extra layer of safety to prevent any accidental movement of the vehicle.
- Put on protective gloves and safety glasses: Working on your vehicle can involve sharp objects, chemicals, or debris, so it’s crucial to protect your hands and eyes from any potential injuries.
- Allow the brakes to cool down: If you’ve been driving, give your brakes enough time to cool down before starting the brake pad replacement. Hot brake components can cause burns.
- Chock the wheels: Use wheel chocks to prevent any unexpected movement of the vehicle. Place them in front of and behind the wheels that aren’t being worked on.
- Read the vehicle’s owner manual: Familiarize yourself with your vehicle’s specific guidelines and instructions related to brake pad replacement. Every vehicle can have slight variations.
- Follow proper lifting techniques: When using a jack to lift your vehicle, ensure you follow the manufacturer’s instructions and lift the car from the recommended jacking points.
- Take your time and work methodically: Rushing through the process can lead to mistakes or accidents. Follow each step carefully and double-check your work as you progress.
By adhering to these safety precautions, you’ll create a safe working environment and minimize the risk of injuries or mishaps. Remember, your well-being should always be the top priority when conducting any maintenance on your vehicle.
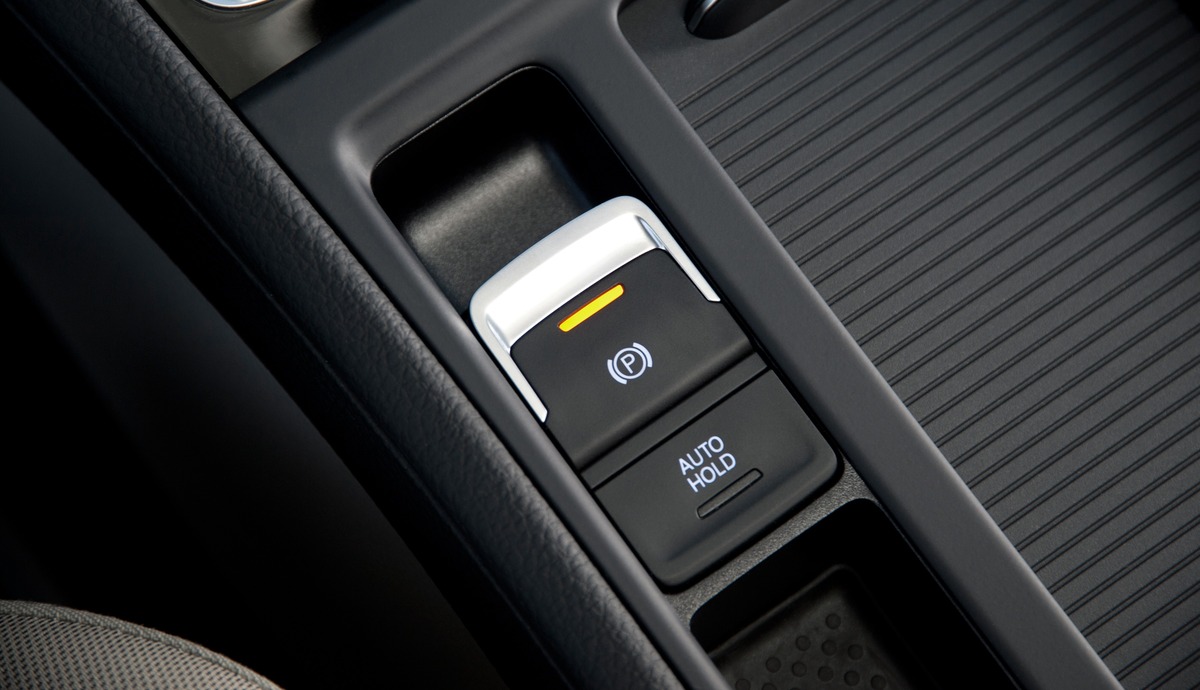
Step 2: Release the Electric Handbrake
Before you can start working on your brake pads, you need to release the electric handbrake. Follow these steps to do so:
- Locate the electric handbrake switch: The electric handbrake switch is usually found on the center console, near the driver’s seat. Refer to your vehicle’s owner manual if you’re unsure about its location.
- Switch on the ignition: Start by switching on the ignition to power your vehicle’s electrical system. However, do not start the engine.
- Step on the brake pedal: Press and hold down the brake pedal firmly with your foot. This step is crucial to release the electric handbrake.
- Engage the electric handbrake button: While holding down the brake pedal, locate the electric handbrake button and engage it. This will deactivate the handbrake mechanism.
- Release the brake pedal: Once the electric handbrake is disengaged, you can release the brake pedal. Make sure it returns to its original position.
- Verify the handbrake is fully released: Look for any indicator on your dashboard that signifies the handbrake is disengaged. It may be a light or a message on the instrument cluster.
It’s crucial to ensure that the electric handbrake is fully released before proceeding with the brake pad replacement. Failing to do so can cause damage to the braking system or make it difficult to remove the brake caliper. Take your time to perform this step correctly and double-check that the handbrake is completely disengaged. Once you’re confident that the handbrake is released, you can proceed to the next step of removing the wheels.
Step 3: Removing the Wheels
With the electric handbrake released, you can now move on to removing the wheels. Follow these steps carefully:
- Locate the lug nuts: The lug nuts are the fasteners that hold the wheels in place. They are usually located in the center of the wheel and can be accessed from the outside.
- Loosen the lug nuts: Using a lug wrench, turn each lug nut counterclockwise to loosen them. You may need to apply a bit of force as they can be tightly secured.
- Jack up the vehicle: Position the jack at the recommended jacking points, usually indicated in your vehicle’s owner manual. Carefully lift the vehicle until the wheel is off the ground.
- Secure the vehicle with jack stands: Once the vehicle is lifted, place jack stands under the recommended support points. This adds an extra layer of safety in case the jack fails.
- Remove the lug nuts and wheels: With the vehicle securely supported by the jack stands, fully remove the lug nuts and set them aside. Gently pull the wheel towards you to remove it from the wheel hub.
- Repeat the process for all wheels: If you’re replacing brake pads on multiple wheels, repeat the above steps for each wheel.
Removing the wheels allows you better access to the brake components and simplifies the brake pad replacement process. Remember to keep track of the lug nuts and store them in a safe place to prevent misplacement. Once you have successfully removed all the wheels, you can proceed to the next step of removing the brake caliper.
Step 4: Removing the Brake Caliper
Now that the wheels are removed, the next step is to remove the brake caliper. Follow these steps carefully:
- Locate the brake caliper: The brake caliper is a metal component that surrounds the brake rotor. It is usually held in place by a couple of bolts.
- Identify the caliper mounting bolts: Look for the caliper mounting bolts located at the back of the caliper. These bolts secure the caliper to the caliper bracket.
- Loosen and remove the caliper mounting bolts: Use a socket or wrench to loosen and remove the caliper mounting bolts. You may need to apply some force, as the bolts can be tight.
- Gently remove the caliper: Once the mounting bolts are removed, carefully pull the caliper away from the brake rotor. Take caution not to strain or damage the brake hose attached to the caliper.
- Secure the caliper: Use a wire or zip tie to secure the caliper to a nearby suspension component or frame. This will prevent unnecessary strain on the brake hose.
When removing the brake caliper, it’s important to handle it with care and avoid putting excessive pressure on the brake hose. Damaging the brake hose can lead to brake fluid leaks, compromising the effectiveness of your braking system. Take your time while removing the caliper, ensuring that it is properly secured after removal. With the caliper out of the way, you’re ready to proceed to the next step of inspecting the brake pads.
Step 5: Inspecting the Brake Pads
Now that the brake caliper has been removed, it’s time to inspect the brake pads. Follow these steps to ensure they are in good condition:
- Examine the brake pads: Take a close look at both the inner and outer brake pads. Look for signs of wear such as uneven thickness, cracks, or excessive wear on the pad surface.
- Check the brake pad thickness: Measure the thickness of the brake pads using a brake pad gauge or a ruler. Compare the measurement to the manufacturer’s recommended minimum thickness.
- Inspect the brake pad backing plate: Check the condition of the backing plate, which holds the brake pad in place. Look for signs of damage or corrosion that may affect the pad’s stability.
- Check for brake pad hardware: Some brake pads have hardware such as clips or shims. Make sure these components are in good condition and securely attached to the brake pad.
- Assess the brake pad wear sensor: If your vehicle has wear sensors, check them for any signs of damage or wear. These sensors are designed to alert you when the brake pads are worn out.
By carefully inspecting the brake pads, you can determine if they need to be replaced. If the brake pads are significantly worn, damaged, or below the manufacturer’s recommended thickness, they should be replaced with new ones. It’s crucial to have properly functioning brake pads to ensure your vehicle’s braking performance and your safety on the road. Once you have inspected the brake pads and made a judgment on their condition, you can proceed to the next step of installing new brake pads.
Step 6: Installing the New Brake Pads
After inspecting the brake pads, it’s time to install new ones. Follow these steps to properly install the new brake pads:
- Prepare the new brake pads: Take the new brake pads out of their packaging and ensure they are the correct ones for your vehicle’s make and model. Remove any protective coverings or packaging materials.
- Apply brake caliper grease: Apply a thin layer of brake caliper grease to the contact points on the back of the brake pads. This will help reduce noise and ensure smooth movement.
- Position the brake pads: Place the new brake pads into the caliper bracket, making sure the friction material is facing the brake rotor. The brake pad with the wear sensor should be installed on the inner side.
- Align the brake caliper: Carefully align the brake caliper with the brake pads, ensuring that the mounting holes on the caliper align with the corresponding holes on the caliper bracket.
- Reinstall the caliper mounting bolts: Insert the caliper mounting bolts and tighten them securely. Use a torque wrench to ensure they are tightened to the manufacturer’s recommended torque specifications.
Properly installing the new brake pads is essential for optimal braking performance and safety on the road. Take your time to align the pads correctly and securely fasten the caliper mounting bolts. Remember to use the appropriate torque specifications to avoid under or over-tightening the bolts. Once the new brake pads are installed, you can proceed to reassembling the brake caliper.
Step 7: Reassembling the Brake Caliper
With the new brake pads in place, it’s time to reassemble the brake caliper. Follow these steps to properly reassemble the brake caliper:
- Remove the wire or zip tie: If you secured the brake caliper with a wire or zip tie, remove it carefully to allow the caliper to sit flush against the brake pads.
- Slide the brake caliper back onto the rotor: Gently slide the brake caliper back onto the brake pads and align it with the caliper bracket. Take care not to damage the brake pads while doing so.
- Reinstall the caliper mounting bolts: Insert the caliper mounting bolts and tighten them securely. Use a torque wrench to ensure they are tightened to the manufacturer’s recommended torque specifications.
- Double-check the brake pad alignment: Ensure that the brake pads are seated correctly and aligned properly with the rotor. Adjust if necessary to achieve even contact between the pads and rotor.
Properly reassembling the brake caliper is crucial to ensure that the brake pads function effectively and provide reliable stopping power. Take your time to align the brake caliper correctly, tighten the mounting bolts securely, and verify the brake pad alignment. Once the brake caliper is reassembled, you can proceed to the next step of putting the wheels back on.
Step 8: Putting the Wheels Back On
After reassembling the brake caliper, it’s time to put the wheels back on your vehicle. Follow these steps to properly install the wheels:
- Retrieve the wheels: Retrieve the wheels that you removed earlier and ensure they are in good condition, free from any damage or debris.
- Align the wheel with the wheel hub: Hold the wheel at a slight angle and align it with the wheel hub. Ensure that the lug nut holes on the wheel align with the studs on the wheel hub.
- Hand-tighten the lug nuts: Start by hand-tightening the lug nuts clockwise. This helps secure the wheel in place and prevents it from falling off while you continue the installation process.
- Tighten the lug nuts with a lug wrench: Once the lug nuts are hand-tightened, use a lug wrench to further tighten them. Tighten the lug nuts in a star or crisscross pattern to ensure uniform tightening and proper wheel alignment.
- Torque the lug nuts to the recommended specifications: Use a torque wrench to torque the lug nuts to the manufacturer’s recommended specifications. This ensures that the lug nuts are tightened to the proper level and prevents under or over-tightening.
Properly installing the wheels is essential for safe driving and proper wheel operation. Take your time to align the wheels correctly, hand-tighten the lug nuts before using a lug wrench, and torque the lug nuts to the recommended specifications. Once the wheels are securely in place, you can proceed to the next step of testing the brakes.
Step 9: Testing the Brakes
After completing the brake pad replacement and wheel installation, it’s important to test the brakes to ensure they are functioning correctly. Follow these steps to properly test the brakes:
- Start the engine: Start your vehicle’s engine and allow it to idle.
- Pump the brake pedal: Pump the brake pedal a few times to build up pressure in the braking system. This helps ensure proper brake pad contact with the rotors.
- Test the brake pedal firmness: Apply steady pressure to the brake pedal and assess its firmness. It should feel solid and not sink to the floor when pressed. If the pedal feels spongy or excessively soft, there may be air in the braking system that needs to be bled.
- Test the brakes at low speed: Carefully drive your vehicle at a low speed and apply the brakes gradually. Observe how the vehicle responds and ensure that it comes to a smooth and controlled stop without any pulling to the side.
- Test the brakes at higher speed: Find an open area where you can safely accelerate to a higher speed. Then, apply the brakes firmly to test their effectiveness in bringing the vehicle to a safe and quick stop.
- Listen for any unusual noises: Pay attention to any unusual noises, such as grinding, squealing, or scraping, as these may indicate a problem with the braking system. If you notice any abnormal noises, further inspection may be required.
Testing the brakes after a brake pad replacement is essential to ensure optimal performance and safety. By following these steps, you can verify that the brakes are working properly and address any issues promptly. If you have any concerns about the brake performance or notice any abnormalities during the test, it’s recommended to consult a professional mechanic for further inspection and adjustment. Once you’re confident in the brakes’ functionality, you can move on to the final step of maintaining your new brake pads.
Step 10: Maintaining Your New Brake Pads
After completing the brake pad replacement, it’s important to properly maintain your new brake pads to ensure their longevity and optimal performance. Follow these steps to maintain your new brake pads:
- Follow the bedding-in process: Many new brake pads require a bedding-in process to properly mate with the brake rotors. Follow the manufacturer’s instructions for the specific bedding-in procedure, which typically involves a series of controlled stops to gradually transfer a layer of friction material to the rotor surface.
- Regularly inspect the brake pads: Make it a habit to visually inspect your brake pads every few months or before embarking on a long trip. Look for signs of wear, uneven thickness, or any abnormalities. If the brake pads are worn beyond the manufacturer’s recommended limit, replace them promptly.
- Keep the braking system clean: Periodically clean the brake caliper, rotor, and other components using brake cleaner. Removing built-up dirt, dust, and debris helps maintain proper brake function and prevents noisy or uneven braking.
- Monitor brake fluid level: Check the brake fluid reservoir regularly and ensure that it is at the proper level. If the fluid is low, it may indicate a leak or worn brake pads that need replacement. Consult your vehicle’s owner manual for the recommended brake fluid type and refill as needed.
- Drive responsibly: Practicing safe driving habits can help prolong the life of your brake pads. Avoid abrupt and excessive braking, as it can wear out the brake pads prematurely. Maintain a safe following distance and anticipate stops to minimize the need for aggressive braking.
- Have regular brake inspections: Schedule regular inspections of your vehicle’s braking system by a qualified technician. They can assess the condition of the brake pads, check for any fluid leaks, and ensure the overall performance of the brakes.
By following these maintenance steps, you can extend the life of your new brake pads and ensure that your vehicle’s braking system remains in optimal condition. Regular inspections and proper care contribute to your safety and the reliable performance of your brakes. Remember, if you ever notice any concerning symptoms or experience any issues with your brakes, it’s important to have them inspected and serviced by a professional. With proper maintenance, your new brake pads will provide reliable stopping power for miles to come.