
Materials Needed
Before beginning the construction of an Atlantic gaming desk, gather the following materials:
- A gaming desk kit from Atlantic: Choose a model that suits your preferences and gaming needs. Ensure that it includes all necessary components.
- A screwdriver: Opt for a Phillips-head screwdriver of the appropriate size for easy assembly.
- Optional tools: Depending on the specific desk model, you may need additional tools such as an Allen wrench or a drill.
- A soft cloth or microfiber cloth: Use this to clean the desk components before assembly and to wipe off any dust or debris during the construction process.
- A level: This will help ensure that the desk is properly aligned and balanced.
- An adjustable wrench: A wrench is necessary for tightening any bolts or nuts during the assembly process.
- Extra screws and fasteners: It’s always a good idea to have spare screws and fasteners on hand in case any are lost or damaged.
- Electrical tape: This will come in handy during the cable management process to keep the wires organized and prevent them from tangling.
Make sure you have all the necessary materials readily available before starting the assembly process. This will make the construction of your Atlantic gaming desk smooth and hassle-free.
Step 1: Preparing the Workspace
Before diving into the assembly process, it’s crucial to create a suitable workspace for building your Atlantic gaming desk. Follow these steps to ensure you have an organized and conducive environment:
- Clear the area: Remove any clutter or objects that may hinder the construction process. This will give you ample space to work efficiently and ensure safety.
- Clean the workspace: Wipe down the surface of your work area with a soft cloth or microfiber cloth to remove any dust, debris, or potential obstacles. A clean workspace will make the assembly process more seamless.
- Organize the components: Lay out all the components from your Atlantic gaming desk kit in an orderly manner. Group similar items together and ensure that you have all the necessary parts before proceeding with the assembly.
- Gather your tools: As mentioned in the previous section, gather the required tools such as a screwdriver, adjustable wrench, level, and any other tools specified by your specific desk model. Having them within reach will save you time and effort when needed.
- Adjust the lighting: Adequate lighting is crucial for precise assembly. Ensure that your workspace is well-lit, either by natural light or artificial lighting, to avoid any errors or difficulties during the construction process.
By following these steps, you will create an organized and well-prepared workspace for building your Atlantic gaming desk. This will not only make the assembly process smoother but also enhance your overall experience and ensure the best possible outcome for your newly constructed gaming desk.
Step 2: Assembly of the Desk Frame
With your workspace prepared, it’s time to start assembling the frame of your Atlantic gaming desk. Follow these steps to ensure proper construction:
- Refer to the instructions: Carefully read the assembly instructions provided with your gaming desk kit. Familiarize yourself with the various components and their corresponding labels.
- Identify the desk frame parts: Locate the pieces that form the main frame structure of the desk. These may include side panels, front and back beams, or any other components specific to your desk model.
- Align the pieces: Position the frame pieces according to the instructions. Make sure they are aligned correctly and fit snugly together. Use the provided screws and fasteners to secure them in place.
- Secure the connections: Using a screwdriver or other appropriate tools, attach the screws tightly to create a sturdy and stable frame. Be careful not to overtighten and damage the components.
- Double-check the alignment: Use a level to ensure the desk frame is level and balanced. Adjust as necessary before proceeding.
- Test the stability: Give the desk frame a gentle shake to test its stability. If it wobbles or feels unstable, check that all the screws are tightened correctly.
Following these steps will result in a well-constructed and sturdy desk frame. Take your time during this process to ensure accuracy and precision. Remember to consult the assembly instructions specific to your Atlantic gaming desk model for any additional guidance or details.
Step 3: Attaching the Legs and Supports
Once you have assembled the frame of your Atlantic gaming desk, it’s time to attach the legs and supports to provide stability and structural integrity. Follow these steps for a secure and balanced desk:
- Prepare the legs: Locate the designated leg components and ensure they are clean and free from any debris. If necessary, use a soft cloth to wipe off any dust or dirt.
- Position the legs: Place the legs in the appropriate locations on the desk frame, aligning them with the pre-drilled holes or brackets. Take note of any specific instructions provided by your gaming desk model.
- Attach the legs: Using the provided screws or fasteners, secure the legs firmly to the frame. Ensure that they are tightened evenly to maintain a balanced and stable desk.
- Install additional supports: Some desk models may require additional support beams or braces for added stability. Follow the instructions provided by your specific gaming desk model to attach these supports securely.
- Check for stability: Gently apply pressure to the desk to test its stability. Ensure that all the legs and supports are securely attached and there is no wobbling or instability.
By following these steps, you will successfully attach the legs and supports to your Atlantic gaming desk. This will provide a solid foundation for your desk and ensure its stability during use. As always, refer to the assembly instructions provided with your desk for any model-specific guidance or details.
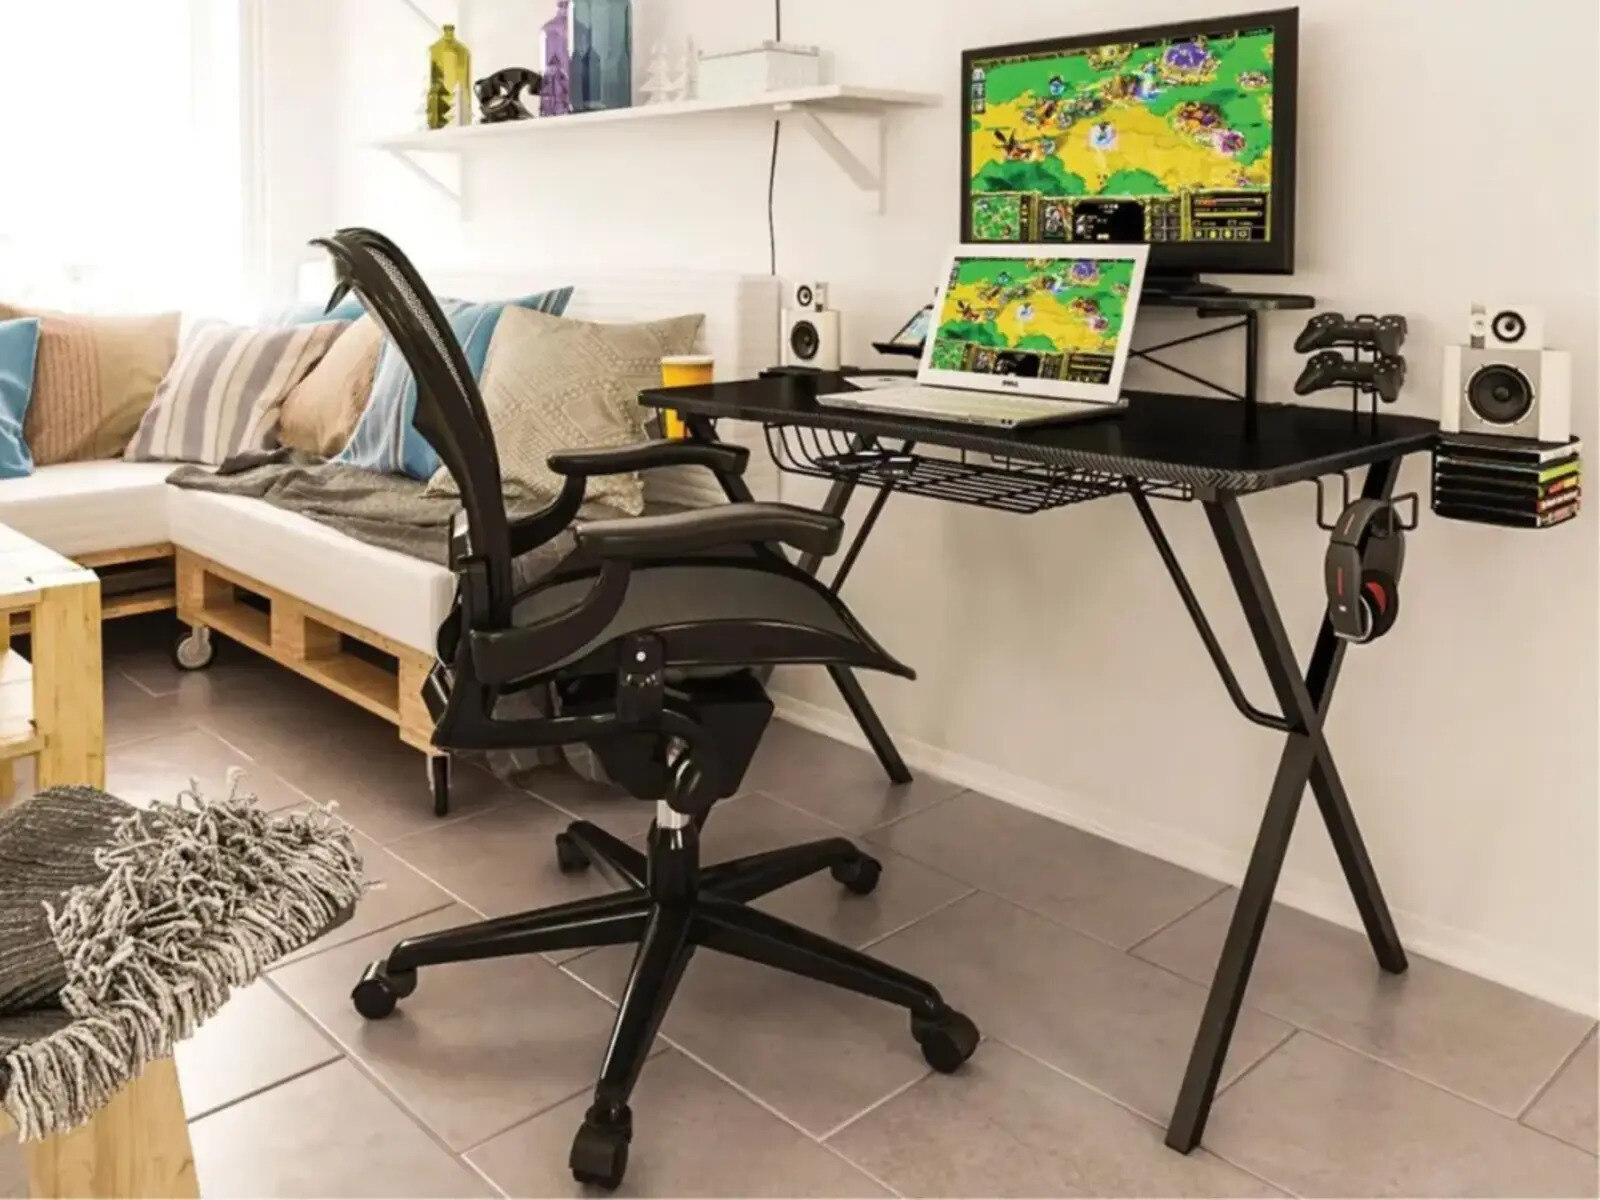
Step 4: Installing the Monitor Stand
The monitor stand is a critical component of your Atlantic gaming desk that holds your display securely and at an optimal viewing height. Follow these steps to install the monitor stand:
- Position the monitor stand: Identify the designated area on your gaming desk for the monitor stand. It is usually located towards the back of the desk, centered between the two side panels.
- Align the stand: Place the monitor stand in position, ensuring that it is centered and parallel to the desk’s edges. Take note of any specific instructions provided by your specific gaming desk model.
- Secure the stand: Using the screws or fasteners provided, attach the monitor stand to the desk frame. Ensure that the stand is tightly secured to prevent any instability or wobbling during use.
- Check for stability: Gently test the stability of the monitor stand by applying slight pressure. Ensure that it remains steady and securely attached to the desk frame.
- Adjust the height: If your monitor stand offers height adjustment, adjust it to your preferred viewing height. Follow the instructions provided with your specific monitor stand model to make the necessary adjustments.
- Place the monitor: Carefully position and place your monitor on the monitor stand. Ensure that it is centered and securely seated on the stand’s mounting plate or arms. Adjust the monitor’s angle and position as desired.
Following these steps will result in a properly installed monitor stand on your Atlantic gaming desk. Make sure to refer to the assembly instructions provided with your specific gaming desk and monitor stand for any additional guidance or model-specific details.
Step 5: Mounting the Gaming Accessories
One of the key features of an Atlantic gaming desk is its ability to accommodate various gaming accessories. Follow these steps to mount your gaming accessories onto your desk:
- Identify the accessory mounting points: Take note of the designated areas on your gaming desk for mounting accessories. These may include hooks, shelves, or other attachment points.
- Choose the accessories: Select the gaming accessories you wish to mount on your desk, such as a headphone holder, controller stand, or cup holder. Ensure they are compatible with your specific gaming desk model.
- Mount the accessories: Follow the instructions provided with each accessory to securely mount them onto your gaming desk. Use the appropriate screws or attachments provided, ensuring a stable and secure attachment.
- Arrange the accessories: Arrange the mounted accessories in a way that suits your needs and preferences. Consider factors such as accessibility, convenience, and comfort while positioning them on your desk.
- Test the stability: Gently apply pressure to the mounted accessories to ensure they are securely attached and stable. Make any necessary adjustments to enhance stability if required.
By following these steps, you will be able to effectively mount your gaming accessories onto your Atlantic gaming desk. Having your accessories within reach will enhance your gaming experience and keep your desk organized and clutter-free. Refer to the instructions provided with your gaming accessories for any specific guidance or details.
Step 6: Cable Management
Cable management is essential to keep your gaming setup neat, organized, and free from tangled wires. Follow these steps to effectively manage the cables on your Atlantic gaming desk:
- Identify cable routing options: Take note of the available cable routing options on your gaming desk. Look for built-in cable management features such as cable channels, clips, or grommets.
- Gather your cables: Collect all the cables that need to be managed, including power cords, USB cables, and audio cables. Untangle them and ensure they are in good condition.
- Group and organize cables: Group cables based on their function or destination. Use cable ties or Velcro straps to secure the cables together and prevent them from tangling.
- Use cable routing options: Utilize the cable routing options provided by your gaming desk, such as cable channels or clips, to guide and secure the cables in place.
- Route cables behind the desk: Whenever possible, direct the cables behind the desk to keep them out of sight. Use adhesive cable clips or cable sleeves to hold them in place and prevent them from hanging or dangling.
- Label the cables: To easily identify and manage the cables, consider labeling them using cable tags or labels. This will make future adjustments or additions to your gaming setup much easier.
- Secure cables to the desk: Use adhesive cable clips or cable management trays to secure the cables to the underside or back of your gaming desk. This will prevent them from shifting or falling out of place.
By following these steps, you can effectively manage the cables on your Atlantic gaming desk, creating a clean and organized setup. This not only improves the aesthetics of your gaming area but also makes it easier to access and manage your devices. Experiment with different cable management techniques to find the best approach for your specific gaming desk model and setup.
Step 7: Finishing Touches
Now that you’ve assembled your Atlantic gaming desk and managed the cables, it’s time to add those final touches to personalize and optimize your gaming experience. Follow these steps to add the finishing touches to your gaming setup:
- Clear and clean the desk: Clear off any debris or tools from the desk surface and give it a final wipe-down with a clean cloth. This will ensure a clean and presentable gaming space.
- Organize your gaming accessories: Arrange your gaming accessories in a way that maximizes comfort and accessibility during gameplay. This could include placing your keyboard, mouse, and other peripherals in comfortable positions.
- Customize the lighting: Consider adding LED lighting strips or other ambient lighting to enhance the aesthetics of your gaming desk. Experiment with different colors and effects to create a personalized gaming atmosphere.
- Personalize your desk: Add personal touches such as gaming posters, artwork, or figurines to make your gaming desk truly reflect your personality and interests.
- Keep essentials within reach: Arrange items such as drinks, snacks, and tissues in a convenient and accessible location on your desk. This will minimize distractions and keep you focused during gameplay.
- Ergonomic adjustments: Make any necessary ergonomic adjustments to ensure optimal comfort during long gaming sessions. This could include adjusting the height of your chair, the position of your monitor, and the placement of your keyboard and mouse.
By following these steps, you can add those final touches to your Atlantic gaming desk, creating a personalized and optimized gaming setup. Remember that personal preferences and comfort play a significant role in these finishing touches, so feel free to customize your gaming desk to suit your unique style and gaming needs.
Step 8: Testing and Adjustments
After completing the assembly and customization of your Atlantic gaming desk, it’s important to thoroughly test its functionality and make any necessary adjustments. Follow these steps to ensure your desk is in optimal condition:
- Test the stability: Apply pressure to various parts of the desk to check for any signs of instability or wobbling. If needed, tighten any loose screws or connections to improve stability.
- Check the alignment: Use a level to ensure that the desk is properly aligned and balanced. Adjust the legs or supports if necessary to achieve a level surface.
- Test the cable management: Ensure that the cables are properly organized and secured. Check for any loose cables and reposition or secure them accordingly.
- Monitor placement and adjustment: Evaluate the positioning and angle of your monitor. Make any necessary adjustments to ensure optimal viewing comfort and minimize eye strain.
- Ergonomic adjustments: Sit in your gaming chair and assess the ergonomics of your desk setup. Make adjustments to the chair height, monitor height, keyboard position, and mouse position to achieve a comfortable and healthy gaming posture.
- Test accessories and functionality: Test the functionality of any mounted gaming accessories, such as headphone holders or controller stands. Ensure that they are securely attached and function as intended.
- Take a test gaming session: Spend some time gaming to further assess the comfort and functionality of your Atlantic gaming desk. Note any areas that may need further adjustments or improvements.
- Make necessary adjustments: Based on your testing, make any required adjustments to the desk, accessories, or ergonomics. Continuously monitor and fine-tune the setup to ensure optimal performance and comfort.
By following these steps and conducting thorough testing, you can identify any issues with your Atlantic gaming desk and make the necessary adjustments to optimize its functionality and comfort. Remember that ongoing evaluation and adjustment are essential to ensure a top-notch gaming experience.