
Step 1: Accessing Your Email Settings
Blocking messages from a specific domain can vary depending on your email provider. In order to start the process, you’ll need to access your email settings. Here’s a step-by-step guide to help you navigate through this initial stage:
- Login to your email account using your credentials. This can typically be done by visiting the website of your email provider or using their dedicated application.
- Once logged in, locate the settings or preferences tab. This is usually represented by a gear icon or a menu option labeled “Settings”. Click on it to proceed.
- Scroll through the settings options until you find the “Filters” or “Blocking” section. This is where you can customize your email filtering options.
- If you’re using a web-based email client like Gmail, you may need to click on the “More Settings” or “Advanced Settings” option to access the desired settings.
- Some email providers may require you to navigate through multiple tabs or menus to find the appropriate section. Take your time to explore the interface until you locate the necessary settings.
It’s important to note that the specific steps may vary slightly depending on the email provider you’re using. If you’re unsure about how to access your email settings, consult the help documentation provided by your email service or contact their customer support for assistance.
Once you’ve successfully accessed your email settings, you’re ready to move on to the next step and find the block or spam filter option in your email provider. This will allow you to specify the domain you want to block and prevent any future messages from reaching your inbox.
Step 2: Finding the Block or Spam Filter Option in Your Email Provider
Now that you have accessed your email settings, the next step is to locate the block or spam filter option in your email provider. This feature allows you to set up filters that will automatically send unwanted emails from a specific domain to your spam folder or block them altogether. Follow these guidelines to find this option:
- In the settings or preferences section of your email account, look for the “Filters” or “Blocking” tab. This is where you can manage your email filters.
- Click on the “Filters” or “Blocking” tab to reveal the available options. In some email providers, you may find a pre-existing list of filters, while others may require you to create new filters.
- If you already have filters set up, navigate to the option that allows you to edit or add a new filter. This will take you to the filter creation page.
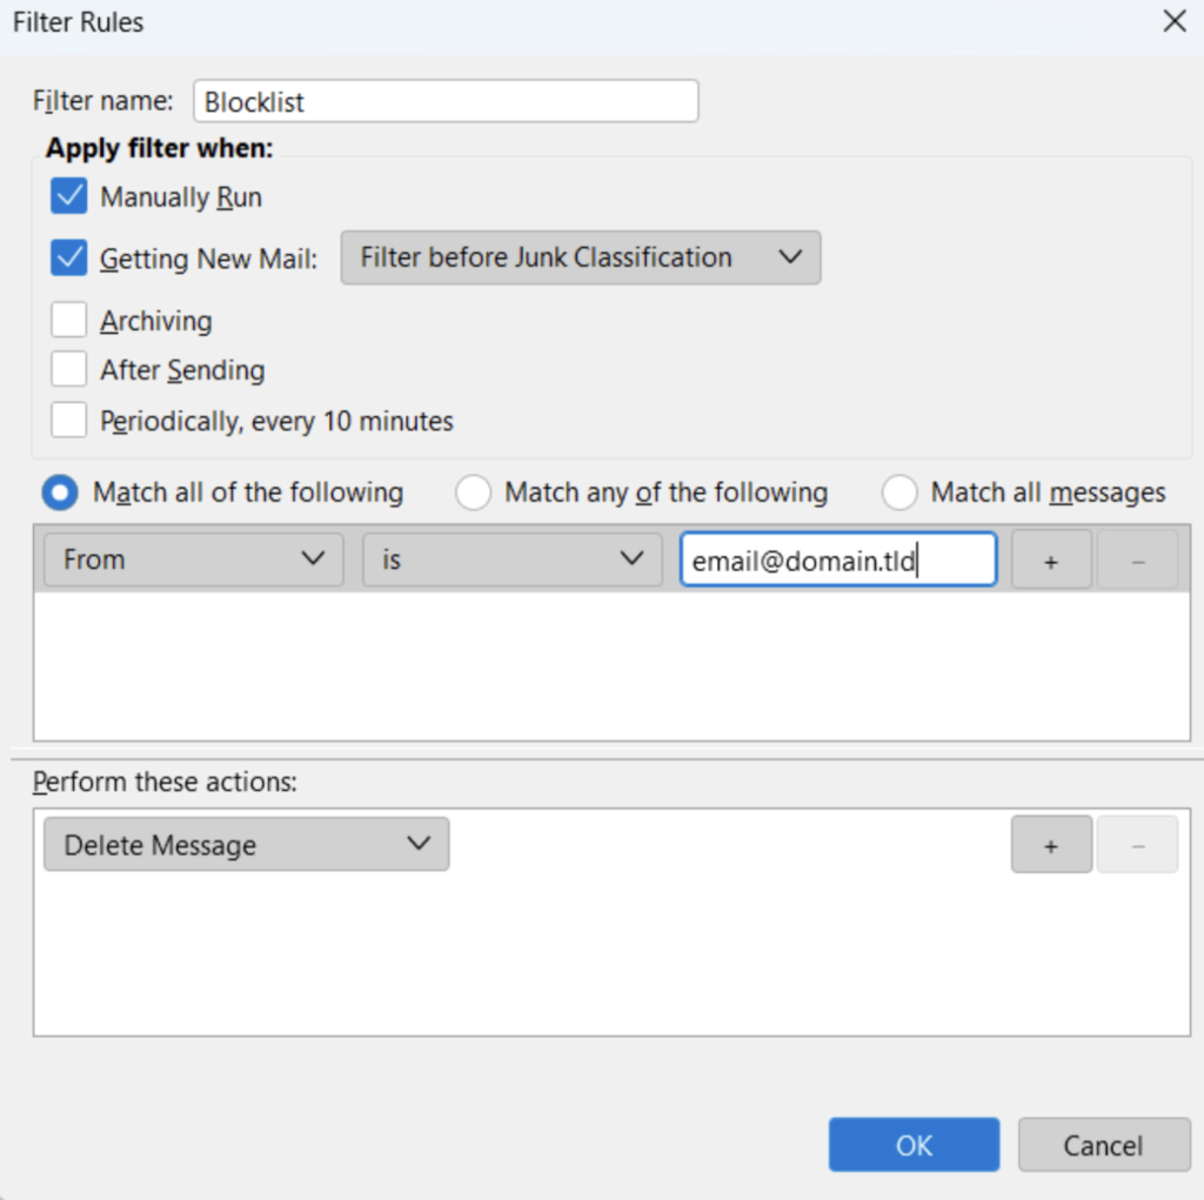
- If you don’t have any filters, you’ll need to create a new filter to block messages from a specific domain. Look for the option labeled “Create New Filter” or similar wording.
- Once you’re on the filter creation page, you’ll see a series of fields or checkboxes to customize your filter. Look for a field that allows you to specify the sender’s domain or email address.
- Enter the domain you want to block in the appropriate field. Make sure to include the “@domain.com” or “@subdomain.domain.com” format to ensure accurate blocking.
- Depending on your email provider, you may have additional options to further customize the filter. For example, you can choose to delete the blocked emails immediately, send them to the spam folder, or mark them as read without notification.
- After specifying the desired settings for your filter, save or apply the changes. This will activate the filter and start blocking incoming messages from the specified domain.
Remember, the exact steps and terminology used in your email provider may differ slightly, so refer to the help documentation or contact customer support if you encounter any difficulties in finding the block or spam filter option.
Once you have successfully found and set up the block or spam filter, you’re ready to proceed to the next step. This involves adding the sender’s domain to your blocked list and ensuring that the block is working effectively.
Step 3: Adding the Sender’s Domain to Your Blocked List
Now that you have located the block or spam filter option in your email provider, it’s time to add the sender’s domain to your blocked list. This step will ensure that any incoming messages from that domain are automatically blocked or sent to your spam folder. Follow these steps to add the sender’s domain to your blocked list:
- Access your email settings and navigate to the block or spam filter section as explained in the previous steps.
- Locate the option to manage your blocked list or add blocked senders. This is where you can specify the domains or email addresses you want to block.
- In the provided field, enter the domain you want to block. Make sure to include the “@domain.com” or “@subdomain.domain.com” format to accurately identify the sender’s domain.
- If your email provider allows you to block specific email addresses as well, you can add them separately or include them alongside the domain. This can be useful if you want to block specific individuals from the sender’s domain.
- Once you have entered the desired domains or email addresses, save or apply the changes to update your blocked list. This will ensure that any future messages from those domains are automatically filtered out.
It’s worth noting that adding a domain to your blocked list may slightly vary depending on your email provider’s interface. Some email clients offer additional options like wildcards or advanced settings to further refine your blocking criteria. Take your time to explore the available options and customize the block according to your preferences and needs.
With the sender’s domain successfully added to your blocked list, you can now move on to the next step and test the block to ensure it is working as intended.
Step 4: Testing the Block to Ensure It is Working
After adding the sender’s domain to your blocked list, it’s crucial to test the block to ensure that it is functioning properly. By carrying out this step, you can verify whether the block is effectively preventing messages from the specified domain from reaching your inbox. Follow these guidelines to test the block:
- Ask a trusted contact or a secondary email account to send a test message from the blocked domain to your email address.
- Check your inbox and spam folder to see if the test message is successfully blocked or filtered. If the message still appears in your inbox, move to the next step.
- Double-check the settings in your email provider to ensure that the filter or block is correctly configured. Verify that the domain is accurately listed in your blocked senders or spam filter settings.
- If the test message is still not blocked, consider reviewing the instructions provided by your email provider’s help documentation or contact their customer support for further assistance.
- Once you have confirmed that the block is working as intended and the test message is properly filtered or blocked, you can proceed to the next step to adjust the block settings for future messages.
It’s important to note that testing the block is a critical step to ensure its effectiveness. By thoroughly checking the block, you can avoid any potential surprises and have confidence that unwanted messages from the specified domain will be effectively blocked in the future.
In the next step, you will learn how to adjust the block settings to customize the handling of blocked messages and ensure maximum control over your email filtering system.
Step 5: Adjusting Block Settings for Future Messages
Once you have successfully tested the block and confirmed that it is working as intended, you can proceed to adjust the block settings to further customize the handling of future messages from the blocked domain. This step allows you to fine-tune your email filtering system according to your personal preferences. Follow these steps to adjust the block settings:
- Access your email settings and navigate to the block or spam filter section as explained in the previous steps.
- Look for the option to manage your blocked list or edit the existing block settings. This is where you can modify the settings for the blocked domain.
- Review the available options and determine how you want your email provider to handle the blocked messages. Some common options include automatically deleting the blocked messages, sending them to the spam folder, or marking them as read.
- In some cases, you may have the option to create specific rules for the blocked domain. This can be useful if you want to have different handling for certain types of messages or if you want to control the behavior for specific senders within the blocked domain.
- Make the desired adjustments to the block settings based on your preferences. Ensure that the changes align with your desired email filtering strategy.
- Save or apply the changes to update the block settings for future messages.
By adjusting the block settings, you can have more control over how your email provider handles the blocked messages. This customization allows you to seamlessly manage your inbox and tailor the filtering system to meet your specific needs.
In the next step, you will learn about reporting persistent spam or harassment to your email provider, ensuring a safer and more enjoyable email experience.
Step 6: Reporting Persistent Spam or Harassment to Your Email Provider
While blocking messages from a specific domain is an effective way to filter out unwanted emails, there may be instances where you encounter persistent spam or harassment from other sources. In such cases, it’s important to report these issues to your email provider to address the problem. Follow these steps to report persistent spam or harassment:
- Access your email account settings and look for the “Help” or “Support” section. This is where you can find the necessary resources to report issues.
- Visit the support documentation or contact the customer support of your email provider to seek guidance on reporting persistent spam or harassment. They will provide you with specific instructions tailored to their platform.
- If available, utilize the “Report Spam” button provided within your email client to directly report spam emails. This helps train your email provider’s spam filters and improves their overall spam detection capabilities.
- If you’re experiencing harassment or receiving abusive messages, provide as much detail as possible when reporting the issue. Include the sender’s email address, specific message content, and any additional evidence that can support your complaint.
- Follow the instructions provided by your email provider to submit your report. They may have different channels for reporting spam or harassment, such as online forms, dedicated email addresses, or direct chat support.
- Monitor your email account for updates from your email provider regarding your report. They will inform you of any actions taken and provide further assistance if necessary.
By reporting persistent spam or harassment to your email provider, you not only protect yourself but also contribute to creating a safer email environment for other users. Email providers rely on user reports to improve their spam filters and take appropriate actions against abusive senders.
In the next and final step, you will discover the option of utilizing third-party tools that offer advanced blocking and filter options for enhanced email management.
Step 7: Utilizing Third-party Tools for Advanced Blocking and Filter Options
In addition to the built-in options provided by your email provider, there are third-party tools available that offer advanced blocking and filter options to further enhance your email management. These tools can provide additional features and customization capabilities to help you effectively block messages from specific domains. Follow these guidelines to utilize third-party tools:
- Research and identify reputable third-party tools that specialize in email filtering and blocking. Look for tools that are compatible with your email provider and offer the features you require.
- Visit the websites of the selected tools and explore their offerings. Pay attention to the features they provide, such as advanced filtering rules, domain-based blocking, and customizable settings.
- Read user reviews and testimonials to gauge the effectiveness and user-friendliness of the tools you are considering. Look for feedback on their ability to block messages from specific domains.
- Once you have chosen a third-party tool, sign up for an account or install the application according to the provided instructions. Some tools may require you to integrate them with your existing email account.
- After setting up the third-party tool, follow their user guide or documentation to configure the blocking and filter options. This typically involves specifying the domains or email addresses you want to block.
- Explore the additional features offered by the tool, such as advanced spam filtering, email categorization, or the ability to create complex filtering rules. Customize these settings to your preferences and needs.
- Regularly review and update the settings of your third-party tool as needed. This ensures optimal performance and effective blocking of messages from specific domains.
By utilizing third-party tools, you can empower yourself with advanced blocking and filter options that go beyond the capabilities provided by your email provider. These tools offer additional control and customization, giving you a higher level of protection against unwanted messages.
With this final step, you have successfully learned how to block messages from a specific domain using the available options provided by your email provider, as well as harnessing the power of third-party tools for enhanced email management. Implement these steps effectively to keep your inbox tidy and free from unwanted messages.