
Why Backing Up Contacts to Google is Important
Backing up contacts to Google is a crucial step in ensuring the safety and accessibility of your valuable contact information. In today’s digital age, where smartphones and electronic devices are an integral part of our lives, the risk of losing contacts due to device damage, theft, or software issues is a constant concern.
By backing up your contacts to Google, you create a secure and reliable backup copy of your contacts that is stored in the cloud. This means that even if you lose or replace your device, your contacts will remain safe and easily retrievable. This is especially important if you rely on your contacts for work or have extensive business or personal connections.
Another benefit of backing up contacts to Google is the seamless synchronization across multiple devices. Whether you switch to a new phone, tablet, or computer, having your contacts stored on Google ensures that you can easily access and update them from any device. This eliminates the need for manual transfer or input of contacts, saving you time and effort.
Moreover, by using Google as your contact backup solution, you can take advantage of its powerful search and organization features. Google Contacts offers advanced search capabilities and allows you to create custom labels, groups, and tags to organize your contacts in a way that is most convenient for you. This makes it easy to find specific contacts or create targeted lists for email campaigns or group messaging.
Additionally, backing up to Google provides an added layer of protection against accidental deletion or data loss. In the event that you accidentally delete a contact or if your device experiences a technical issue, your contacts will remain safe in the cloud and can be easily restored.
Lastly, with the increasing prevalence of cybersecurity threats, having your contacts backed up to Google ensures that your data is protected. Google’s security measures and data encryption protocols safeguard your contact information from unauthorized access or data breaches, giving you peace of mind.
Step 1: Open the Contacts App on Your Phone
The first step to backing up your contacts to Google is to open the Contacts app on your phone. The Contacts app is usually pre-installed on most smartphones and can be easily accessed from the home screen or the app drawer.
Once you locate the Contacts app icon, simply tap on it to launch the app. The Contacts app serves as the central hub for managing and organizing all your contact information.
Upon opening the Contacts app, you will be greeted with a list of your existing contacts if you have any. The app may also display tabs or options for different contact groups or categories, depending on the device and the version of the operating system.
If you have previously used the Contacts app to store your contacts on your phone, you will be able to see all the stored contacts within the app. This step is necessary to ensure that you have all your contacts available for the backup process.
In some cases, the Contacts app may require you to sign in to your Google account before proceeding. If prompted, enter your Google account credentials to log in. This step is necessary to establish a connection between the Contacts app and your Google account, which will enable the backup process.
Additionally, you may have the option to customize the display settings of the Contacts app, such as choosing how your contacts are organized and displayed. Take a moment to explore the app’s settings and personalize it according to your preferences.
Once you have successfully opened the Contacts app and ensured that all your contacts are visible, you are ready to proceed to the next step of backing up your contacts to Google.
Step 2: Access Settings within the Contacts App
After opening the Contacts app on your phone, the next step is to access the settings menu within the app. The settings menu allows you to configure various options and preferences related to managing and backing up your contacts.
To access the settings menu, look for an icon that resembles three vertical dots or three horizontal lines, typically located in the top-right or bottom-right corner of the Contacts app screen. This icon represents the menu button, and tapping on it will open a drop-down or slide-out menu.
Once the menu is open, scroll through the options and look for a section labeled “Settings.” This section may be located at the top, middle, or bottom of the menu, depending on the app’s design.
Tap on the “Settings” option to enter the settings menu. Within the settings menu, you will find a range of options and preferences that you can customize to suit your needs. These settings may include display options, contact merging or linking options, and import/export settings.
Depending on your device and the version of the operating system, you might need to navigate through additional submenus within the settings menu to find the specific options related to contact backup. These submenus could be labeled as “Backup & Restore,” “Import/Export,” or “Accounts,” among others.
Take your time to explore the options within the settings menu and familiarize yourself with the available features. This will allow you to make informed decisions and ensure that you are utilizing the full potential of the Contacts app.
Once you have accessed the settings menu and located the appropriate options for contact backup, you’re ready to move on to the next step: selecting the “Import/Export” option.
Step 3: Select “Import/Export” from the Settings Menu
After accessing the settings menu within the Contacts app, the next step in backing up your contacts to Google is to select the “Import/Export” option. This option allows you to manage the import and export of your contact data, including the ability to export contacts to Google.
Once you are in the settings menu of the Contacts app, look for the “Import/Export” option. This option is typically listed among the various settings and preferences within the menu. It may be labeled as “Import/Export” or simply “Export.”
Tap on the “Import/Export” option to proceed. This will open a new screen or submenu with different import and export options for your contact data.
Within the “Import/Export” screen, you may encounter multiple options, such as importing contacts from a SIM card, SD card, or another device. However, for the purpose of backing up contacts to Google, we will focus on the export options.
Look for an option that allows you to export contacts to your Google account or to a storage location. This option could be labeled as “Export to Storage,” “Export to Google,” or similar wording.
Select the appropriate export option, which in this case would be exporting to your Google account. This will initiate the process of exporting your contacts from the device and saving them to your Google account in the cloud.
It’s worth mentioning that the wording and appearance of these options may vary depending on the device and the version of the Contacts app. In some cases, you may be prompted to choose the format for exporting contacts, such as a vCard (.vcf) file or a CSV file.
Once you have selected the “Import/Export” option, with a focus on exporting to your Google account, you’re ready for the next step: choosing the specific Google account to export your contacts.
Step 4: Choose the “Export to Storage” Option
After selecting the “Import/Export” option within the Contacts app settings, the next step in backing up your contacts to Google is to choose the “Export to Storage” option. This option enables you to export your contacts from your device and save them to a storage location.
Within the “Import/Export” screen or submenu, look for the option that specifically mentions “Export to Storage.” This option might be listed among other export options, such as exporting to a SIM card, SD card, or another device.
Tap on the “Export to Storage” option to proceed with the backup process. This will initiate the export of your contacts from the device to a file that can be saved and transferred to other storage locations.
The “Export to Storage” option is typically the preferred method for backing up contacts to Google, as it allows for a seamless and efficient backup process. By exporting to storage, you create a file containing all your contacts that can be easily transferred and synced with your Google account.
It’s important to note that the appearance and labeling of the “Export to Storage” option may vary depending on the device and the version of the Contacts app. In some cases, you may be prompted to choose the file format for exporting contacts, such as a vCard (.vcf) file or a CSV file.
Choose the desired file format, or use the default option, and proceed with the export. The Contacts app will then begin the process of exporting your contacts to the chosen storage location.
Once the export is complete, you will receive a notification or confirmation indicating the success of the backup process. It is advisable to take note of this confirmation or keep it for future reference.
With the “Export to Storage” option selected and the contacts exported, you are now ready for the next step: choosing the Google account to which you want to export your contacts.
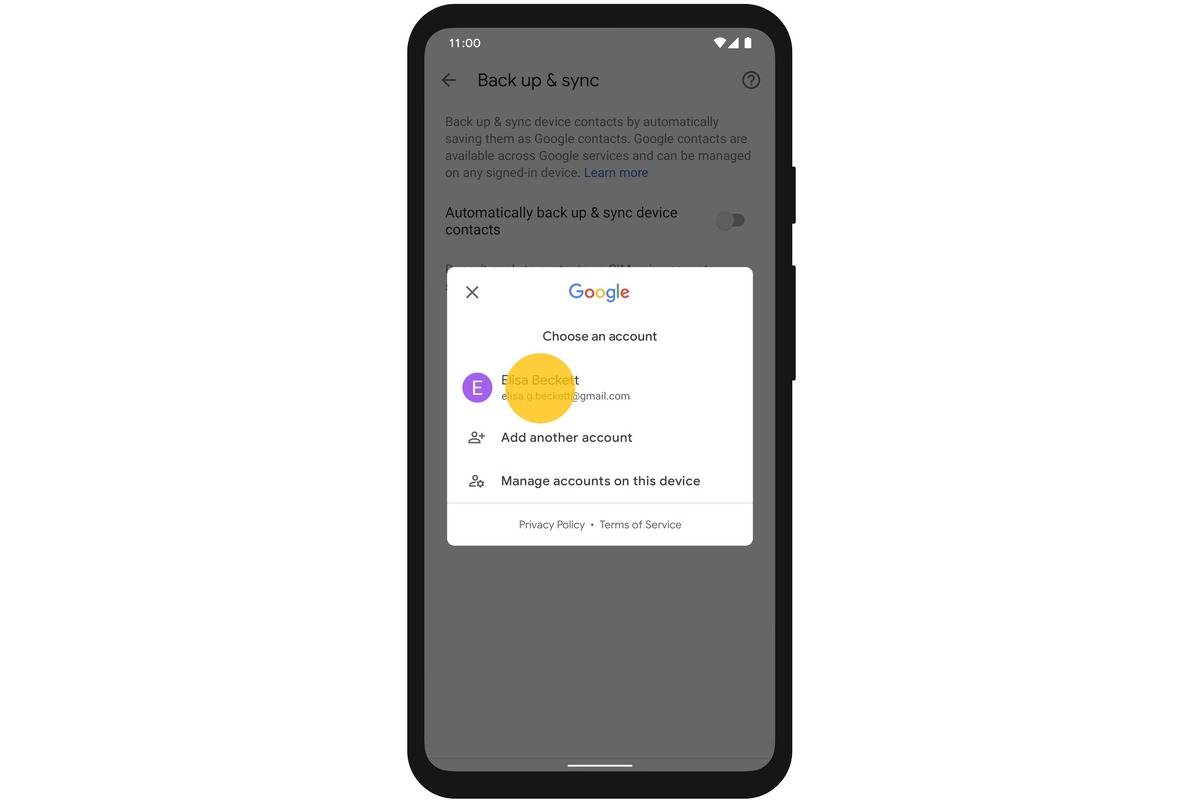
Step 5: Choose the Google Account to Export Contacts
After selecting the “Export to Storage” option within the Contacts app settings, the next step in backing up your contacts to Google is to choose the specific Google account to which you want to export your contacts. This step ensures that your contacts are securely stored and accessible across all devices associated with that Google account.
Once you have initiated the export process, the Contacts app will display a list of available Google accounts linked to your device. This list may include multiple accounts if you have set up more than one Google account on your device.
Review the list of Google accounts and identify the one that you want to use for exporting your contacts. Consider factors such as which account is most frequently used or is associated with the devices and applications you commonly use.
Tap on the desired Google account to continue. The Contacts app will then proceed with exporting your contacts to the selected Google account.
It’s worth noting that if you do not see your desired Google account on the list, you may need to add it to your device’s accounts settings. This can usually be done within the device’s system settings under the “Accounts” or “Users & Accounts” section.
Alternatively, if you want to export your contacts to a different Google account that is not currently listed, you can choose the “Add Account” option within the Contacts app and follow the prompts to add the desired Google account to your device.
Once you have selected the appropriate Google account for exporting your contacts, the Contacts app will proceed with transferring your contacts to that Google account. The app may display a progress bar or notification to indicate the status of the export process.
After the contacts have been successfully exported to your chosen Google account, you will be ready for the next step: accessing your Google account on a computer to verify that the contacts have been imported.
Step 6: Click “Export” to Begin Exporting the Contacts
After selecting the specific Google account to which you want to export your contacts, the next step in backing up your contacts to Google is to click the “Export” button. This step initiates the transfer of your contacts from the device to your chosen Google account.
Within the Export to Storage screen or submenu, you will typically find a button labeled “Export” or a similar term to begin the export process. Look for this button and tap on it to proceed with exporting your contacts.
When you click the “Export” button, the Contacts app will start the process of transferring your contacts to the selected Google account. The app may display a progress bar, notification, or other visual indicators to provide updates on the export process.
Depending on the number of contacts you have and the speed of your device, the export process may take a few seconds or a few minutes to complete. It’s important to ensure that your device remains powered on and connected to a stable internet connection during this time.
During the export process, the Contacts app will securely transmit your contact data to your Google account. This data will then be stored in Google’s cloud servers, making it accessible from any device connected to the same Google account.
It’s recommended to monitor the progress of the export process and wait for the app to display a confirmation or success message. This confirmation indicates that the export has been completed and your contacts have been successfully transferred to your Google account.
Once you have received the confirmation, you can proceed to the next step: accessing your Google account on a computer to verify that the contacts have been imported.
By clicking the “Export” button, you have taken a significant step in ensuring the safety and accessibility of your contacts. With your contacts now securely backed up in your Google account, you can have peace of mind knowing that your valuable contact information is protected and easily retrievable.
Step 7: Confirm the Export in the Notification Bar
After clicking the “Export” button to initiate the export process, the Contacts app will start transferring your contacts to your chosen Google account. During and after the export process, you may receive notifications in the notification bar of your device confirming the status and success of the export.
As the export progresses, you may see a progress bar or a percentage indicator in the notification bar, showing how much of the export has been completed. This allows you to track the progress of the export, giving you an idea of how long it will take before it finishes.
It’s important to be patient and allow the export process to complete without interruption. Do not close the Contacts app or turn off your device during the export, as this could disrupt the process and potentially lead to incomplete or unsuccessful contact backup.
Once the export process is finished, you will usually receive a notification in the notification bar indicating the successful completion of the export. This notification may include a message such as “Contacts exported to [Google account name]” or “Export completed successfully.”
Make sure to check the notification bar for any such confirmation message. You may need to expand or swipe down the notification shade to view the full details of the notification.
If you see a notification confirming the successful export of your contacts, this is a positive indication that your contacts have been securely backed up to your Google account. This means that you can access your contacts from any device connected to the same Google account, ensuring their safety and accessibility.
On the other hand, if you do not receive a notification or if you encounter an error or failure message in the notification bar, it’s important to troubleshoot the issue. Double-check your internet connection, verify that you have selected the correct Google account, and ensure that your device has enough storage space to accommodate the exported contact data.
If you encounter any issues during the export process or if you do not receive a confirmation notification, you may need to repeat the export steps or seek technical assistance to resolve the problem.
Once you have confirmed the successful export in the notification bar, you can proceed to the next step: accessing your Google account on a computer to verify that the contacts have been imported.
Step 8: Access Your Google Account on a Computer
After successfully exporting your contacts to your Google account, the next step in the process of backing up your contacts is to access your Google account on a computer. This step allows you to verify that the contacts have been imported and are available for access and management.
To access your Google account on a computer, open a web browser and go to the Google homepage. At the top right corner of the page, click on the “Sign In” button to log in to your Google account using your username and password.
After entering your login credentials, you will be directed to the Google account homepage, which displays various Google services and features. Look for the icon or link that represents Google Contacts, such as a grid of squares or the word “Contacts” itself.
Click on the Google Contacts icon or link to open the Google Contacts webpage. This will take you to the Google Contacts interface, where you can view, manage, and organize your contacts directly from your computer.
Once you are in the Google Contacts interface, take a moment to explore the features and options available. You will see a list of your contacts, which should include the contacts that you recently exported from your phone.
Verify that all the contacts you expected to be exported are present in the Google Contacts interface. You can scroll through the list, search for specific contacts using the search bar, or navigate different sections or labels to locate specific contacts or groups.
If you notice that some contacts are missing or if any discrepancies exist between the phone contacts and the Google contacts, make sure to compare them and investigate further.
At this stage, it’s also a good idea to ensure that the contact details and information are accurate and up to date. You can make edits, additions, or modifications to the contacts directly in the Google Contacts interface to ensure that your contact information is current.
Accessing your Google account on a computer provides a convenient way to manage and organize your contacts, allowing you to easily make changes, add new contacts, or delete outdated ones.
By successfully accessing your Google account on a computer and verifying the presence of your contacts in the Google Contacts interface, you can be confident that your contacts have been securely backed up in the cloud and are ready for access and synchronization across multiple devices.
Step 9: Open Google Contacts on Your Computer
After accessing your Google account on a computer, the next step in the process of backing up your contacts is to open Google Contacts. Opening Google Contacts on your computer allows you to manage and organize your contacts in a convenient and user-friendly interface.
To open Google Contacts, ensure that you are still signed in to your Google account on your computer. If you are not, visit the Google homepage and click on the “Sign In” button at the top right corner. Enter your Google account credentials to sign in.
Once you are signed in, navigate to the Google Apps menu, which is usually represented by a grid of squares in the top right corner of the screen. Click on this menu icon, and a drop-down menu will appear.
From the drop-down menu, locate and click on the “Contacts” icon or the text link that says “Contacts.” This action will open Google Contacts in a new tab or window of your web browser.
After the Google Contacts page loads, you will be presented with the main interface, which displays your contact list. This list will include the contacts that you have previously exported from your device to your Google account.
Take a moment to explore the various features and options available in Google Contacts. You can search for specific contacts using the search bar at the top of the screen, create new contacts, edit existing ones, and organize your contacts into groups and labels.
The Google Contacts interface provides a user-friendly experience, allowing you to easily navigate through your contact list, view contact details, and update information as needed.
Ensure that all of the contacts you exported from your device are present in the Google Contacts interface. Take the time to review the contact information and verify that it matches your expectations. If you notice any discrepancies or missing contacts, you may need to troubleshoot the export process or revisit the steps you followed previously.
By opening Google Contacts on your computer, you have successfully accessed the platform that allows you to manage your contacts outside of your smartphone or device. This provides a seamless and efficient way to keep your contacts organized and synced across all your devices.
With Google Contacts open on your computer, you’re ready to proceed to the next step, which involves verifying that your contacts have been successfully imported to Google.
Step 10: Verify that the Contacts Have Been Imported to Google
After opening Google Contacts on your computer, the next step in the process of backing up your contacts is to verify that the contacts have been successfully imported to your Google account. Verifying the import ensures that your contacts are securely stored and accessible across all devices connected to your Google account.
When you are in the Google Contacts interface, take a moment to review your contact list. Scroll through the contacts or use the search bar to locate specific contacts you expect to find. Confirm that all the contacts you exported from your device are present in the Google Contacts list.
Check each contact entry to make sure that the contact information, such as names, phone numbers, and email addresses, has been accurately imported. If you notice any missing or mismatched information, you may need to review the export process or update the contacts manually within Google Contacts.
One way to ensure that the contacts have been imported correctly is to compare the list of contacts in Google Contacts with the list on your device. You can do this by opening the Contacts app on your phone or device and cross-referencing the contacts displayed there with the contacts in Google Contacts on your computer.
Additionally, you can test the accessibility and synchronization of the contacts by adding or modifying a contact on your device and checking if the changes are reflected in Google Contacts on your computer. This will ensure that any updates or changes to your contacts are successfully synced across all devices and platforms.
If you find any discrepancies between the contacts on your device and the contacts in Google Contacts, you may need to revisit the export process or check for any potential issues with the synchronization or connection between your device and your Google account.
Verifying the import of your contacts to Google is an essential step to ensure the successful backup and synchronization of your contact information. By confirming that your contacts are accurately imported and accessible in Google Contacts, you can have peace of mind knowing that your valuable contact data is securely stored and ready for use on any device connected to your Google account.
Once you have verified the import of your contacts to Google, you are ready for the next step, which involves enabling automatic syncing to keep your contacts backed up and up to date across all devices.
Step 11: Enable Automatic Syncing to Keep Contacts Backed Up
After verifying that your contacts have been successfully imported to Google, the next step in the process of backing up your contacts is to enable automatic syncing. Enabling automatic syncing ensures that any changes or updates you make to your contacts on one device will be automatically reflected on all devices connected to your Google account.
To enable automatic syncing, you will need to access the settings on your device. The process may differ slightly depending on the device and operating system, but the general steps remain similar.
On most Android devices, open the Settings app and scroll down to find the “Accounts” or “Users & Accounts” section. Tap on this section to view the accounts associated with your device, including your Google account.
Tap on your Google account and look for the option to sync various types of data, including contacts. Ensure that the switch or checkbox for syncing contacts is turned on. This allows your device to automatically sync changes made to your contacts with the contacts stored in your Google account.
For iOS devices, open the Settings app and scroll down to locate the “Passwords & Accounts” or “Mail, Contacts, Calendars” section. Tap on this section to access your account settings.
Find your Google account and tap on it. Look for the option to sync contacts, and make sure it is toggled on. This enables automatic syncing between your device’s contact app and your Google account.
Enabling automatic syncing not only ensures that your contacts are consistently backed up to your Google account but also allows for seamless access and management of contacts across multiple devices.
If you make any changes or additions to your contacts on your phone, tablet, or computer, these changes will automatically sync to your Google account, making sure that your contacts are always up to date.
Furthermore, if you ever switch to a new device or need to restore your contacts, you can simply sign in to your Google account on the new device, and your contacts will be automatically synced and available for access.
By enabling automatic syncing, you are taking an important step towards ensuring the ongoing backup and synchronization of your contacts. This feature provides convenience and peace of mind knowing that your contacts will always be backed up and accessible on any device connected to your Google account.
With automatic syncing enabled, you can move on to the next step, which involves periodically checking and updating your contacts in Google to keep them up to date.
Step 12: Periodically Check and Update Your Contacts in Google
The final step in the process of backing up your contacts to Google is to periodically check and update your contacts within Google to ensure they remain accurate and up to date. Regularly reviewing and managing your contacts helps maintain the integrity and usefulness of your contact list.
To do this, access Google Contacts on your computer or any device connected to your Google account. Open the Google Contacts interface and review the contact list to identify any changes or updates that need to be made.
First, check for any new contacts that may have been added or imported into your Google account since the last backup. Review these contacts to ensure they are correctly labeled and contain accurate information.
Next, verify the accuracy of the existing contacts. Check for any outdated or incorrect information, such as outdated phone numbers or email addresses. Make the necessary updates and corrections to ensure the contact details are up to date.
During this review process, it’s also helpful to organize your contacts using labels and groups. Consider creating specific labels for different categories, such as work, family, friends, or specific projects or events. Assign contacts to the relevant labels to keep your contacts organized and easily searchable.
Additionally, take advantage of the search and filter features in Google Contacts to locate specific contacts or groups of contacts quickly. Use the search bar to find contacts by name, company, or any other relevant keyword.
Periodically reviewing and updating your contacts within Google ensures that your contact list remains accurate and relevant. It also helps to streamline your communication by having the most up-to-date information readily available.
Remember to sync your devices regularly to ensure that any changes made in Google Contacts are reflected across all your connected devices. By syncing, you ensure that all changes and updates are applied consistently and keep your contact list unified and synchronized.
By periodically checking and updating your contacts in Google, you can ensure that your backup is comprehensive, accurate, and reflects the most current information. This proactive approach helps maintain the integrity and usefulness of your contacts and ensures that you have a reliable and up-to-date backup for peace of mind.
Congratulations! You have completed the 12-step process for backing up your contacts to Google. By following these steps and periodically reviewing and updating your contacts, you can ensure that your valuable contact information remains safe, accessible, and up to date.