
What is an extension number?
An extension number is a numeric code used within a telephone system to reach a specific individual or department within an organization. It is commonly used in business settings where multiple phone lines are managed by a central phone system. Each extension number is unique and corresponds to a specific employee or department.
Extension numbers are typically used to efficiently handle large volumes of incoming calls and ensure that they are routed to the appropriate destination. Instead of having separate phone lines for each individual or department, an extension number allows callers to directly reach the intended recipient without going through a receptionist or operator.
Extension numbers are often assigned sequentially or based on specific criteria, such as department or location. For example, a company’s sales department might have extension numbers starting with “2,” while the marketing department’s extension numbers might start with “3.”
Extension numbers can vary in length, depending on the phone system in use. They can be as short as two digits or can contain more than four digits. The purpose of the extension number is to create a unique identifier that quickly connects callers to their desired destination.
Moreover, extension numbers may be accompanied by an automated voicemail service or call forwarding, enabling callers to leave messages or connect to an alternate person if the intended recipient is unavailable.
Overall, extension numbers play a crucial role in streamlining communication within an organization. They make it easier for callers to reach the right person or department promptly, enhancing efficiency and productivity in a business setting.
Why would you want to automatically dial extensions?
Automatically dialing extensions can be a time-saving and convenient feature, especially in scenarios where you frequently need to call specific individuals or departments within an organization. Here are some reasons why you might want to utilize this functionality:
- Efficiency: Dialing extensions manually can be time-consuming, especially if you need to call different extensions repeatedly. By automating the process, you can save valuable time and increase productivity.
- Streamlined communication: Automatically dialing extensions ensures that you reach the intended recipient directly, without the need for manual transfers or going through a receptionist. It eliminates the possibility of miscommunication or getting stuck in a phone tree.
- Improved customer service: If you are in a customer-facing role, being able to quickly dial extensions can enhance the experience for your customers. It allows you to promptly connect them to the right department or person, resulting in faster resolutions and a higher level of service.
- Consistency: By using automatic extension dialing, you can ensure that you always utilize the correct extension for a particular employee or department. This eliminates the chances of dialing the wrong number or misdialing, which can lead to potential communication delays.
- Convenience: Dialing extensions manually can be tedious, especially if you have to remember or look up numerous extension numbers. With automatic extension dialing, you can store and access these numbers easily, making the calling process more convenient and hassle-free.
Whether you are a busy professional, a customer service representative, or simply someone who needs to frequently communicate with colleagues within your organization, the ability to automatically dial extensions can greatly simplify and expedite the calling process. It allows you to make efficient use of your time and ensures that your communication is accurate and effective, benefiting both you and the recipients of your calls.
How does the Android phone system handle extensions?
The Android phone system is designed to handle extensions seamlessly, allowing users to easily dial extension numbers and connect with the intended recipient. Here’s how it works:
When making a call on an Android phone, you can directly input the extension number after dialing the main phone number. By default, the Android phone system treats the extension number as part of the phone number and sends it along with the call. However, you need to utilize specific methods to inform the phone system that an extension is being dialed.
There are several methods you can use to indicate an extension when dialing a number on an Android phone:
- Method 1: Using a comma as a pause
- Method 2: Using a semicolon
- Method 3: Using a dedicated extension dialer app
- Method 4: Setting up speed dial for extensions
- Method 5: Utilizing the contacts app
You can insert a comma (“,”) after dialing the main phone number and before the extension number. The comma acts as a pause, giving the phone system a brief interval before dialing the extension. For example, if the main number is “555-123-4567” and the extension is “1234,” you would dial “555-123-4567,1234.”
An alternative method is to use a semicolon (“;”) instead of a comma. The semicolon acts as a separator between the main phone number and the extension. For example, you would dial “555-123-4567;1234” to connect to extension 1234.
There are also dedicated extension dialer apps available on the Google Play Store. These apps are designed specifically to handle extensions and provide a more streamlined dialing experience. They usually provide a separate field to input the extension number, allowing for easier and more efficient calling.
Another way to handle extensions on an Android phone is by setting up speed dial shortcuts. You can assign specific numbers or contacts to speed dial slots and include the extension number in the contact details. This way, you can quickly dial the desired contact and have the extension dialed automatically.
You can also save contacts with their extension numbers in the contacts app on your Android phone. When you want to call someone with an extension, simply select their contact from the app, and the phone system will automatically dial the extension after connecting to the main phone number.
These methods allow the Android phone system to handle extensions efficiently, ensuring that calls are properly routed to the intended recipients within an organization. By utilizing these techniques, you can easily navigate through phone trees and connect with the right person or department without any hassle.
Method 1: Using a comma as a pause in the phone number
One way to handle extensions on an Android phone is by using a comma as a pause in the phone number. This method allows you to input the main phone number followed by a comma and then the extension number. Here’s how it works:
When dialing a phone number with an extension, you can insert a comma (“,”) after the main phone number. The comma acts as a pause, signaling the Android phone system to briefly wait before dialing the extension. For example, if the main phone number is “555-123-4567” and the extension is “1234,” you would dial “555-123-4567,1234.” The comma tells the phone system to wait for a moment before automatically dialing the extension number.
By using the comma as a pause, the Android phone system ensures that the call connects to the main phone number first, allowing any automated systems or IVRs to be navigated. Once the connection is established, the phone system automatically dials the extension number and bridges the call to the desired recipient.
This method is particularly useful when navigating through phone trees, automated menus, or interactive voice response (IVR) systems. By adding a comma after dialing the main phone number, you give the system time to process the initial connection and then smoothly transfer the call to the extension. It eliminates the need for manual transfers or interaction with a human operator.
It’s important to note that the specific time duration of the pause may vary depending on the Android phone model and software version. However, the default timing is generally sufficient for most phone systems to recognize the comma as a pause and proceed to dial the extension.
Using a comma as a pause in the phone number simplifies the process of dialing extensions on an Android phone. It enables you to seamlessly connect with the intended recipient within an organization without the need for additional manual steps. By taking advantage of this method, you can navigate phone systems efficiently and ensure that calls are properly routed to the desired extensions.
Method 2: Using a semicolon to specify an extension
Another method to handle extensions on an Android phone is by using a semicolon to specify the extension directly in the phone number. This method allows you to input the main phone number followed by a semicolon and then the extension number. Here’s how it works:
When dialing a phone number with an extension, you can insert a semicolon (“;”) after the main phone number. The semicolon acts as a separator, indicating that the following digits are the extension number. For example, if the main phone number is “555-123-4567” and the extension is “1234,” you would dial “555-123-4567;1234.” The semicolon tells the Android phone system that the number following it is the extension.
By using the semicolon to specify the extension, the Android phone system recognizes that the digits following the semicolon are part of the extension number. This allows the system to automatically dial the main phone number and then seamlessly connect to the desired extension.
Using a semicolon to specify the extension is particularly useful when saving phone numbers or creating speed dial shortcuts. It allows you to store contacts with their respective extensions, simplifying the calling process. When you select a contact with an extension from your phone’s address book or speed dial list, the Android phone system automatically dials the main phone number and proceeds to the specified extension without any additional input required.
It’s worth noting that not all phone systems or applications may recognize the semicolon as a valid separator for extensions. In such cases, you may need to resort to other methods like using a comma or utilizing a dedicated extension dialer app.
Using a semicolon to specify an extension offers a straightforward and efficient way to dial extensions on an Android phone. It simplifies the process of connecting with specific individuals or departments within an organization and eliminates the need for manual transfers or additional input during the call. By utilizing this method, you can ensure that your calls are properly routed and effortlessly reach their intended recipients.
Method 3: Using a dedicated extension dialer app
Another effective way to handle extensions on an Android phone is by using a dedicated extension dialer app. These apps are specifically designed to streamline the process of dialing extensions and provide a more seamless calling experience. Here’s how this method works:
Dedicated extension dialer apps, available on the Google Play Store, offer a simple and intuitive interface for dialing extensions. These apps allow you to input the main phone number and then provide a separate field to enter the extension number. By filling in the appropriate information and tapping the call button, the app automatically dials the main phone number and smoothly connects to the specified extension.
One of the advantages of using a dedicated extension dialer app is that it eliminates the need to manually input commas, semicolons, or memorize extension numbers. These apps provide a dedicated space where you can store and manage contacts with their respective extensions. This makes it quick and easy to locate and call individuals or departments without the hassle of navigating through phone systems or remembering extension numbers.
Additionally, these apps often offer additional features such as call history, favorites, and speed dial options. You can customize the app to suit your preferences and save frequently dialed extensions for even faster access. Some apps may also integrate with your phone’s contacts, allowing you to directly select contacts with extensions from your address book.
It’s important to note that there are several extension dialer apps available, each with its own set of features and user interfaces. Be sure to read reviews and choose a reputable app that suits your needs and preferences. Look for apps that have positive ratings, regular updates, and a user-friendly interface for the best experience.
By using a dedicated extension dialer app, you can simplify the process of dialing extensions on your Android phone. These apps provide a convenient and efficient way to handle extensions, ensuring that your calls are properly routed and connected to the intended recipients within an organization.
Method 4: Setting up speed dial for extensions
Setting up speed dial for extensions is another effective method to handle extensions on an Android phone. Speed dial allows you to assign specific numbers or contacts to speed dial slots, making it easier to dial extensions quickly. Here’s how to set up speed dial for extensions:
1. Open the Phone app on your Android phone.
2. Locate the settings or options menu, usually represented by three dots or lines in the top-right corner of the screen. Tap on it to access the settings.
3. Look for an option called “Speed Dial” or “Speed Dial Settings.”
4. Tap on “Speed Dial” to enter the speed dial settings menu.
5. In the speed dial settings menu, you should see a list of available speed dial slots. Each slot corresponds to a number on the dial pad (usually 2 to 9). Tap on an empty slot to assign a contact to it.
6. A list of contacts from your address book should appear. Select the contact you want to assign to that speed dial slot. If the contact has an extension, make sure to include it in the contact details.
7. Repeat steps 5 and 6 for other speed dial slots, assigning contacts with extensions as needed.
Once you’ve set up speed dial for extensions, dialing them is simple. Just tap and hold the corresponding number on the dial pad for a few seconds, and it will automatically dial the assigned contact with the extension, bypassing the need to manually enter the entire phone number.
Speed dial for extensions is particularly useful when you frequently need to call specific individuals or departments. It saves you time and effort by eliminating the need to manually input phone numbers or extensions. With a single tap, you can quickly connect with the desired recipient within an organization.
Note that the steps to set up speed dial for extensions may vary slightly depending on the Android phone model and software version. If you’re unable to find the speed dial settings or encounter any issues, refer to your phone’s user manual or contact the manufacturer’s support for assistance.
By utilizing speed dial for extensions, you can streamline the calling process on your Android phone and ensure that your calls are efficiently routed to the correct individuals or departments within your organization.
Method 5: Utilizing the contacts app for extensions
Utilizing the contacts app on your Android phone is another convenient method to handle extensions effectively. By saving contacts with their respective extension numbers, you can easily dial them without the need to manually input the entire phone number each time. Here’s how to utilize the contacts app for extensions:
1. Open the contacts app on your Android phone. This app is usually represented by an icon that resembles a person or a silhouette.
2. Tap on the option to create a new contact or locate the existing contact you want to add an extension to.
3. Once you’re in the contact details page, find the field where you can input the phone number.
4. Enter the main phone number in the phone number field.
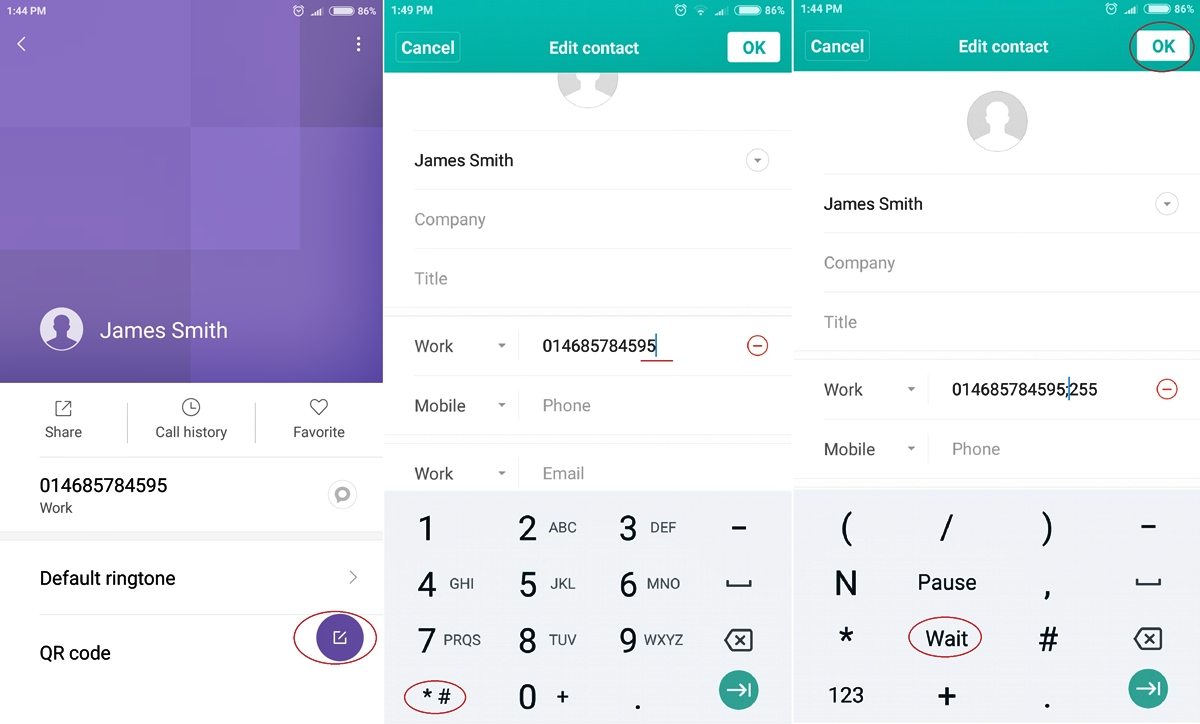
5. After entering the main phone number, add a separator such as a comma or a semicolon (depending on which method your phone system recognizes) followed by the extension number. For example, if the main phone number is “555-123-4567” and the extension is “1234,” you would enter “555-123-4567,1234” or “555-123-4567;1234”.
6. Save the contact with the added extension number.
Once you have saved a contact with the extension number, dialing it is as simple as selecting the contact from your contacts app and tapping on the phone number. The Android phone system will automatically recognize the extension and dial it after connecting to the main phone number.
Using the contacts app for extensions offers a convenient way to streamline the calling process on your Android phone. It eliminates the need to remember and manually input extension numbers each time you want to make a call. By utilizing this method, you can quickly and accurately dial extensions, ensuring that your calls are properly routed to the intended recipients within an organization.
It’s worth noting that the specific field or method for adding the extension number may vary slightly depending on the contacts app you’re using and the Android phone model and software version. If you encounter any difficulties, refer to your phone’s user manual or contact the manufacturer’s support for further guidance.
By utilizing the contacts app for extensions, you can simplify the calling process on your Android phone and ensure efficient communication with specific individuals or departments in your organization.
Common issues and troubleshooting tips
While handling extensions on an Android phone can be convenient, you may encounter some common issues along the way. Here are a few common issues and troubleshooting tips to help you overcome them:
- Extension not recognized: If the Android phone system is not recognizing the extension number, try using a different method to specify the extension, such as using a comma instead of a semicolon or vice versa.
- Incorrect dialing format: Ensure that the extension number is entered in the correct format. Double-check for any typos or missing digits, as even a small error can prevent the call from connecting.
- Phone system incompatibility: Some phone systems may not recognize certain methods, such as using a comma or semicolon to specify extensions. In such cases, consider using a dedicated extension dialer app that is compatible with your specific phone system.
- App compatibility issues: If you are using a dedicated extension dialer app, ensure that it is compatible with your Android phone model and software version. If you experience any compatibility issues, try using a different app or reaching out to the app developer for support.
- Network or coverage issues: Poor network or coverage can sometimes interfere with the successful connection of calls, including calls with extensions. Ensure that you have a stable internet connection or strong cellular signal when making calls with extensions.
- Double-check contact information: When utilizing the contacts app for extensions, make sure that the phone number and extension are correctly entered in the contact details. Check for any discrepancies or missing information that may cause dialing issues.
- Contact synchronization problems: If you’re experiencing issues with contacts not syncing properly across devices, ensure that your contacts are set to sync with your Google account or the appropriate cloud storage service. Try manually syncing your contacts or checking the sync settings to resolve any synchronization issues.
- Update phone software: Keeping your Android phone software up to date can help resolve any compatibility or performance issues related to handling extensions. Check for software updates regularly and install them as necessary.
- Contact technical support: If you have tried the above troubleshooting tips and are still experiencing issues with handling extensions on your Android phone, consider reaching out to your phone’s manufacturer or technical support team for further assistance. They may be able to provide more specific guidance based on your device and software version.
By being aware of these common issues and using the troubleshooting tips, you can resolve any challenges you might encounter while handling extensions on your Android phone. With a bit of patience and troubleshooting, you’ll be able to effectively dial extensions and connect with the desired recipients within your organization.