
Tools You Will Need
Adjusting a mesh watch band requires a few essential tools to ensure a smooth and hassle-free process. Before you begin, gather the following items:
- Spring bar tool: This tool is crucial for removing and inserting the pins that hold the links together on a mesh watch band. It typically features a pointed end for pushing the pins out and a forked end for holding and inserting them back into place.
- Small hammer or mallet: Sometimes, the pins can be quite stubborn and difficult to remove. A small hammer or mallet can provide the extra force needed to push them out.
- Pliers or tweezers: These tools come in handy for holding onto the pins as you remove them, as well as for handling any small components.
- Microfiber cloth: To protect the watch band from scratches, have a soft microfiber cloth on hand to lay it on while you work.
Having these tools readily available will make the process of adjusting your mesh watch band much easier and more efficient. It is important to note that the specific tools required may vary depending on the type and design of your watch band. Therefore, it’s always a good idea to consult the manufacturer’s guidelines or seek professional assistance if you’re unsure about the specific tools needed for your watch band.
Step 1: Determine how many links to remove
Before you start adjusting the mesh watch band, it’s important to determine how many links need to be removed to achieve the perfect fit. A properly sized watch band should sit comfortably around your wrist without being too loose or too tight.
There are a few methods you can use to determine the number of links to remove:
- Measure your wrist: Use a flexible measuring tape or a piece of string to measure the circumference of your wrist. Add about 0.5 to 1 inch (1.3 to 2.5 cm) to this measurement to allow for a comfortable fit. Keep in mind that mesh watch bands usually have minimal adjustability, so it’s better to err on the side of caution and remove fewer links.
- Try on the watch: Fit the watch around your wrist and fasten the clasp. Pay attention to how it feels – if it’s too loose or too tight, you’ll need to make adjustments. Remember that a properly fitted watch band should have a bit of wiggle room without sliding up and down your wrist.
- Seek professional advice: If you’re unsure about the correct number of links to remove, consider visiting a watch specialist or jeweler. They have the expertise to accurately assess the fit of your watch band and determine the appropriate number of links to remove, ensuring a comfortable and secure fit.
Once you have determined the number of links to remove, you can proceed to gather the necessary tools and begin the adjustment process. Taking the time to properly measure and assess the fit will result in a watch band that not only looks stylish but also feels comfortable on your wrist.
Step 2: Gather the necessary tools
Before you can start adjusting your mesh watch band, it’s important to gather all the necessary tools. Having the right tools on hand will make the process much easier and ensure that you can complete the adjustment accurately.
Here are the tools you will need:
- Spring bar tool: This specialized tool is essential for removing and inserting the pins that hold the links of the mesh watch band together. It typically features a pointed end for pushing the pins out and a forked end for holding and inserting them back into place.
- Small hammer or mallet: In some cases, the pins may be tightly secured and difficult to remove. A small hammer or mallet can provide the extra force needed to push them out and make the adjustment process smoother.
- Pliers or tweezers: These tools will come in handy for holding onto the pins as you remove them, as well as for handling any small components.
- Microfiber cloth: To protect your watch band from scratches, it’s a good idea to have a soft microfiber cloth nearby. You can lay the watch band on it while you work to keep it safe and clean.
Ensure that you have all these tools before starting the adjustment process. This will save you time and frustration, as you won’t have to interrupt your progress to search for missing tools. Additionally, using the right tools for the job will help avoid any potential damage to your watch band.
If you’re unsure about which tools to use or don’t have them readily available, consider seeking professional assistance. A watch specialist or jeweler will have the necessary tools and expertise to make the adjustment properly.
Step 3: Locate the adjustable clasp or pin
Once you have gathered all the necessary tools, the next step in adjusting your mesh watch band is to locate the adjustable clasp or pin. The exact location of this feature may vary depending on the design of your watch band.
Here are a few common locations to look for:
- On the clasp: Some mesh watch bands have a clasp with an adjustable mechanism. Look for small pins or buttons on the clasp itself which allow you to change the length of the band.
- On the side of the band: In certain designs, the adjustable feature can be found on the side of the watch band. It may appear as a small pin that can be pushed in to release the links.
- Hidden beneath a link: In more intricate mesh watch bands, the adjustable clasp or pin may be hidden beneath a specific link. Look for a removable link that is slightly different from the others or has a subtle release mechanism.
Refer to your watch’s user manual or contact the manufacturer if you’re having trouble locating the adjustable clasp or pin. They can provide specific instructions based on your watch’s unique design.
Once you have found the adjustable clasp or pin, you’re ready to move on to the next step: releasing the clasp and removing the necessary number of links to achieve a perfect fit.
Step 4: Push the pin to release the clasp
With the adjustable clasp or pin located, it’s time to release the clasp and remove the necessary links from your mesh watch band. This step requires pushing the pin in the right direction to disengage the clasp.
Follow these steps to release the clasp:
- Position your watch band securely on a flat surface, such as a workbench or a table covered with a microfiber cloth, to avoid scratching it.
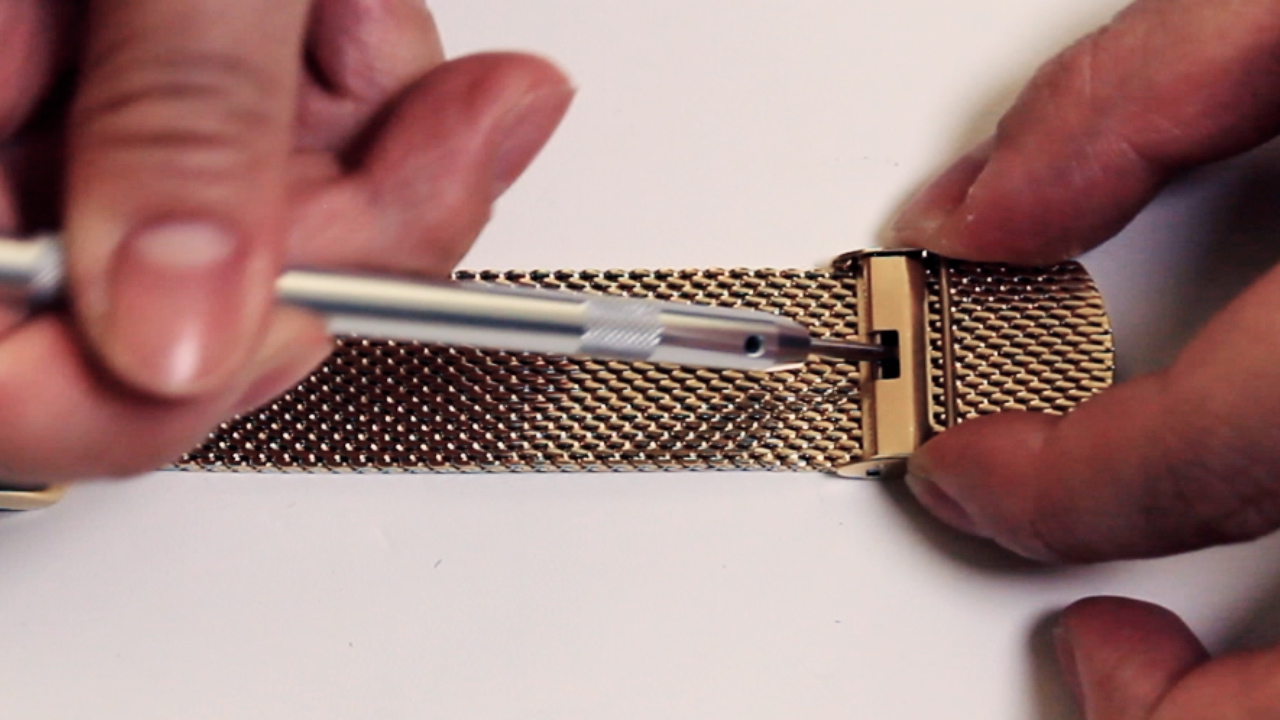
- Using the pointed end of the spring bar tool, apply gentle pressure to the pin located next to the adjustable clasp or along the side of the band. The pin should move in the direction indicated by arrows or other markings.
- Continue pushing the pin until it disengages from the clasp mechanism or releases the link that needs to be removed.
Take caution while pushing the pin to avoid applying too much force, as this could damage the watch band. If the pin seems stubborn and difficult to move, you can use a small hammer or mallet to provide gentle taps on the spring bar tool to help loosen it.
Once the clasp is released, you can proceed to the next step, which involves removing the required number of links from the mesh watch band. Remember to keep the removed links safe for future use, in case you want to add them back for a larger size.
Step 5: Remove the required number of links
Now that the clasp is released, it’s time to remove the necessary number of links from your mesh watch band. This step requires precision and attention to detail to ensure a proper fit.
- Identify the links that need to be removed based on your wrist measurement or the desired fit of the watch band.
- Locate the pins that connect the links and hold them together.
- Using the pointed end of the spring bar tool, apply gentle pressure to the pin and push it out in the direction indicated.
- Once the pin is fully removed, carefully separate the two links from each other.
- Repeat this process for each link that needs to be removed, ensuring that you remove an equal number of links from both sides of the watch band for balance.
Be cautious while removing the links to avoid accidentally scratching the watch band or causing any damage. If you encounter difficulty in removing the pins, you can use pliers or tweezers to provide additional grip and leverage.
Keep the removed links in a safe place in case you need to reattach them in the future, such as if you want to adjust the band for a larger size. This way, you’ll have the flexibility to modify the fit of your watch band as needed.
Once you have successfully removed the required number of links, you can proceed to the next step: reattaching the clasp to secure the adjusted watch band.
Step 6: Reattach the clasp
Now that you have removed the necessary links from your mesh watch band, it’s time to reattach the clasp to secure the adjusted band. Follow these steps to ensure a proper and secure reattachment:
- Align the remaining links on both sides of the watch band.
- Hold the clasp or pin mechanism firmly against the last link on one side of the band.
- Insert the pin into the hole on the adjacent link, ensuring that it aligns correctly.
- Using the forked end of the spring bar tool, apply gentle pressure to the pin and push it back into place.
- Make sure the pin is fully inserted and not sticking out on either side, as this may cause discomfort or snagging.
- Repeat this process for the other side of the watch band, ensuring that the clasp is securely attached to the last link.
As you reattach the clasp, double-check that the links fit together smoothly and that there is no excessive play or movement in the watch band. It’s important to achieve a secure and comfortable fit.
If necessary, you can use pliers or tweezers to help align and insert the pins with more precision. However, be careful not to exert too much force, as it may damage the watch band or cause the pins to get stuck.
Once the clasp is reattached and the links are securely in place, you can move on to the next step: testing the fit of your adjusted watch band.
Step 7: Test the fit of the watch band
After reattaching the clasp and completing the adjustment process, it’s essential to test the fit of your watch band to ensure that it is comfortable and secure on your wrist. Follow these steps to check the fit:
- Fasten the clasp and place the watch on your wrist.
- Make sure the watch band sits snugly but comfortably around your wrist.
- Check for any excessive tightness or looseness. The watch band should have a bit of wiggle room, but it shouldn’t slide up and down your wrist.
- Moving your wrist around, test the flexibility and adjustability of the band. Ensure that it doesn’t cause discomfort or restrict your movement.
- Observe the aesthetic appeal of the watch band on your wrist. It should complement your overall style and look visually appealing.
If you find that the watch band is too tight or too loose, you may need to make further adjustments by adding or removing additional links. Repeat the previous steps as necessary until you achieve the desired fit.
Remember that the perfect fit may vary based on personal preference and comfort. It’s crucial to find a balance that suits your wrist size and provides both comfort and style.
By testing the fit of your watch band, you can ensure that it is properly adjusted and ready to be worn confidently.
Step 8: Make additional adjustments if necessary
After testing the fit of your adjusted watch band, you may find that further adjustments are needed to achieve the perfect fit on your wrist. Don’t worry – making additional adjustments is a normal part of the process. Here’s what you can do:
- Assess the fit: Pay close attention to how the watch band feels and whether it is snug but comfortable around your wrist. Notice any areas where it may be too loose or too tight.
- Add links: If the band is too tight or constricting, you can add back some of the links you removed earlier. Reattach them using the same method you followed previously.
- Remove more links: Conversely, if the band is still too loose and slides around on your wrist, you may need to remove additional links. Repeat the process of removing the pins and separating the links until the band fits just right.
- Seek professional assistance: If you’re unsure about how to make further adjustments or if you’re having trouble getting the perfect fit, consider visiting a watch specialist or jeweler for assistance. They have the expertise and tools to make precise adjustments tailored to your wrist.
Remember that achieving the ideal fit for your watch band may take some trial and error. It’s worth taking the time to get it right, as a well-fitted watch not only looks stylish but also enhances your overall comfort and enjoyment.
Once you’re satisfied with the fit and feel of your watch band, you’re ready to move on to the final step: enjoying your perfectly adjusted watch band!
Step 9: Enjoy your perfectly fitted watch band!
Congratulations! You have successfully adjusted your mesh watch band to achieve the perfect fit on your wrist. Now it’s time to sit back, relax, and enjoy the fruits of your labor. Here’s what you can do to fully appreciate your perfectly fitted watch band:
- Admire the aesthetics: Take a moment to appreciate how the watch band enhances the overall appearance of your timepiece. A well-fitted band ensures a polished and stylish look.
- Experience comfort: Enjoy the comfort that comes with wearing a watch band that fits just right. No more tightness or looseness that can cause discomfort throughout the day.
- Embrace versatility: With the watch band fitting perfectly on your wrist, you can confidently wear your timepiece for any occasion, knowing that it complements your style effortlessly.
- Feel the confidence: A properly adjusted watch band not only looks great but also instills a sense of confidence. Knowing that you have taken the time to achieve the perfect fit adds an extra touch of pride to your accessory.
- Maintain the band: Regularly clean and care for your watch band to keep it in top condition. Use a soft cloth to gently wipe away dirt or debris, and avoid exposing the band to harsh chemicals or excessive moisture.
Enjoy the convenience and reliability of your watch without any distractions caused by an ill-fitting band. Your perfectly adjusted watch band ensures that your timepiece stays securely on your wrist, allowing you to focus on what matters most.
Remember, if you ever need to readjust the band in the future due to changes in your wrist size or preferences, you now have the skills and knowledge to do so with ease.
Now that you have completed all the necessary steps, it’s time to wear your watch with pride and enjoy the perfect fit of your newly adjusted mesh watch band!