
Why Add Music to Facebook Stories?
Adding music to your Facebook Stories can greatly enhance your storytelling and make your posts more engaging and entertaining. Music has a powerful impact on our emotions and can help create a certain mood or atmosphere for your story. Whether you want to share a funny moment with friends, capture a special memory, or simply add some flair to your everyday activities, incorporating music can make your content more memorable and enjoyable to watch.
Here are some reasons why you should consider adding music to your Facebook Stories:
- Evokes Emotions: Music has the ability to evoke a wide range of emotions. By selecting the right song that aligns with the theme or message of your story, you can amplify the emotional impact of your content. Whether you want to convey excitement, happiness, nostalgia, or even sadness, music offers a powerful tool to enhance the viewer’s emotional experience.
- Captivates Attention: With the increasing amount of content available on social media, it’s important to capture the attention of your audience. Including music in your Facebook Stories can help grab viewers’ attention right from the start. A catchy tune or an intriguing musical intro can pique curiosity and entice viewers to watch your story till the end.
- Adds Dynamic Element: Music adds a dynamic element to your Stories, making them more vibrant and engaging. Depending on the tempo, beat, and style of music you choose, you can create a sense of energy and movement in your videos. This can make your Stories more visually appealing and entertaining to watch.
- Showcases Personality: The music you select for your Facebook Stories can be a reflection of your personality, interests, and preferences. It allows you to express your individuality and showcase your unique style. Whether you’re into hip-hop, pop, rock, or classical music, choosing a song that resonates with you adds a personal touch to your Stories.
- Enhances Storytelling: Music has been used as a storytelling tool for centuries. It has the power to enhance the narrative of your Facebook Stories by providing a backdrop of sound that complements the visuals. Whether you’re sharing a travel adventure, a cooking tutorial, or simply capturing a day in your life, music can help create a cohesive and immersive storytelling experience.
By adding music to your Facebook Stories, you can elevate your content and make it more captivating and memorable for your audience. With a wide variety of songs and genres to choose from, you can find the perfect soundtrack to enhance your storytelling and bring your stories to life.
How to Add Music to Facebook Stories
Adding music to your Facebook Stories is a simple and straightforward process. Whether you want to include a popular hit or a niche track, Facebook offers a built-in feature that allows you to seamlessly incorporate music into your Stories.
Here’s a step-by-step guide on how to add music to your Facebook Stories:
- Start a Facebook Story: Open the Facebook app on your mobile device and tap on the camera icon in the top left corner or swipe right from your News Feed to access the Stories section.
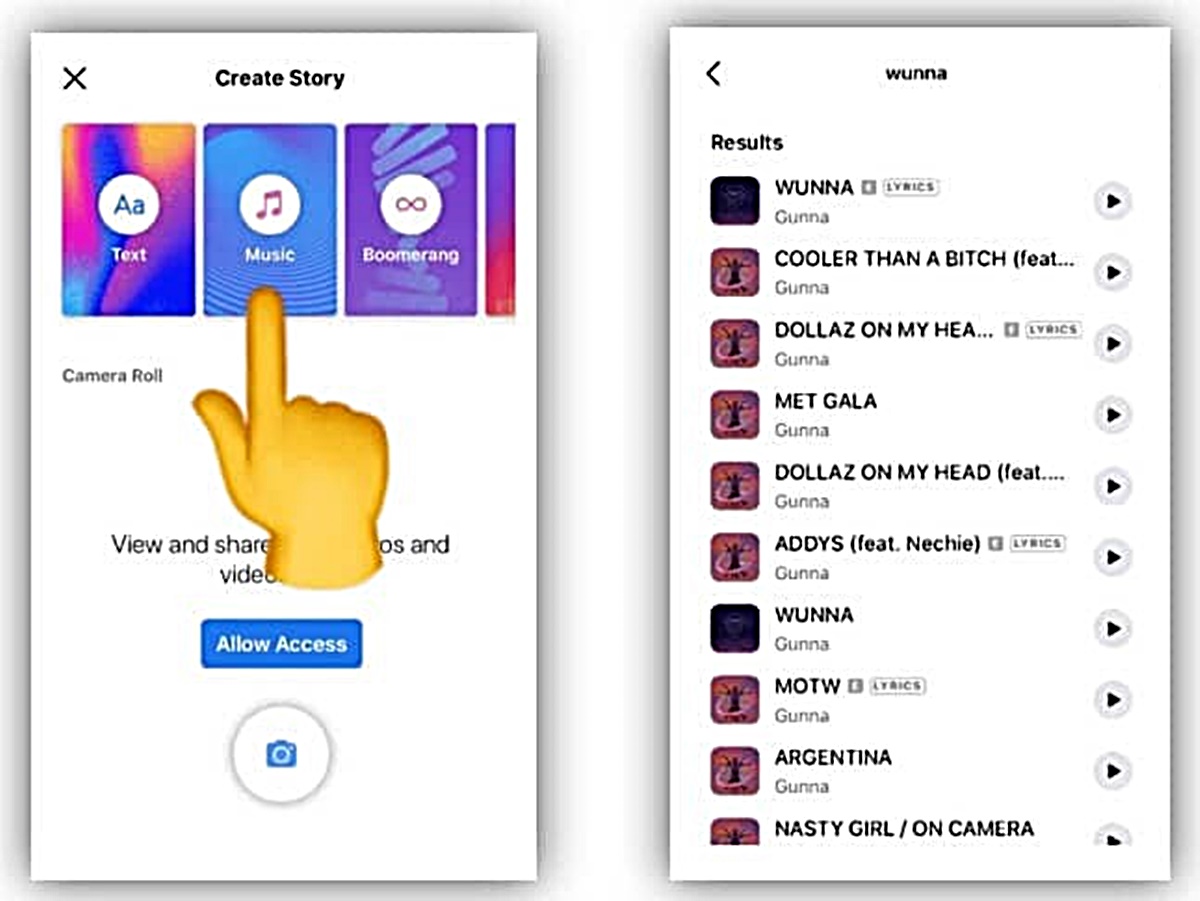
- Tap on the Music Sticker: Once you’re in the Facebook Stories camera interface, swipe up or tap on the sticker icon in the top right corner. Look for the “Music” sticker among the available options and tap on it.
- Browse and Select a Song: You will be presented with various options to browse and select a song. You can search for specific songs, browse popular genres or playlists, or explore the featured tracks. Once you find the song you want to add, tap on it to preview and select it.
- Customize the Music Sticker: After selecting a song, you can customize the appearance and behavior of the music sticker. You can choose to display the song title and artist, change the style or color of the sticker, and adjust the duration of the music clip in your Story.
- Add Text, Effects, or Filters (Optional): If you want to further enhance your Facebook Story, you can add text, effects, or filters to accompany the music. This allows you to personalize your content and make it more visually appealing.
- Publish your Facebook Story with Music: Once you’re satisfied with your Facebook Story and have added the desired music and additional elements, tap on the “Your Story” button to publish it. Your Story will be visible to your friends or followers for 24 hours.
Adding music to your Facebook Stories is a fun and creative way to share your experiences and engage your audience. Whether you’re documenting a special moment or simply expressing yourself, music can elevate the impact of your Stories and make them more enjoyable to watch.
So go ahead and start adding music to your Facebook Stories to make them truly stand out and leave a lasting impression on your viewers!
Start a Facebook Story
Before adding music to your Facebook Stories, you need to start creating a Story on the Facebook app. Here’s how you can begin:
1. Open the Facebook app on your mobile device and log in to your account.
2. Tap on the camera icon in the top left corner of your screen or swipe right from your News Feed to access the Stories section.
3. You will be taken to the Facebook Stories camera interface, where you can capture photos or record videos for your Story. To take a photo, tap the shutter button once. To record a video, hold down the shutter button.
4. Once you have captured your desired content, you can enhance it by applying filters, adding text, or using other creative tools available within the Stories camera interface. To access these features, swipe left or tap on the icons at the bottom of the screen.
5. After editing your photo or video, you can also add stickers, tags, or location information to your Story by tapping on the icons provided. This allows you to personalize your content and make it more engaging.
6. Once you are satisfied with your Facebook Story, you can either publish it immediately by tapping on the “Your Story” button or choose specific friends or groups to share it with by tapping on the “Send To” button. You can also save your Story to your device or upload it as a post.
Starting a Facebook Story is the first step in adding music and sharing your experiences with your friends and followers. By following these simple instructions, you can begin creating captivating Stories that will capture the attention and interest of your audience.
So grab your phone, open the Facebook app, and start unleashing your creativity by initiating a Facebook Story!
Tap on the Music Sticker
To add music to your Facebook Stories, you need to tap on the Music sticker. Here’s how you can do it:
1. After starting a Facebook Story, navigate to the camera interface by tapping on the camera icon in the top left corner or swiping right from your News Feed.
2. Once in the Stories camera interface, you will see a row of sticker icons at the top of the screen. Tap on the sticker icon located in the top right corner.
3. A selection of stickers will appear, allowing you to choose different types of interactive elements for your Story. Swipe through the options until you find the “Music” sticker.
4. Tap on the “Music” sticker to select it. This will open the music library where you can browse and choose the song you want to add to your Story.
5. Depending on your location and availability, you may have access to different music catalogs, genres, or playlists. You can search for specific songs, explore popular tracks, or discover trending music.
6. To find a song, you can use the search bar at the top of the screen to type in the name of the track, artist, or album. Alternatively, you can browse through the featured tracks or popular genres.
7. Once you find the song you want to add, tap on it to preview the song and see the available customization options.
8. The Music sticker allows you to customize the appearance and behavior of the sticker. You can choose if you want to display the song title and artist, change the style or color of the sticker, and adjust the duration of the music clip in your Story.
9. After customizing the Music sticker to your liking, tap on the “Done” or “Add” button to add the selected song to your Story. The song will now be integrated into your Facebook Story, ready to be shared with your friends and followers.
By tapping on the Music sticker, you can easily incorporate music into your Facebook Stories and enhance the overall experience for your viewers. So don’t hesitate to explore the various tracks available and choose the perfect song that complements your Story.
Browse and Select a Song
Once you’ve tapped on the Music sticker in the Facebook Stories camera interface, it’s time to browse and select the perfect song to add to your Story. Here’s how you can do it:
1. After selecting the Music sticker, you will be presented with a music library where you can explore different songs, genres, and playlists. This library offers a wide variety of options to suit your preferences and the mood you want to create.
2. To search for a specific song or artist, use the search bar at the top of the screen. Simply type in the name of the song, artist, or album you are looking for, and the library will display relevant results.
3. If you’re not sure what song to add, you can browse through the featured tracks or popular genres. This will give you a chance to discover new and trending music that you might find appealing.
4. As you scroll through the music library, you can tap on individual songs to preview them. This allows you to listen to a snippet of the track and determine whether it suits the mood or theme of your Story.
5. If you find a song that you want to add to your Story, simply tap on it to select it. This will automatically integrate the song into your Story and bring you to the customization options for the Music sticker.
6. Within the customization options, you can choose if you want to display the song title and artist on your Story. This can be helpful for viewers who want to know the name of the song or the artist behind it.
7. You can also customize the style or color of the Music sticker to match the aesthetic of your Story. This adds a personal touch and allows you to create a visually cohesive experience for your viewers.
8. Additionally, you can adjust the duration of the music clip that plays in your Story. This gives you control over how long the song will be featured and ensures that it aligns with the flow of your visuals.
By browsing and selecting a song from the music library, you can add the perfect soundtrack to your Facebook Story. Enhance the atmosphere, evoke emotions, and make your Story more engaging by choosing a song that complements your content and resonates with your audience.
Customize the Music Sticker
Once you have selected a song for your Facebook Story, you can further customize the appearance and behavior of the Music sticker. This allows you to personalize your Story and make it more visually appealing. Here’s how you can customize the Music sticker:
1. After selecting a song, you will be taken to the customization options for the Music sticker. These options are located within the sticker itself, and you can access them by tapping on the sticker in your Story or by tapping on the sticker icon next to your profile picture in the top left corner of the screen.
2. One of the customization options is whether to display the song title and artist on your Story. If you want viewers to know the name of the song or the artist, toggle the display option to “On.” If you prefer a cleaner look, you can choose to hide the title and artist information by toggling the option to “Off.”
3. You can also customize the style or color of the Music sticker to match the aesthetic of your Story. Facebook offers a variety of styles, fonts, and colors to choose from. Explore different options until you find a design that enhances the visual appeal and complements your content.
4. In addition to style customization, you can adjust the duration of the music clip that plays in your Story. This gives you control over how long the song will be featured and ensures that it aligns with the flow of your visuals. Use the sliders provided to shorten or lengthen the clip according to your preference.
5. As you make adjustments to the Music sticker, make sure to preview the changes in real-time. This allows you to see how the sticker looks and behaves within the context of your Story. If the changes aren’t satisfactory, you can always go back and modify the customization options until you achieve the desired effect.
Customizing the Music sticker gives you the opportunity to add a personal touch to your Facebook Story. By displaying song information, choosing a style that matches your Story’s aesthetic, and adjusting the duration of the music clip, you can create a cohesive and visually appealing experience for your viewers.
Take your time to experiment with different customization options and find the perfect configuration that elevates your Story and enhances the overall viewer experience.
Add Text, Effects, or Filters (Optional)
Once you’ve added music to your Facebook Story, you have the option to further enhance it by adding text, effects, or filters. These additional elements can elevate your Story and make it more visually appealing and engaging. Here’s how you can do it:
1. After selecting a song and customizing the Music sticker, you can tap on the icons displayed at the top or bottom of the screen to access various editing features.
2. To add text to your Story, tap on the text icon, usually represented by the letter “A.” This will open a text editor where you can type your desired message. Customize the font style, color, size, and position of the text as per your preference. You can use the text feature to add captions, provide context, or highlight key points in your Story.
3. If you want to add effects or filters to your Story, tap on the magic wand or filter icon. Facebook offers a range of effects and filters that you can apply to your photos or videos. Experiment with different options like sepia, black and white, vibrant colors, or even fun animations to enhance the visual appeal of your Story.
4. In addition to text and filters, you can also consider using other creative tools available within the Stories interface. These may include stickers, emojis, drawings, or AR effects. These elements add a layer of interactivity, playfulness, and personalization to your Story.
5. As you add text, effects, or filters to your Story, make sure to preview the changes in real-time. This allows you to see how the different elements blend together and contribute to the overall impact of your Story. If needed, you can modify or adjust the elements until you achieve the desired visual effect.
Adding text, effects, or filters to your Facebook Story is optional but can significantly enhance the storytelling experience. These additional elements allow you to make your Story more engaging, expressive, and visually appealing. So don’t hesitate to explore the different editing options and unleash your creativity to make your Story truly stand out.
Publish your Facebook Story with Music
After you have added music, customized the Music sticker, and made any desired additional edits to your Facebook Story, it’s time to publish and share it with your friends and followers. Here’s how you can do it:
1. Once you are satisfied with your Story, tap on the “Your Story” button located at the bottom of the screen. This will publish your Story and make it visible to your friends or followers for 24 hours.
2. If you want to share your Story with specific friends or groups, tap on the “Send To” button instead. This will allow you to select the recipients from your Facebook friends list or specific groups you are a part of.
3. Before publishing, take a moment to review your Story and ensure that everything is as you intended. Check for any errors or inconsistencies in the content, as well as the positioning and appearance of the Music sticker and any additional elements.
4. If you want to save your Story to your device or upload it as a post, you have the option to do so. Tap on the “Save” or “Upload” button, which is usually located next to the “Your Story” button.
5. Keep in mind that the music you have added to your Story may be subject to copyright restrictions. Facebook has a library of licensed music that can be used freely, but if you have added your own music or used copyrighted tracks, it’s important to ensure that you have the necessary permissions or licenses to do so.
6. Once your Story is published, your friends or followers can view it by tapping on your profile picture or by accessing the Stories section on Facebook. They can listen to the music you have added, watch the visual content, and engage with your Story through reactions, comments, or direct messages.
Publishing your Facebook Story with music allows you to share your experiences, emotions, and creative endeavors with your online community. It’s a powerful way to connect and engage with others, and the addition of music enhances the impact and enjoyment of your Story.
So go ahead and share your Story with the world, and let the music you’ve incorporated enrich the viewing experience for your friends and followers!