
Connecting the HTC Vive Mic
One of the key features of the HTC Vive is the built-in microphone, allowing you to communicate with others in virtual reality experiences. To make the most of this feature, it’s essential to know how to properly connect and configure the HTC Vive mic. Here’s how you can do it:
The first step is to ensure that the HTC Vive headset is properly set up and connected to your computer. Plug in all necessary cables, including the HDMI cable and USB cable, and ensure that they are securely connected.
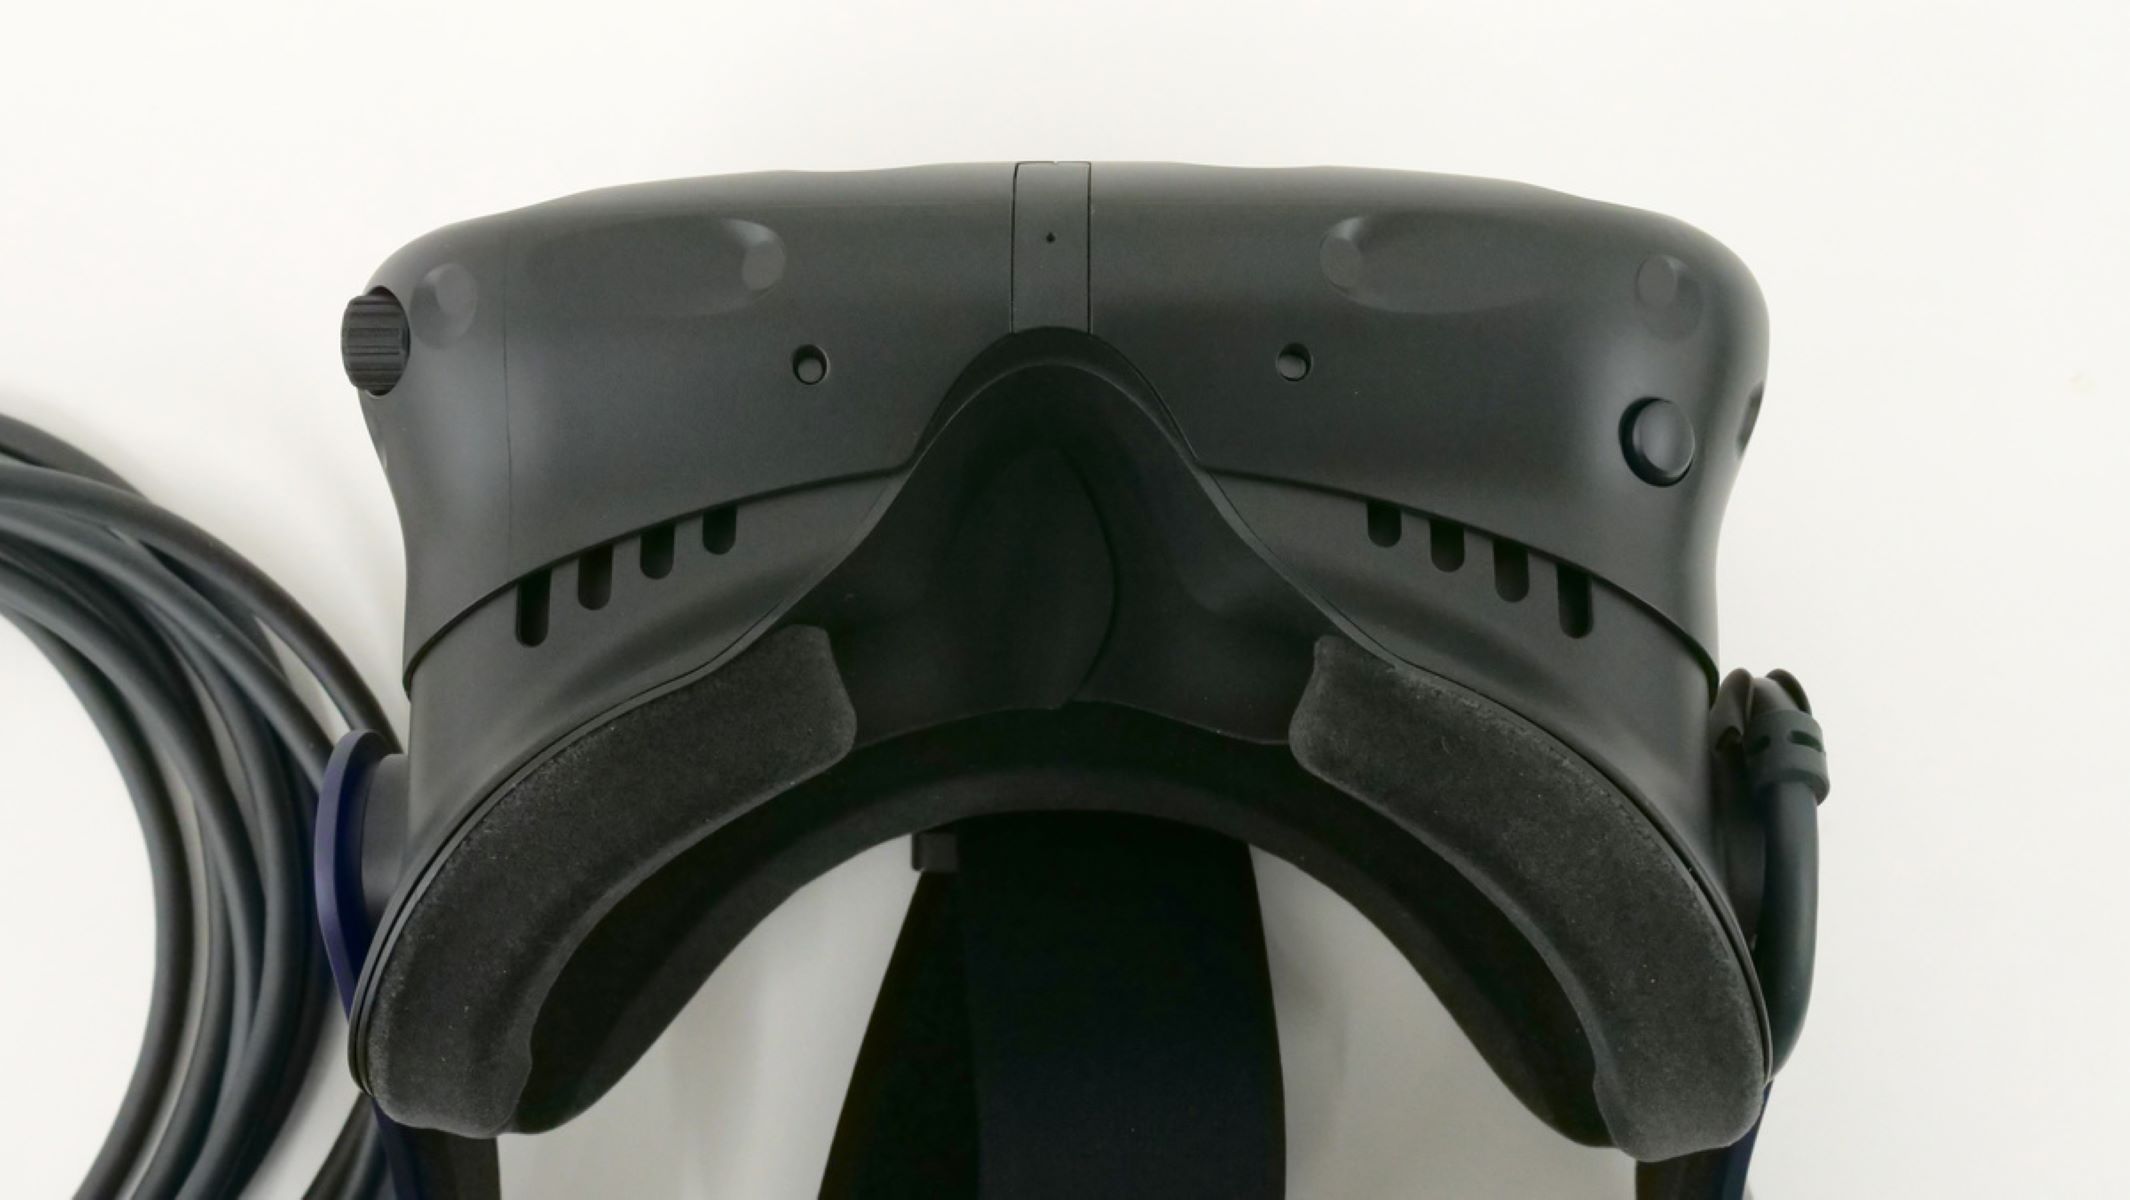
Next, locate the headset port on the HTC Vive headset. This port is usually located on the left side of the headset, near the earpiece. Gently insert the mic plug into the corresponding headset port until it clicks into place. Take care not to force the plug, as this could damage the port or the mic itself.
Once the mic is connected, you may need to adjust the mic volume to ensure that it is neither too loud nor too soft. To do this, navigate to the audio settings on your computer. On Windows, right-click on the speaker icon in the taskbar and select “Open Volume Mixer” or “Sounds.” On macOS, go to “System Preferences” > “Sound” and adjust the input volume slider.
It’s also a good idea to test and calibrate the mic to ensure that it is functioning correctly. Open your preferred voice recording software or use the built-in voice recorder app on your computer. Speak into the mic and listen back to the recording to check for any issues with sound quality or volume. Adjust the mic settings as needed until you are satisfied with the results.
In addition to configuring the mic on your computer, you may also need to make changes in the SteamVR settings if you plan to use the mic while in virtual reality. Open SteamVR and go to the settings menu. Under the audio tab, check that the microphone is selected as the default input device. You can also adjust the mic volume within the SteamVR settings to further fine-tune your audio experience.
With the HTC Vive mic properly connected and configured, you are now ready to use it in virtual reality games and applications. Many VR experiences offer voice chat or in-game communication features, allowing you to interact with other players or communicate with NPCs. Take advantage of this immersive feature to enhance your overall VR experience.
If you encounter any issues with the HTC Vive mic, there are a few troubleshooting steps you can take. First, ensure that all cables are securely connected and that the mic plug is properly inserted into the headset port. Restart your computer and try reconnecting the headset if necessary. If the problem persists, check for driver updates for your HTC Vive headset and audio devices. You can also seek assistance from the official HTC support channels or community forums for further guidance.
Adjusting Mic Volume
Having the correct mic volume is crucial to ensure clear communication in virtual reality experiences with your HTC Vive headset. Here are some steps to help you adjust the mic volume to the desired level:
1. Open the audio settings on your computer. On Windows, right-click the speaker icon in the taskbar and select “Open Volume Mixer” or “Sounds.” On macOS, go to “System Preferences” > “Sound.”
2. Look for the input or recording device options within the audio settings. You should see the HTC Vive mic listed as one of the available devices.
3. Adjust the volume slider for the HTC Vive mic to increase or decrease the volume level. Start with a mid-range setting and test the volume to ensure it is audible and clear.
4. Speak into the mic and monitor the volume levels on your computer. If the volume is too low, increase the mic volume. If it is too loud and distorts the audio, decrease the mic volume accordingly.
5. Experiment with different volume levels and test the mic in various applications or games to find the optimal setting. Every virtual reality experience may have different audio requirements, so fine-tuning the mic volume based on the specific application can enhance the overall experience.
6. If you are using the HTC Vive mic for voice chat or multiplayer games, it is also a good idea to consult with the other players or friends you are communicating with to ensure that they can hear you clearly. Adjust the volume as needed based on their feedback.
Remember that the ideal mic volume may vary depending on factors such as room acoustics, distance from the mic, and the sensitivity of the application or game you are using. Regularly check and adjust the mic volume when switching between different experiences to maintain optimal clarity.
If your HTC Vive mic volume is still unsatisfactory after adjusting it through the computer’s audio settings, consider checking the mic position and angle. Make sure it is positioned correctly and not obstructed by any objects or clothing that could affect sound pickup. Additionally, ensure that the mic is clean and free from debris or blockages that may interfere with its functionality.
By following these steps and regularly fine-tuning the mic volume, you can ensure that your voice is heard clearly and accurately in virtual reality experiences with your HTC Vive headset.
Testing and Calibrating Mic
Testing and calibrating your HTC Vive mic is essential to ensure optimal performance and clear voice communication in virtual reality. Follow these steps to properly test and calibrate your mic:
1. Open your preferred voice recording software on your computer or use the built-in voice recorder app. If you don’t have a specific software, you can search for “voice recorder” in the Start Menu (Windows) or Launchpad (macOS) to find the default app.
2. Ensure that the HTC Vive mic is selected as the input device in your recording software settings. Look for the microphone dropdown menu or settings section and choose the HTC Vive mic as the recording device.
3. Speak into the mic while recording a short message or sentence. Make sure to speak in a normal voice and vary your volume levels to simulate different speaking scenarios.
4. Playback the recorded message and listen for any issues with sound quality or volume. Pay attention to any distortion, muffled audio, or background noise that may be present. If necessary, adjust the mic settings in your audio software or computer settings to improve the recording quality.
5. Repeat the recording and playback process with different mic settings to find the optimal configuration for your voice. Adjust the mic input volume, gain, or sensitivity to achieve a clear and balanced audio output.
6. Test the mic in various virtual reality applications or games that allow voice chat or communication. Join multiplayer sessions or interact with NPCs to see if your voice is transmitted clearly to others. Adjust the mic settings as needed within the application to achieve the desired audio quality.
During the testing and calibration process, it’s important to consider the environment in which you are using the HTC Vive mic. If you are in a noisy room, try to minimize background noise by closing windows, turning off fans, or using a noise-canceling headset. This will help improve the clarity of your voice and reduce potential distractions during virtual reality experiences.
Regularly testing and calibrating your HTC Vive mic will ensure that you have the best possible audio quality for your virtual reality interactions. As every individual’s voice and recording setup may vary, it’s important to experiment and fine-tune the mic settings to suit your specific needs and preferences.
If you encounter any persistent issues with the mic, such as low volume or poor sound quality, try restarting your computer and recalibrating the mic again. It’s also worth checking for any available driver or software updates for your HTC Vive headset to ensure compatibility and optimal performance.
By taking the time to test and calibrate your HTC Vive mic, you can enhance your overall virtual reality experience and enjoy clear and immersive communication with others in the virtual world.
Configuring Mic in SteamVR Settings
Configuring your HTC Vive mic in the SteamVR settings is an important step to ensure seamless communication during virtual reality experiences. Follow these steps to configure your mic in SteamVR:
1. Launch SteamVR by opening the Steam client on your computer and clicking on the “VR” button located at the top-right corner of the Steam window.
2. Once you’re in SteamVR, look for the SteamVR status window, which typically appears on your desktop. Click on the dropdown arrow next to the SteamVR status to open the settings menu.
3. In the settings menu, navigate to the “Audio” tab. Here, you will find the options to configure the microphone settings for your HTC Vive.
4. Ensure that the HTC Vive mic is selected as the default input device in the microphone dropdown menu. This will make sure that SteamVR recognizes and uses the HTC Vive mic for voice communication.
5. Adjust the mic volume slider within the SteamVR settings to fine-tune the microphone volume level specifically for virtual reality experiences. Start with a middle range setting and make adjustments based on your preferences and the requirements of the VR applications or games you are using.
6. It’s also worth checking the checkbox for “Automatic Volume Control” in the SteamVR audio settings. This option helps manage microphone volume levels dynamically, preventing sudden spikes or drops in volume during gameplay.
7. Close the SteamVR settings menu and make sure that your changes are saved. You are now ready to use your HTC Vive mic within the SteamVR environment.
During virtual reality experiences, SteamVR allows you to take advantage of voice chat features and in-game communication. Make sure to enable the microphone settings within individual VR applications or games to utilize the HTC Vive mic for seamless communication with other players or virtual characters.
It’s important to note that some applications and games may have their own microphone settings independent of SteamVR. Check the in-game or application-specific settings to ensure that the HTC Vive mic is enabled and selected as the microphone input device.
If you encounter any issues with mic configuration in SteamVR, make sure that your HTC Vive headset is properly connected to your computer. Restart the SteamVR application and your computer if necessary. Updating your SteamVR software to the latest version may also help ensure compatibility and resolve potential mic configuration conflicts.
By properly configuring the HTC Vive mic in SteamVR settings, you can experience immersive virtual reality communication and enhance your overall VR gameplay or social interactions.
Using Mic in Virtual Reality Games and Applications
The built-in microphone of the HTC Vive allows for interactive and immersive communication within virtual reality games and applications. Here’s a guide on how to effectively use the mic in your virtual reality experiences:
1. Before launching a virtual reality game or application, ensure that the microphone is properly configured. Follow the steps mentioned earlier to set up and adjust the mic volume in your computer’s audio settings and SteamVR settings.
2. Launch the virtual reality game or application of your choice. Once inside, check the settings menu or options for voice chat or microphone-related settings. Enable the microphone to ensure that you can communicate with other players or interact with virtual characters within the experience.
3. Familiarize yourself with the voice chat controls or input methods specific to the game or application you are using. Some VR games may allow for voice-activated communication, while others may require you to press a certain button or use a specific gesture to activate the mic.
4. Speak naturally and clearly into the microphone while playing the game or using the VR application. Engage in conversations with other players or communicate with virtual characters to enhance your immersion and collaboration within the virtual environment.
5. Take advantage of the features provided by the VR game or application to optimize your voice communication. Some experiences offer spatial audio, which means that the direction of the sound will be based on the position of the virtual characters or objects in the virtual world. This can create a more realistic and immersive audio experience.
6. Respect the privacy and boundaries of other players when using the microphone in multiplayer VR games. Ensure that your microphone usage does not interfere with the gameplay or the experience of others. Use voice chat responsibly and maintain a friendly and inclusive environment for all players.
7. If you encounter any issues with the microphone during gameplay, such as low volume or distorted sound, pause the game and check the microphone settings within the VR application. Adjust the microphone volume or sensitivity settings as needed to improve the audio quality. It’s also worth checking if there are any updates for the game or application that could address microphone-related issues.
Using the microphone in virtual reality games and applications adds a new dimension of immersion and interaction to your VR experiences. Whether you’re coordinating strategies with teammates, engaging in virtual social activities, or giving voice commands to virtual characters, the mic can enhance the overall enjoyment and realism of the virtual world.
Remember to take breaks as needed during extended VR sessions to rest both your eyes and your vocal cords. Properly maintaining and caring for your HTC Vive mic will ensure its longevity and continued functionality for future virtual reality endeavors.
Troubleshooting Mic Issues with HTC Vive
If you are experiencing mic issues with your HTC Vive headset, there are several troubleshooting steps you can take to identify and resolve the problem. Here are some common solutions:
1. Check the physical connections: Ensure that all cables and connections are securely plugged into the HTC Vive headset and your computer. Disconnect and reconnect the mic plug to make sure it is properly inserted into the headset port. Also, check for any visible damage or loose connections that may be affecting the mic functionality.
2. Restart your computer: Sometimes, a simple system reboot can resolve microphone-related issues. Close all VR applications, shut down your computer, wait a few moments, and then power it back on. Once the computer restarts, relaunch the VR application to see if the mic issue has been resolved.
3. Update audio drivers: Outdated or incompatible audio drivers can cause mic problems. Check for driver updates for your HTC Vive headset, sound card, and any other audio devices connected to your computer. Visit the manufacturer’s website or use a driver update utility to ensure you have the latest drivers installed.
4. Adjust microphone privacy settings: On Windows 10, microphone privacy settings can sometimes prevent applications from accessing the mic. Go to “Settings” > “Privacy” > “Microphone” and make sure that “Allow apps to access your microphone” is turned on. Additionally, check individual application settings to grant microphone permissions if necessary.
5. Disable other audio devices: If you have multiple audio devices connected to your computer, such as headphones or external microphones, disable them temporarily to ensure that the HTC Vive mic is the default and active input device. In the audio settings of your computer, select the HTC Vive mic as the primary recording device.
6. Reset SteamVR settings: In some cases, resetting the SteamVR settings can help resolve mic issues. Open SteamVR, go to “Settings” > “Reset” > “Reset SteamVR Settings.” Keep in mind that this will reset all SteamVR settings to default, so you may need to reconfigure other settings as well.
7. Test the mic in different applications: Try using the HTC Vive mic in other VR applications or voice recording software to determine if the issue is specific to a particular application. If the mic works fine in other applications, the problem may be related to the configuration or settings of the problematic application.
8. Seek professional assistance: If the above steps do not resolve the mic issues, consider seeking support from the official HTC Vive support channels or community forums. Provide detailed information about the problem you are encountering and any steps you have already taken to troubleshoot. The support team or community may be able to provide further guidance or solutions.
By systematically troubleshooting and addressing mic issues with your HTC Vive headset, you can ensure optimal performance and clear voice communication within your VR experiences. Remember to be patient and thorough in your troubleshooting process, as the solution may require a combination of different steps or further assistance.