
Checking Internet Connection
Before troubleshooting email issues on your iPhone 10, it's crucial to ensure that your device has a stable internet connection. Without a reliable internet connection, your iPhone may struggle to send or receive emails. Here's how you can check and address potential internet connectivity issues:
-
Wi-Fi Connection: Start by verifying that your iPhone 10 is connected to a stable Wi-Fi network. Navigate to "Settings" and tap on "Wi-Fi." Ensure that the Wi-Fi toggle is switched on and that your device is connected to the correct network. If the Wi-Fi network requires a password, confirm that the correct password is entered.
-
Cellular Data: If you're unable to connect to a Wi-Fi network, consider using cellular data to send and receive emails. To enable cellular data, go to "Settings," tap on "Cellular," and ensure that the "Cellular Data" option is turned on. Keep in mind that using cellular data for email activities may consume your data plan, so it's advisable to monitor your data usage.
-
Signal Strength: Check the signal strength indicator on your iPhone to ensure that you have a strong cellular signal or a stable Wi-Fi connection. Low signal strength can lead to intermittent email connectivity issues. If the signal is weak, consider moving to a location with better reception or closer to the Wi-Fi router.
-
Airplane Mode: Sometimes, enabling and disabling Airplane Mode can help reset the network connection on your iPhone. To do this, open "Control Center" by swiping down from the top-right corner of the screen (iPhone X and later) or swiping up from the bottom of the screen (iPhone 8 and earlier). Tap the airplane icon to enable Airplane Mode, wait a few seconds, and then tap it again to disable Airplane Mode.
By ensuring that your iPhone 10 has a stable internet connection, you can eliminate potential connectivity issues as you proceed with troubleshooting your email problems. If the internet connection appears to be stable, you can move on to the next steps to verify your email settings and address any potential configuration issues.
Remember, a reliable internet connection is the foundation for seamless email communication on your iPhone 10.
Verifying Email Settings
Verifying the email settings on your iPhone 10 is a crucial step in troubleshooting email-related issues. Incorrect or outdated email configurations can lead to problems with sending, receiving, or syncing emails. By carefully reviewing and confirming the email settings, you can ensure that your iPhone is correctly configured to communicate with your email server. Here's a detailed guide on how to verify and adjust your email settings:
1. Accessing Email Account Settings
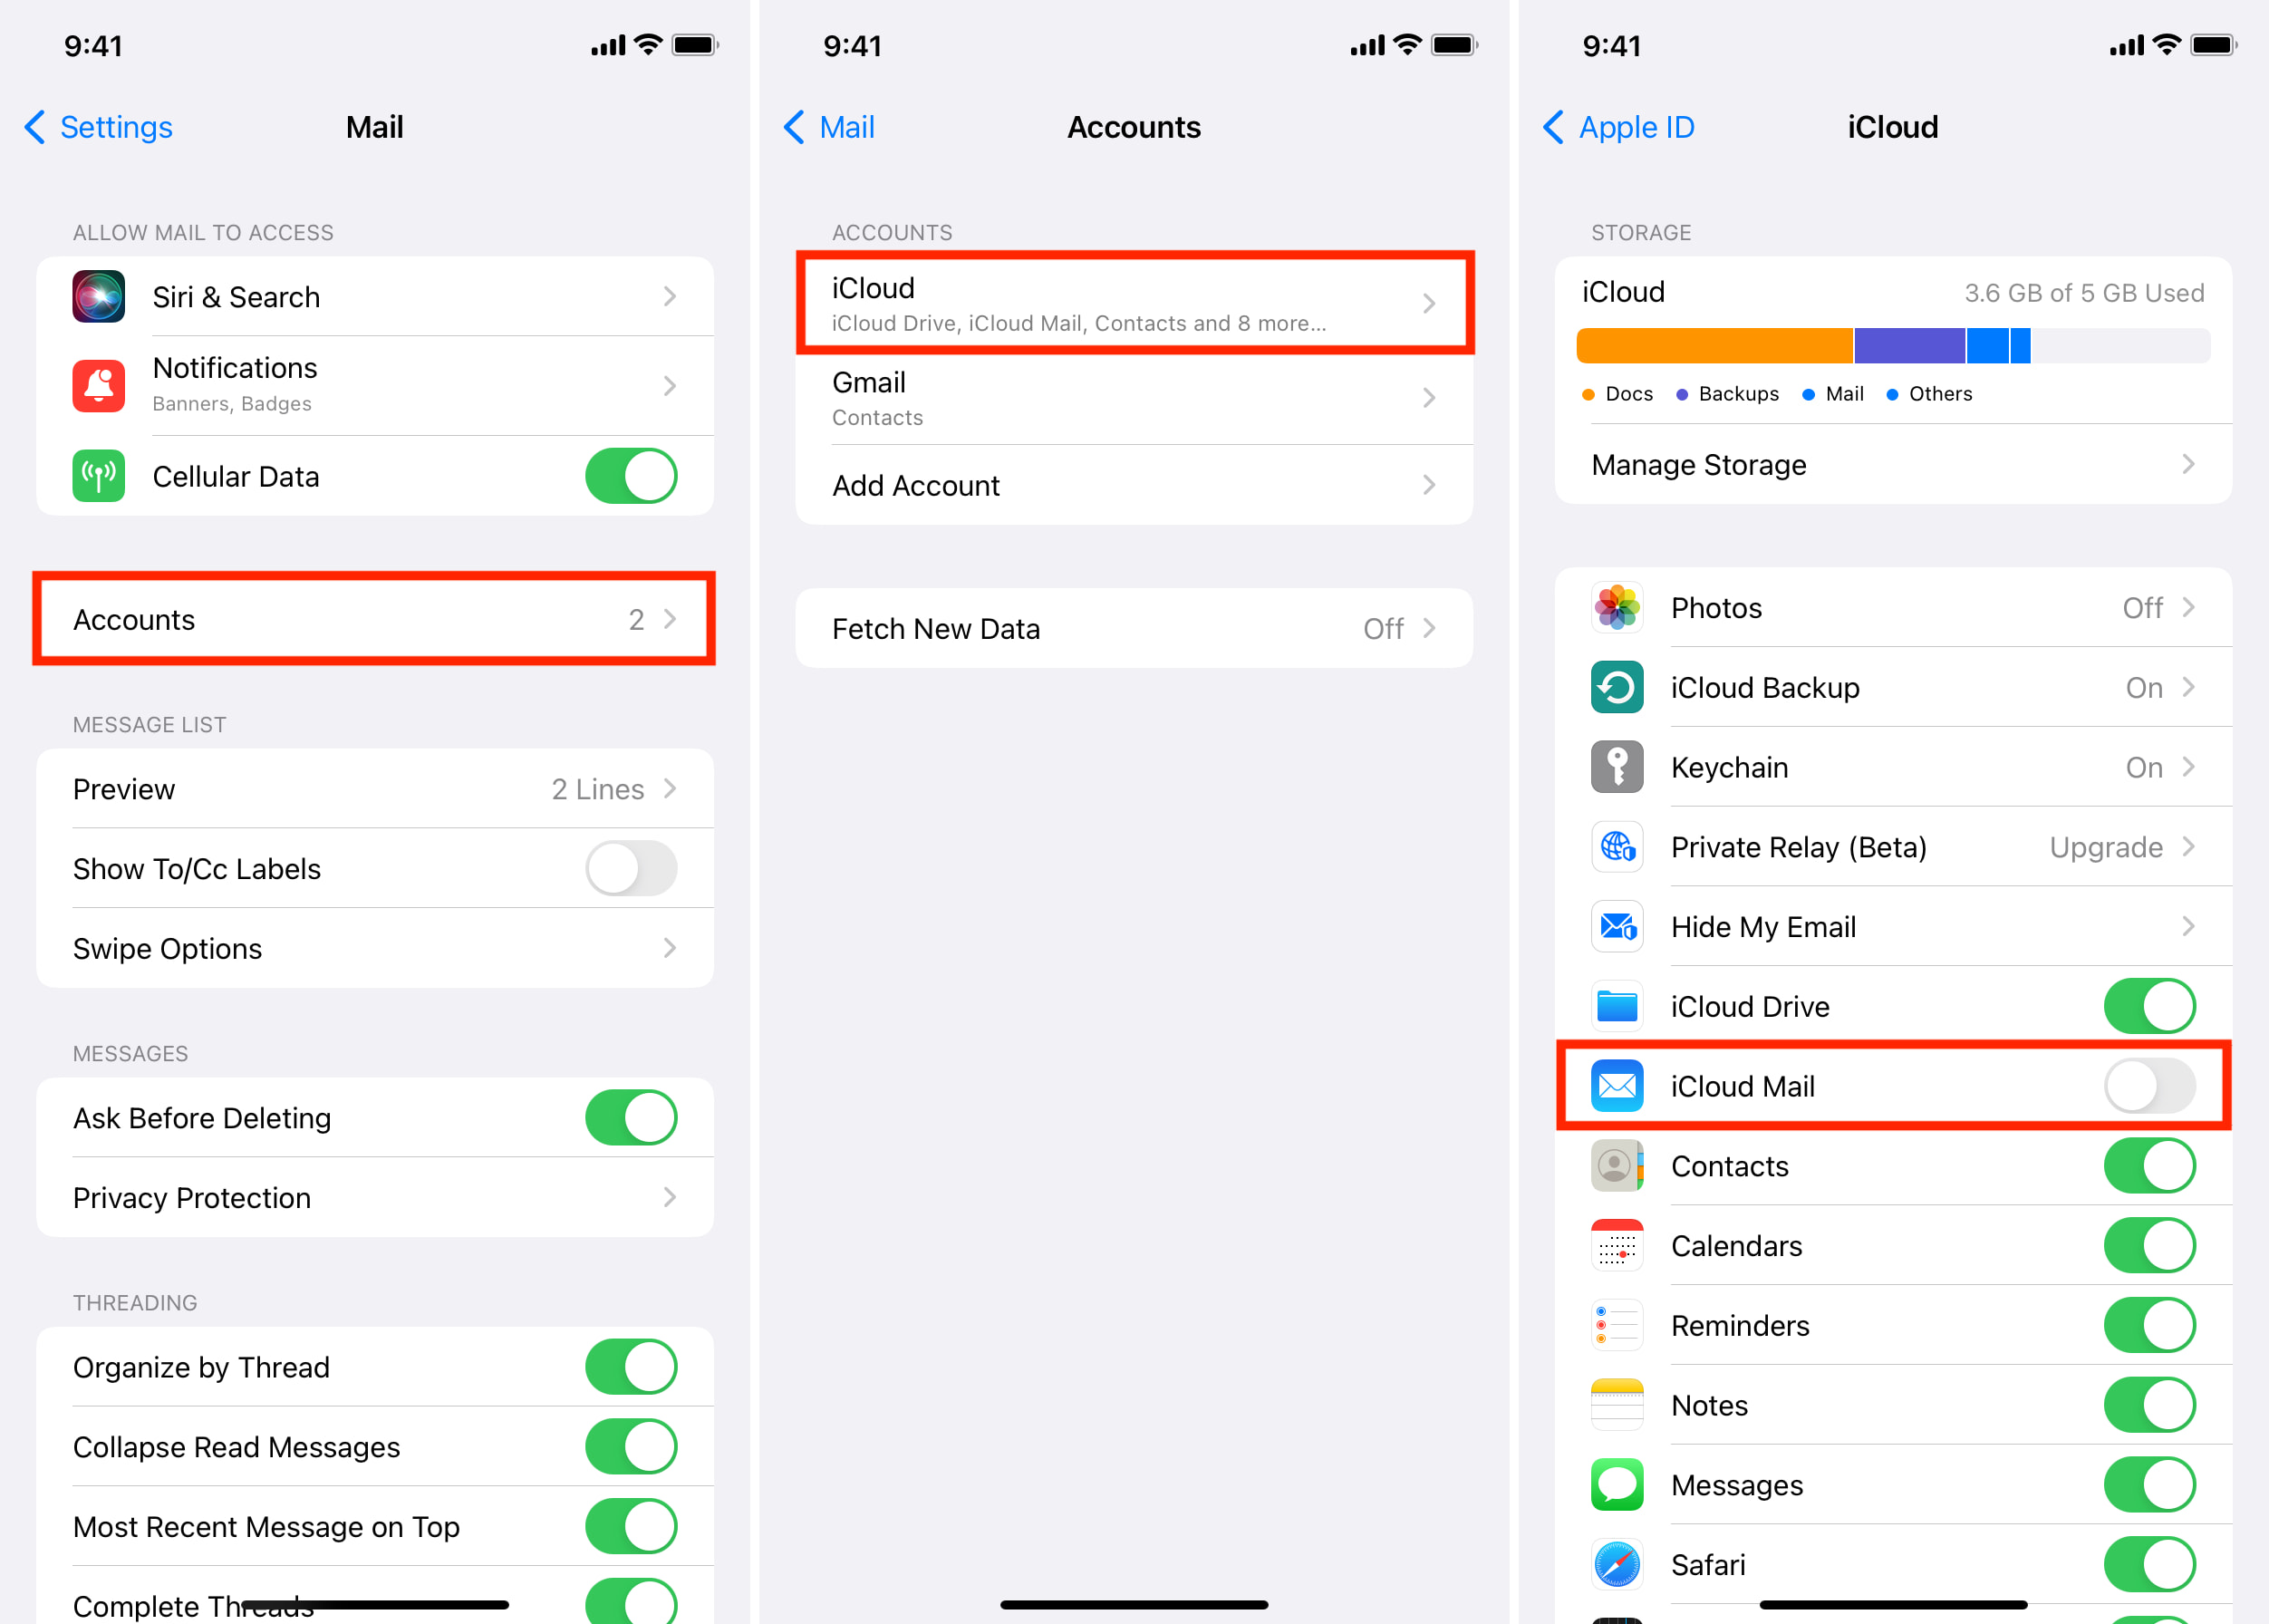
To begin, navigate to the "Settings" app on your iPhone 10 and scroll down to find and select "Mail." Within the "Mail" settings, tap on "Accounts" to view a list of configured email accounts on your device. Choose the email account that is experiencing issues to access its specific settings.
2. Checking Incoming Mail Server Settings
Once you've selected the problematic email account, review the incoming mail server settings. Ensure that the incoming mail server hostname, username, password, and port are accurately configured. The hostname should typically be in the format of "mail.yourdomain.com" or "imap.yourdomain.com," depending on your email provider. Verify that the username and password fields contain the correct credentials for accessing the incoming mail server.
3. Verifying Outgoing Mail Server Settings
Next, inspect the outgoing mail server (SMTP) settings associated with the email account. Confirm that the outgoing mail server hostname, username, password, and port are correctly entered. Similar to the incoming mail server, the outgoing mail server hostname should align with your email provider's specifications. Double-check the username and password to ensure that they match the credentials required for sending emails through the SMTP server.
4. Authentication and SSL/TLS Settings
Pay close attention to the authentication method and SSL/TLS settings for both the incoming and outgoing mail servers. Authentication should be set to "Password" or "MD5 Challenge-Response," depending on your email provider's requirements. Additionally, ensure that SSL or TLS encryption is enabled for secure communication with the mail servers. These settings are vital for protecting your email account and maintaining a secure connection.
5. Sync Frequency and Mail Fetch Settings
Review the sync frequency and mail fetch settings to determine how often your iPhone 10 checks for new emails. Adjust the sync frequency based on your preferences, keeping in mind that more frequent syncing may impact battery life. Additionally, consider the mail fetch settings, which determine how often your device fetches new emails from the server. Select the most suitable option based on your email usage patterns.
6. Testing Email Functionality
After verifying and potentially adjusting the email settings, it's essential to test the functionality by sending a test email and ensuring that incoming emails are successfully received. Pay attention to any error messages or prompts that may indicate ongoing issues with the email configuration.
By meticulously verifying and adjusting the email settings on your iPhone 10, you can effectively troubleshoot email-related problems and optimize the communication between your device and the email server. Accurate email configurations are fundamental to seamless email functionality, and by following these steps, you can ensure that your iPhone is appropriately set up to manage your email correspondence.
Restarting iPhone
Restarting your iPhone 10 can serve as a simple yet effective troubleshooting step to address various issues, including email-related problems. This process involves powering off the device and then turning it back on, which can help resolve temporary software glitches and refresh system functionalities. Here's a detailed guide on how to restart your iPhone 10:
-
Power Off the Device: Begin by pressing and holding the side button along with either volume button until the "slide to power off" slider appears on the screen. Drag the slider to the right to power off the iPhone. Alternatively, you can go to "Settings," select "General," and then tap "Shut Down" to initiate the power-off process.
-
Wait for Shutdown: Once the iPhone is powered off, allow a few moments for the device to completely shut down. This brief pause ensures that all running processes and applications are properly terminated before the device is restarted.
-
Power On the iPhone: After the device has been powered off, press and hold the side button until the Apple logo appears on the screen. Release the button, and the iPhone will boot up, indicating that the restart process is complete.
-
Test Email Functionality: Once the iPhone has restarted, check the email application to verify if the previous issues have been resolved. Attempt to send and receive test emails to confirm that the email functionality has been restored.
Restarting your iPhone 10 can effectively clear temporary software hiccups and refresh the device's operating system, potentially resolving email-related issues in the process. It is a quick and straightforward step that can be performed without the need for advanced technical knowledge. If the email problems persist after restarting the device, you can explore additional troubleshooting steps to further address the underlying causes of the issues.
By incorporating the practice of restarting your iPhone into your troubleshooting routine, you can proactively manage and resolve various software-related challenges, ensuring a smoother and more reliable user experience.
Updating iPhone Software
Ensuring that your iPhone 10 is running the latest software version is a pivotal aspect of troubleshooting email issues and maintaining overall device performance. Software updates often include bug fixes, security enhancements, and improvements to system stability, all of which can directly impact the functionality of email applications. By keeping your iPhone's software up to date, you can address potential software-related email glitches and benefit from the latest features and optimizations. Here's a comprehensive guide on updating the software on your iPhone 10:
-
Checking for Software Updates: Begin by accessing the "Settings" app on your iPhone 10 and navigating to "General." Within the "General" settings, tap on "Software Update" to initiate the process of checking for available updates. Your device will connect to Apple's servers to determine if a new software version is available for installation.
-
Downloading and Installing Updates: If a software update is found, your iPhone will display information about the available update, including its size and a brief overview of the changes it encompasses. Ensure that your device is connected to a stable Wi-Fi network, as software updates are often large in size and may require a significant amount of data. Tap "Download and Install" to commence the update process.
-
Preparing for Installation: Once the update has been downloaded, your iPhone will begin preparing for the installation. This phase involves verifying the update and preparing the device for the upcoming software transition. It is essential to have sufficient battery life or connect your device to a power source to prevent any interruptions during the installation process.
-
Installing the Update: After the preparation phase is complete, your iPhone will prompt you to proceed with the installation of the software update. Tap "Install" to initiate the installation process. The device will restart as part of the update installation, and a progress bar will indicate the status of the installation.
-
Completing the Update: Upon successful installation, your iPhone will boot up with the updated software version. You may be required to enter your passcode to access the device after the update is completed. Once the update process is finished, your iPhone 10 will be running the latest available software version.
By routinely updating the software on your iPhone 10, you can proactively address potential software-related issues that may affect email functionality. Additionally, staying current with software updates ensures that your device benefits from the latest security patches and performance enhancements, contributing to a more secure and efficient user experience. Regularly checking for and installing software updates is a fundamental practice for maintaining the optimal functionality of your iPhone 10 and addressing potential email-related challenges.
Deleting and Re-adding Email Account
When troubleshooting persistent email issues on your iPhone 10, deleting and re-adding the problematic email account can serve as a strategic approach to address underlying configuration or synchronization challenges. This process involves removing the existing email account from your device and then reconfiguring it to establish a fresh connection with the email server. By doing so, you can potentially resolve inconsistencies or errors that may have been hindering the seamless functionality of the email account. Here's a detailed exploration of the steps involved in deleting and re-adding an email account on your iPhone 10:
1. Accessing Email Account Settings
Begin by navigating to the "Settings" app on your iPhone 10 and scrolling down to locate and select "Mail." Within the "Mail" settings, tap on "Accounts" to view a list of configured email accounts on your device. Identify the email account that is experiencing persistent issues and proceed to delete it from the device.
2. Deleting the Email Account
Upon selecting the problematic email account, you will be presented with the option to delete or remove the account from your iPhone. Confirm the deletion to proceed with removing the email account from the device. This action will effectively sever the existing connection between your iPhone and the email server, preparing the groundwork for re-adding the account with a fresh configuration.
3. Re-adding the Email Account
After successfully deleting the email account, return to the "Accounts" section within the "Mail" settings. Tap on "Add Account" to initiate the process of re-adding the email account to your iPhone 10. Select the appropriate email service provider or choose "Other" if the provider is not listed, and proceed to enter the necessary account details, including the email address, password, and any additional configuration specifics.
4. Verifying Email Settings
As part of the re-adding process, carefully review and confirm the email settings, ensuring that the incoming and outgoing mail server details, authentication methods, and SSL/TLS settings are accurately entered. Pay close attention to any specific requirements outlined by your email service provider to ensure that the account is configured correctly.
5. Testing Email Functionality
Once the email account has been re-added and the settings have been verified, proceed to test the functionality by sending a test email and verifying the successful receipt of incoming emails. Monitor the email application for any error messages or indications of connectivity issues, ensuring that the re-added account is functioning as expected.
By deleting and re-adding the email account on your iPhone 10, you can effectively refresh the email configuration and establish a new connection with the email server. This process can help rectify persistent email issues stemming from configuration discrepancies or synchronization errors, ultimately contributing to a more reliable and seamless email experience on your device. Additionally, it provides an opportunity to ensure that the email account is correctly configured to align with the latest server requirements, addressing potential compatibility issues that may have been impeding the smooth operation of the account.
Incorporating the practice of deleting and re-adding email accounts into your troubleshooting repertoire empowers you to proactively manage and resolve email-related challenges, contributing to an optimized and efficient email communication environment on your iPhone 10.