
Choosing the Right Touchscreen Panel
When embarking on the exciting journey of transforming your smart mirror into a touchscreen-enabled marvel, the first crucial step is selecting the appropriate touchscreen panel. With a multitude of options available in the market, it's essential to consider several factors to ensure the seamless integration and optimal functionality of the touchscreen feature.
1. Size and Aspect Ratio
The size and aspect ratio of the touchscreen panel should harmonize with the dimensions of your smart mirror. It's imperative to measure the available space accurately to prevent any misfit or obstruction. Additionally, consider the aspect ratio to maintain the visual coherence of the smart mirror.
2. Touch Technology
There are various touch technologies, including resistive, capacitive, infrared, and surface acoustic wave (SAW). Capacitive touchscreens, known for their responsiveness and multi-touch support, are often preferred for smart mirror applications due to their intuitive functionality.
3. Transparency and Reflectivity
As the smart mirror's reflective surface is a defining feature, the touchscreen panel's transparency and reflectivity are pivotal. Opt for a high-transparency touchscreen to maintain the mirror's reflective properties while ensuring seamless touch sensitivity.
4. Compatibility and Driver Support
Ensure that the chosen touchscreen panel is compatible with your smart mirror's operating system and hardware. Additionally, check for driver support to facilitate effortless integration and functionality.
5. Durability and Build Quality
Considering the environment in which smart mirrors are typically placed, such as bathrooms or dressing areas, durability is paramount. Select a touchscreen panel with robust build quality to withstand the conditions and ensure longevity.
6. Budget Considerations
While exploring the available options, it's essential to align the features and quality of the touchscreen panel with your budget. Balancing cost-effectiveness with functionality is crucial in making an informed decision.
By meticulously evaluating these factors, you can confidently select a touchscreen panel that seamlessly complements your smart mirror, enriching its functionality and user experience.
The next step in this exhilarating journey involves the installation of the chosen touchscreen panel, bringing you closer to experiencing the seamless convergence of technology and innovation within your smart mirror.
Installing the Touchscreen Panel
With the carefully chosen touchscreen panel in hand, the installation process marks a significant stride toward elevating your smart mirror with interactive capabilities. This transformative endeavor requires attention to detail and precision to ensure a seamless integration of the touchscreen functionality.
1. Preparation and Safety
Before commencing the installation, gather the necessary tools, ensuring that the workspace is conducive to the task. Adhering to safety precautions, such as wearing gloves and ensuring a stable work surface, is essential to prevent any mishaps during the installation process.
2. Disassembling the Smart Mirror
To access the internal components of the smart mirror, carefully disassemble the frame and the mirror itself. Exercise caution to avoid damage to the mirror or other delicate components. Keep track of the disassembled parts to facilitate the reassembly process.
3. Positioning and Alignment
Place the touchscreen panel in the designated area on the mirror, ensuring precise alignment and a snug fit. Accurate positioning is crucial to maintain the aesthetic appeal of the smart mirror while enabling seamless touch interaction.
4. Securing the Touchscreen Panel
Utilize appropriate adhesive or mounting brackets to secure the touchscreen panel onto the mirror. Ensure a firm and stable attachment while being mindful of the visibility of any fastening elements from the front of the mirror.
5. Connecting the Cables
Carefully route and connect the cables from the touchscreen panel to the designated ports on the smart mirror’s internal hardware. Exercise caution to prevent cable entanglement and ensure secure connections to facilitate optimal functionality.
6. Reassembling the Smart Mirror
Once the touchscreen panel is securely installed and connected, proceed to reassemble the smart mirror, ensuring that all components are reinstated in their respective positions. Exercise care to avoid any damage to the newly installed touchscreen panel during the reassembly process.
As the touchscreen panel seamlessly integrates with the smart mirror, the next phase involves setting up the touchscreen functionality, unlocking a world of interactive possibilities within your innovative creation.
Setting up the Touchscreen Functionality
As the touchscreen panel becomes an integral part of your smart mirror, configuring its functionality is a pivotal step in harnessing its interactive potential. This process entails software setup and calibration to ensure precise touch recognition and seamless user interaction.
1. Software Installation
Begin by installing the requisite touchscreen drivers and software on the smart mirror’s operating system. Ensure compatibility with the touchscreen panel and follow the manufacturer’s guidelines for a smooth installation process.
2. Calibration Process
Initiate the calibration process to align the touchscreen’s touch points accurately with the display. This step is crucial for precise touch recognition and optimal responsiveness, enhancing the user experience when interacting with the smart mirror.
3. Configuration of Touch Gestures
Explore the configuration options to customize touch gestures based on your preferences and usage scenarios. This may include defining swipe gestures for navigation, implementing multi-touch functionalities, and assigning specific actions to different touch inputs.
4. Integration with Smart Mirror Applications
Integrate the touchscreen functionality with existing smart mirror applications or explore new applications that leverage the interactive capabilities. This integration opens avenues for intuitive control and enhanced user engagement, enriching the smart mirror experience.
5. User Interface Optimization
Optimize the user interface to accommodate the touchscreen interactions seamlessly. This may involve adjusting the size of interactive elements, refining touch response times, and ensuring consistent visual feedback for touch inputs.
6. Testing and Iteration
Thoroughly test the touchscreen functionality across various scenarios to identify any responsiveness issues or areas for refinement. Iterate on the configuration settings based on user feedback and usage patterns to enhance the overall usability of the touchscreen feature.
As the touchscreen functionality is meticulously set up, the subsequent phase involves testing and calibrating the touchscreen to ensure its precision and responsiveness, culminating in a seamless and immersive user experience with your enhanced smart mirror.
Testing and Calibrating the Touchscreen
With the touchscreen functionality configured, the pivotal phase of testing and calibrating the touchscreen ensues, ensuring optimal responsiveness and accuracy. This meticulous process is instrumental in fine-tuning the interactive capabilities of your smart mirror, enhancing user interaction and overall usability.
1. Touch Accuracy Assessment
Initiate the testing phase by assessing the touchscreen’s accuracy across the display. Verify that touch inputs align precisely with on-screen elements, ensuring a seamless and intuitive user experience. Identify and address any deviations in touch accuracy through calibration adjustments.
2. Multi-Touch Validation
Verify the touchscreen’s multi-touch capabilities by performing gestures such as pinch-to-zoom and multi-finger interactions. Ensure that the touchscreen accurately registers and responds to multi-touch inputs, enabling versatile and natural interactions for users.
3. Responsiveness Evaluation
Evaluate the responsiveness of the touchscreen across different areas of the display. Verify consistent touch response times and swift feedback to user inputs, enhancing the overall fluidity of interactions and minimizing latency.
4. Calibration Refinement
Fine-tune the calibration settings based on the testing results, aiming to achieve optimal touch accuracy and responsiveness. Iteratively adjust the calibration parameters to address any discrepancies and enhance the precision of touch inputs.
5. User Experience Validation
Engage in user-centric testing to gather feedback on the touchscreen’s usability and overall user experience. Encourage users to interact with the smart mirror and provide insights on the intuitiveness and effectiveness of the touchscreen functionality.
6. Iterative Refinement
Based on user feedback and testing outcomes, iteratively refine the touchscreen calibration and settings to align with user preferences and usage scenarios. This iterative approach ensures that the touchscreen functionality evolves to meet user expectations and usage patterns.
As the testing and calibration phase culminates, the touchscreen of your smart mirror is primed to deliver a seamless and immersive interactive experience, seamlessly blending innovative technology with everyday utility. The final phase involves customizing touchscreen features, unlocking the full potential of your enhanced smart mirror.
Customizing Touchscreen Features
With the touchscreen functionality finely tuned and calibrated, the stage is set for customizing its features to align with your preferences and elevate the interactive potential of your smart mirror. This phase encompasses tailoring touch gestures, exploring additional functionalities, and integrating innovative features to create a personalized and intuitive user experience.
1. Gesture Customization
Delve into the touchscreen settings to customize touch gestures based on your usage patterns and preferences. Tailor swipe gestures for navigation, define tap and hold actions, and configure gestures that align with your intuitive interaction style.
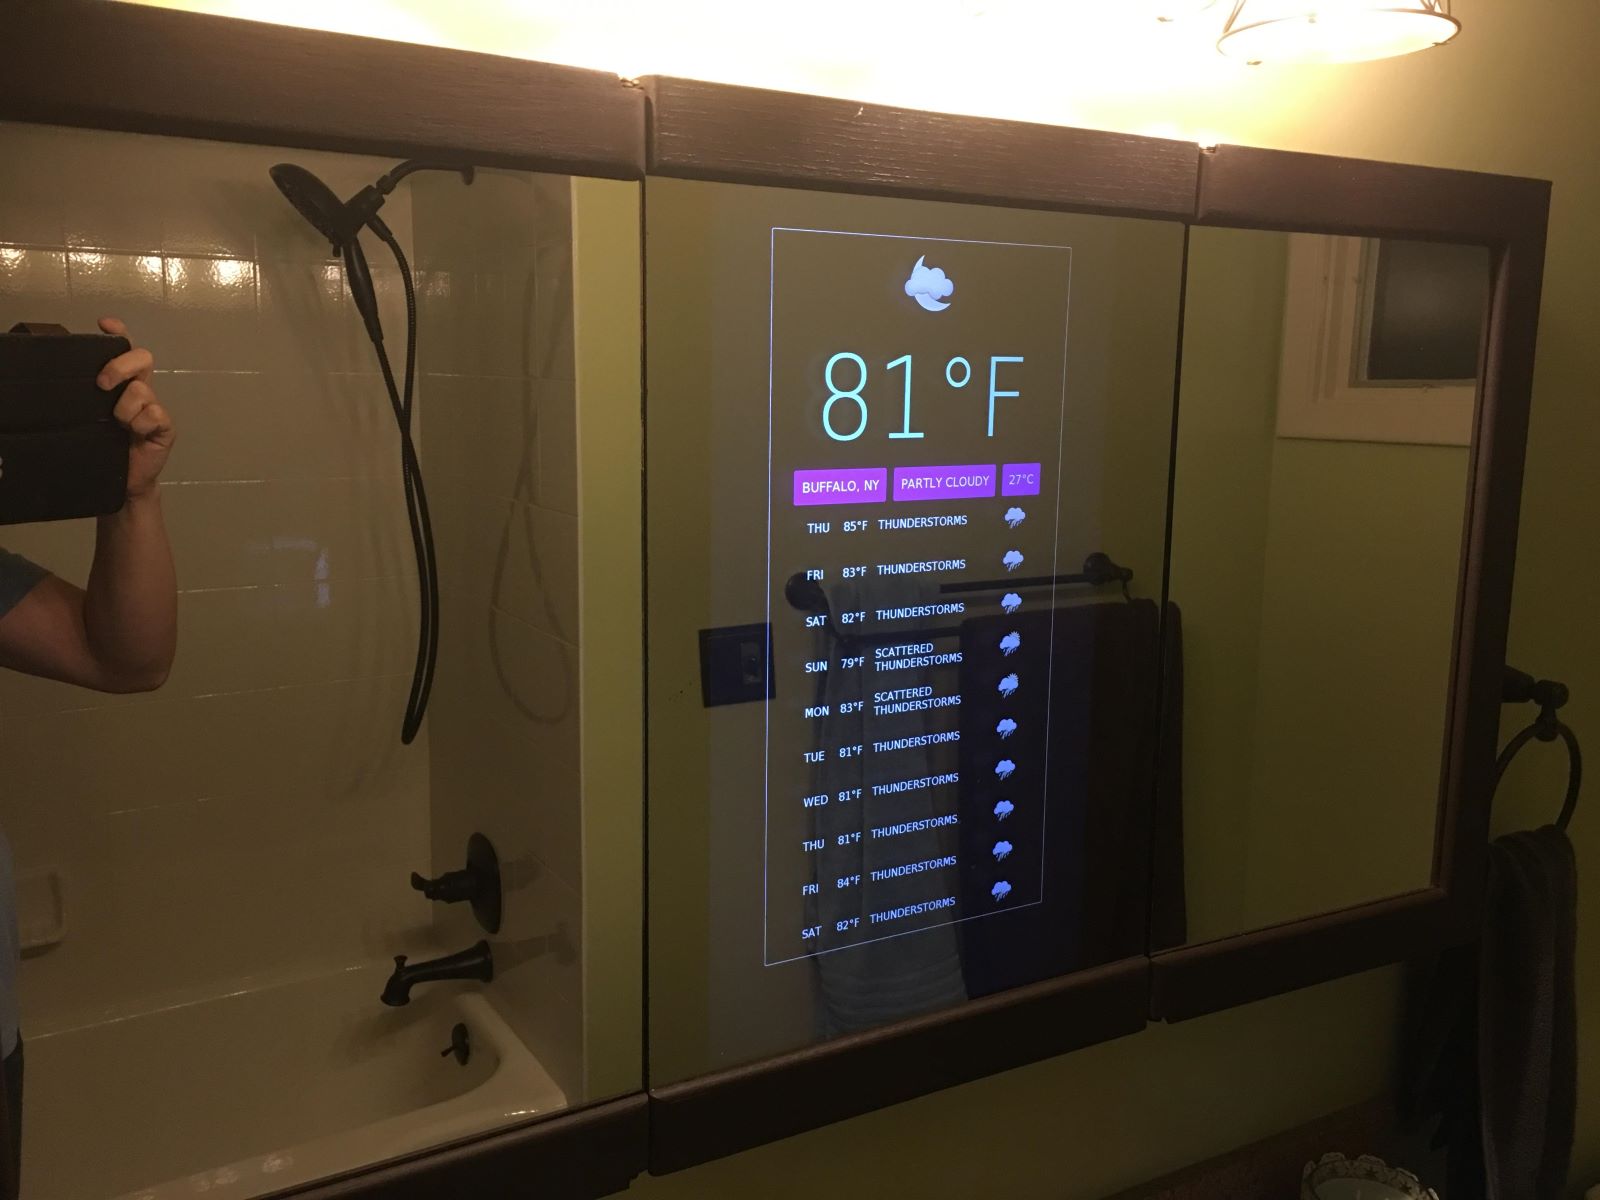
2. Interactive Widgets and Widgets
Explore the integration of interactive widgets and modules that leverage the touchscreen capabilities. Consider incorporating weather widgets, calendar modules, and interactive news feeds that users can seamlessly access and interact with using the touchscreen.
3. Voice Command Integration
Consider integrating voice command functionalities alongside the touchscreen interactions, offering users a multifaceted interaction experience. Explore voice-activated commands for specific actions, complementing the touchscreen interactions for enhanced usability.
4. Personalized Shortcuts
Empower users to create personalized shortcuts and quick-access features through the touchscreen interface. Enable the customization of shortcut icons and actions, allowing users to tailor the smart mirror’s interactive elements to align with their unique preferences.
5. Ambient Lighting Control
Integrate touchscreen controls for adjusting ambient lighting settings, providing users with a seamless interface to personalize the lighting ambiance based on their preferences and environmental conditions.
6. Gesture Feedback and Visual Cues
Incorporate visual cues and feedback mechanisms to enhance the touchscreen interactions. Implement intuitive visual cues for touch gestures, ensuring users receive clear feedback when interacting with the smart mirror through the touchscreen.
By customizing the touchscreen features, you infuse your smart mirror with personalized and innovative capabilities, enriching the user experience and fostering seamless interaction. This transformative journey culminates in a smart mirror that seamlessly integrates technology and user-centric design, delivering a captivating and intuitive interface for users to engage with effortlessly.