
Importance of a Telephone Jack
A telephone jack is an essential component for a home or office communication system. In this digital age, where mobile devices and internet-based communication platforms dominate the scene, you might wonder about the relevance of a telephone jack. However, despite the rise of wireless technology, a traditional telephone connection still holds significant value.
One of the key reasons why a telephone jack is important is its reliability. Unlike mobile signals that can be affected by factors such as network congestion, signal strength, or battery life, a landline connection provided by a telephone jack offers a stable and consistent connection. This makes it the go-to option for emergency situations when you need to make a critical call with utmost clarity and without the fear of a dropped call or poor reception.
Moreover, having a telephone jack provides an added layer of security. With a landline connection, you can rest assured that your communication is not susceptible to hacking or unauthorized access. This is particularly essential for businesses that handle confidential information or individuals who prioritize privacy and want to avoid the risk associated with online communication.
Another advantage of a telephone jack is its compatibility with various devices and services. Although smartphones and the internet have made communication more convenient, there are still instances where a landline connection is required. For instance, some business equipment, such as fax machines, credit card terminals, or alarm systems, rely on a telephone line for operation. By installing a telephone jack, you ensure seamless connectivity for these devices without the need for additional adapters or converters.
Furthermore, a telephone jack allows for a dedicated communication line. This means that you can have multiple conversations simultaneously, as each telephone jack is associated with a separate line. This is especially useful in households or offices where several people need to make or receive calls simultaneously, ensuring that everyone has equal access to a clear connection without any interference.
In addition, a telephone jack can also serve as a backup communication method. In cases where internet or mobile signal disruptions occur, having a landline connection can be a lifesaver. It ensures that you remain connected to the outside world, even during unforeseen circumstances such as power outages or natural disasters that may impact wireless communication.
Overall, while technology continues to evolve, the importance of a telephone jack remains evident. Its reliability, security, compatibility, dedicated communication line, and backup functionality make it an essential component for reliable and uninterrupted communication. Whether it’s for personal or professional use, installing a telephone jack ensures that you have a reliable connection when you need it the most.
Tools and Materials Needed for Installation
Before you begin installing a telephone jack, it’s important to gather all the necessary tools and materials. Having everything prepared in advance will help streamline the installation process and ensure that you have everything you need at your fingertips. Here’s a list of the tools and materials you’ll need:
- Telephone jack kit: Purchase a telephone jack kit that includes the jack itself, mounting box, screws, and wiring connectors.
- Telephone cable: Get a suitable length of telephone cable, typically either Cat5e or Cat6, depending on your specific requirements.
- Wire cutters/strippers: These tools will be used to strip and cut the telephone cable as needed.
- Screwdriver: Have a Phillips screwdriver on hand to secure the telephone jack and mounting box.
- Cordless drill (optional): If you need to install the telephone jack on a wall, a cordless drill can come in handy for drilling pilot holes.
- Level: Use a level to ensure that the telephone jack is mounted straight and level on the wall.
- Tape measure: Have a tape measure available to accurately measure and cut the telephone cable.
- Pencil: Use a pencil to mark the location for the telephone jack on the wall.
- Safety glasses: Protect your eyes by wearing safety glasses while working with tools and materials.
It’s important to note that the specific tools and materials required may vary based on the type of telephone jack and the installation location. Therefore, it’s a good idea to consult the instructions provided with the telephone jack kit to ensure you have all the necessary items.
Additionally, make sure to choose a telephone jack kit that is compatible with your existing telephone or communication system. Different types of jacks may have different wiring configurations, so it’s crucial to select the right kit for your needs.
By gathering all the tools and materials mentioned above, you’ll be well-prepared to install a telephone jack efficiently and effectively. Having everything organized and readily available will save you time and allow for a smooth installation process.
Choosing the Location for the Telephone Jack
When it comes to installing a telephone jack, choosing the right location is crucial. The location not only determines the convenience and accessibility of your telephone connection but also affects the overall functionality and aesthetic appeal. Here are some key factors to consider when choosing the location for your telephone jack:
1. Accessibility: Select a location that is easily accessible for both installation and regular use. Avoid areas that are hidden, obstructed, or difficult to reach as it can make maintenance and troubleshooting challenging in the future.
2. Proximity to existing telephone lines: If you already have telephone lines installed in your home or office, consider locating the new telephone jack near the existing lines. This can simplify the installation process by eliminating the need for long cable runs and reducing potential signal loss.
3. Wall type: Take into account the type of wall where you plan to install the telephone jack. If it’s a drywall or plaster wall, locating the jack near an existing electrical outlet can provide easy access to power. However, if the wall is made of brick, concrete, or other hard materials, additional tools and techniques may be required for installation.
4. Noise interference: Avoid placing the telephone jack near sources of electrical interference, such as power outlets, electrical panels, or appliances. These can introduce unwanted noise and interference into your telephone line, affecting the call quality.
5. Cable length: Evaluate the length of the telephone cable required to connect the jack to the nearest telephone junction box or service entry point. Opt for a location that allows for a reasonable cable length without excessive slack or tension. Avoid sharp bends or tight corners in the cable, as they can cause signal degradation.
6. Aesthetics: While the aesthetics may not directly impact the functionality of the telephone jack, consider how it will look in the chosen location. Ideally, you’ll want to place the jack in a spot that is visually appealing and blends well with the surrounding environment.
Remember, it’s essential to comply with any local building codes and regulations when choosing the location for your telephone jack. Additionally, consult the user manual or manufacturer’s guidelines for specific recommendations regarding placement and installation.
By carefully considering these factors, you can select the optimal location for your telephone jack, ensuring a reliable and convenient telephone connection within your home or office.
Preparing the Jack and Wiring
Before you can start installing a telephone jack, it’s important to prepare the jack and wiring for the installation process. This involves a few crucial steps to ensure the proper functionality and connection. Here’s a guide on how to prepare the jack and wiring:
1. Familiarize yourself with the telephone jack: Take a close look at the telephone jack and familiarize yourself with its various components. This will help you understand how the wiring needs to be connected and ensure that you install the jack correctly.
2. Strip the telephone cable: Using wire cutters, carefully strip the outer insulation of the telephone cable to expose the individual wires inside. Be cautious not to strip too much insulation, as it can lead to exposed wires or short circuits.
3. Check the wiring instructions: Consult the instructions provided with the telephone jack kit to determine the appropriate wiring configuration. Different jacks may have different wiring schemes, so it’s crucial to follow the manufacturer’s guidelines to ensure compatibility and functionality.
4. Identify the color-coding: The individual wires inside the telephone cable are typically color-coded. Common color codes include red, green, yellow, and black. Match the wires according to the recommended color-coding provided by the manufacturer.
5. Prepare the wires: Once you’ve identified the color-coding, carefully trim any excess wire length and strip a small portion of the insulation from each wire. This will allow for easier connection and ensure proper contact with the terminals in the jack.
6. Inspect for damage or wear: Before proceeding, inspect the wires for any signs of damage, wear, or loose connections. If you notice any issues, consider replacing the affected wires or seeking professional assistance.
7. Verify for secure connections: Double-check that the wiring is securely connected to the telephone jack terminals. Poorly connected or loose wires can result in static, dropped calls, or even complete loss of connectivity.
8. Neatly organize the wires: Once the wiring is properly connected, neatly organize the wires to avoid tangling or interference. Use cable ties or wire clips to secure the wires in place, especially if there is excess cable length.
By taking the time to carefully prepare the telephone jack and wiring, you can ensure a smooth installation process and optimal performance. Following the manufacturer’s instructions, properly organizing the wires, and verifying secure connections will contribute to a reliable and functional telephone connection.
Installing the Telephone Jack Box
Installing a telephone jack box is the next step in setting up your telephone connection. The jack box serves as a housing unit for the telephone jack, providing a secure and organized installation. Here’s a step-by-step guide on how to install the telephone jack box:
1. Select the installation location: Determine where you want to mount the telephone jack box. It should be near the chosen location for the telephone jack and easily accessible for maintenance and future wiring adjustments.
2. Mark the mounting holes: Hold the telephone jack box against the wall or surface where you plan to install it. Use a pencil or marker to make small marks on the wall through the mounting holes on the jack box. This will serve as a guide for drilling pilot holes.
3. Drill pilot holes: Using a cordless drill and an appropriate-sized drill bit, carefully drill pilot holes into the marked locations on the wall. Take care not to drill too deep, especially if you are installing the jack box on a wall made of fragile or delicate material.
4. Attach the mounting plate: Align the mounting plate on the back of the telephone jack box with the pilot holes on the wall. Secure it in place using screws appropriate for the type of wall you are working with. Make sure the mounting plate is level and firmly attached.
5. Connect the telephone cable: Bring the telephone cable up through the bottom of the telephone jack box, ensuring that there is adequate slack for wiring and future adjustments. Insert the exposed wires into the appropriate terminals on the jack box and tighten the screws to secure the connections.
6. Secure the jack box: Place the telephone jack into the mounting plate on the jack box, aligning it properly with the mounting holes. Secure it in place using the provided screws. Ensure that the jack is flush against the mounting plate without any gaps or misalignments.
7. Test the installation: Once the telephone jack box is securely installed, it’s important to test the connection. Connect a telephone device to the jack and make a test call to ensure that the wiring and connection are functioning correctly. Check for dial tone, clear audio, and no static or interference.
Remember to refer to the manufacturer’s instructions for any specific guidance or recommendations for installing the telephone jack box. Following the proper installation process will result in a secure and reliable telephone jack box, providing a stable connection for your telephone communication needs.
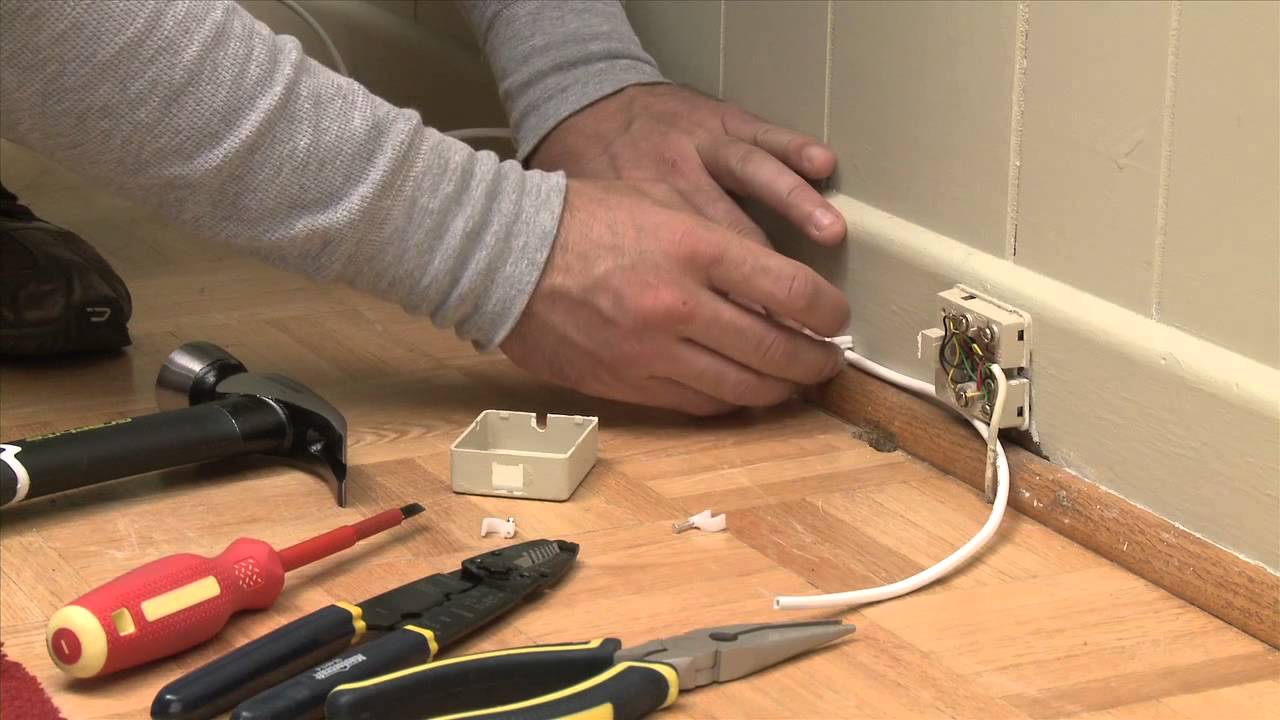
Connecting the Wires to the Jack
Now that you have installed the telephone jack box, it’s time to connect the wires to the jack itself. Properly connecting the wires is crucial for a reliable and functioning telephone connection. Here’s a step-by-step guide on how to connect the wires to the jack:
1. Identify the terminals: Look at the back of the telephone jack and identify the terminals where the wires will be connected. Each terminal is typically labeled or color-coded for easy identification. Common labels include Line 1 (L1), Line 2 (L2), and Ground (GND).
2. Strip the wires: Using wire cutters or strippers, carefully strip a small portion of insulation from the ends of the telephone wires. Take care not to remove too much insulation, as it can expose the bare wire and lead to electrical hazards.
3. Match the wire colors: Match the color-coded wires to the corresponding terminals on the telephone jack. For example, connect the red wire to the terminal labeled Line 1 (L1) and the green wire to the terminal labeled Line 2 (L2). Check the manufacturer’s instructions to ensure you are connecting the wires to the correct terminals.
4. Insert the wires: Insert the stripped ends of the wires into the appropriate terminals, ensuring that there is good contact between the wire and the terminal. Some telephone jacks have screw terminals, while others may have punch-down terminals. Follow the specific instructions provided with your telephone jack to properly insert the wires.
5. Tighten the terminals: Once the wires are inserted, use a screwdriver or appropriate tool to tighten the terminal screws securely. This will ensure that the wires are firmly connected and establish a reliable electrical connection.
6. Verify the connections: After connecting the wires, visually inspect the connections to ensure that the wires are securely in place and there are no loose or exposed portions. Double-check that each wire is connected to the correct terminal based on the color coding or labeling.
7. Test the connection: Once the wires are connected, it’s important to test the telephone jack’s functionality. Plug a telephone device into the jack and make a test call to confirm a clear dial tone and proper audio transmission. Check for any static, interference, or connectivity issues.
By following these steps, you can successfully connect the wires to the telephone jack. Paying attention to detail, ensuring a secure and proper connection, and testing the functionality will result in a reliable telephone connection for your home or office.
Testing the Telephone Jack
Once you have completed the installation and connected the wires to the telephone jack, it’s important to test the jack to ensure that it is functioning correctly. By conducting a thorough test, you can verify the quality of the telephone connection and address any potential issues. Here’s a step-by-step guide on how to test the telephone jack:
1. Plug in a telephone device: Start by plugging in a telephone device, such as a corded or cordless phone, into the telephone jack. Make sure the phone is properly connected and powered on.
2. Check for a dial tone: Lift the phone’s receiver or press the appropriate button to check for a dial tone. A clear and stable dial tone indicates that the telephone jack is properly connected and functioning correctly.
3. Make a test call: Dial a test number, such as a friend or family member’s phone number, to make a test call. During the call, pay attention to the audio quality, ensuring that the voice transmission is clear and without any static, distortion, or background noise.
4. Check for call clarity: Engage in a conversation during the test call to assess the clarity of the audio. Verify that there are no echoes, drops in volume, or interruptions during the call. Both parties should be able to hear each other clearly without any difficulties.
5. Test multiple lines (if applicable): If you have installed a telephone jack that supports multiple lines, test each line individually by dialing different numbers corresponding to the respective lines. Ensure that each line has a clear dial tone and functions correctly during the test calls.
6. Evaluate call quality during peak usage: Perform additional test calls during peak usage times, such as in the evening when network traffic is usually heavier. This will help identify any potential issues that may arise due to network congestion or interference.
7. Troubleshoot any issues: If you encounter any problems during the test, such as poor call quality, no dial tone, or other connectivity issues, troubleshoot the problem. Check the connections between the telephone jack, the wiring, and the telephone device. Verify that the wires are securely connected and that there are no loose connections or damaged wires.
By conducting a thorough test of the telephone jack, you can ensure that it is functioning properly and providing a reliable telephone connection. Address any issues promptly to avoid prolonged periods without a functioning telephone line.
Troubleshooting Common Issues
While installing and testing a telephone jack, you may encounter some common issues that can affect the functionality of the connection. Here are a few troubleshooting tips to help you address these issues:
1. No dial tone: If you don’t hear a dial tone when you pick up the phone receiver, check the wiring connections. Ensure that the telephone cable is securely connected to the telephone jack. If the connections are fine, test the phone with another jack to determine if the issue is with the phone or the jack itself.
2. Static or interference: If you experience static or interference during calls, it may be caused by faulty wiring or external factors. Check the wiring connections and make sure they are tight and secure. If the issue persists, try connecting the phone to a different jack to rule out any issues with the specific jack or wiring.
3. Cross-talk or echo: Cross-talk or echo occurs when you can hear another conversation or your own voice echoing during a call. This may be caused by improper wiring or a faulty telephone device. Ensure that the wires are connected to the correct terminals and that they are securely attached. If the problem persists, consider replacing the telephone device.
4. Noisy line: If you experience a consistently noisy line that affects call quality, it may be caused by external interference or a damaged telephone cable. Check for any loose connections or exposed wires in the telephone jack. If the issue persists, contact your service provider to rule out any external factors and request a line quality test.
5. Line dead or intermittent: If the telephone line is completely dead or intermittently drops calls, it may be due to a faulty telephone jack, wiring, or external factors. Start by checking the wiring connections and ensuring they are secure. If the problem persists, test the phone with another jack to determine if the issue is specific to one jack or affects multiple jacks.
6. Power issues: Some telephone devices require power, either through a power cord or batteries. If your phone is not turning on or not functioning properly, check the power source. Replace the batteries if necessary or plug the phone into a different power outlet.
7. Seeking professional assistance: If you have exhausted all troubleshooting options and the issues persist, it may be beneficial to seek professional assistance. Contact a qualified technician or your service provider to diagnose and repair any complex issues with the telephone jack or the overall telephone system.
Remember, it’s important to exercise caution and follow proper safety procedures when troubleshooting or working with telephone jacks and wires. If you are unsure or uncomfortable with any aspect of troubleshooting, consult a professional to ensure the problem is addressed correctly.
Tips for Maintaining the Telephone Jack
Maintaining your telephone jack is essential to ensure optimal performance and a reliable telephone connection. With proper care and maintenance, you can prolong the lifespan of the jack and minimize potential issues. Here are some tips for maintaining your telephone jack:
1. Keep the area clean: Regularly clean the area around the telephone jack to prevent dust, debris, and loose wires from interfering with the connection. Use a soft cloth or a small brush to gently clean the jack and its surroundings.
2. Avoid physical damage: Be mindful of the telephone jack and avoid accidentally bumping, dropping, or subjecting it to excessive force. Physical damage can result in loose connections, damaged terminals, or other issues that may affect the overall performance of the jack.
3. Secure the wiring: Periodically check the wiring connections to ensure they are secure and not loose. Loose connections can lead to call quality issues, static, or intermittent connectivity problems. If you notice any loose connections, tighten them gently but firmly.
4. Protect from moisture: Keep the telephone jack and its surrounding area dry and protected from moisture. Moisture exposure can cause corrosion on the wires and terminals, leading to poor connectivity or complete failure. If the jack is located in a high-moisture area, consider using protective covers or enclosures.
5. Avoid overloading the jack: Do not overload the telephone jack by connecting too many devices or using adapters or splitters excessively. Overloading can strain the jack’s capacity and result in degraded call quality or even damage to the telephone jack itself. Use appropriate splitters or filters if necessary.
6. Test regularly: Periodically test the telephone jack to ensure it is functioning properly. Test for a dial tone, call quality, and any noticeable issues. Regular testing can help identify potential problems early on and allow for timely troubleshooting or repair.
7. Keep an eye on wiring: Routinely inspect the wiring connected to the jack for any signs of wear, damage, or fraying. Replace any damaged wiring promptly to prevent further complications. If you notice any exposed wires, cover them with electrical tape or seek professional assistance.
8. Follow manufacturer’s guidelines: Follow the maintenance instructions provided by the manufacturer of the telephone jack. Each jack may have specific guidelines regarding cleaning, maintenance, or troubleshooting. Adhering to these guidelines can ensure proper care and optimal performance.
By following these tips, you can maintain your telephone jack effectively and enjoy a reliable and clear telephone connection. Regular maintenance and attention to detail will help prevent issues and maximize the lifespan of your telephone jack.
Benefits of Installing a Telephone Jack
Installing a telephone jack offers a range of benefits, making it a valuable addition to any home or office communication system. While modern technology has revolutionized communication with wireless devices and internet-based platforms, a traditional telephone connection still holds significant advantages. Here are some benefits of installing a telephone jack:
1. Reliable connection: Unlike mobile signals that can be affected by network congestion, signal strength, or battery life, a landline connection provided by a telephone jack offers a stable and consistent connection. This reliability makes it the go-to option for critical calls or emergency situations where a stable and uninterrupted connection is essential.
2. Enhanced security: Landline connections provided by telephone jacks offer an added layer of security. Unlike internet-based communication platforms, landline connections are not susceptible to hacking or unauthorized access. This is particularly valuable for businesses that handle sensitive information or individuals concerned about privacy.
3. Compatibility with devices and services: Telephone jacks are compatible with various devices and services that rely on a telephone line for operation. From fax machines and credit card terminals to alarm systems and older equipment, a telephone jack ensures seamless connectivity without the need for additional adapters or converters.
4. Dedicated communication line: Telephone jacks allow for a dedicated communication line, ensuring that multiple conversations can take place simultaneously. This is particularly useful in households or offices with multiple users where everyone can have equal access to a clear connection without interference.
5. Backup communication method: Telephone jacks serve as a reliable backup communication method. In situations where internet or mobile signal disruptions occur, having a landline connection ensures that you remain connected even during power outages or natural disasters that may affect wireless communication.
6. Excellent call quality: Landline connections provided by telephone jacks often offer better call quality compared to mobile or internet-based calls. Clearer audio, reduced background noise, and fewer dropped calls contribute to a more satisfying and efficient communication experience.
7. Reliable for emergencies: Telephone jacks are a reliable form of communication during emergencies. In situations where mobile networks may become overloaded or unreliable, landline connections provided by telephone jacks can still function reliably, allowing you to make critical calls for help or to notify emergency services.
8. Cost-effective long-distance calling: Traditional telephone lines provided by telephone jacks often offer cheaper long-distance calling rates compared to mobile or internet-based platforms. This can be beneficial for individuals or businesses that regularly make long-distance calls and want to save on communication costs.
By installing a telephone jack, you gain the advantages of a reliable connection, enhanced security, compatibility with various devices, dedicated communication lines, backup communication during emergencies, superior call quality, and cost-effective long-distance calling. These benefits make a telephone jack a valuable asset for both personal and professional needs.