
Step 1: Open the Phone App
Opening the Phone app on your Redmi device is the initial step towards customizing the call settings, including disabling auto call answering. This simple yet essential process can be accomplished by following a few straightforward steps.
Firstly, locate the Phone app on your Redmi device's home screen or app drawer. The Phone app icon typically features a handset or a phone receiver symbol, making it easily recognizable among the array of app icons on your device.
Once you've located the Phone app, tap on the icon to launch the application. As the app opens, you'll be greeted by the familiar interface, featuring tabs or sections such as Dialer, Call History, Contacts, and more, depending on the specific layout of the Phone app on your Redmi device.
Upon opening the Phone app, you'll notice the Dialer tab, which is the default view that allows you to manually dial numbers and make outgoing calls. Additionally, you may observe the Call History tab, which conveniently displays your recent incoming and outgoing calls, providing quick access to your call records.
By accessing the Phone app, you gain immediate access to essential call management features, enabling you to navigate through various settings and options to tailor your calling experience to your preferences.
In essence, opening the Phone app sets the stage for the subsequent steps in customizing call settings on your Redmi device. Whether you seek to disable auto call answering, modify call forwarding preferences, or explore additional call-related configurations, initiating the process by opening the Phone app serves as the gateway to a seamless and personalized calling experience.
With the Phone app readily accessible, you're poised to delve into the intricacies of call settings and make adjustments that align with your unique communication needs. This foundational step paves the way for a user-centric approach to managing incoming calls and optimizing the overall calling functionality on your Redmi device.
In summary, opening the Phone app on your Redmi device marks the commencement of the journey toward tailoring call settings to suit your individual preferences, ultimately enhancing your calling experience through personalized configurations and seamless call management.
Step 2: Go to Settings
After successfully opening the Phone app on your Redmi device, the next pivotal step in the process of disabling auto call answering involves navigating to the settings menu. This crucial maneuver grants you access to a plethora of customizable options, empowering you to tailor the device's functionalities to your specific preferences.
To embark on this step, you can swiftly transition to the settings menu by locating and tapping the "Settings" app on your device's home screen or app drawer. The Settings app, often denoted by a gear or cogwheel icon, serves as the central hub for configuring various aspects of your Redmi device, ranging from network and connectivity settings to display and sound preferences.
Upon entering the Settings app, you are greeted by an array of categories and submenus, each housing a distinct set of options for fine-tuning your device's behavior and performance. The layout and organization of the settings may vary slightly based on the specific model and software version of your Redmi device; however, the fundamental structure typically encompasses sections such as Wireless & Networks, Device, Personal, and System.
As you delve into the Settings app, you're presented with a wealth of customization possibilities, allowing you to tailor the device's features to suit your unique needs and usage patterns. The intuitive design of the settings interface facilitates seamless navigation, ensuring that you can effortlessly locate the desired options without unnecessary complexity.
Once within the settings menu, you can proceed to identify and select the "Call Settings" or "Additional Settings" category, depending on the specific terminology employed in the user interface of your Redmi device. This critical step brings you closer to the targeted configuration options related to call management, including the setting for disabling auto call answering.
By venturing into the call settings section, you gain access to a diverse range of call-related preferences, spanning from call forwarding and call barring to caller ID and auto call answering. This comprehensive array of options empowers you to exert precise control over how incoming calls are handled, ensuring that the device aligns with your communication preferences and operational requirements.
In essence, navigating to the settings menu on your Redmi device represents a pivotal juncture in the quest to disable auto call answering, as it sets the stage for accessing the specific call settings that govern the device's behavior during incoming calls. This strategic maneuver underscores the user-centric design philosophy embraced by Redmi, placing the power of customization squarely in the hands of the device owner.
As you seamlessly transition into the settings menu and explore the call settings section, you're poised to embark on the subsequent steps that lead to the successful disabling of auto call answering on your Redmi device. This seamless progression through the settings interface reflects the user-friendly approach adopted by Redmi, ensuring that users can effortlessly tailor their device to suit their unique communication preferences and operational needs.
Step 3: Select Call Settings
Upon entering the settings menu on your Redmi device, the pivotal next step in the process of disabling auto call answering involves navigating to the specific section dedicated to call settings. This critical maneuver provides access to a myriad of customizable options, empowering you to tailor the device's call management behavior to align with your unique preferences and operational requirements.
To embark on this step, you can seamlessly transition to the call settings section by methodically navigating through the intuitive settings interface on your Redmi device. Within the settings menu, you may encounter various categories and submenus, each offering a distinct array of options for configuring different aspects of the device's functionality. Depending on the specific model and software version of your Redmi device, the call settings may be prominently featured within the main settings menu or nested within an "Additional Settings" or "System" category.
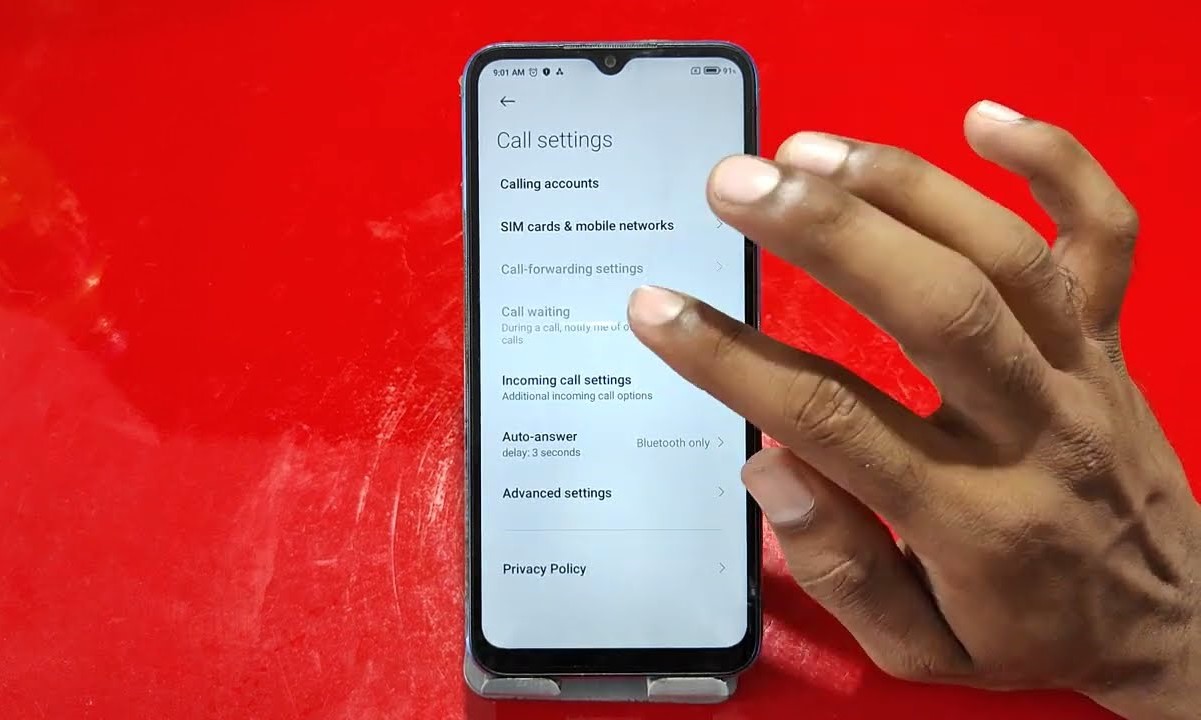
As you delve into the call settings section, you're presented with a comprehensive spectrum of call-related preferences, ranging from call forwarding and call barring to caller ID and auto call answering. This expansive array of options underscores Redmi's commitment to user-centric design, as it empowers you to exert precise control over how incoming calls are handled, ensuring that the device's behavior aligns seamlessly with your communication preferences and operational needs.
Within the call settings section, you'll likely encounter a diverse range of configurable options, each accompanied by clear and concise descriptions to facilitate informed decision-making. These options may encompass call forwarding settings, enabling you to redirect incoming calls to an alternative number based on predefined conditions, as well as call barring configurations, which allow you to restrict certain types of outgoing or incoming calls.
Moreover, the call settings section may feature caller ID preferences, affording you the ability to customize how your phone number is displayed when making outgoing calls. Additionally, you'll encounter the pivotal setting for auto call answering, which, when disabled, prevents the device from automatically answering incoming calls without user intervention.
By navigating to the call settings section, you gain access to a wealth of customization possibilities that lay the foundation for tailoring the device's call management behavior to suit your individual preferences and operational requirements. This strategic progression through the call settings interface underscores Redmi's commitment to delivering a seamless and user-centric experience, ensuring that users can effortlessly configure their devices to align with their unique communication needs.
As you seamlessly transition into the call settings section and explore the diverse range of configurable options, you're poised to proceed to the subsequent steps that lead to the successful disabling of auto call answering on your Redmi device. This seamless progression through the call settings interface reflects the user-friendly approach embraced by Redmi, ensuring that users can effortlessly tailor their devices to suit their unique communication preferences and operational needs.
Step 4: Disable Auto Call Answering
Upon reaching the pivotal juncture of disabling auto call answering on your Redmi device, you are poised to embark on the crucial step of navigating through the call settings interface to locate and deactivate the auto call answering feature. This essential maneuver empowers you to exert precise control over how incoming calls are handled, ensuring that the device aligns seamlessly with your communication preferences and operational needs.
To initiate the process of disabling auto call answering, you can seamlessly navigate within the call settings section on your Redmi device, where a diverse array of configurable options awaits. Within this interface, you'll likely encounter the specific setting for auto call answering, which, when enabled, allows the device to automatically answer incoming calls without user intervention.
In order to disable this feature, you can meticulously navigate through the call settings interface, methodically identifying and selecting the option for auto call answering. Once located, you can proceed to deactivate this setting, thereby preventing the device from automatically answering incoming calls without your explicit consent.
Upon successfully disabling auto call answering, you effectively reclaim control over the device's behavior during incoming calls, ensuring that each call is handled in accordance with your preferences. This strategic customization empowers you to tailor the call management functionality of your Redmi device to suit your unique communication needs, fostering a seamless and user-centric calling experience.
By seamlessly navigating through the call settings interface and deactivating the auto call answering feature, you assert authority over how incoming calls are managed, underscoring the user-centric design philosophy embraced by Redmi. This pivotal customization capability ensures that the device aligns seamlessly with your communication preferences, empowering you to engage in effortless and personalized call management.
In essence, the successful disabling of auto call answering on your Redmi device marks a significant milestone in tailoring the device's call management behavior to suit your individual preferences and operational requirements. This strategic maneuver underscores Redmi's commitment to delivering a seamless and user-centric experience, ensuring that users can effortlessly configure their devices to align with their unique communication needs.
Step 5: Test the Settings
After successfully disabling the auto call answering feature on your Redmi device, it is imperative to proceed with testing the modified settings to ensure that the desired changes have been implemented effectively. This pivotal step allows you to validate the efficacy of your customization efforts and ascertain that the device now aligns seamlessly with your communication preferences and operational needs.
To commence the testing process, you can initiate a simulated incoming call to your Redmi device, either from an alternate phone or through a call simulation service. As the incoming call is received by your device, closely observe its behavior to ascertain whether the auto call answering feature remains disabled as intended.
Upon receiving the simulated incoming call, you should notice that the device refrains from automatically answering the call without your explicit intervention. This observable behavior serves as a definitive indicator that the auto call answering feature has been successfully disabled, thereby affirming the efficacy of your customization efforts.
In addition to validating the absence of auto call answering, you may also wish to assess the device's response to the incoming call in a broader context. By answering the call manually and engaging in a brief conversation, you can further confirm that the call management functionalities align seamlessly with your preferences, fostering a user-centric and personalized calling experience.
Furthermore, it is prudent to test the call forwarding and call barring functionalities, if applicable, to ensure that the modifications made to the call settings have been implemented effectively across the spectrum of call management features. By redirecting calls and evaluating the device's response to various call scenarios, you can comprehensively validate the integrity of the customized call settings.
In essence, testing the modified call settings on your Redmi device serves as a crucial validation step, allowing you to confirm the successful disabling of auto call answering and assess the overall responsiveness of the device to incoming calls. This meticulous testing process empowers you to ensure that the device's call management behavior aligns seamlessly with your unique communication preferences, culminating in a user-centric and tailored calling experience.
By meticulously conducting the testing process, you reaffirm the efficacy of your customization endeavors and validate the seamless alignment of the device's call management functionalities with your individual preferences. This strategic validation process underscores the user-centric design philosophy embraced by Redmi, ensuring that users can effortlessly tailor their devices to suit their unique communication needs and operational requirements.