
Common Issues with the Wii U Gamepad
Common Issues with the Wii U Gamepad
As a dedicated Wii U player, encountering issues with the gamepad can be frustrating. Several common problems may arise, hampering your gaming experience. Understanding these issues is crucial to effectively troubleshoot and resolve them.
1. Unresponsive Touch Screen: The touch screen may become unresponsive, hindering gameplay and navigation through menus.
2. Battery Drain: Some users have reported rapid battery drain, leading to frequent recharging or a shortened gaming session.
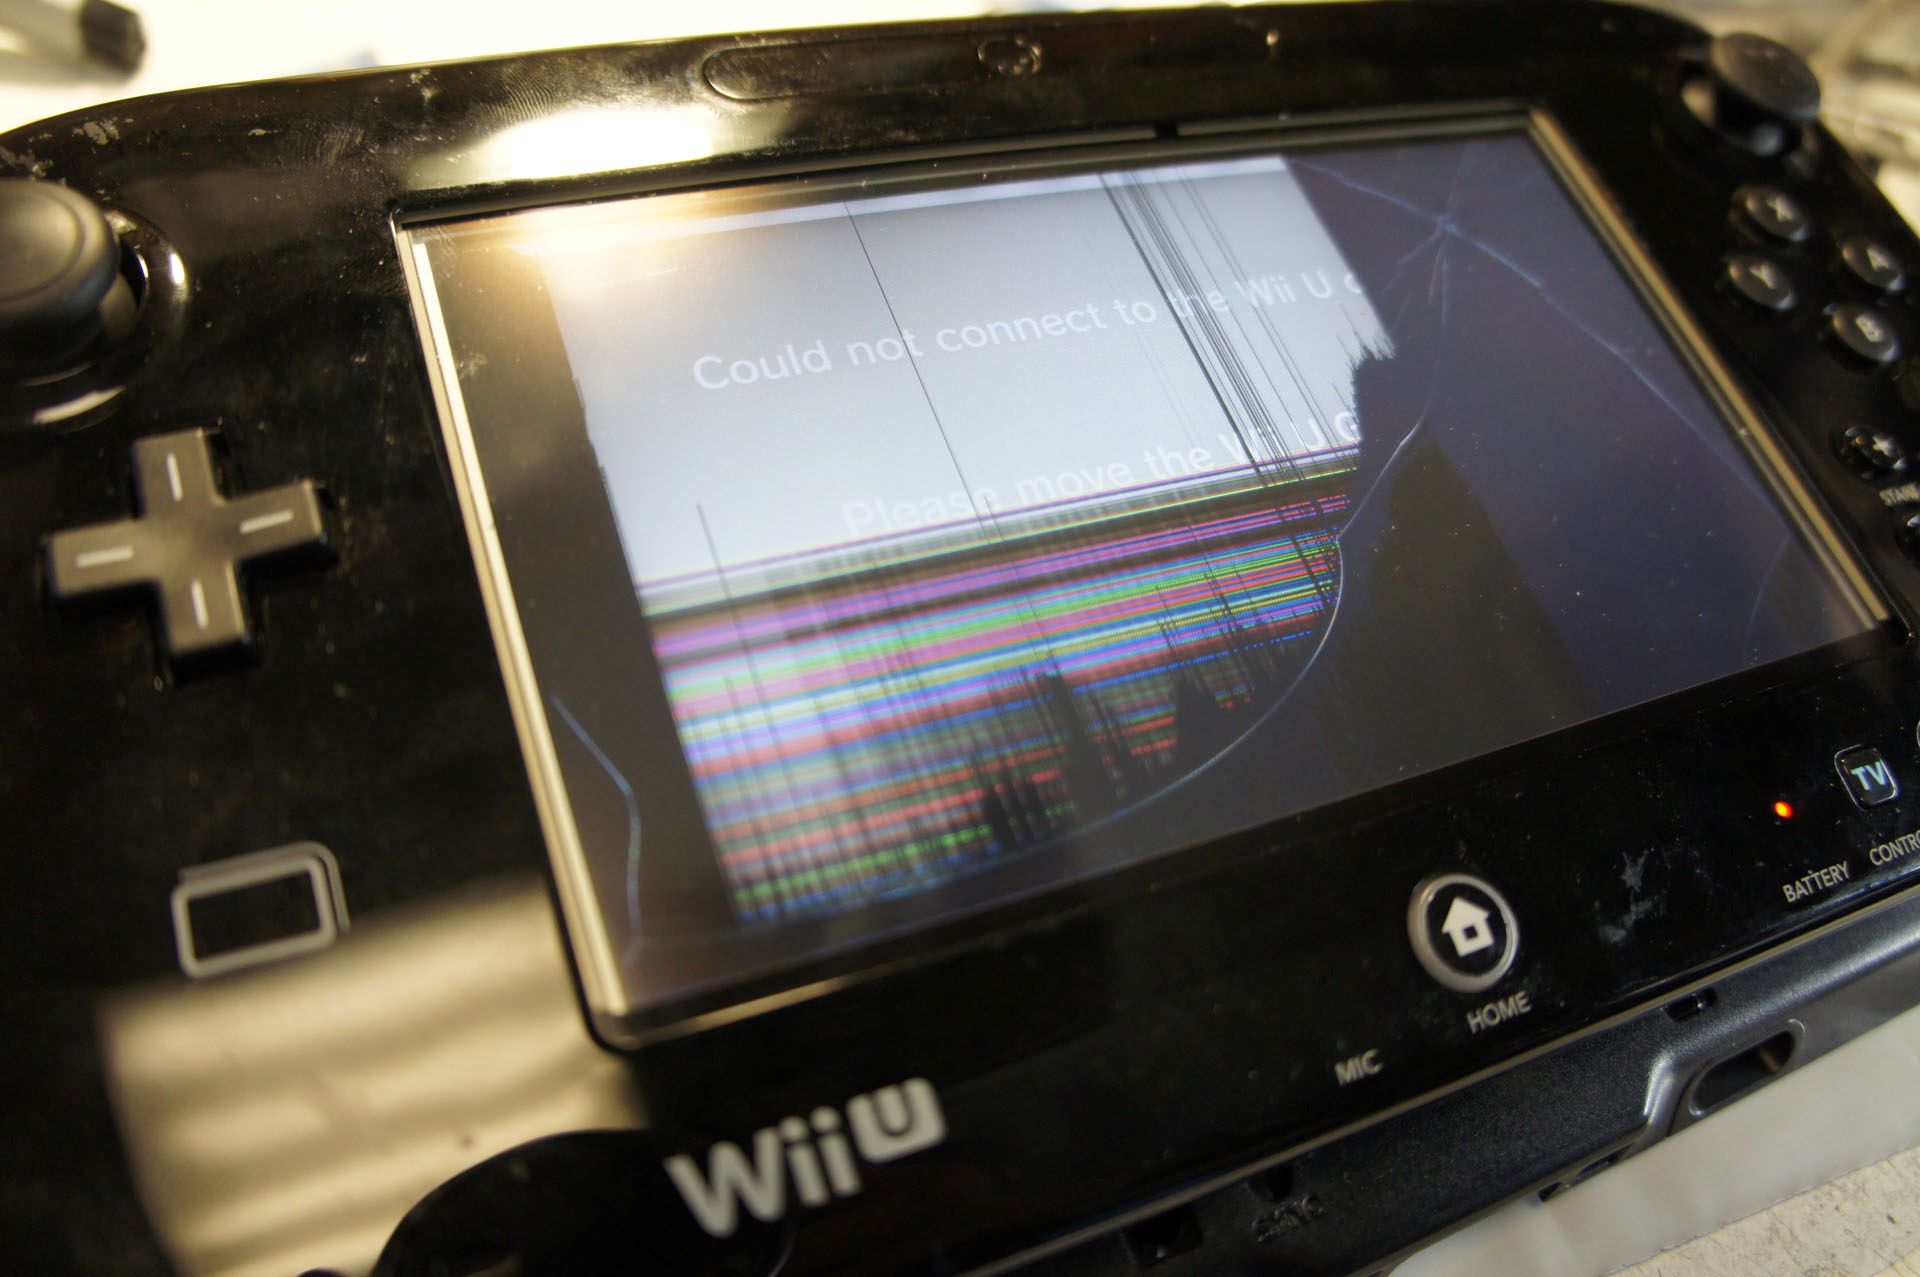
3. Connection Problems: The gamepad may experience difficulty connecting to the console, resulting in interrupted gameplay or a complete loss of functionality.
4. Physical Damage: Accidental drops or impacts can cause physical damage to the gamepad, such as cracks, scratches, or malfunctioning buttons.
5. Audio Distortion: Issues with sound output, including crackling or distorted audio, can disrupt the immersive gaming experience.
Recognizing these common issues is the first step in addressing any problems with your Wii U gamepad. By understanding the nature of these issues, you can take appropriate measures to troubleshoot and resolve them, ensuring an uninterrupted gaming experience.
Troubleshooting Steps for the Wii U Gamepad
Troubleshooting Steps for the Wii U Gamepad
Encountering issues with your Wii U gamepad can be disheartening, but there are several troubleshooting steps you can take to address common problems and restore functionality. Here are some effective solutions to consider:
-
Reset the Gamepad: Start by resetting the gamepad. Press and hold the power button until the device powers off, then turn it back on to see if the issue persists.
-
Check Battery Life: If you're experiencing battery drain, ensure that the gamepad is fully charged. If the issue persists, consider replacing the battery with a new one.
-
Clean the Touch Screen: An unresponsive touch screen may benefit from a gentle cleaning. Use a soft, microfiber cloth to remove any dirt or smudges that could be affecting its responsiveness.
-
Re-Sync the Gamepad: If you're encountering connection problems, try re-syncing the gamepad with the console. Access the Wii U settings and follow the instructions to establish a new connection.
-
Inspect for Physical Damage: If the gamepad has suffered physical damage, such as cracks or malfunctioning buttons, consider seeking professional repair services or replacing the gamepad altogether.
-
Update Firmware: Ensure that both the gamepad and the console have the latest firmware updates installed. Updating the firmware can resolve compatibility issues and improve overall performance.
-
Address Audio Issues: If you're experiencing audio distortion, check the gamepad's audio settings and the connection to any external audio devices. Adjust the settings and connections as needed to address the problem.
-
Contact Customer Support: If the troubleshooting steps don't resolve the issue, consider reaching out to Nintendo's customer support for further assistance and guidance.
By following these troubleshooting steps, you can effectively address common issues with the Wii U gamepad and restore its functionality, allowing you to enjoy uninterrupted gaming sessions.
Sending the Wii U Gamepad for Repair
Sending the Wii U Gamepad for Repair
When troubleshooting efforts fail to resolve issues with your Wii U gamepad, sending the device for professional repair may be the most viable solution. Here are the essential steps to consider when sending your gamepad for repair:
-
Assess Warranty Coverage: Before proceeding with the repair process, check if your gamepad is still under warranty. If it is, you may be eligible for cost-free repairs or a replacement.
-
Contact Nintendo Support: Reach out to Nintendo's customer support to initiate the repair process. They will provide guidance on the necessary steps and may offer troubleshooting assistance before recommending a repair.
-
Obtain Repair Authorization: If your gamepad requires professional repair, Nintendo's support team will guide you through obtaining a repair authorization and provide instructions for sending in the device.
-
Package the Gamepad Securely: When preparing the gamepad for shipment, ensure it is securely packaged to prevent any further damage during transit. Use appropriate padding and a sturdy shipping box.
-
Include Necessary Information: When sending the gamepad for repair, include a detailed description of the issues you're experiencing, as well as your contact information and any relevant documentation, such as proof of purchase or warranty details.
-
Shipping and Tracking: Utilize a reliable shipping service with tracking capabilities to ensure the safe delivery of your gamepad to the repair center. Keep a record of the tracking information for reference.
-
Wait for Assessment and Repair: Once the gamepad reaches the repair center, the technicians will assess the issues and proceed with the necessary repairs. Depending on the extent of the repairs needed, the process may take some time.
-
Receive and Test the Repaired Gamepad: Upon completion of the repairs, the gamepad will be returned to you. Test the device thoroughly to ensure that the issues have been effectively resolved.
By following these steps and entrusting your Wii U gamepad to professional repair services, you can potentially restore the device to its optimal functionality, allowing you to resume your gaming adventures with confidence.
Replacing the Wii U Gamepad
Replacing the Wii U Gamepad
When all troubleshooting efforts and repair options have been exhausted, replacing the Wii U gamepad may be the most practical course of action. Here are the essential steps to consider when replacing your gamepad:
-
Check Warranty Coverage: If your gamepad is still under warranty, explore the warranty terms to determine if it covers a replacement. Contact Nintendo's customer support to inquire about warranty-related replacement options.
-
Explore Replacement Programs: Nintendo may offer replacement programs for specific hardware issues or provide options for obtaining a new gamepad at a discounted price. Research the available replacement programs and assess their suitability for your situation.
-
Purchase a New Gamepad: If your gamepad is not covered by warranty or replacement programs, you have the option to purchase a new gamepad either directly from Nintendo or through authorized retailers.
-
Verify Compatibility: Ensure that the replacement gamepad is compatible with your Wii U console. Check for any specific model numbers or compatibility requirements to guarantee a seamless integration with your gaming setup.
-
Transfer Data and Settings: If applicable, transfer any saved data, settings, or profiles from your old gamepad to the new one. Follow the recommended procedures for transferring data to ensure that your gaming experience continues seamlessly.
-
Dispose of the Old Gamepad Responsibly: If your old gamepad is beyond repair and is being replaced, consider recycling or disposing of it in an environmentally responsible manner. Check local regulations for electronic waste disposal guidelines.
-
Test the New Gamepad: Once you have the new gamepad in hand, thoroughly test its functionality to ensure that it operates as expected. Verify that all buttons, the touch screen, and other features are working correctly.
By considering these steps and exploring replacement options for your Wii U gamepad, you can transition to a new device seamlessly, allowing you to continue enjoying your gaming experiences without interruption.
Preventing Future Damage to the Wii U Gamepad
Preventing Future Damage to the Wii U Gamepad
After addressing issues with your Wii U gamepad, it’s essential to take proactive measures to prevent future damage and maintain the device’s optimal functionality. Consider the following strategies to safeguard your gamepad from potential harm:
-
Use Protective Cases: Invest in a durable and well-fitted protective case for your gamepad. A quality case can shield the device from accidental drops, impacts, and scratches, preserving its integrity.
-
Handle with Care: Handle the gamepad with care, avoiding sudden impacts or rough handling. Encourage responsible usage, especially if younger players are using the device.
-
Regular Cleaning and Maintenance: Keep the gamepad clean by regularly wiping the touch screen and surfaces with a soft, dry cloth. Avoid using harsh chemicals or abrasive materials that may damage the device.
-
Proper Storage: When not in use, store the gamepad in a safe and designated location, away from potential hazards such as liquids, extreme temperatures, or direct sunlight.
-
Mindful Charging Practices: Follow recommended charging practices to prolong the battery life of the gamepad. Avoid overcharging or exposing the device to extreme temperatures while charging.
-
Regular Inspections: Periodically inspect the gamepad for any signs of wear, loose components, or potential issues. Address any concerns promptly to prevent them from escalating into more significant problems.
-
Establish Clear Rules and Guidelines: If the gamepad is shared among family members or friends, establish clear rules for usage and handling to promote responsible and respectful use of the device.
-
Stay Informed about Software Updates: Keep the gamepad and the Wii U console updated with the latest firmware and software releases. Updates often include performance enhancements and bug fixes that can contribute to the overall longevity of the device.
By integrating these preventive measures into your routine, you can significantly reduce the risk of future damage to your Wii U gamepad, prolonging its lifespan and ensuring a consistently enjoyable gaming experience.