
Choosing the Right Materials
When embarking on a DIY phone case project, selecting the appropriate materials is essential for achieving a durable and visually appealing end product. Here are the key factors to consider when choosing the right materials for your custom phone case:
- Material Durability: Opt for materials that provide ample protection for your phone while ensuring longevity. High-quality silicone, sturdy plastic, or durable rubber are excellent choices for safeguarding your device against accidental drops and impacts.
- Aesthetic Appeal: Consider the visual appeal of the materials. Reflect on the color, texture, and transparency of the materials to align with your desired design and style. Transparent materials allow you to showcase the original color and design of your phone, while colored or patterned materials can add a personalized touch.
- Compatibility: Ensure that the materials you select are compatible with your phone model. Take accurate measurements of your phone to guarantee a precise fit, and consider any necessary cutouts for buttons, ports, and the camera lens.
- Ease of Customization: Choose materials that are conducive to customization. Opt for materials that can be easily cut, shaped, and decorated to accommodate your design preferences.
By carefully evaluating these factors, you can make informed decisions when sourcing materials for your DIY phone case. Keep in mind that the chosen materials will not only impact the aesthetics of the final product but also play a crucial role in providing adequate protection for your phone. Once you have selected the ideal materials, you can proceed to the next phase of the DIY phone case project: designing your custom creation.
Designing Your Phone Case
Designing your DIY phone case allows for a personalized and unique creation that reflects your individual style and preferences. Here are the essential steps to consider when designing your custom phone case:
- Sketching Your Design: Begin by sketching out your desired design on paper. Consider the placement of any embellishments, such as rhinestones or decals, and visualize how the design will complement your phone.
- Choosing Color Schemes: Select a color scheme that resonates with your personal taste. Whether you opt for bold and vibrant hues, subtle pastel tones, or a monochromatic palette, the color scheme should harmonize with your overall design concept.
- Incorporating Personal Elements: Infuse your design with personal elements that hold significance to you. This could include incorporating your favorite quotes, symbols, or images that resonate with your interests and passions.
- Considering Texture and Finish: Explore different textures and finishes to add depth and visual interest to your phone case. Whether you prefer a smooth and glossy finish, a matte texture, or a tactile surface, the choice of texture can enhance the tactile experience of your custom creation.
By meticulously planning and conceptualizing your design, you can ensure that your DIY phone case encapsulates your unique personality and style. Once you have finalized the design, you can proceed to the next phase of the project: cutting and shaping the materials to bring your vision to life.
Cutting and Shaping the Materials
Once you have designed your custom phone case, the next crucial step is to bring your vision to life by cutting and shaping the selected materials. This phase requires precision and attention to detail to ensure a seamless and tailored fit for your phone. Here’s a guide to effectively cutting and shaping the materials for your DIY phone case:
- Tracing the Template: Begin by tracing the outline of your phone onto the chosen material. Use a pencil or a washable marker to create an accurate template that aligns with the dimensions of your phone, including the necessary cutouts for buttons, ports, and the camera.
- Utilizing Cutting Tools: Employ precision cutting tools such as sharp scissors, craft knives, or rotary cutters to cut along the traced template. Exercise caution and patience to achieve clean and precise cuts, ensuring that the material conforms to the contours of your phone.
- Shaping and Smoothing Edges: After cutting the main shape of the phone case, refine the edges and corners to achieve a polished look. Sand the edges lightly with fine-grit sandpaper or utilize a filing tool to smooth any rough edges and create a professional finish.
- Creating Additional Layers: If your design incorporates multiple layers or embellishments, repeat the cutting and shaping process for each component, ensuring that they align seamlessly when assembled.
By meticulously executing the cutting and shaping phase, you can ensure that the materials are tailored to fit your phone precisely, resulting in a professional-looking and functional DIY phone case. With the materials accurately cut and shaped, you are now ready to progress to the assembly phase, where your custom phone case will take its final form.
Assembling Your DIY Phone Case
Assembling your DIY phone case marks the pivotal stage where the carefully crafted components come together to form a functional and visually captivating protective cover for your phone. This phase requires precision and attention to detail to ensure a secure and seamless assembly. Here’s a comprehensive guide to effectively assembling your custom phone case:
- Arranging the Components: Lay out the cut and shaped materials in the intended arrangement, ensuring that each component aligns accurately with the design concept. This step allows you to visualize the final assembly before securing the components together.
- Applying Adhesive: Utilize a reliable adhesive suitable for the chosen materials, such as strong glue or adhesive tape, to affix the components together. Apply the adhesive sparingly and precisely to avoid any excess seepage that may compromise the aesthetics of the phone case.
- Securing the Fit: Press the assembled components firmly together, ensuring a snug and secure fit. Pay close attention to any overlapping layers or intricate details to guarantee a cohesive and polished final result.
- Allowing for Drying Time: If the adhesive requires drying time, follow the manufacturer’s instructions to allow the assembled phone case to set and bond securely. Exercise patience during this phase to prevent any premature handling that may disrupt the assembly.
By meticulously following these assembly steps, you can ensure that your DIY phone case is expertly crafted and structurally sound. The assembly phase is a critical juncture in the DIY process, as it transforms the individual components into a unified and functional accessory for your phone. With the phone case securely assembled, you can now proceed to the final phase: adding personal touches and decorations to further embellish your custom creation.
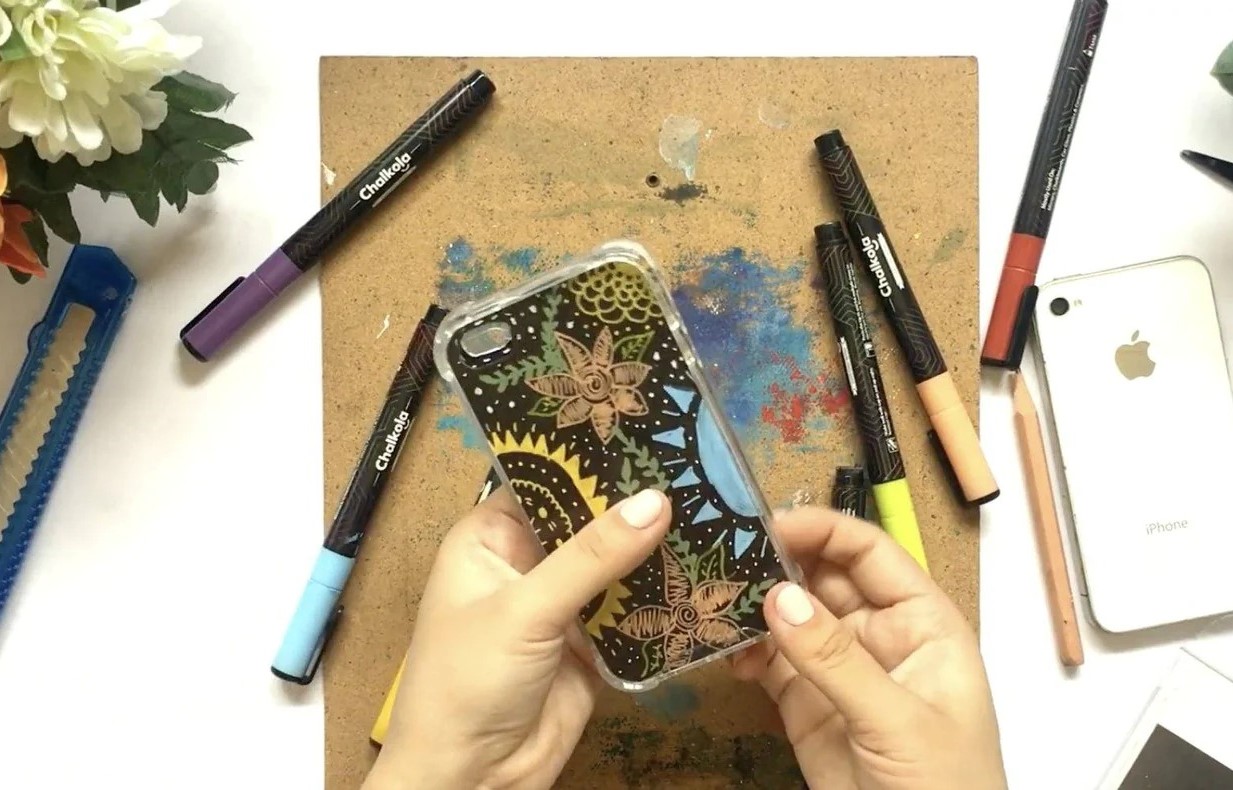
Adding Personal Touches and Decorations
Once the fundamental structure of your DIY phone case is in place, the final phase involves infusing your creation with personal touches and embellishments to elevate its visual appeal and reflect your unique style. This stage allows for creative expression and customization, enabling you to transform your phone case into a one-of-a-kind accessory. Here’s a comprehensive guide to adding personal touches and decorations to your custom phone case:
- Embellishing with Decals and Stickers: Explore a myriad of decorative decals, stickers, and vinyl embellishments to adorn your phone case. Whether you opt for intricate designs, quirky patterns, or minimalist accents, these decorative elements can enhance the aesthetic allure of your creation.
- Applying Rhinestones and Gems: Embellish your phone case with the subtle sparkle of rhinestones or gems, strategically placing them to create eye-catching accents. The addition of these embellishments can infuse a touch of glamour and individuality into your design.
- Customizing with Paint or Markers: Exercise your artistic flair by customizing the phone case with acrylic paints, fabric markers, or permanent markers. Whether you opt for intricate hand-drawn designs, abstract motifs, or personalized monograms, painting or drawing directly onto the case allows for a truly bespoke creation.
- Exploring Textured Elements: Consider incorporating textured elements such as fabric patches, lace appliques, or embossed designs to introduce tactile interest to your phone case. These textured additions can create a multi-dimensional and tactile experience, adding an extra layer of sophistication to your design.
By artfully integrating these personal touches and decorations, you can transform your DIY phone case into a captivating and personalized accessory that resonates with your individual style. This final phase allows for creative experimentation and artistic expression, culminating in a unique and functional masterpiece that reflects your personality and creativity.