
Choosing the Right Time to Plant Summer Bulbs
Planting summer bulbs can add a burst of color and beauty to any garden. However, choosing the right time to plant these bulbs is crucial for their successful growth and blooming. While the specific timing may vary depending on your climate and the type of bulbs you’re planting, there are some general guidelines you can follow.
Consider Your Climate:
The first step in determining the best time to plant summer bulbs is to consider your climate. Different regions have different growing seasons and weather patterns, which can impact the success of your bulbs. Research the USDA Hardiness Zone for your area to understand the climate conditions and frost dates.
Identify the Ideal Planting Window:
Once you have an understanding of your climate, identify the ideal planting window for your specific bulbs. Most summer bulbs prefer to be planted when the soil has warmed up but before the heat of summer arrives. This usually falls between spring and early summer.
Spring Planting for Summer Blooms:
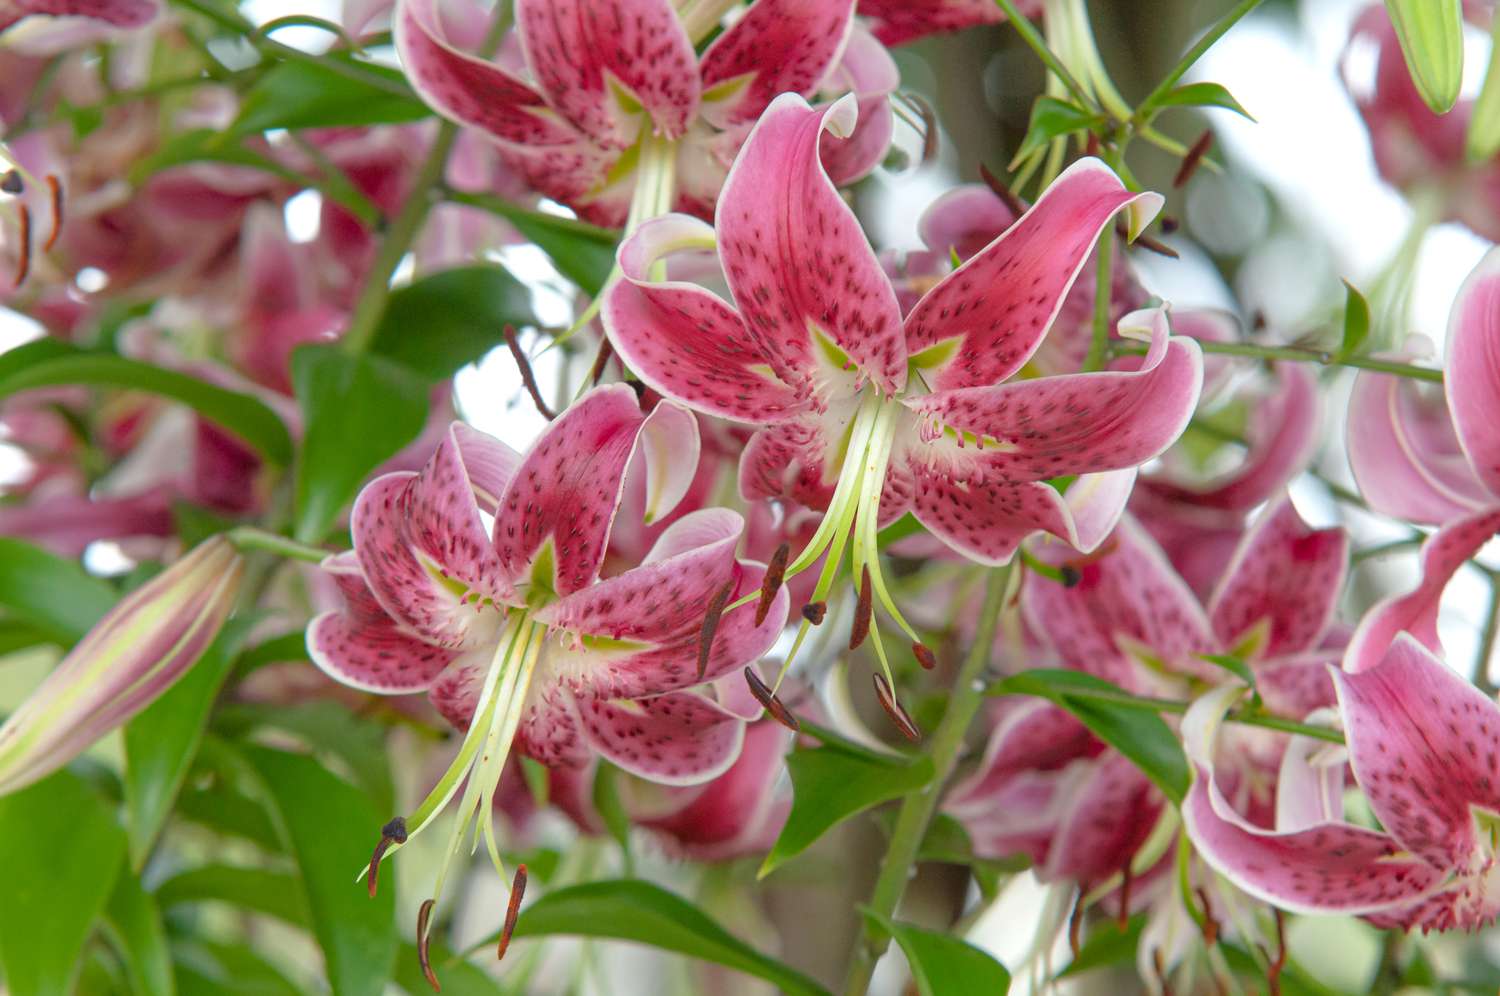
For many summer bulbs, spring planting is the best option. This allows the bulbs to establish their roots and start growing before the hotter temperatures set in. Examples of bulbs that are commonly planted in spring include dahlias, gladiolus, and lilies.
Understanding the Frost-Free Date:
One important factor to consider when planting summer bulbs is the frost-free date for your area. Frost can damage or kill young bulb plants, so it’s crucial to wait until the threat of frost has passed. Consult your local gardening center or cooperative extension service to determine the average frost-free date in your region.
Preparing the Soil for Bulb Planting:
Before planting your summer bulbs, it’s essential to prepare the soil properly. The soil should be well-drained, loose, and rich in organic matter. Remove any weeds or debris from the planting area and incorporate compost or well-aged manure to improve soil fertility.
Ensuring Proper Sunlight and Drainage:
Most summer bulbs thrive in full sun or partial shade. Ensure that the planting location receives the appropriate amount of sunlight each day. Additionally, proper drainage is crucial to prevent the bulbs from rotting. Avoid planting bulbs in areas prone to waterlogging or heavy clay soils.
Taking Care of Summer Bulbs During Growth:
Once the bulbs are planted, providing proper care during their growth period is essential. Water them regularly, keeping the soil moist but not waterlogged. Apply a balanced fertilizer every few weeks to promote healthy growth and blooming.
Protecting Bulbs from Extreme Weather Conditions:
Summer bulbs can be sensitive to extreme weather conditions like heatwaves or heavy rainfall. Take precautions to protect them from these conditions by providing shade, using mulch to regulate soil temperature, and providing proper drainage.
Harvesting and Storing Summer Bulbs for the Next Season:
Once your summer bulbs have finished blooming, you can harvest them for storage or propagation. Carefully dig up the bulbs after the foliage has withered and dried. Clean off any excess soil and store them in a cool, dry place for the next planting season.
By choosing the right time to plant summer bulbs, you give them the best chance to thrive and produce beautiful blooms. Remember to consider your climate, planting windows, and provide proper care throughout their growth cycle. With a little planning and care, you can enjoy a stunning array of summer flowers in your garden.
Consider Your Climate
When it comes to planting summer bulbs, considering your climate is crucial for successful growth. Different regions have different weather patterns, temperatures, and growing seasons, which can significantly impact the viability and performance of your bulbs. By understanding your climate, you can make informed decisions and choose the right bulbs for your specific conditions.
Start by researching the USDA Hardiness Zone for your area. The USDA Hardiness Zone map divides the United States and Canada into different zones based on average annual minimum temperatures. This classification gives you a general idea of the climate conditions in your region and helps you select bulbs that are suitable for your zone.
Pay attention to the average temperature range and frost dates for your area. Some bulbs, like gladiolus or begonias, thrive in warmer climates, while others, such as tulips or daffodils, prefer cooler regions. Understanding the temperature and frost tolerance of different bulbs will help you determine if they are suitable for your climate and if you need to take extra precautions during colder months.
Consider the rainfall patterns in your area as well. Some bulbs, like rain lilies or calla lilies, can tolerate periods of drought, while others, like iris or lily of the valley, prefer consistently moist soil. By matching the water requirements of bulbs with your area’s rainfall patterns, you can optimize their growth and reduce the need for supplemental watering.
Take note of any microclimates in your garden. Microclimates are small pockets within your garden that differ from the overall climate of your area. Factors such as shade from trees, slopes, or proximity to buildings can create variations in temperature, wind exposure, and moisture levels. Understanding these microclimates allows you to choose bulbs that are better suited to specific locations within your garden.
Consult local gardening resources or talk to experienced gardeners in your area for personalized advice on bulb selection based on your climate. They can provide valuable insights and recommendations specific to your region.
By considering your climate, you can ensure that the bulbs you choose have the best chance of thriving in your garden. Matching the temperature, rainfall, and other environmental factors with the specific requirements of the bulbs will set them up for success and help you create a vibrant and flourishing garden.
Identify the Ideal Planting Window
When it comes to planting summer bulbs, timing is everything. Identifying the ideal planting window for your specific bulbs is crucial for their successful growth and development. While the exact timing may vary depending on your climate and the specific type of bulbs you’re planting, there are some general guidelines you can follow to ensure optimal planting conditions.
Start by assessing the type of summer bulbs you want to plant. Different bulbs have different growth requirements and bloom times. Some bulbs, like dahlias or gladiolus, require a longer growing season and should be planted earlier, while others, like lilies or cannas, have a shorter growing season and can be planted later.
Research the average last frost date in your area. The last frost date is a critical factor to consider when determining the ideal planting window for summer bulbs. It’s essential to wait until the threat of frost has passed to avoid potential damage to the young bulbs or plants. Consult your local gardening center or cooperative extension service to find out the average last frost date in your region.
Once you have the last frost date, work backward to determine when you should start planting. Allow enough time for the bulbs to establish their roots and start growing before the heat of summer arrives. This usually falls between spring and early summer, but it may vary depending on your specific location.
Consider the soil temperature as well. Most summer bulbs prefer to be planted in soil that has warmed up sufficiently. Cold soil can delay growth and may lead to rotting. Use a soil thermometer to check the soil temperature. As a general guideline, the soil temperature should be at least 55°F (12.8°C) or higher for optimal bulb planting conditions.
Keep an eye on the weather forecast when planning your planting. Avoid planting bulbs if heavy rain or extreme weather conditions are expected. Excessive moisture can lead to rot or mold, while strong winds or storms can damage or uproot young bulbs. Wait for more favorable weather conditions to ensure that your bulbs have the best chance of thriving.
Remember that these are general guidelines, and the ideal planting window may vary depending on your specific bulbs and climate. Always refer to the recommended planting instructions provided with the bulbs or seek advice from local experts to ensure the best results.
By identifying the ideal planting window and planting your summer bulbs at the right time, you give them the best chance for healthy growth, strong root development, and spectacular blooms. Pay attention to last frost dates, soil temperatures, and weather forecasts to create optimal conditions for your bulbs to thrive.
Spring Planting for Summer Blooms
One of the most common and successful strategies for planting summer bulbs is to do so in the spring. Spring planting allows the bulbs to establish their roots and prepare for the warmer months ahead, resulting in vibrant and beautiful blooms during the summer season.
When it comes to selecting the right bulbs for spring planting, you have plenty of options. Bulbs such as dahlias, gladiolus, lilies, and begonias are popular choices for spring planting and summer blooms. These bulbs are known for their stunning flowers and come in a wide range of colors and sizes to suit any garden design.
Before planting, it’s important to prepare the soil properly. Make sure the soil is well-drained, loose, and enriched with organic matter. Remove any weeds or debris from the planting area and incorporate compost or well-aged manure to improve soil fertility. This will provide a healthy foundation for your bulbs to grow and thrive.
When planting the bulbs, follow the instructions provided by the specific bulbs you’ve chosen. Typically, bulbs should be planted at a depth of two to three times their size, with the pointed end facing upwards. Space the bulbs according to the recommended distance, allowing enough room for the plants to grow and spread.
After planting, water the bulbs thoroughly to help settle the soil and provide adequate moisture for the roots to establish. Remember to water regularly throughout the growing season, keeping the soil consistently moist but not waterlogged.
Applying a balanced fertilizer every few weeks can also help promote healthy growth and abundant blooms. Look for a fertilizer specifically formulated for bulbs or use a general-purpose fertilizer with equal amounts of nitrogen, phosphorus, and potassium.
During the spring, be vigilant about protecting your bulbs from potential threats. Keep an eye out for pests such as slugs and snails, which can damage or eat the tender shoots and leaves. If necessary, use organic pest control methods or physical barriers to keep these unwanted visitors at bay.
As the weather warms up and the bulbs start to grow, provide support for taller varieties like dahlias or gladiolus by staking or tying them to prevent them from bending or falling over. This will ensure that your plants grow upright and display their blooms proudly.
Lastly, enjoy the process of watching your bulbs grow and anticipate the burst of color that will come during the summer months. With proper care and attention, spring-planted bulbs will reward you with a stunning display of vibrant blooms, enhancing the beauty of your garden and bringing joy all season long.
Understanding the Frost-Free Date
When it comes to planting summer bulbs, understanding the frost-free date is essential for the successful growth and survival of your plants. The frost-free date refers to the average date in spring when the last frost is expected to occur in your specific area. Knowing this date will help you determine when it is safe to plant your bulbs without the risk of them being damaged by frost.
Frost can be detrimental to young and tender plants, including summer bulbs. It can cause the bulbs to rot or suffer from frost damage, leading to stunted growth or even death. Therefore, it is crucial to wait until the threat of frost has passed before initiating your planting efforts.
The frost-free date varies depending on your location and can differ even within the same region. To determine the average frost-free date for your area, consult your local gardening center, cooperative extension service, or agricultural resources. They often provide valuable information specific to your region, including frost dates and other essential gardening guidelines.
Your region’s average last frost date is usually based on historical weather data. However, keep in mind that these dates are approximate and not set in stone. Weather patterns can vary from year to year, so it is recommended to use the average last frost date as a general guideline and keep an eye on the weather forecast for any unexpected late frosts.
Once you have identified the average frost-free date, it’s important to plan your planting accordingly. Wait until after this date to begin planting your summer bulbs. By doing so, you can minimize the risk of frost damage and give your bulbs the best chance to thrive.
Remember that frost can still occur occasionally after the average frost-free date. If a late frost is predicted, take precautionary measures to protect your young plants. Covering them with frost cloths or blankets can help to insulate the bulbs and prevent damage from frost.
It’s worth noting that some summer bulbs, particularly those with a longer growing season, may benefit from being started indoors or in containers before the frost-free date. This allows them to get a head start and be more established by the time they are transplanted into the garden after the risk of frost has diminished.
By understanding the frost-free date for your area and planning your summer bulb planting accordingly, you can ensure that your plants have the best opportunity to thrive and produce beautiful blooms throughout the summer season.
Preparing the Soil for Bulb Planting
Proper soil preparation is essential for successful bulb planting and the healthy growth of your summer bulbs. Well-prepared soil provides a favorable environment for the bulbs to establish roots, access nutrients, and thrive. Here are some steps you can take to ensure the soil is ready for bulb planting.
Start by choosing a planting location that receives adequate sunlight for your specific bulbs. Most summer bulbs thrive in full sun or partial shade, so selecting an area with the appropriate light conditions will set your bulbs up for success.
Next, prepare the soil by removing any weeds, rocks, or debris from the planting area. Clearing the soil of these obstructions will allow the bulbs to grow without competition and ensure they have ample space to develop and emerge.
Loosen the soil to improve drainage and root penetration. Use a garden fork or tiller to gently break up compacted soil. This will create a loose and friable texture, allowing water to drain properly and roots to spread easily.
Before planting, it’s beneficial to enrich the soil with organic matter. This can be done by incorporating compost, well-aged manure, or other organic amendments into the soil. Organic matter improves soil fertility, structure, and water-holding capacity, providing a nutrient-rich environment for your bulbs to grow and thrive.
Consider performing a soil test to determine its nutrient levels and pH. Bulbs generally prefer a slightly acidic to neutral pH range. If the pH is too low or too high, you can adjust it by adding lime to raise the pH or sulfur to lower it. Follow the recommendations from your soil test results or consult a local gardening expert for guidance.
When planting the bulbs, ensure they are placed at the appropriate depth. Typically, bulbs should be planted at a depth of two to three times their own size. Planting too shallow or too deep can affect their ability to sprout and bloom properly.
After planting, water the bulbs thoroughly to settle the soil and provide initial moisture. This will help the roots establish and promote proper plant growth. Keep in mind that while bulbs require adequate moisture, it’s important to avoid overwatering, as excessive soil moisture can lead to rotting.
Mulching the planting area can provide numerous benefits. A layer of organic mulch, such as wood chips or straw, helps to retain soil moisture, regulate soil temperatures, suppress weeds, and improve overall soil health. Just be sure to leave a little space around the base of the bulbs to prevent moisture accumulation and potential rotting.
By taking the time to prepare the soil properly, you create an optimal environment for your summer bulbs to thrive and produce stunning blooms. Good soil preparation promotes healthy root development, nutrient absorption, and overall plant growth, ensuring your garden is filled with beautiful flowers throughout the summer season.
Ensuring Proper Sunlight and Drainage
When it comes to planting summer bulbs, ensuring they receive proper sunlight and have adequate drainage is crucial for their health and overall growth. Sunlight provides the energy needed for photosynthesis, while proper drainage helps prevent root rot and waterlogged soil. Here are some tips to ensure your bulbs get the right balance of sunlight and drainage.
Most summer bulbs thrive in full sun or partial shade. Before planting, assess the selected planting area to determine its sunlight exposure throughout the day. Observe the area at different times and take note of any nearby structures or trees that may cast shadows. This information will help you select bulbs that are appropriate for your garden’s light conditions.
Ensure that the planting location receives at least six hours of direct sunlight each day for optimal growth. Bulbs planted in full sun tend to produce stronger stems and more vibrant blooms. However, if your region experiences extremely hot summers, a little bit of afternoon shade can provide relief and prevent scorching.
Proper drainage is equally important for the success of your bulbs. Bulbs left in waterlogged soil are prone to rot and other diseases. Before planting, assess the soil’s drainage capacity by checking its texture and structure. Sandy or loamy soil generally has good drainage, while clay soil tends to retain water. If you have clay soil, consider improving the drainage by adding organic matter or creating raised beds.
If your planting area has poor natural drainage, consider creating a raised bed or planting your bulbs in containers. Raised beds and containers provide better control over soil moisture levels and allow excess water to drain more efficiently.
Digging a proper planting hole can also help improve drainage. Ensure that the hole is deep enough for the bulb but also wide enough for the roots to spread and establish. If the soil is heavy or compacted, consider loosening it at the bottom of the hole to facilitate drainage.
When planting in the ground, backfill the hole with soil, gently firming it around the bulb to eliminate air pockets. This will ensure good root-to-soil contact, allowing the bulb to absorb moisture and nutrients effectively.
Applying a layer of organic mulch around the planted bulbs can help moderate soil temperature and retain moisture while still allowing for proper drainage. Just be sure to keep the mulch a few inches away from the bulb’s base to prevent excess moisture accumulation.
Regularly monitoring the soil moisture level is crucial. Water the bulbs thoroughly after planting, and continue to provide sufficient water throughout their growing season. However, avoid overwatering, as this can lead to waterlogged soil.
By ensuring proper sunlight and drainage for your summer bulbs, you create an environment conducive to their healthy growth and development. They will receive the necessary energy from sunlight and avoid the risk of root rot caused by poor drainage. With the right balance of sunlight and drainage, your bulbs will thrive, resulting in a vibrant and flourishing garden.
Taking Care of Summer Bulbs During Growth
Once your summer bulbs are planted and their growth begins, proper care is essential to ensure they thrive and produce beautiful blooms. Taking the time to provide appropriate care throughout their growth period will help your bulbs reach their full potential. Here are some tips to follow when caring for your summer bulbs during their growth:
Watering: Regular watering is crucial for the health and growth of your summer bulbs. Keep the soil consistently moist but not waterlogged. Avoid letting the soil dry out completely or allowing the bulbs to sit in waterlogged conditions, as this can lead to root rot. Water deeply, ensuring that the moisture reaches the root zone.
Fertilizing: Applying a balanced fertilizer can provide the necessary nutrients for your summer bulbs. Choose a fertilizer formulated for flowering plants and follow the package instructions for application rates. Apply the fertilizer every few weeks during the active growth period to promote healthy foliage growth and flower production.
Support: Taller varieties of summer bulbs, such as dahlias or gladiolus, may need support as they grow. Use stakes, cages, or trellises to support the stems and prevent them from bending or breaking. Proper support ensures that the plants grow upright and display their blooms proudly.
Weeding: Regularly check for weeds around your summer bulbs and remove them promptly. Weeds compete for nutrients, water, and sunlight, which can hinder the growth and development of your bulbs. Mulching the planting area can also help suppress weed growth, making it easier to maintain a weed-free garden.
Removing spent flowers: Deadheading, or removing spent flowers, can encourage the production of new blooms and prolong the flowering period. This process directs the plant’s energy towards new growth rather than seed production. Cut off the faded flowers just above the first set of healthy leaves to keep your summer bulbs blooming longer.
Pest and disease control: Keep an eye out for common pests and diseases that can affect summer bulbs, such as aphids, slugs, snails, and fungal infections. Regularly inspect the plants and take appropriate measures to control pests, such as using organic insecticides or physical barriers. Proper garden hygiene, such as removing fallen leaves and debris, can help reduce the risk of disease outbreaks.
Regular monitoring: Continuously monitor the growth and overall health of your summer bulbs. Look for signs of nutrient deficiencies, pest infestations, or any other issues that may arise. Early detection allows for prompt intervention, increasing the chances of resolving problems before they become severe.
Protecting from extreme weather conditions: Extreme weather conditions, such as heatwaves or heavy rainstorms, can stress and damage summer bulbs. Provide shade or temporary coverings to protect the bulbs from excessive sunlight or intense heat. In the case of heavy rainfall, ensure adequate drainage to prevent waterlogging that can lead to root rot.
By giving your summer bulbs the proper care during their growth period, you will foster healthy growth, vibrant blooms, and overall plant vitality. Regular watering, fertilizing, support, and pest control are key aspects of their care. Stay attentive to their needs, and your summer bulbs will reward you with a stunning display of color and beauty.
Protecting Bulbs from Extreme Weather Conditions
Extreme weather conditions, such as heatwaves, heavy rainfall, or cold snaps, can pose challenges to the health and survival of your summer bulbs. Protecting your bulbs from these conditions is crucial to ensure their well-being and encourage optimal growth and blooming. Here are some tips for safeguarding your bulbs from extreme weather:
Heatwaves and high temperatures can put stress on summer bulbs. To protect them from excessive heat, provide shade during the hottest part of the day. Erect temporary structures, such as shade cloth or umbrellas, to shield the bulbs from direct sunlight. Avoid placing the bulbs in hot, exposed areas of the garden. Instead, choose locations with partial shade or that receive morning sunlight and afternoon shade.
During periods of prolonged drought, it’s important to ensure the soil stays consistently moist. Water your bulbs deeply and thoroughly, focusing on the root zone. Apply a layer of organic mulch around the plants to help retain soil moisture and reduce evaporation. This will help to prevent dehydration and stress on the bulbs.
Heavy rain can lead to waterlogged soil, which can be detrimental to bulb health. If your garden experiences excessive rainfall and poor drainage, consider creating raised beds or using containers to plant your bulbs. These methods allow for better control over soil moisture levels and prevent waterlogging. Adequate drainage is essential to avoid root rot and other moisture-related issues.
Cold snaps or icy conditions can damage the tender bulbs and impede their growth. To protect your bulbs from frost or freezing temperatures, cover them with cloths, blankets, or frost covers. These covers provide insulation, helping to trap heat and protect the bulbs from the cold. Use stakes or hoops to prevent the covers from weighing down on the plants, which could potentially damage them.
Strong winds can also cause harm to your bulbs, especially taller varieties. Stake or tie the plants to provide support and prevent them from bending or breaking due to gusts of wind. Creating windbreaks with fences, hedges, or other structures can also help shield the bulbs and reduce the impact of strong winds.
Extreme weather conditions may necessitate adjusting your usual care routine. Monitor your plants closely during these times and make necessary adjustments. For example, increase watering during heatwaves or add temporary shading during intense sunlight. By staying vigilant and responsive to changing weather patterns, you can help your bulbs withstand the challenges posed by extreme weather.
Remember to prioritize the overall health of your bulbs. Act promptly if you notice signs of stress or damage, such as wilting, yellowing leaves, or disease. Taking preventative measures and providing suitable conditions during extreme weather will help ensure the resilience and vitality of your summer bulbs.
Harvesting and Storing Summer Bulbs for the Next Season
As the summer season comes to an end, it’s time to harvest and store your summer bulbs to ensure their survival and enable you to enjoy their beauty in the following seasons. Proper harvesting and storage techniques are crucial for preserving the bulbs and preparing them for replanting. Here are some guidelines to follow:
Wait until the foliage of your summer bulbs has withered and turned yellow or brown. This indicates that the bulbs have finished storing energy from the leaves for future growth. Gently dig out the bulbs from the soil, being careful not to damage them.
Inspect each bulb for signs of damage or disease. Discard any bulbs that are soft, mushy, or show signs of rot or pest infestation. Keeping only healthy bulbs will ensure successful replanting and avoid spreading diseases or pests.
After harvesting, clean off any excess soil from the bulbs. You can gently brush or shake off the soil, but avoid washing them, as excess moisture could lead to rot. Let the bulbs dry in a well-ventilated area for a few days. This drying period allows any remaining moisture on the bulbs to evaporate and helps prevent mold or fungal growth during storage.
Once the bulbs are dry, you can prepare them for storage. Some bulbs, such as daffodils or tulips, benefit from being stored in a cool, dry place with good air circulation. Others, like Canna or Calla lilies, may require slightly higher humidity levels. Research the specific storage requirements for each type of bulb to ensure the best conditions.
For most bulbs, storing them in a cool and dry location is essential to prevent rot or premature sprouting. Find a suitable storage area that maintains a consistent temperature between 50-60°F (10-15°C) and has low humidity. Basements, garages, or ventilated sheds can be suitable options.
Avoid storing the bulbs near fruits or vegetables, as they produce ethylene gas, which can stimulate premature sprouting or decay in the bulbs. Place the bulbs in mesh bags or containers with good airflow to allow for proper ventilation.
Periodically check the stored bulbs during the off-season. Discard any bulbs that show signs of decay, mold, or shriveling. This will prevent the spread of disease and ensure that you are only replanting healthy and viable bulbs for the next season.
It’s worth noting that not all summer bulbs need to be dug up and stored. Some bulbs, like hardy lilies or gladiolus, can be left in the ground over winter in areas with mild climates. However, if you live in a region with freezing temperatures, it is safer to dig up and store all bulbs to protect them from frost damage.
By properly harvesting and storing your summer bulbs, you can preserve their vitality and prepare them for successful replanting in the next season. Following these guidelines will ensure that you can enjoy the beauty of your bulbs for years to come.