Best Time to Plant Okra
Choosing the right time to plant okra is crucial for the success of your crop. Okra is a warm-season vegetable that thrives in hot and humid conditions, so it’s important to plant it when the weather is consistently warm.
The optimal time to plant okra varies depending on your location and climate. Generally, okra seeds or seedlings should be planted after the last frost date in your area. In most regions, this means planting okra in late spring or early summer.
Okra plants require soil temperatures of at least 60°F (15.6°C) to germinate and grow properly. Planting too early, when the soil is still cool, can result in poor germination and stunted growth. So, it’s important to wait until the soil has warmed up sufficiently before planting okra.
It’s also important to consider your geographical location when determining the best time to plant okra. Okra is typically grown in USDA plant hardiness zones 5 and above. If you live in a colder climate, you may need to start okra seeds indoors or use season extension techniques, such as row covers or hoop houses, to protect the plants from early frost.
When planning your okra planting schedule, keep in mind that okra plants have a long growing season. They usually take around 60 to 70 days to start producing pods, and more than 80 days to reach full maturity. If you have a short growing season, you might want to choose early-maturing okra varieties or start the seeds indoors to give them a head start.
Okra Planting Zones
Understanding the appropriate planting zones for okra is essential for successful cultivation. Okra plants thrive in warm climates, and their growth is influenced by temperature, frost, and the length of the growing season.
Okra is typically grown in USDA plant hardiness zones 5 and above. These zones are characterized by their average minimum winter temperatures and provide valuable information about the suitability of a particular area for growing okra.
In zones 8 and higher, where temperatures rarely drop below 20°F (-6.7°C), okra can be grown as a perennial crop. In these warm regions, okra plants can continue producing pods for several years, given the right care and maintenance.
For zones 7 and below, okra is typically grown as an annual crop. Since these areas experience colder winters, the plants cannot survive freezing temperatures and must be replanted each growing season.
When planning to grow okra, it’s important to check the specific hardiness zone for your location. This information can be obtained from agricultural extension offices, gardening websites, or the USDA Plant Hardiness Zone map.
While okra prefers warm climates, it can also be grown in cooler regions by using season extension techniques. These techniques, such as using row covers, hoop houses, or greenhouses, can protect okra plants from early frost and help extend the growing season.
Before planting okra, it’s crucial to consider the average frost dates for your location. Okra seeds or seedlings should be planted after the last frost date to ensure that the plants won’t be damaged by cold temperatures.
By taking into account the specific planting zones and utilizing appropriate season extension techniques, you can successfully grow okra in a wider range of climates and enjoy a bountiful harvest.
Choosing the Right Okra Varieties
When it comes to choosing okra varieties for your garden, there are several factors to consider. Different varieties have unique characteristics, such as pod size, color, flavor, and disease resistance. By selecting the right okra varieties, you can ensure a successful and rewarding growing experience.
Here are some important considerations when choosing okra varieties:
1. Growth habit: Okra plants can have either a bushy or a tall, vining growth habit. Bush varieties are more compact and suitable for smaller gardens or containers, while tall varieties require more space but typically have a higher yield.
2. Pod size and shape: Okra pods come in various sizes, ranging from small to large. Consider your personal preference and how you plan to use the okra pods. Smaller pods are tender and great for cooking whole, while larger pods are ideal for slicing into stews or frying.
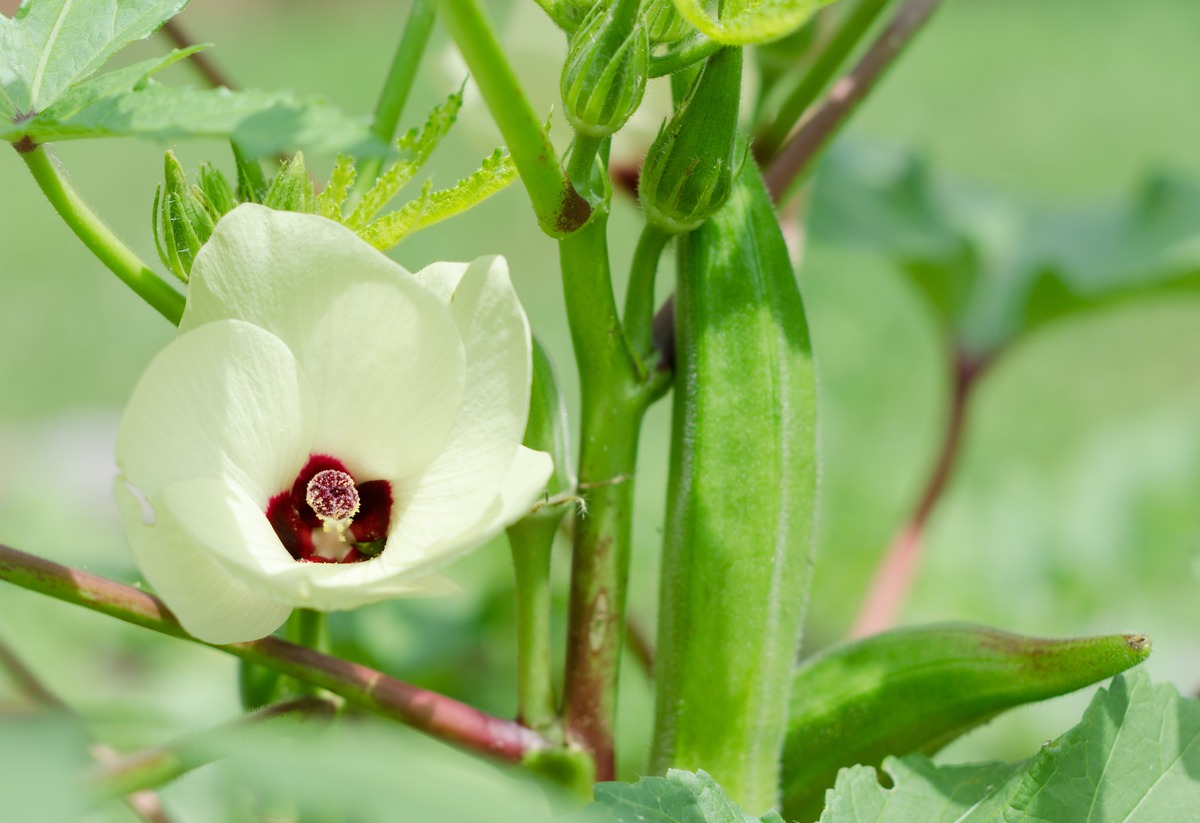
3. Pod color: Okra pods can be green, red, or purple. Green okra is the most common variety, while red and purple varieties add a colorful twist to dishes. Consider the visual appeal of the pods and how they will complement your garden or meals.
4. Disease resistance: Some okra varieties are bred to be resistant to certain diseases, such as Fusarium wilt or root-knot nematodes. If you have a history of these diseases in your garden or want to minimize the risk, selecting disease-resistant varieties can help ensure a healthier crop.
5. Days to maturity: The number of days it takes for an okra variety to reach maturity can vary. If you have a short growing season, look for early-maturing varieties that can produce pods within a shorter timeframe. On the other hand, if you have a longer growing season, you may opt for a variety that takes more time to mature for a higher yield.
6. Flavor and texture: Okra varieties can differ in taste and texture. Some are known for their tender, melting texture, while others may have a firmer texture. Consider your flavor preferences and how you plan to use the okra in your culinary creations.
Take time to research different okra varieties, read reviews, and consult with local gardeners or seed suppliers to determine which varieties will thrive in your specific growing conditions and meet your preferences. By selecting the right okra varieties, you can enjoy a bountiful harvest and savor the flavors of this versatile vegetable.
Preparing the Soil for Okra
Proper soil preparation is essential for establishing healthy and productive okra plants. By creating the right growing environment, you can give your okra a solid foundation for growth and maximize its potential.
Here are the steps to prepare the soil for okra:
1. Choose a sunny location: Okra thrives in full sun, so select a planting site that receives at least 6 to 8 hours of direct sunlight per day. Avoid areas that are shaded by trees or buildings, as this can limit the growth and productivity of the okra plants.
2. Clear the area: Remove any existing weeds, grass, or debris from the planting area. These can compete with the okra plants for nutrients and water, so it’s important to start with a clean slate.
3. Test the soil: Conduct a soil test to determine its pH level and nutrient composition. Okra prefers a slightly acidic to neutral pH range of 6.0 to 7.0. If the soil is too acidic or alkaline, you may need to make amendments to adjust the pH level. The soil test will also indicate any nutrient deficiencies, allowing you to apply the appropriate fertilizers or organic amendments.
4. Improve the soil structure: Okra grows best in well-draining soil with good fertility. If your soil is heavy or compacted, you can improve its structure by incorporating organic matter such as compost, aged manure, or leaf mold. These amendments will add nutrients, improve drainage, and help retain moisture in the soil, creating a favorable environment for the okra plants.
5. Remove rocks and debris: Clear the soil of any rocks, roots, or large debris that could hinder the growth of the okra plants or interfere with cultivation. Smooth out the surface to create a level planting area.
6. Loosen the soil: Use a garden fork or a tiller to loosen the soil to a depth of 8 to 12 inches (20 to 30 cm). Loosening the soil helps promote root penetration, allows for better water infiltration and air circulation, and creates a loose and friable bed for the okra plants.
7. Apply organic matter and fertilizers: Before planting, incorporate a balanced organic fertilizer or compost into the soil. This will provide essential nutrients for the okra plants and improve overall soil fertility. Follow the recommended application rates on the fertilizer package or consult a local extension office for specific nutrient recommendations.
By following these steps, you can ensure that the soil is well-prepared and optimized for the growth of your okra plants. Remember to regularly monitor soil moisture levels and provide adequate irrigation to keep the plants healthy and thriving throughout the growing season.
Direct Seeding vs. Transplanting Okra
When it comes to planting okra, you have two primary methods: direct seeding and transplanting. Each method has its advantages and considerations, and the choice depends on factors such as your growing conditions, available space, and personal preference.
Direct Seeding:
Direct seeding involves planting okra seeds directly into the soil where they will grow. This method is simple, cost-effective, and suitable for most okra varieties. Here are some key points to consider when direct seeding okra:
- Timing: Wait until after the last frost date in your area to ensure the soil is warm enough for optimal germination. Okra seeds require soil temperatures above 60°F (15.6°C) to sprout and grow successfully.
- Preparation: Prepare the soil by removing weeds and incorporating organic matter or compost to improve fertility and drainage. Smooth out the planting area and create shallow furrows or holes for the seeds.
- Spacing: Sow the okra seeds about 1 inch (2.5 cm) deep and 6 to 12 inches (15 to 30 cm) apart in rows spaced 2 to 3 feet (60 to 90 cm) apart. Adjust the spacing based on the specific variety’s growth habit and recommendations.
- Thinning: Once the okra seedlings have emerged and grown a few inches tall, thin them to allow for proper spacing between plants. Typically, thin the seedlings to about 12 to 18 inches (30 to 45 cm) apart to give each plant enough room to develop.
- Watering: Keep the soil evenly moist during the germination and early growth phase. Avoid overwatering, as this can lead to rot and disease. Once the plants are established, water deeply but infrequently to encourage deep root growth.
Transplanting:
Transplanting okra involves starting seeds indoors or purchasing seedlings and then transplanting them into the garden. Here are some considerations when choosing to transplant okra:
- Seed starting: Start okra seeds indoors 4 to 6 weeks before the last frost date. Use seed starting trays or pots filled with a sterile seed starting mix. Keep the soil consistently moist and provide adequate light for healthy seedling growth.
- Hardening off: Before transplanting, gradually acclimate the okra seedlings to outdoor conditions by placing them outdoors for a few hours each day, gradually increasing the duration over a week or two. This helps the seedlings adjust to temperature, wind, and sun exposure.
- Transplanting: Choose a cloudy or overcast day or transplant in the evening to minimize stress on the seedlings. Dig a hole slightly larger than the root ball of the okra seedling and gently place the seedling in the hole, ensuring the soil level matches the original planting depth. Firmly but gently press the soil around the roots and water well.
- Spacing: Space the okra seedlings 12 to 18 inches (30 to 45 cm) apart, allowing them enough room to grow and develop. Adjust the spacing based on the specific variety’s growth habit.
- Care: Provide regular watering to keep the soil moist, especially during the establishment phase. Apply a layer of mulch to conserve moisture and suppress weed growth around the plants.
Both direct seeding and transplanting can be successful methods for growing okra. Consider your specific growing conditions, available resources, and preferences to determine which method is best suited for your garden and maximize the chances of a fruitful harvest.
Steps for Direct Seeding Okra
Direct seeding is a popular method for planting okra, especially for gardeners who want to start their plants from seeds. Here are the steps to follow when direct seeding okra:
- Prepare the soil: Clear the planting area of any weeds, grass, or debris. Loosen the soil to a depth of about 8 to 12 inches (20 to 30 cm) using a garden fork or tiller. Incorporate organic matter or compost to improve soil fertility and drainage.
- Choose the right time: Wait until after the last frost date in your area. Okra seeds require warm soil with temperatures above 60°F (15.6°C) for optimal germination and growth.
- Sow the seeds: Create shallow furrows or holes in the prepared soil using your finger or a garden tool. Space the furrows or holes about 6 to 12 inches (15 to 30 cm) apart, depending on the specific variety’s growth habit and recommendations.
- Plant the seeds: Place one or two okra seeds in each furrow or hole. Cover the seeds with a thin layer of soil, about 1 inch (2.5 cm) deep.
- Water the seeds: Gently water the planting area to evenly moisten the soil. Avoid overwatering, as it can lead to rot or fungal diseases. Maintain consistent moisture during the germination and early growth phase.
- Thin the seedlings: Once the okra seedlings emerge and grow a few inches tall, thin them to provide proper spacing between plants. Thin the seedlings to about 12 to 18 inches (30 to 45 cm) apart to allow each plant enough room to develop.
- Maintain the plants: Ensure the okra plants receive full sun and water them deeply but infrequently once they are established. Monitor the soil moisture and water when it feels dry a few inches below the surface. Apply mulch around the plants to conserve moisture and suppress weed growth.
- Monitor for pests and diseases: Regularly inspect the okra plants for signs of pests or diseases. Common pests include aphids, caterpillars, and stink bugs, while common diseases include powdery mildew and bacterial wilt. Take appropriate measures to control and manage any issues that arise.
- Harvest the pods: Okra pods are typically ready to be harvested around 50 to 60 days after planting. Harvest the pods when they are about 2 to 3 inches (5 to 7.6 cm) long, firm, and still tender. Use a sharp knife or pruners to cut the pods from the plant.
By following these steps for direct seeding okra, you can successfully grow this warm-season vegetable in your garden. Remember to provide adequate care and attention to the plants throughout the growing season to ensure a bountiful harvest of delicious okra pods.
Transplanting Okra Seedlings
Transplanting okra seedlings is an effective method for starting your plants indoors or purchasing established seedlings for quicker cultivation. Follow these steps to transplant okra seedlings into your garden:
- Start the seedlings: Begin by starting your okra seedlings indoors about 4 to 6 weeks before the last expected frost date in your area. Plant the seeds in seed starting trays or pots filled with a sterile seed starting mix. Keep the soil consistently moist and provide adequate light for healthy seedling growth.
- Harden off the seedlings: Prior to transplanting, gradually acclimate the okra seedlings to outdoor conditions. Begin by placing them outside for a few hours a day in a sheltered location, gradually increasing their exposure to direct sunlight, wind, and colder temperatures over the course of a week or two.
- Choose the right time: Select a cloudy or overcast day or transplant in the evening when the temperatures are cooler. Avoid transplanting during the hottest part of the day to minimize stress on the plants.
- Prepare the planting holes: Dig holes in the garden bed that are slightly larger than the root ball of the okra seedlings. Space the holes according to the recommended distance for the specific variety, usually around 12 to 18 inches (30 to 45 cm) apart.
- Transplant the seedlings: Carefully remove the okra seedlings from their containers, gently loosening the root ball. Place each seedling into a planting hole, making sure the soil level matches the original planting depth. Firmly but gently press the soil around the roots to eliminate air pockets and provide stability.
- Water the seedlings: After transplanting, give the seedlings a thorough watering to settle the soil around the roots. Keep the soil consistently moist, but avoid overwatering, which can lead to root rot. Mulch the soil around the seedlings to help retain moisture and prevent weed growth.
- Provide ongoing care: Ensure the transplanted okra seedlings receive full sun, at least 6 to 8 hours per day. Monitor soil moisture levels and water deeply but infrequently, allowing the soil to partially dry out between waterings. Apply a balanced fertilizer following the recommended application rates to provide the necessary nutrients for healthy growth.
- Manage pests and diseases: Regularly check the okra plants for signs of pests or diseases. Common pests include aphids, caterpillars, and stink bugs, while common diseases include powdery mildew and bacterial wilt. Take appropriate measures, such as handpicking pests or using organic pest control methods, to manage issues that may arise.
- Harvesting the pods: Okra plants typically begin producing pods around 50 to 60 days after transplanting. Harvest the pods when they are tender, about 2 to 3 inches (5 to 7.6 cm) long. Use a sharp knife or pruners to cut the pods from the plant, taking care not to damage the other parts of the plant.
By following these steps for transplanting okra seedlings, you can successfully establish your plants in the garden and enjoy a bountiful harvest of delicious okra pods.
Okra Plant Spacing
Proper spacing is key to ensuring healthy growth and maximum productivity of okra plants. By giving each plant enough room to develop and access to adequate sunlight and nutrients, you can optimize their growth and harvest. Here are some guidelines for spacing okra plants:
1. Row spacing: Space the rows of okra plants approximately 2 to 3 feet (60 to 90 cm) apart. This allows for good air circulation and easy access for maintenance and harvesting. Adjust the spacing based on the specific growth habit and size of the okra variety you are planting.
2. In-row spacing: Within each row, space the okra plants 12 to 18 inches (30 to 45 cm) apart. This gives each plant enough room to grow and spread its foliage without overcrowding. Proper spacing also helps prevent the transmission of diseases between plants and allows for better light penetration and airflow.
3. Bush vs. tall varieties: Consider the growth habit of the okra variety you are planting when determining the spacing. Bush varieties tend to have a more compact growth habit and can be spaced slightly closer together, around 12 to 15 inches (30 to 38 cm) apart. Taller varieties may require more space, up to 18 inches (45 cm) between plants, to accommodate their height and branching.
4. Companion planting: Consider companion planting with okra to maximize your garden space and benefit from synergistic plant combinations. Okra can be paired with compatible plants such as tomatoes, peppers, or herbs like basil or marigolds. Take into account the space requirements and growth habits of the companion plants when determining overall spacing.
5. Overcrowding: Avoid overcrowding the okra plants, as this can lead to competition for sunlight, nutrients, and water. Overcrowded plants are more susceptible to diseases and pests and may result in smaller yields. Adequate spacing also helps ease harvesting and maintenance tasks, as it allows room for maneuvering and access to each plant.
6. Thinning: If you started okra plants from seeds and have multiple seedlings in one spot, thin them out once they have established themselves. Remove the weaker or excess plants to create the recommended spacing between each plant. This will ensure that each okra plant has enough resources to grow and produce optimally.
By following these spacing guidelines, you can promote healthy growth, minimize the risk of pests and diseases, and optimize the yield of your okra plants. Remember to regularly monitor the plants as they grow and make adjustments as necessary to maintain the appropriate spacing throughout the growing season.
Watering Okra Plants
Proper watering is essential for the healthy growth and productivity of okra plants. Watering them consistently and adequately allows the plants to thrive and produce high-quality pods. Here are some important considerations when watering okra:
1. Establish a watering routine: Set up a regular watering schedule for the okra plants, especially during dry periods or hot summer months. Consistency is key, as uneven watering can lead to stress and negatively affect plant development.
2. Monitor soil moisture: Check the moisture level of the soil regularly by inserting your finger or a moisture meter about an inch (2.5 cm) into the soil. Water when the top inch of the soil feels dry. Okra plants prefer moist soil but can be adversely affected by waterlogged conditions.
3. Deep watering: When irrigating okra, aim for deep watering rather than light, frequent sprinkling. This encourages the plants to develop deep root systems and makes them more resilient to drought. Apply water slowly and deeply to allow it to penetrate the root zone.
4. Timing of watering: Water early in the day to provide the plants with ample moisture before the heat of the day evaporates it. Avoid watering in the evening, as prolonged moisture on the leaves can promote the development of fungal diseases.
5. Minimize foliage wetness: Try to avoid wetting the foliage when watering, as wet leaves can increase the risk of fungal diseases. Water directly at the base of the plants or use drip irrigation or soaker hoses for targeted watering.
6. Mulch: Apply a layer of organic mulch, such as straw or wood chips, around the base of the okra plants. Mulching helps to conserve moisture in the soil, regulate soil temperature, and suppress weed growth.
7. Rainwater: Whenever possible, utilize rainwater for watering okra plants. Rainwater is natural and free from chemicals found in tap water, making it an ideal choice for maintaining healthy plants.
8. Adjust watering during fruiting: As the okra plants develop pods, pay closer attention to their water needs. During fruit development, the plants may require slightly more water to support the growth of the pods. Monitor the soil moisture and adjust your watering frequency as needed.
9. Drought tolerance: Okra is relatively drought-tolerant once established, but consistent watering during periods of drought is still important for optimal pod production. Be mindful of extended dry spells and increase watering accordingly.
By providing regular, deep watering and monitoring the soil moisture, you can ensure that your okra plants receive the water they need to grow and produce a bountiful harvest of delicious pods. Remember to adjust the watering regimen based on weather conditions and the stage of growth of the okra plants.
Fertilizing Okra Plants
Fertilizing okra plants is crucial for promoting healthy growth, abundant foliage, and a productive harvest. While okra plants can thrive in moderately fertile soils, providing them with the right nutrients ensures optimal development and crop yield. Here are some important points to consider when fertilizing okra:
1. Soil testing: Before applying any fertilizers, it’s beneficial to conduct a soil test to determine its nutrient content and pH level. Soil tests provide valuable information about any deficiencies or imbalances in the soil, allowing you to tailor your fertilizer application accordingly.
2. Balanced fertilizers: Okra plants benefit from balanced fertilizers that supply essential macro and micronutrients. Look for a fertilizer with an NPK ratio (nitrogen, phosphorus, and potassium) of 10-10-10 or a similar balanced blend. This provides a well-rounded nutrient profile that supports overall plant growth.
3. Nitrogen for foliage growth: Okra plants require nitrogen for robust foliage development. Nitrogen promotes leaf and stem growth, which leads to increased photosynthesis and higher energy production for fruiting. Apply nitrogen-rich fertilizers according to package instructions or based on soil test recommendations.
4. Phosphorus for root development: Phosphorus plays a vital role in root development, ensuring strong and healthy root systems in okra plants. It also aids in the development of flowers and fruit. Look for fertilizers with higher phosphorus content, such as a formulation with an NPK ratio of 5-10-10.
5. Potassium for overall plant health: Potassium is essential for several aspects of plant health, including disease resistance, water regulation, and overall vigor. Fertilizers with a balanced NPK ratio help supply an adequate amount of potassium for the okra plants.
6. Organic alternatives: If you prefer organic fertilizers, options like composted manure, compost, and organic fish or seaweed emulsions can nourish the soil and provide a slow-release source of nutrients for the okra plants. Organic fertilizers also contribute to soil health and microbial activity.
7. Timing of application: Apply fertilizers before planting or as a side dressing during the growing season. Follow the package instructions for specific application rates and timing. It’s generally beneficial to fertilize okra plants shortly after transplanting or when direct-seeding, and again when the plants are actively growing.
8. Avoid excessive fertilization: While it’s important to provide the necessary nutrients, avoid overfertilization as it can lead to excessive leaf growth or nutrient imbalances. Always follow recommended application rates and be mindful of the specific needs of your okra plants.
9. Supplement with compost: Incorporating compost into the soil can enrich its nutrient content and improve its overall structure. Work compost into the planting holes or apply a layer as a mulch around the base of the okra plants. Compost slowly releases nutrients and improves soil fertility over time.
Remember to monitor your okra plants throughout the growing season and adjust fertilization practices as needed. Healthy and well-fed okra plants are more resistant to pests and diseases and are more likely to produce a bountiful harvest of tasty pods.
Managing Weeds in the Okra Patch
Keeping weeds under control in the okra patch is essential for the health and productivity of your plants. Weeds compete with okra for essential resources such as water, nutrients, and sunlight, which can hinder their growth and reduce yields. Here are some effective strategies for managing weeds in the okra patch:
1. Mulching: Apply a layer of organic mulch around the base of the okra plants. Mulch helps suppress weed growth by blocking sunlight and preventing weed seeds from germinating. Use materials such as straw, wood chips, or dried leaves, and ensure a layer of about 2 to 3 inches (5 to 7.6 cm) thick.
2. Hand weeding: Regularly inspect the okra patch and manually remove any emerging weeds. Hand weeding is most effective when done early in the season before weeds have a chance to establish deep roots or produce seeds. Take care not to disturb the okra plants’ roots during the process.
3. Hoeing or cultivating: Use a hoe or cultivator to carefully break up the soil around the okra plants, cutting off any weed seedlings just below the soil surface. This method disrupts weed growth and provides an opportunity to remove them before they become established. Be cautious not to damage the okra’s shallow roots while hoeing.
4. Weed barriers: Consider using weed barriers or landscape fabric in the okra patch. These materials suppress weed growth by blocking sunlight and creating a physical barrier. Cut holes or slits in the fabric to accommodate the okra plants, ensuring they have sufficient space to grow.
5. Timing of weed management: Stay proactive and monitor the okra patch regularly for weed growth. Remove weeds as soon as they appear, before they have a chance to establish and spread. Frequent and consistent weed control is key to preventing weed competition.
6. Chemical weed control: If necessary, you can use herbicides labeled for use in vegetable gardens to control persistent weed problems. However, exercise caution and strictly follow the instructions and safety precautions outlined on the product label. Be mindful of the potential effects on beneficial insects and pollinators.
7. Crop rotation: Practicing crop rotation can greatly reduce the weed pressure in the okra patch. By rotating your okra plants with different vegetable crops each year, you break the weed life cycle and prevent the buildup of specific weed populations.
8. Preventing weeds before planting: Prior to planting your okra patch, remove any existing weeds, grass, or vegetation from the area. This minimizes weed competition from the start and makes weed management easier throughout the growing season.
9. Regular monitoring: Continuously inspect the okra patch for any new weed seedlings or invasive weeds. Promptly remove them to prevent them from spreading and competing with your okra plants for resources.
By employing these strategies, you can effectively manage weeds in your okra patch and create favorable growing conditions for your plants. Regular maintenance and vigilant weed control practices will help ensure the successful growth and productivity of your okra crop.
Common Pests and Diseases of Okra
While okra plants are generally resilient, they can be prone to certain pests and diseases that can affect their overall health and productivity. Understanding these common issues can help you identify and take prompt action to mitigate the damage. Here are some of the most common pests and diseases that can affect okra:
Pests:
1. Aphids: These tiny, soft-bodied insects can cluster on the undersides of okra leaves, sucking sap and causing distorted growth. Use insecticidal soaps, neem oil, or introduce natural predators like ladybugs or lacewings to control aphid populations.
2. Caterpillars: Cabbage loopers, corn earworms, and fruitworms are common caterpillar pests that feed on okra foliage and pods. Manual removal, applying botanical insecticides, or introducing biological controls such as Bacillus thuringiensis (Bt) can help manage caterpillar infestations.
3. Stink bugs: Stink bugs pierce the okra pods and suck out sap, causing damage and deformities. Handpicking, applying insecticidal soap, or introducing natural predators like spined soldier bugs or beneficial wasps can help control stink bugs.
4. Root-knot nematodes: These microscopic soil-dwelling pests can cause root galls and stunt the growth of okra plants. Planting nematode-resistant varieties or incorporating beneficial nematodes into the soil can help manage these pests.
Diseases:
1. Fusarium wilt: Fusarium wilt is a soilborne fungal disease that causes yellowing, wilting, and death of lower leaves. Practicing crop rotation, ensuring proper drainage, and using disease-resistant varieties are effective in managing Fusarium wilt.
2. Powdery mildew: Powdery mildew is a fungal disease that appears as a white powder-like coating on the leaves. Adequate spacing, providing good air circulation, and applying fungicides or organic treatments like neem oil can help control powdery mildew.
3. Bacterial leaf spot: Bacterial leaf spot causes dark, water-soaked lesions on okra leaves. Remove infected plant material and apply copper-based fungicides early in the growing season to prevent further spread.
4. Yellow mosaic virus: Yellow mosaic virus causes yellowing, mottling, and distortion of okra leaves. Aphids transmit the virus, so controlling aphid populations with insecticides or reflective mulches can help reduce transmission.
5. Southern blight: Southern blight is a soilborne disease that causes wilting, yellowing, and rotting of the base of okra plants. To manage southern blight, remove infected plants promptly, practice crop rotation, and improve soil drainage.
Regular monitoring, early detection, and appropriate management practices can help prevent or control pest and disease issues in the okra patch. Implementing cultural practices, such as maintaining proper sanitation, choosing disease-resistant varieties, and providing optimal growing conditions, can contribute to the overall health and success of your okra plants.
Harvesting Okra Pods
Knowing when and how to harvest okra pods is crucial to ensure optimal flavor, tenderness, and overall quality. Harvesting at the right stage of maturity ensures the best taste and texture. Here are some guidelines to follow when harvesting okra:
1. Check the size: Okra pods should be harvested when they reach a certain size, typically around 2 to 3 inches (5 to 7.6 cm) in length. Pick the pods while they are still tender and before they become tough and fibrous. Avoid letting them grow too large, as this can result in tough or woody pods.
2. Frequent harvesting: Harvest okra pods regularly, every 2 to 3 days, as the plants can produce new pods rapidly. Leaving mature pods on the plant can reduce production since the plants will focus energy on pod development rather than producing new ones.
3. Using protective gear: It’s recommended to wear gloves and long sleeves when harvesting okra, as some varieties have fine spines on the pods and stems that can cause skin irritation or itching.
4. Handling the pods: Handle okra pods with care to prevent any damage. Use a sharp knife or garden shears to cut the pods from the plant, making clean cuts without damaging the stem or nearby plant parts.
5. Harvesting time of day: Harvest okra pods in the early morning when they are still cool and the plant is well-hydrated. This is when the pods are freshest and least likely to wilt after harvesting.
6. Ideal weather conditions: Ideally, harvest okra when the weather is dry, as wet pods can be more prone to spoilage during storage. Avoid harvesting during or immediately after rainfall to prevent excess moisture on the pods.
7. Post-harvest storage: After harvesting, store the okra pods in a cool, dry place to maintain their quality. Use them as soon as possible for the best flavor and texture. Alternatively, store them in a perforated plastic bag in the refrigerator for up to a week.
8. Saving seeds: If you’re interested in saving okra seeds for future planting, allow a few pods towards the end of the growing season to fully mature and dry on the plant. Remove the dry pods and extract the seeds for storage in a cool, dry place.
By following these guidelines, you can ensure that you harvest your okra pods at the right stage of maturity for the best quality and flavor. Enjoy the bountiful harvest and explore the many delicious culinary possibilities that okra has to offer.
Tips for Storing and Using Fresh Okra
Once you’ve harvested fresh okra from your garden or purchased it from the market, it’s important to store and use it correctly to maintain its flavor, texture, and nutritional value. Here are some helpful tips for storing and using fresh okra:
1. Storage:
- Store fresh okra in a perforated plastic bag or airtight container in the refrigerator. Properly stored okra can stay fresh for up to a week.
- Make sure the okra is completely dry before storing it to prevent moisture buildup, which can lead to spoilage.
- Avoid washing okra before storing, as excess moisture can promote spoilage. Rinse it just before use.
- If you have excess okra, blanch and freeze it for longer-term storage. First, blanch the okra by boiling it for a few minutes, then transfer it to an ice bath to stop the cooking process. Once cooled, pack it into freezer-safe bags or containers and store in the freezer for up to 6 months.
2. Preparing Okra:
- Wash fresh okra thoroughly under cool running water to remove any dirt or debris. Trim off the stem end, being mindful not to cut into the seed cavity.
- Pat the okra dry with a clean towel before cutting or cooking to avoid excess moisture.
- If the okra pods are large or fibrous, consider slicing them into smaller, more manageable pieces for cooking.
3. Cooking Methods:
- Okra can be cooked in various ways, including frying, grilling, roasting, sautéing, and adding to soups, stews, or gumbo.
- To retain the natural flavor and texture, consider cooking okra quickly over high heat to minimize any sliminess that can occur with prolonged cooking.
- Try marinating okra in a mixture of olive oil, herbs, and spices before grilling or roasting for added flavor.
- Experiment with different seasonings and spices, such as cayenne pepper, paprika, garlic, or lemon zest, to enhance the taste of the okra.
4. Minimizing Sliminess:
- If you’re concerned about sliminess, there are a few techniques that can help minimize it. Adding acidic ingredients like lemon juice or vinegar, or cooking okra with tomatoes, can reduce sliminess.
- Dry cooking methods like frying or roasting can also help reduce the slimy texture.
- Alternatively, pickled okra is a popular option that eliminates the sliminess while still capturing its unique flavor.
5. Pairing and Serving:
- Okra pairs well with a variety of other ingredients, including tomatoes, onions, garlic, peppers, and spices like cumin or turmeric.
- Consider adding okra to dishes like stir-fries, curries, stews, or jambalaya for added flavor, texture, and nutritional value.
- For a simple and delicious side dish, lightly sauté okra in butter or olive oil and season with salt and pepper.
By following these tips, you can store fresh okra properly and incorporate it into various dishes to enjoy its unique flavor and many health benefits. Let your culinary creativity shine as you explore the versatility of fresh okra in your cooking!
Season Extension Techniques for Okra
While okra thrives in warm climates, gardeners in cooler regions can still enjoy a longer growing season and harvest by employing various season extension techniques. These techniques help extend the time period in which okra can be grown, allowing for a more abundant harvest. Here are some effective season extension techniques for okra:
1. Start seeds indoors: Begin the okra growing season earlier by starting seeds indoors. About 4 to 6 weeks before the last expected frost date, sow okra seeds in seed starting trays or pots filled with a sterile seed starting mix. Provide adequate warmth and light to promote seed germination and strong seedling growth.
2. Use row covers: Row covers, made of lightweight frost-resistant fabric, can protect young okra plants from chilly temperatures and frost. Before transplanting the okra seedlings, prepare the planting area and cover it with row covers. Secure the covers to the ground to create a protective barrier. Row covers also provide a slight increase in temperature and protect against pests.
3. Construct and utilize hoop houses: Hoop houses, also known as high tunnels, are structures made of PVC or metal hoops covered with clear plastic. These structures capture sunlight and create a warmer environment for the okra plants. Erect hoop houses over the planting area, securing the plastic cover tightly. Ventilation is important, so ensure proper airflow when constructing hoop houses.
4. Solarize the soil: Solarization involves covering the soil with clear plastic to capture and intensify the sun’s heat. This technique is effective in regions with ample sunlight and helps warm the soil for early planting. Before the growing season, prepare the planting area and cover it with clear plastic. Leave the plastic in place for several weeks to heat the soil and kill any weeds, pests, or disease-causing organisms.
5. Adopt container gardening: If you have limited space or inadequate growing conditions, consider growing okra in containers. Choose deep containers that provide sufficient room for the plants’ root growth. Place them in sunny locations, and move them indoors during excessively cold or frosty nights. Container-grown okra can be easily transported to optimize its growing conditions.
6. Utilize black plastic mulch: Black plastic mulch can help raise soil temperatures and suppress weed growth. After preparing the soil, lay black plastic mulch over the planting area. Secure the edges to prevent movement. The black plastic absorbs heat from the sun, keeping the soil warmer during cooler periods and promoting better okra growth and production.
7. Employ cold frames: Cold frames are low, enclosed structures with transparent tops that capture and retain heat. They provide a microclimate for growing plants and protect them from freezing temperatures. Construct or purchase a cold frame and place it over the okra plants. Open the lid during the day to prevent overheating and reduce humidity, and close it at night to protect against low temperatures.
By utilizing these season extension techniques, you can enjoy an extended growing season for okra and maximize your harvest. Experiment with different methods and combinations to find the most effective approach for your specific climate and gardening conditions.