
Why Use Storage Bags for Expressed Breastmilk?
When it comes to storing expressed breastmilk, using storage bags is the best way to go. These bags serve as an excellent option for preserving and safely storing the valuable nutrients and antibodies present in breastmilk. So why should you choose storage bags over other alternatives? Let’s explore the benefits:
1. Convenience: Storage bags are designed to be compact and easy to use. They take up minimal space in your refrigerator or freezer, allowing you to maximize storage capacity.
2. Hygiene: Most storage bags are pre-sterilized and come with airtight seals, ensuring the hygiene and safety of your breastmilk. The sealed bags prevent contamination and keep the milk fresh for a longer time.
3. Portability: If you’re on the go or need to transport your breastmilk, storage bags are a great option. They are lightweight, leak-proof, and fit easily into your diaper bag or cooler, making it convenient to feed your baby while away from home.
4. Space Efficiency: Storage bags offer a space-saving solution, especially for those with limited freezer space. Their flat design allows for easy stacking, maximizing the use of available space.
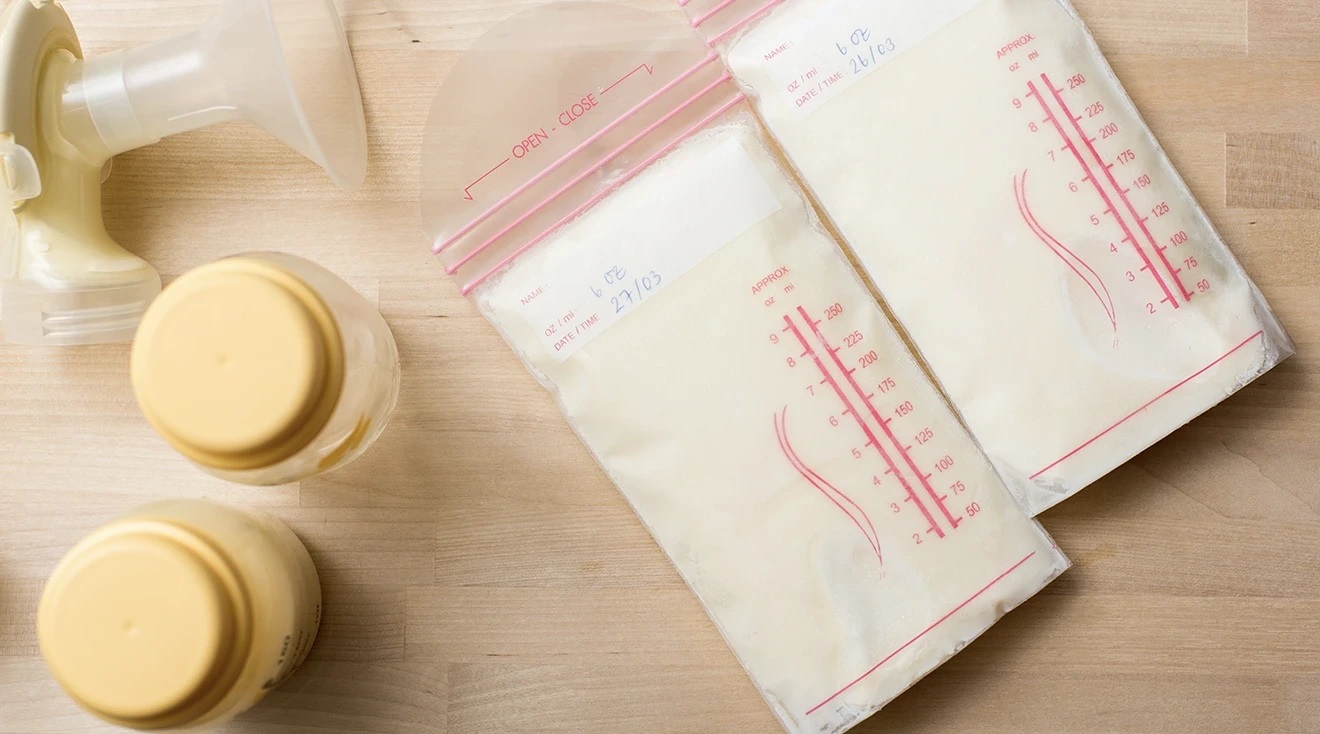
5. Easy Monitoring: Many storage bags have clear labeling areas where you can write the date and time of expressing the milk. This makes it easy to keep track of the freshness of the milk and ensures that you are using the oldest milk first.
6. Graduated Measurements: Most storage bags come with graduated measurements, allowing you to accurately monitor the amount of milk being stored. This feature comes in handy when you need to know exactly how much milk your baby is consuming.
By using storage bags for expressed breastmilk, you can ensure that your baby receives all the benefits of your precious milk while maintaining its freshness and quality. Whether you are building a freezer stash or need to store breastmilk for occasional use, storage bags offer a convenient, hygienic, and space-saving solution.
Choosing the Right Storage Bags
When it comes to selecting storage bags for expressed breastmilk, it’s important to choose ones that are safe, reliable, and compatible with your needs. Here are some factors to consider:
1. BPA-Free and Food-Grade Materials: Look for storage bags that are made from BPA-free and food-grade materials. This ensures that there are no harmful chemicals that could leach into your breastmilk.
2. Leak-Proof Design: Opt for storage bags with a sturdy and leak-proof design. Look for features such as double-zip closures or reinforced seams to prevent any accidental leaks or spills.
3. Freezer-Safe: Check if the storage bags are specifically designed to be freezer-safe. Freezer-safe bags can withstand low temperatures without compromising the quality of the breastmilk.
4. Easy-to-Read Measurement Markings: Look for bags with clear and well-defined measurement markings. This makes it easier to accurately measure the amount of breastmilk you are storing.
5. Compatibility with Pumping Equipment: Ensure that the storage bags are compatible with your breast pump. Some brands offer adapters or specific storage bag systems that seamlessly connect to various pumps, allowing you to express milk directly into the bag.
6. Puncture and Tear-Resistant: Consider storage bags that are puncture and tear-resistant, as they offer an added layer of protection during freezing and thawing processes.
7. Easy to Label: Choose bags that provide a designated area for labeling. This allows you to record important details such as date and time of expressing, making it easier to track the freshness of the milk.
8. Brand Reputation and Reviews: Research different brands and read reviews from other users to get an idea of the overall quality and reliability of the storage bags. User feedback can provide valuable insights into the performance of the product.
Remember, the key is to choose storage bags that meet your specific needs and offer peace of mind when storing your precious breastmilk. Keeping these factors in mind will help ensure that you select the right storage bags to safely preserve your expressed breastmilk.
Preparing the Storage Bag
Before using a storage bag for expressed breastmilk, it’s essential to properly prepare it to maintain the hygiene and quality of the milk. Follow these steps to prepare the storage bag:
1. Wash your hands: Begin by washing your hands thoroughly with soap and water. This step ensures that you are working with clean hands and reduces the risk of contamination.
2. Gather the materials: Get the storage bags, a pen or marker, and a clean surface to work on. Make sure the storage bags are within reach and easily accessible.
3. Check the bag for any damage: Before using a storage bag, inspect it for any signs of damage, such as leaks, tears, or punctures. If you notice any damage, discard the bag and use a new one to ensure the integrity of the milk.
4. Write the information on the bag: Use a pen or marker to write important information on the bag, such as the date and time the milk was expressed. This helps you keep track of the freshness of the breastmilk and ensures that you use the oldest milk first.
5. Open the bag carefully: Gently open the storage bag, being mindful not to contaminate the inside where the milk will be stored. Avoid touching the inside of the bag to maintain its cleanliness.
6. Expand the bag: Hold the bag open with one hand and use your other hand to gently expand the bottom of the bag. This creates a stable base for pouring the milk and prevents spills or leaks during the transferring process.
7. Place the bag securely: If using a bag designed to attach directly to your breast pump, ensure it is securely attached before starting the expressing process. This allows you to pump the milk directly into the bag, minimizing the need for transferring later.
By properly preparing the storage bag, you can ensure that your expressed breastmilk is stored in a clean and secure way. Taking the time to follow these steps will help maintain the quality and safety of the milk for your baby’s consumption.
Expressing Breastmilk into a Storage Bag
Now that you have prepared the storage bag, it’s time to express your breastmilk directly into it. Follow these steps to ensure a smooth and hassle-free process:
1. Position yourself comfortably: Find a comfortable and relaxed position to express your breastmilk. This could be sitting in a chair with good back support or using a nursing pillow to support your arms and back.
2. Attach the bag to your breast pump (if applicable): If you are using a storage bag specifically designed to attach to your breast pump, make sure it is securely connected before initiating the pumping process. This allows you to collect the milk directly into the bag.
3. Start pumping: Begin pumping according to the instructions provided with your breast pump. Use the appropriate settings that suit your comfort level and ensure an efficient milk expression process.
4. Direct the milk into the bag: If you are not using a bag that attaches to your breast pump, use a clean funnel or a breastmilk storage bag holder to guide the milk from the breast pump container or bottle into the storage bag. Be cautious and pour slowly to prevent spillage.
5. Fill the bag to the desired amount: Fill the storage bag with the desired amount of breastmilk, leaving some space at the top to allow for expansion during freezing. Avoid overfilling the bag to prevent leaks or spillage when sealing.
6. Remove the bag from the pump (if applicable): If you used a bag attached to your breast pump, carefully disconnect it from the pump once you have finished expressing the desired amount of milk. Be cautious not to spill any milk during this step.
7. Seal the bag: Ensure that the storage bag is tightly sealed to maintain the freshness and prevent any leaks. Use a bag with a reliable closure mechanism, such as a double-zipper or press-and-seal closure, to ensure a secure seal.
8. Label the bag: Use a pen or marker to write the date and time of expression on the storage bag. This will help you keep track of the freshness of the milk and ensure that you use the oldest milk first.
By following these steps, you can successfully express your breastmilk directly into a storage bag, making the process convenient and efficient. Remember to practice good hygiene throughout the process and handle the expressed milk with care to maintain its quality and safety for your baby.
Removing Air from the Storage Bag
When storing expressed breastmilk in a storage bag, it’s important to remove as much air as possible from the bag before sealing it. Here’s why it matters and how to effectively remove the air:
Why remove air?
Removing air from the storage bag has multiple benefits:
- Preserves Freshness: Air contains oxygen, which can cause the milk to oxidize and affect its freshness. Removing the air helps to preserve the quality and taste of the breastmilk.
- Prevents Freezer Burn: Air in the storage bag contributes to freezer burn, which can degrade the quality of the breastmilk over time. By removing the air, you lower the risk of freezer burn.
- Maximizes Storage Space: Eliminating air allows the bags to lay flat and stack neatly, maximizing the use of available freezer space and making it easier to organize your breastmilk stash.
How to remove air:
- Slow Pour Method: After filling the storage bag with breastmilk, hold the bag upright and slowly pour the milk towards the bottom corner. This helps to push out excess air as the bag fills up.
- Press and Smooth Method: Fill the storage bag as usual, leaving some space for expansion at the top. Gently press out any air bubbles, then carefully smooth the bag from the bottom corner towards the zipper seal, pushing out additional air as you go.
- Straw or Tube Method: Insert a clean straw or small tube into the bag through the zipper seal, making sure it reaches the bottom corner of the bag. Close the zipper seal tightly around the straw or tube. While holding the bag upright, suck the air out through the straw or tube, then quickly remove it and seal the bag.
- Use a Vacuum Sealer (optional): If you have a vacuum sealer designed for food storage bags, follow the manufacturer’s instructions to remove air from the storage bag. This method provides an airtight seal and can further extend the shelf life of the breastmilk.
Remember to be gentle while removing air to prevent accidental spillage. Additionally, be cautious not to squeeze or agitate the breastmilk too vigorously, as it can affect the fat content and cause separation.
By effectively removing air from the storage bag, you can ensure that your expressed breastmilk stays fresh and maintains its quality during freezer storage.
Sealing the Storage Bag Properly
After expressing and removing air from the storage bag, it’s crucial to seal it properly to maintain the freshness and integrity of the breastmilk. Follow these steps to ensure a secure and reliable seal:
1. Check for any spills or leaks: Before sealing the bag, carefully inspect the edges and seams to ensure there are no spills or leaks. Wipe off any excess milk or moisture to prevent the seal from becoming compromised.
2. Align the seals: Ensure that the top edges of the storage bag are properly aligned for a secure seal. Line up the zipper or closure mechanism evenly along the top of the bag.
3. Close the zipper seal: Gently press the two sides of the zipper seal together, starting from one end and moving to the other. Use your fingertips to ensure a tight seal and eliminate any gaps where air or moisture could enter.
4. Double-check the seal: Run your fingers along the length of the zipper seal to double-check that it is fully closed and secure. This step helps to prevent leaks or accidental openings during storage.
5. Optional: Use a heat seal or twist tie closure: Some storage bags come with additional closure options, such as heat seals or twist ties, to provide an extra layer of security. If your storage bag offers these options, follow the manufacturer’s instructions to seal the bag accordingly.
6. Label the bag: Once the storage bag is properly sealed, use a waterproof marker or pen to label it with the date and time of expression. This helps you keep track of the freshness of the breastmilk and ensures that you use the oldest milk first.
7. Optional: Use an extra layer of protection: For added protection, you can place the sealed storage bag inside a larger zip-lock bag or a plastic container with a lid. This extra layer of protection can prevent damage from accidental punctures or leaks.
By sealing the storage bag properly, you can maintain the quality and safety of the breastmilk throughout the storage period. An airtight and secure seal prevents air, moisture, and contaminants from entering the bag and ensures that your expressed breastmilk remains fresh and ready for your baby’s consumption.
Storing the Expressed Breastmilk in the Freezer
Freezing your expressed breastmilk is a great way to preserve its freshness and extend its shelf life. Proper storage in the freezer ensures that the milk retains its nutritional value for later use. Follow these guidelines to store your expressed breastmilk in the freezer:
1. Choose an appropriate freezer container: Use breastmilk storage bags or containers specifically designed for freezing breastmilk. These should be made of BPA-free plastic and have an airtight and leak-proof seal to maintain the milk’s quality.
2. Freeze breastmilk promptly: Put your expressed breastmilk in the freezer as soon as possible after pumping. Freshly expressed breastmilk contains more live antibodies and enzymes that help protect your baby’s health.
3. Label the storage bags or containers: Clearly label each bag or container with the date the milk was expressed. This ensures that you use the oldest milk first and helps you keep track of freshness.
4. Lay flat for freezing: When using storage bags, lay them flat in the freezer. This allows them to freeze quickly and evenly, making it easier to stack and maximize freezer space.
5. Avoid overfilling: Leave some room at the top of the bag or container to allow for expansion during freezing. Breastmilk expands as it freezes, so overfilling may cause the bag or container to burst.
6. Store in the coldest part of the freezer: Place the breastmilk bags or containers in the coldest part of your freezer, which is usually towards the back or in the bottom drawer. Avoid storing them in the freezer door, as it experiences temperature fluctuations when opened.
7. Keep breastmilk away from other items: Try to keep your breastmilk bags or containers away from strong-smelling foods or items with strong flavors to prevent the milk from absorbing any odors.
8. Use a first-in, first-out system: When using frozen breastmilk, use the oldest milk first. Place newly expressed breastmilk at the back of the freezer to ensure proper rotation and avoid wasting any milk.
9. Monitor and maintain freezer temperature: Regularly check and maintain the temperature of your freezer. The temperature should be consistently kept at or below 0°F (-18°C) to ensure the quality and safety of your stored breastmilk.
By following these storage guidelines, you can safely and effectively store your expressed breastmilk in the freezer. This allows you to build a stash of milk for future use and ensures that your baby receives the valuable nutrients and antibodies contained in your breastmilk even when you are away.
Thawing and Using Stored Breastmilk from a Storage Bag
When the time comes to use the stored breastmilk from your freezer, proper thawing is essential to preserve its nutritional value and ensure the safety of your baby. Follow these steps for thawing and using stored breastmilk from a storage bag:
1. Choose the milk based on date: Select the oldest bag of breastmilk for thawing and use. Remember to follow the first-in, first-out system to ensure that none of the milk goes to waste.
2. Thaw gradually in the refrigerator: The best way to thaw breastmilk is to transfer the storage bag from the freezer to the refrigerator. Place the bag in a deep container or on a plate to catch any potential leaks. The milk will thaw gradually over 12 to 24 hours.
3. Warm the milk if desired: If you prefer to serve the breastmilk warm, you can warm it by placing the storage bag in a bowl of warm water. Avoid using hot water or heating the breastmilk in the microwave as it can destroy its nutritional properties and create hot spots.
4. Gently swirl or shake the bag: After the breastmilk is thawed, gently swirl or shake the storage bag to mix any separated fat back into the milk. Avoid vigorously shaking the bag, as this can cause the breastmilk to break down and lose nutrients.
5. Check for any signs of spoilage: Ensure that the breastmilk has a pleasant odor and a creamy appearance. If you notice any spoiled or off-putting smell, or if the milk looks clumpy or discolored, discard it immediately.
6. Use thawed breastmilk within 24 hours: Once breastmilk is thawed, it should be used within 24 hours. If your baby does not consume all of the thawed breastmilk during a feeding, discard the remaining milk as it is not safe to re-freeze it.
7. Offer the breastmilk to your baby: Pour the desired amount of breastmilk into a clean bottle and offer it to your baby. You can warm the bottle by placing it in a bowl of warm water, but do not use a microwave or stovetop to heat the breastmilk directly.
Remember to handle thawed breastmilk with care, as it is delicate and can lose some of its beneficial properties during the thawing process. If your baby does not finish a bottle of thawed breastmilk, it is safer to discard the remaining milk rather than reusing it for another feeding.
By following these steps, you can safely thaw and use the stored breastmilk from your storage bags, ensuring that your baby receives the valuable nutrients and benefits of your expressed milk.