
How a Brita Water Filter Works
Brita water filters are a popular choice for households looking to improve the quality of their tap water. These filters utilize a simple yet effective process to remove impurities and provide clean, great-tasting water. Understanding how a Brita water filter works can help you make the most of this valuable tool.
Brita filters use a combination of activated carbon and ion exchange resin to filter water. When water passes through the filter, the activated carbon works to capture impurities such as chlorine, sediment, and certain volatile organic compounds, while the ion exchange resin targets heavy metals like lead and copper.
The activated carbon in the Brita filter acts as an adsorbent, meaning it attracts and holds onto impurities in the water. This is achieved through a process called adsorption, where the impurities stick to the surface of the carbon particles. As a result, the water that passes through the filter is free from these contaminants, giving you cleaner, better-tasting water.
In addition to adsorption, the ion exchange resin in the Brita filter plays a crucial role in improving water quality. This resin contains small beads that are capable of removing dissolved metals from the water. As the water flows through the filter, the resin beads exchange ions with the metals, effectively trapping them and preventing them from flowing through to the filtered water.
Once the water has passed through the activated carbon and ion exchange resin, it is significantly cleaner and healthier to consume. Not only does it remove impurities that can affect the taste and odor of your tap water, but it also reduces potentially harmful contaminants that may be present.
It is important to note that while a Brita water filter can help improve the quality of your tap water, it may not be suitable for filtering all types of contaminants. It is always a good idea to check the product specifications to ensure that it addresses your specific filtration needs.
Which Brita Filter is Right for You?
When it comes to choosing a Brita filter, there are several options available to cater to different needs and preferences. Understanding the different types of Brita filters can help you make an informed decision that suits your specific requirements.
One of the most popular options is the Brita Standard Filter. This filter is designed to remove impurities such as chlorine, sediment, and taste and odor contaminants, providing clean and refreshing water. It is suitable for everyday use and is compatible with most Brita pitchers and dispensers.
If you are looking for advanced filtration, the Brita Longlast Filter might be the right choice for you. This filter is capable of removing even more contaminants, including lead, asbestos, and benzene, ensuring the highest level of filtration. It has an extended filter life, providing you with up to 6 months of great-tasting water before needing a replacement.
For those concerned about microplastics in their water, the Brita Faucet Filter could be the ideal solution. This filter easily attaches to your faucet and helps reduce impurities, including microplastics, lead, and chlorine. It offers a convenient and continuous supply of filtered water directly from your tap.
If you prefer the convenience of a filtered water bottle, the Brita Water Filter Bottle is a perfect choice. This portable option allows you to enjoy filtered water on the go, whether you’re at the gym, office, or out exploring. It effectively reduces chlorine taste and odor, making it an excellent companion for staying hydrated throughout the day.
Other specialized options are also available, such as the Brita Stream Filter and Brita Infinity Pitcher. The Brita Stream Filter utilizes proprietary technology to provide faster filtration, allowing you to fill your glass or reusable bottle in seconds. The Brita Infinity Pitcher, on the other hand, features a reservoir that automatically fills as you pour, ensuring a continuous supply of filtered water without the need for refilling.
When choosing which Brita filter is right for you, consider factors such as your filtration needs, lifestyle, and preferences. Whether you opt for the standard filter, long-lasting filtration, faucet attachment, or portable bottle, you can enjoy the benefits of clean and refreshing water with the trusted quality of a Brita filter.
How to Prepare Your Brita Water Filter
Preparing your Brita water filter is an essential step to ensure optimal performance and efficiency. By following these simple steps, you can set up your Brita filter correctly and start enjoying clean and filtered water in no time.
The first step is to gather all the necessary components of your Brita water filter. This typically includes the filter cartridge, Brita pitcher or dispenser, and the filter indicator if applicable. Ensure that all components are clean and in good condition before proceeding.
If you are using a new Brita filter cartridge, it is recommended to soak it in cold water for approximately 15 minutes. This step helps to activate the carbon in the filter and remove any loose carbon fines. After soaking, rinse the filter under cold water for about 15 seconds to remove any remaining particles.
Next, insert the filter cartridge into the designated slot of your Brita pitcher or dispenser. Make sure it fits securely and is properly aligned. Some Brita filters have a locking mechanism to ensure a snug fit. Follow the instructions provided with your specific model to ensure correct installation.
If your Brita filter has a filter indicator, it is important to activate it before use. This indicator helps track the lifespan of the filter and reminds you when it’s time for a replacement. Consult the user manual or product instructions to activate the indicator according to the manufacturer’s guidelines.
Before using your Brita water filter for the first time, it is recommended to prime the filter. Priming helps to flush out any air and loose carbon particles, ensuring optimal performance. Simply fill the pitcher or dispenser with cold tap water, then discard the first two pitchers of filtered water. This helps ensure that the water you consume is free from any residual particles from the priming process.
Once the initial preparation steps are complete, your Brita water filter is ready to use. Fill the pitcher or dispenser with tap water, ensuring not to exceed the maximum fill line. Allow the water to pass through the filter, and it will start filtering out impurities, providing you with clean and refreshing water.
Remember to follow the specific instructions and recommendations provided with your Brita filter model for the best results. Regularly replace the filter cartridge according to the manufacturer’s guidelines to maintain optimal filtration performance.
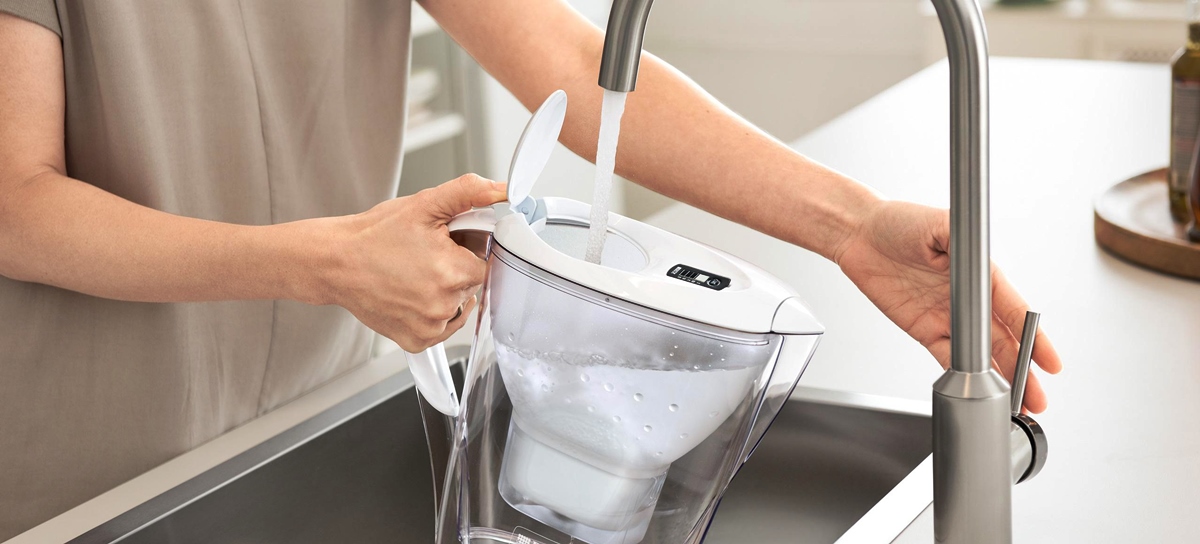
Filling the Brita Pitcher with Water
Filling your Brita pitcher with water is a simple yet important step to ensure you have a ready supply of clean and filtered water whenever you need it. By following these guidelines, you can properly fill your Brita pitcher and maximize its filtration capabilities.
First, locate the fill reservoir or lid on your Brita pitcher. Most models have a flip-top lid or a removable fill reservoir that allows you to conveniently add water without removing the entire lid.
Next, remove the fill reservoir or open the flip-top lid, exposing the opening of the pitcher. It’s recommended to fill the pitcher with cold tap water, as warm water can affect the performance of the filter. If the tap water is too warm, you can let it run for a few seconds until it becomes cool.
Position the pitcher under the tap, aligning the opening with the stream of water. Slowly pour the water into the pitcher, taking care not to overfill it. Most Brita pitchers have a maximum fill line indicated on the side, which should not be exceeded to prevent water overflow.
As you fill the pitcher, ensure that the water flows through the fill reservoir and into the main body of the pitcher. This allows the water to come into contact with the Brita filter and begin the filtration process.
Once the pitcher is filled to the desired level, you can close the flip-top lid or replace the fill reservoir, ensuring that it is securely in place. This helps to maintain the cleanliness of the filtered water and prevent any contaminants from entering the pitcher.
After filling the pitcher, it’s recommended to let the water pass through the filter before using it. This ensures that any initial particles or residue from the filtration process are flushed out, providing you with clean and fresh-tasting water.
Remember to clean the pitcher regularly to prevent any buildup of debris or contaminants. Follow the cleaning instructions provided with your specific Brita model to ensure proper maintenance and ensure the longevity of your filter.
By properly filling your Brita pitcher with cold tap water and maintaining its cleanliness, you can enjoy the benefits of clean and filtered water conveniently at home.
Activating the Brita Filter
Activating your Brita filter is a crucial step to ensure its optimal performance and effectiveness in providing clean and filtered water. By following these simple instructions, you can activate your Brita filter and start enjoying the benefits of purified water.
The activation process may vary depending on the type of Brita filter you have. Some filters, such as the Brita Longlast Filter, require activation before use, while others may not have this requirement. It’s important to consult the user manual or product instructions specific to your Brita filter for accurate activation guidelines.
If your Brita filter requires activation, the common method is to soak the filter cartridge in cold water for a designated period of time. This step helps remove any carbon fines or loose particles that may be present in the filter and ensures its readiness for use.
To activate the filter, fill a clean container with cold tap water. Submerge the filter cartridge in the water, ensuring that it is fully covered. Allow the filter to soak for the recommended time specified in the product instructions, usually around 15 minutes.
While the filter is soaking, you may notice some carbon particles or small bubbles being released into the water. This is a normal part of the activation process, and these particles will be flushed out during the priming step.
Once the designated activation time has passed, remove the filter cartridge from the water and rinse it under running cold water for about 15 seconds. This step helps ensure that any loose particles or carbon fines are completely removed from the filter.
After activating and rinsing the filter, it is now ready to be inserted into your Brita pitcher or dispenser. Follow the specific installation instructions provided with your filter model to ensure the correct placement and alignment of the cartridge.
It is important to note that not all Brita filters require activation. For filters that do not have this requirement, simply follow the instructions provided for proper installation and usage of the filter.
By activating your Brita filter according to the manufacturer”s guidelines, you can ensure the best filtration performance and enjoy the benefits of clean, great-tasting water.
How Long Does it Take to Filter the Water?
The length of time it takes for a Brita water filter to filter the water can vary depending on factors such as the filter type, water pressure, and the amount of water being filtered. Understanding the typical filtration time can help you plan and ensure you have a steady supply of clean and filtered water.
For most Brita filters, the average time required to filter water is around 10 to 15 minutes. This includes the time it takes for the water to pass through the filter, removing impurities and improving the water’s taste and odor. However, it’s important to note that this is an estimate and can vary slightly in different scenarios.
The filtration time can be influenced by the type of Brita filter you are using. Some filters, such as the standard Brita Filter or the Brita Longlast Filter, have different flow rates, which can affect the filtration speed. The Longlast Filter, for example, is designed for higher capacity and long-lasting performance, which may result in slightly longer filtration times compared to the standard filter.
Water pressure also plays a role in the filtration speed. Higher water pressure can help the water pass through the filter more quickly, reducing the overall filtration time. If you notice that the filtration time seems longer than usual, you can check the water pressure in your home and ensure it is at an optimal level.
The amount of water being filtered also affects the filtration time. If you are filtering a larger volume of water, it may take more time for the water to pass through the filter. Conversely, filtering a smaller amount of water can be quicker.
It’s important to be patient and allow the Brita water filter to complete its filtration process. Trying to rush the filtration process by pouring water too quickly or overfilling the pitcher can compromise the filter’s efficiency and lead to inadequate filtration.
Additionally, keep in mind that the filtration performance may gradually decrease over time as the filter cartridge reaches its capacity. Regularly replacing the filter cartridge according to the manufacturer’s guidelines is essential to ensure consistent filtration and optimal performance.
By understanding the expected filtration time and following the recommended usage and maintenance practices, you can enjoy clean and filtered water with your Brita water filter.
Storing the Filtered Water
Once you have successfully filtered your water using a Brita water filter, it’s important to store the filtered water properly to maintain its quality and freshness. Here are some guidelines for storing your filtered water:
1. Use clean, airtight containers: Transfer the filtered water into clean containers that are specifically designed for storing liquids. Make sure the containers are made of food-grade materials and have airtight lids to prevent any contaminants from entering the water.
2. Store in a cool and dark place: Place the containers of filtered water in a cool and dark area away from direct sunlight. This helps to maintain the quality of the water and prevent the growth of bacteria or algae. Avoid storing the water near chemicals or strong-smelling substances that could potentially taint the water.
3. Use within a reasonable timeframe: While filtered water can be stored for a certain period, it’s best to consume it within 2 to 3 days for optimal freshness. The longer water sits, the greater the risk of bacteria or impurities seeping into the water, even if it has been properly filtered. If the water develops an off odor or taste, it’s advisable to discard it.
4. Keep containers clean: Regularly clean the containers used for storing filtered water to prevent the buildup of any residue or contaminants. Washing them with warm, soapy water and rinsing thoroughly ensures that the containers remain sanitary for your stored water.
5. Monitor storage conditions: Periodically check the stored water for any signs of spoilage or contamination. If you notice any discoloration, odd taste, or unusual odor, it’s best to discard the water and refill with fresh filtered water.
6. Rotate stored water: If you plan on storing larger quantities of filtered water, consider implementing a rotation system. This means using the oldest stored water first and replacing it with fresh filtered water to ensure that you always have a supply of fresh and clean water on hand.
By following these guidelines, you can store your filtered water in a safe and effective manner, ensuring that it remains clean, fresh, and ready to use whenever you need it.
Replacing the Brita Filter
Regularly replacing your Brita filter is essential to maintain its filtration efficiency and ensure that you continue to enjoy clean and filtered water. The frequency at which you should replace the filter depends on the type of Brita filter you have and the water quality in your area. Here are some general guidelines to help you determine when to replace your Brita filter:
1. Follow manufacturer’s recommendations: Brita provides recommendations on when to replace their filters based on usage and water quality. It’s important to review the user manual or product instructions specific to your Brita filter model to determine the recommended replacement schedule.
2. Monitor the filter indicator: Many Brita filters come with a filter indicator that helps track the lifespan of the filter. This indicator measures the amount of filtered water that has passed through the filter and alerts you when it’s time for a replacement. It’s important to activate the filter indicator when setting up your Brita filter and pay attention to the alerts it provides.
3. Check the taste and odor of the water: An indicator that your Brita filter may need to be replaced is a change in the taste or odor of the filtered water. If you notice that the water tastes or smells different than usual, it may be a sign that the filter is no longer effectively removing impurities and it’s time for a replacement.
4. Monitor water flow: If you notice a significant decrease in water flow or the filtered water takes longer to fill your pitcher or glass, it could indicate that the filter is becoming clogged and needs to be replaced. Inadequate water flow can be a sign that the filter is no longer able to effectively remove impurities.
5. Consider water quality and usage: If you live in an area with poor water quality or if your household uses a large amount of water, you may need to replace the filter more frequently. Factors such as high levels of contaminants or heavy usage can impact the lifespan of the filter.
It’s important to note that these guidelines are general recommendations, and specific filter models may have different replacement requirements. Always refer to the manufacturer’s recommendations for your specific Brita filter to ensure proper maintenance and performance.
Regularly replacing your Brita filter is crucial to ensure that you continue to enjoy the benefits of clean and filtered water. By following the recommended replacement schedule and monitoring the condition of your filter, you can maintain optimal performance and keep your water safe and refreshing.
Cleaning the Brita Pitcher and Lid
Regularly cleaning your Brita pitcher and lid is important to maintain the cleanliness and performance of your water filter. Over time, mineral deposits, bacteria, and other contaminants can build up in these components. Here are some guidelines to help you effectively clean your Brita pitcher and lid:
1. Disassemble the pitcher: Start by disassembling the Brita pitcher. Remove the lid, filter cartridge (if applicable), and any other removable parts. This will allow you to clean each component thoroughly.
2. Hand wash with mild soap: Wash the pitcher, lid, and other removable parts with warm water and a mild dish soap. Use a soft sponge or cloth to scrub away any residue or stains. Pay special attention to the inside of the pitcher and the lid, as these areas are more prone to buildup.
3. Rinse thoroughly: After washing, rinse all components with clean water to remove any soap residue. Ensure that no soap or cleaning product is left behind, as it can affect the taste and quality of the filtered water.
4. Remove mineral deposits: Over time, mineral deposits may accumulate on the pitcher and lid, especially in areas with hard water. To remove these deposits, you can use a solution of equal parts water and white vinegar. Soak the affected areas in the vinegar solution for a few minutes, then scrub gently with a sponge or soft brush. Rinse thoroughly afterwards.
5. Clean the filter cartridge: If your Brita pitcher has a filter cartridge, it’s important to clean it as well. Follow the manufacturer’s instructions for cleaning the specific filter model. Typically, this involves rinsing the cartridge under cold water to remove any debris or particles. Avoid using soap or cleaning products on the filter cartridge, as they can damage the filter media.
6. Dry all components: After cleaning, make sure to thoroughly dry all components before reassembling the pitcher. Wipe them with a clean towel or let them air dry completely to prevent the growth of mold or mildew.
7. Clean the pitcher regularly: It’s recommended to clean the Brita pitcher and lid at least once a week. However, if you notice any buildup or discoloration, more frequent cleaning may be necessary. Regular cleaning helps maintain the cleanliness of the pitcher and ensures the longevity of your water filter.
By following these cleaning guidelines, you can keep your Brita pitcher and lid clean and free from contaminants. A clean pitcher not only helps maintain the quality of the filtered water but also ensures the ongoing performance of your Brita water filter.
Troubleshooting Common Issues with Brita Filters
While Brita filters are known for their reliability and effectiveness, occasional issues may arise. Understanding and troubleshooting these common issues can help you resolve them quickly and ensure the optimal performance of your Brita filter. Here are some common issues and their potential solutions:
1. Slow filtration: If your Brita filter is taking longer than usual to filter water, it may be due to clogging. Try removing the filter cartridge and rinsing it under cold water to remove any trapped debris or particles. If the problem persists, it may be time to replace the filter cartridge.
2. Filter not fitting properly: If you are having difficulty inserting or securing the filter cartridge in the pitcher, ensure that you are using the correct size and model of the filter. Some Brita filters have specific instructions for proper alignment and installation. If the issue persists, contact Brita customer support for assistance.
3. Filter indicator not working: If the filter indicator on your Brita filter is not functioning properly, check the battery or power source if applicable. Some filter indicators use batteries that may need replacement. Refer to the user manual or product instructions for troubleshooting steps specific to your filter model.
4. Water leaks: If you notice water leaking from your Brita pitcher or dispenser, check the tightness of the lid. Ensure that the lid is properly closed and aligned with the pitcher or dispenser. If the issue persists, inspect the pitcher or dispenser for any cracks or damage that may be causing the leak. In such cases, it may be necessary to replace the pitcher or dispenser.
5. Unusual taste or odor: If you experience an unusual taste or odor in your filtered water, it could indicate that the filter cartridge needs to be replaced. Brita filters have a lifespan and can become less effective over time. Try replacing the filter cartridge and see if the taste and odor improve. If the issue persists, it may be worth checking the quality of your tap water or contacting your local water provider for further assistance.
6. Mold or mildew growth: If you notice mold or mildew in or around the pitcher, it can be a result of insufficient cleaning or prolonged storage without use. Disassemble the pitcher, lid, and other removable components, and clean them thoroughly with a mixture of water and white vinegar. Ensure that all parts are completely dry before reassembling and using the filter again.
If you encounter any other issues or are unsure how to resolve a particular problem with your Brita filter, it’s recommended to contact Brita customer support or refer to the product manual for specific troubleshooting instructions.
By troubleshooting common issues and addressing them promptly, you can ensure the optimal performance and longevity of your Brita filter, allowing you to continue enjoying clean and filtered water.
Tips and Tricks for Using Brita Water Filter
Using a Brita water filter is a convenient and cost-effective way to improve the taste and quality of your tap water. Here are some tips and tricks to make the most out of your Brita filter:
1. Pre-soak and prime the filter: For new or unused filter cartridges, it’s beneficial to pre-soak them in cold water for about 15 minutes. This helps activate the carbon in the filter and remove any loose carbon fines. After soaking, rinse the filter under cold water for 15 seconds to ensure it’s ready for use.
2. Keep spare filters on hand: To avoid running out of fresh filtered water, it’s helpful to keep spare filter cartridges available. This ensures a seamless transition when it’s time to replace the filter, without any interruption in your access to clean water.
3. Use cold tap water: Brita filters are designed for use with cold tap water. Using hot water can damage the filter and affect its performance. Fill your Brita pitcher or dispenser with cold water for optimal filtration and refreshing results.
4. Avoid overfilling the pitcher: To prevent water overflow and ensure the proper functioning of the filter, avoid overfilling the Brita pitcher. Follow the maximum fill line indicated on the pitcher to maintain its effectiveness.
5. Change the filter regularly: Regularly changing the filter cartridge is crucial for maintaining optimal filtration performance. Follow the manufacturer’s recommendations for replacement and consider factors such as usage and water quality in your area. Replace the filter promptly when the filter indicator alerts you or when you notice a decline in water flow or taste.
6. Filter water for cooking: Aside from drinking water, you can also use filtered water for cooking. Whether you’re boiling pasta, making coffee, or preparing soup, using filtered water can enhance the taste and quality of your dishes.
7. Store filtered water in the refrigerator: If you prefer chilled water, consider storing filtered water in the refrigerator. Cool filtered water can be a refreshing treat on a hot day and can discourage the growth of bacteria or algae in the water.
8. Clean the pitcher regularly: To prevent buildup of residue or contaminants, clean the Brita pitcher regularly. Refer to the manufacturer’s instructions for the recommended cleaning process. A clean pitcher helps maintain the quality of filtered water and prolongs the lifespan of the filter.
9. Consider your filter needs: Brita offers different filter options to address various filtration needs. Research the available filter types, such as the standard filter or the Longlast filter, and choose the one that suits your requirements and water quality.
10. Monitor the filter performance: Pay attention to the taste, odor, and flow of the filtered water. If you notice any changes or issues, it may indicate that the filter needs to be replaced or that there is a problem with the water source. Trust your senses and address any concerns promptly.
By following these tips and tricks, you can optimize your experience with your Brita water filter and enjoy clean, great-tasting water every day.