
Why Use a Paint Strainer?
When it comes to painting projects, achieving a smooth and flawless finish is essential. However, even with the best quality paint, you may encounter issues like debris, lumps, or clumps that can mar the final result. This is where a paint strainer becomes your best friend. A paint strainer, also known as a paint filter, is a simple yet effective tool that helps ensure the quality and cleanliness of your paint before application.
Using a paint strainer offers several benefits:
- Removes Impurities: Paint can sometimes contain impurities like dust, dirt, dried paint flakes, or other particles that can sabotage your painting project. By straining your paint, you can eliminate these impurities and ensure a smooth application.
- Prevents Clogging: Paint sprayers, rollers, or brushes can get clogged due to debris present in the paint. Using a paint strainer helps prevent clogs, allowing for a more consistent and even paint application.
- Improves Paint Flow: Clumps or lumps in the paint can result in uneven coverage and an unprofessional finish. By using a paint strainer, you can achieve a smoother paint flow, giving you a more desirable end result.
- Extends Paint Life: A paint strainer helps remove dried paint particles or skin that may have formed in the can over time. This helps extend the life of your paint by ensuring it remains fresh and easy to work with.
- Saves Time and Money: Straining your paint might take a few extra minutes, but it can save you time and money in the long run. By preventing clogs or imperfections, you won’t have to spend additional time fixing mistakes or repainting surfaces.
Overall, using a paint strainer is a simple yet effective step in ensuring the quality and longevity of your painting project. It helps you achieve a smooth, even finish while minimizing issues that can arise from impurities or debris in the paint. By incorporating this tool into your painting routine, you can elevate the aesthetics of your work and enjoy a hassle-free painting experience.
Types of Paint Strainers
Paint strainers come in various types, each designed to suit different painting applications and preferences. Understanding the different options available can help you choose the right paint strainer for your specific needs. Here are some common types of paint strainers:
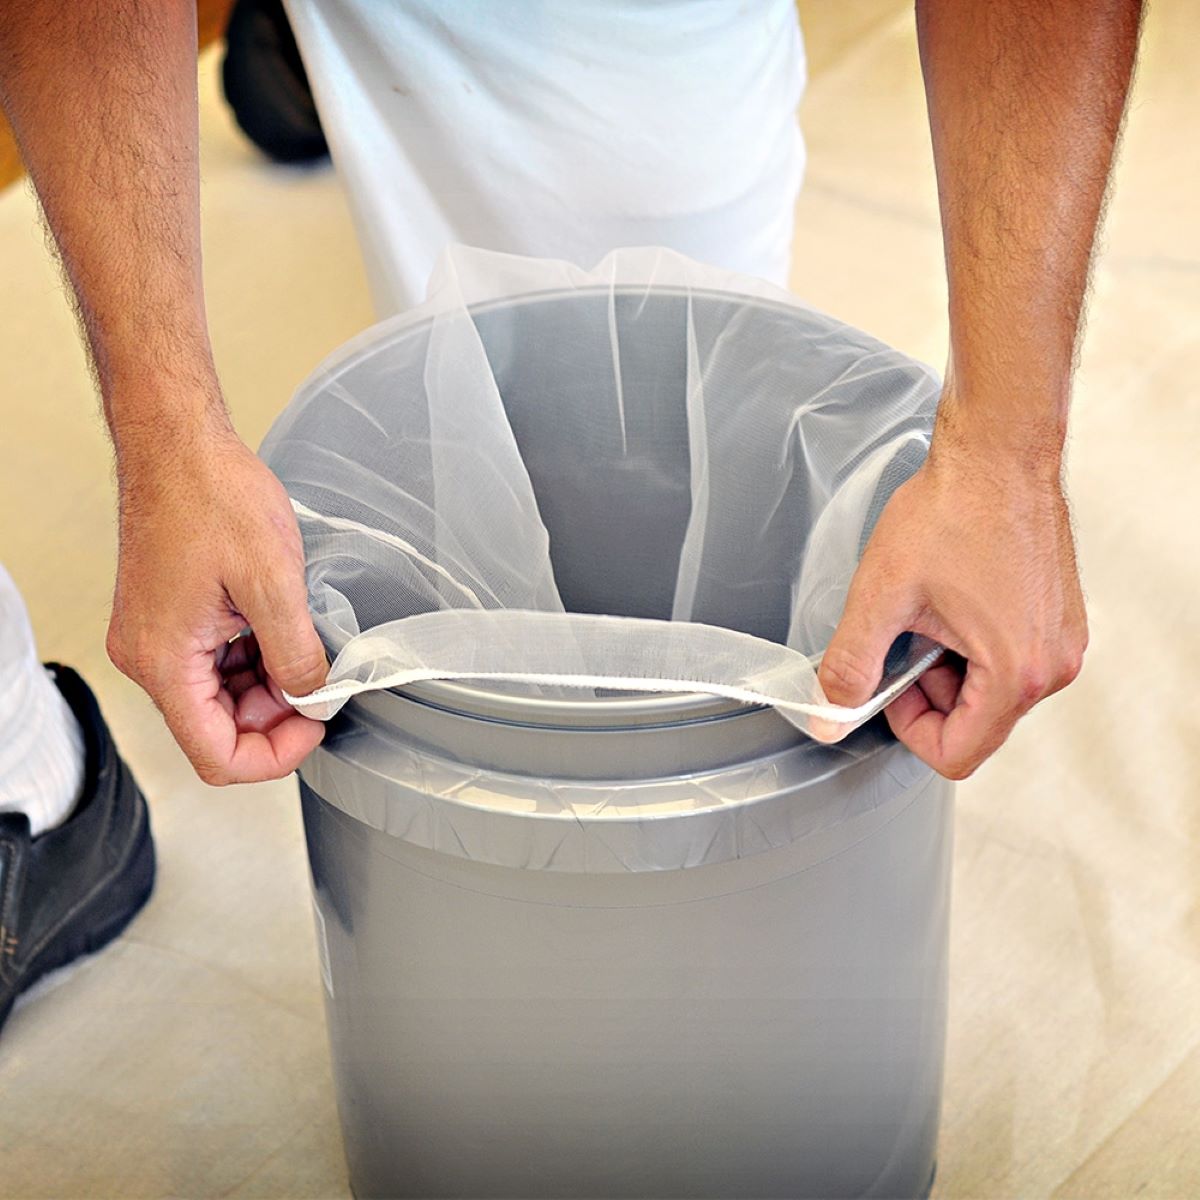
- Nylon Mesh Strainers: Nylon mesh strainers are the most commonly used type of paint strainer. They feature a fine mesh screen made of nylon material. These strainers effectively remove particles, debris, and impurities from the paint while allowing smooth paint flow.
- Paper Cone Strainers: Paper cone strainers are popular among DIY enthusiasts and professionals alike. These strainers are cone-shaped and made of paper with a fine filter at the bottom. Paper cone strainers are disposable and affordable, making them convenient for one-time use or small-scale projects.
- Fine Mesh Strainers: Fine mesh strainers have a tighter weave compared to standard mesh strainers. They are ideal for straining high-quality paints or stains that require a finer filtration of impurities. Fine mesh strainers are commonly used in automotive painting or when working with delicate surfaces.
- Elastic Top Strainers: Elastic top strainers feature an elastic band that fits snugly around the rim of a paint can or bucket. These strainers are convenient as they can be easily secured in place, preventing them from shifting during the paint straining process.
- Cone Paper Funnel Strainers: Cone paper funnel strainers are similar to paper cone strainers but have a wider and more broad shape. They are suitable for straining larger quantities of paint or thicker substances. Cone paper funnel strainers are commonly used in industrial painting applications.
Each type of paint strainer has its own advantages and applications. Consider your specific painting project’s requirements, the type of paint or stain you are using, and your personal preference when choosing the appropriate paint strainer. It is important to select a strainer that can effectively remove impurities without hindering paint flow, ensuring the best possible results for your painting endeavor.
Choosing the Right Paint Strainer for Your Job
Choosing the right paint strainer is crucial to ensure optimal results for your painting project. Here are some factors to consider when selecting a paint strainer:
- Type of Paint: Consider the type of paint you are using. Thicker paints, such as primers or textured coatings, may require a strainer with a wider mesh or a more substantial filtering capability to prevent clogs.
- Particle Size: Determine the size of particles you need to remove from your paint. Finer mesh strainers are ideal for smaller particles, while larger pores are more suitable for removing larger debris.
- Purpose of the Project: Consider the purpose or application of your painting project. For professional or high-quality finishes, finer mesh strainers may be necessary. However, for quick touch-ups or less demanding projects, a standard nylon mesh strainer should suffice.
- Quantity of Paint: Consider the amount of paint you need to strain. For larger volumes, choosing strainers with larger capacities or reusable options can be more cost-effective.
- Compatibility: Ensure that the paint strainer you choose is compatible with your paint sprayer, roller, or brush. Some strainers are designed to fit specific paint equipment, so check for compatibility before making a purchase.
- Budget: Consider your budget when selecting a paint strainer. Some types, like paper cone strainers, are more cost-effective and convenient for one-time use, while others may be pricier but offer reusable options or superior filtration capabilities.
By considering these factors, you can determine the most suitable paint strainer for your job. It’s always a good idea to have a variety of strainers on hand to accommodate different types of paints or painting projects. Experimenting with different strainers and finding the one that works best for your specific needs can help you achieve consistent, professional results in your painting endeavors.
Preparation Before Straining Paint
Before you start straining your paint, it is important to properly prepare the paint and the area where you will be working. Taking the time to prepare ensures a smooth and successful paint straining process. Here are some key steps to follow:
- Clean the Paint Container: Begin by cleaning the paint container thoroughly. Use a clean cloth or rag to wipe away any dust, dirt, or dried paint particles that may be present inside the container.
- Mix the Paint: If the paint has been sitting for a while or has separated, gently stir or mix it with a stir stick. This helps to ensure an even consistency before straining.
- Choose the Right Strainer: Select the appropriate paint strainer based on the type of paint and the level of filtration required. Ensure the strainer is clean and free from any debris or residues.
- Prepare the Straining Setup: Set up your straining area by placing a large container or bucket underneath the strainer to catch the strained paint. This prevents any drips or spills from creating a mess.
- Pour the Paint: Carefully pour the paint into the strainer, allowing it to flow through the mesh or filter. Use a stir stick or paintbrush to gently agitate the paint in the strainer, helping it pass through more smoothly.
- Filter the Paint: Allow the paint to strain naturally, without rushing the process. Use a clean stir stick to occasionally stir the paint in the strainer, encouraging the flow and filtration of any impurities.
- Check the Strained Paint: Once the paint has passed through the strainer, examine it for any remaining debris or clumps. If necessary, strain the paint again using a finer mesh strainer to achieve the desired level of purity.
- Secure the Lid or Cover: After straining the paint, securely replace the lid or cover of the paint container to prevent any contamination or drying.
By following these preparation steps, you ensure that your paint is clean and ready for use after straining. Taking the time to prepare and strain the paint properly will help you achieve a smoother and more professional paint application, eliminating any potential issues caused by impurities or debris in the paint.
Steps to Use a Paint Strainer
Using a paint strainer is a straightforward process that can greatly improve the quality of your paint application. Follow these simple steps to effectively use a paint strainer:
- Gather Your Materials: Collect your paint strainer, a clean container or bucket, and the paint you wish to strain.
- Prepare Your Work Area: Set up a clean and well-ventilated area for straining the paint. Place a large container or bucket underneath the strainer to catch the strained paint.
- Position the Strainer: Secure the paint strainer over the container or bucket, ensuring it sits securely and doesn’t wobble during the straining process.
- Pour the Paint: Carefully pour the paint into the strainer, allowing it to slowly pass through the mesh or filter. Use a stir stick or paintbrush to help agitate the paint, assisting it in passing through smoothly.
- Stir and Scrape: Use a clean stir stick to occasionally stir the paint in the strainer, helping it flow and promoting the filtration of any impurities. Use the stir stick or paintbrush to scrape the sides of the strainer, ensuring all paint is strained.
- Allow the Paint to Strain: Let the paint strain naturally without rushing the process. This may take some time depending on the amount of paint and the viscosity of the liquid.
- Check the Strained Paint: Once the paint has passed through the strainer, inspect it for any remaining debris or clumps. If necessary, strain the paint again using a finer mesh strainer to achieve a higher level of filtration.
- Transfer the Strained Paint: If desired, transfer the strained paint to a clean container for easier handling and application.
- Secure the Container: After straining the paint, seal the container tightly to prevent any contamination or drying.
By following these steps, you can successfully strain your paint, removing impurities and ensuring a smoother application. Taking the time to strain your paint will improve the quality of your work, preventing clogs, clumps, and other issues that can arise from using unfiltered paint.
Tips for Using a Paint Strainer
Using a paint strainer may seem like a simple task, but there are a few tips and tricks that can enhance your straining experience and ensure optimal results. Consider the following tips when using a paint strainer:
- Use the Right Size: Select a paint strainer that is appropriate for the volume of paint you are working with. Using a strainer that is too small for the amount of paint may slow down the straining process or lead to spills.
- Pre-Wet the Strainer: If you are using a nylon mesh strainer, pre-wetting it can make the straining process smoother. This helps prevent the strainer from absorbing too much paint and clogging the mesh.
- Agitate the Paint: To facilitate the flow of paint through the strainer, gently agitate the paint using a stir stick or paintbrush. This encourages the paint to pass through the mesh or filter more easily.
- Strain in Batches: If you have a large quantity of paint to strain, consider straining it in smaller batches. This allows for better control and prevents overflow or excessive strain on the strainer.
- Inspect the Strainer Mesh: Before each use, inspect the mesh or filter of the strainer for any tears or damage. A damaged strainer may not effectively filter the paint and can leave unwanted debris in the strained paint.
- Dispose of Paper Cone Strainers: If you are using disposable paper cone strainers, remember to properly dispose of them after use. Avoid attempting to clean and reuse them, as this may introduce contaminants into the paint.
- Clean and Reuse Strainers: For reusable strainers, clean them thoroughly after each use. This helps maintain their efficacy and extends their lifespan.
- Strain Into a Clean Container: Ensure that the container you are straining the paint into is clean and free from debris. Any dirt or particles in the container can contaminate the strained paint.
- Take Your Time: Allow the paint to strain naturally without rushing the process. This ensures that the impurities are effectively filtered out, resulting in a smoother and more consistent paint application.
By following these tips, you can make the most of your paint strainer and achieve better results in your painting projects. Using the right techniques and taking the necessary precautions will help you achieve a cleaner, more professional finish.
Frequently Asked Questions about Paint Strainers
Here are answers to some common questions about paint strainers:
- Q: Why should I strain my paint?
A: Straining your paint helps remove impurities such as dust, debris, or dried paint particles, resulting in a smoother paint application and a professional finish. - Q: When should I use a paint strainer?
A: It is recommended to use a paint strainer each time you open a new can of paint or if you notice any clumps or debris in your paint. Straining the paint ensures its quality before application. - Q: What type of paint can be strained?
A: Paint strainers can be used with a wide range of paints, including latex, oil-based, acrylics, enamels, or stains. However, keep in mind that some specialty paints or textured coatings may require specific types of strainers or filters. - Q: How often should I clean or replace a reusable paint strainer?
A: It is recommended to clean a reusable paint strainer after each use. Thoroughly rinse it with water or the appropriate cleaning solvent, removing any traces of paint or debris. If the strainer becomes damaged or excessively clogged, it may be time to replace it. - Q: Can I strain paint that has been frozen?
A: No, it is not recommended to strain paint that has been frozen. Freezing can alter the paint’s consistency and may cause the straining process to be ineffective. It is best to discard and replace frozen paint. - Q: Can I reuse disposable paper cone strainers?
A: Disposable paper cone strainers are designed for one-time use and are not meant to be reused. After straining the paint, it is best to dispose of the paper cone strainer and use a new one for the next paint straining task. - Q: Can I strain paint without a paint strainer?
A: While it is possible to strain paint without a dedicated paint strainer, using a strainer provides more effective filtration. Alternatives like cheesecloth or old tights can be used as makeshift strainers if necessary, but they may not filter out impurities as efficiently as a proper paint strainer.
These frequently asked questions aim to provide clarity and address common concerns about paint strainers. By understanding the benefits and proper usage of paint strainers, you can enhance your painting process and achieve better results.