
Tools Required
Before you begin the process of taking apart your recliner sofa, it is essential to gather all the necessary tools. Having the right tools on hand will make the disassembly process much easier and ensure that you avoid any potential damage to your furniture. Here are the tools you will need:
1. Screwdriver set: A set of screwdrivers with both flathead and Phillips heads will be needed to remove screws and fasteners.
2. Allen wrench set: Many recliner sofas use Allen wrenches to secure bolts and screws, so having a set of different sizes will be necessary.
3. Adjustable wrench: An adjustable wrench will come in handy for loosening and tightening nuts and bolts.
4. Needle-nose pliers: These pliers with long, thin jaws are useful for gripping and manipulating small parts.
5. Rubber mallet: A rubber mallet can be used to gently tap and dislodge stubborn parts without causing damage.
6. Plastic bags or containers: It is recommended to have bags or containers to store screws and small parts, ensuring they don’t get lost during disassembly.
7. Old blankets or towels: Having some blankets or towels on hand can help protect both the recliner sofa and the floor while disassembling it.
8. Safety goggles and gloves: It is always a good idea to wear safety goggles and gloves to protect yourself from any potential injuries during the disassembly process.
By gathering these tools before you begin, you will be well-prepared to take apart your recliner sofa with ease and efficiency. Remember to take your time and be gentle when removing each component to avoid any accidental damage. Once you have all the tools ready, you can proceed to the next steps in disassembling your recliner sofa.
Clearing the Area
Before you start disassembling your recliner sofa, it’s crucial to clear the surrounding area to ensure a safe and clutter-free workspace. By doing so, you’ll have ample room to maneuver and avoid any potential accidents or damage to the furniture. Here are some steps to follow when clearing the area:
1. Remove any nearby furniture: Clear the space around your recliner sofa by moving any nearby furniture or decorative items out of the way. This will minimize the risk of damage to these items and provide you with enough space to work comfortably.
2. Create a dedicated workspace: Designate a specific area where you can disassemble the recliner sofa. This area should be spacious enough to accommodate the different components and allow you to lay them out systematically.
3. Protect the floor: Place a drop cloth or old blankets on the floor to protect it from scratches, dents, or any debris that may fall during the disassembly process.
4. Secure loose wires or cords: If your recliner sofa has any electrical components or cords, make sure they are safely secured and unplugged from the power source. This will prevent any accidents or potential damage to the wiring.
5. Gather necessary supplies: Organize all the tools and supplies you gathered in the previous step. Having everything readily accessible will save you time and ensure a smooth disassembly process.
By following these steps and clearing the area before beginning the disassembly, you’ll create a safe and organized workspace. This will allow you to focus on the task at hand and make the process of taking your recliner sofa apart much more efficient. It’s important to remember that every recliner sofa may have specific disassembly instructions, so refer to the manufacturer’s manual or seek professional advice if needed. Now that you’ve cleared the area, you’re ready to move on to the next step of removing the backrest.
Removing the Backrest
When disassembling your recliner sofa, the first step is to remove the backrest. This will allow you to access other components and continue with the disassembly process. Follow these steps to remove the backrest:
1. Locate the attachment points: Examine the backrest and identify the attachment points where it connects to the main frame of the recliner. These are typically located on the sides or the back of the recliner.
2. Remove any screws or bolts: Use a screwdriver or an Allen wrench to loosen and remove any screws or bolts securing the backrest. Be sure to place the screws or bolts in a container or bag to avoid losing them.
3. Disconnect any connectors: Some recliner sofas may have connectors that join the backrest to the reclining mechanism. Carefully detach these connectors by sliding or pulling them apart. Take note of how they are connected for reassembly later.
4. Lift and remove the backrest: Once the attachments and connectors are removed, lift the backrest carefully, making sure not to strain yourself or damage any other parts. Set the backrest aside in a safe place.
It is important to exercise caution when removing the backrest to prevent any damage to the recliner sofa or yourself. If you encounter any resistance or difficulty, double-check for any missed screws or connectors that may still be holding the backrest in place. Refer to the manufacturer’s manual if you need additional guidance or consult a professional if you are unsure.
Now that you have successfully removed the backrest, you can move on to the next step, which is detaching the footrest.
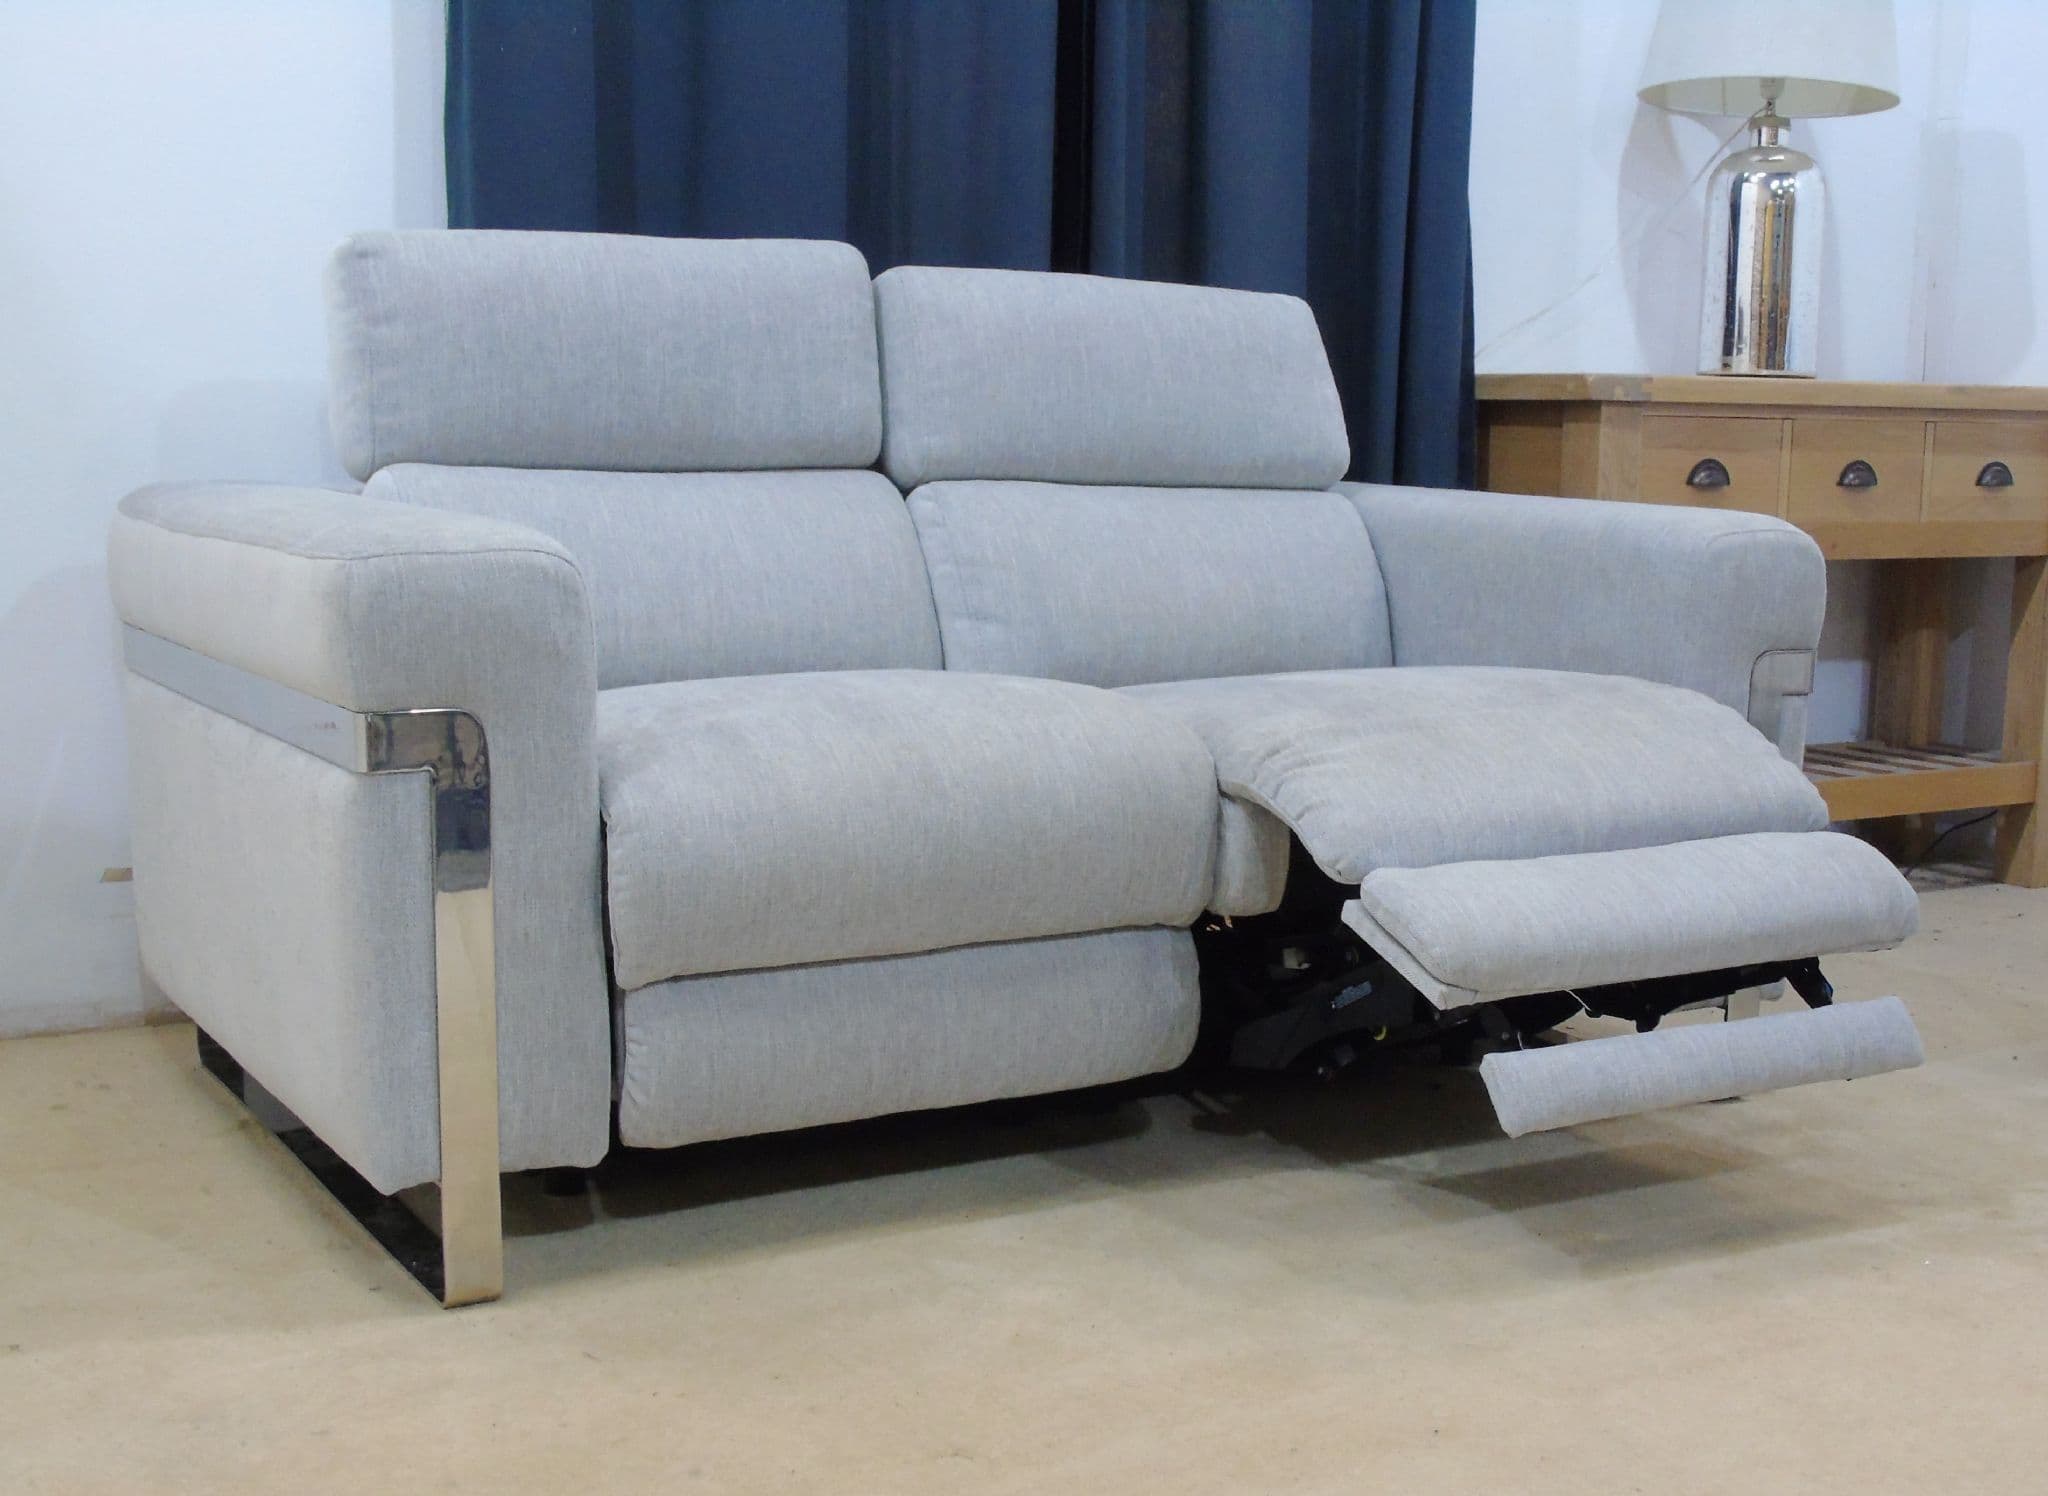
Detaching the Footrest
After removing the backrest, the next step in disassembling your recliner sofa is detaching the footrest. By removing the footrest, you’ll gain access to other components and be closer to disassembling the entire sofa. Follow these steps to detach the footrest:
1. Locate the footrest release mechanism: Look for the lever or button that activates the footrest. This mechanism is typically found on the side or underneath the recliner sofa.
2. Engage the footrest release: Press or pull the designated lever or button to engage the footrest release mechanism. This action will unlock the footrest, allowing it to move freely.
3. Extend the footrest: Gently extend the footrest outward until it reaches its fully extended position. This will expose any screws, bolts, or connectors that are holding the footrest in place.
4. Remove any screws, bolts, or connectors: Use the appropriate tools, such as a screwdriver or Allen wrench, to loosen and remove any screws, bolts, or connectors securing the footrest. Place these in a container or bag to keep them organized.
5. Lift and detach the footrest: Once all fasteners are removed, lift the footrest slowly and carefully to detach it from the recliner sofa. Set the footrest aside in a safe area.
When detaching the footrest, it’s crucial to exercise caution and avoid putting excessive force on any fragile components. If you encounter any difficulties or resistance, double-check for any missed screws or connectors that may still be securing the footrest. Refer to the manufacturer’s manual for specific instructions if needed or consult a professional for assistance.
Now that you have successfully detached the footrest, you can proceed to the next step, which involves removing the seat cushions.
Removing the Seat Cushions
Once the backrest and footrest have been detached, the next step in disassembling your recliner sofa is to remove the seat cushions. This will allow you to access the internal components of the sofa and further disassemble it if needed. Follow these steps to remove the seat cushions:
1. Locate the attachment points: Look underneath the seat cushions or along the sides to identify the attachment points where the cushions are secured to the main frame of the recliner sofa. These attachment points can vary depending on the specific design of your sofa.
2. Remove any fasteners: Inspect the attachment points and determine the type of fasteners used, such as screws or bolts. Use the appropriate tools, such as a screwdriver or Allen wrench, to loosen and remove the fasteners. Place them in a container or bag for safekeeping.
3. Lift and remove the seat cushions: Once the fasteners are removed, carefully lift the seat cushions one at a time and set them aside. Be mindful not to damage the cushions or the sofa frame during this process.
4. Check for additional attachments: Depending on the design of your recliner sofa, there may be additional attachments securing the seat cushions. Look for any straps, hooks, or Velcro that may be keeping the cushions in place. Detach these additional attachments if present.
Removing the seat cushions provides you with a clearer view of the internal components of the recliner sofa and allows for further disassembly if necessary. It’s essential to be cautious during this process to avoid any damage to the cushions or the sofa itself. Take your time and double-check for any missed fasteners or attachments before proceeding.
With the seat cushions successfully removed, you can now move forward with unbolting the armrests.
Unbolting the Armrests
After removing the seat cushions, the next step in disassembling your recliner sofa is unbolting the armrests. By detaching the armrests, you’ll gain access to the internal mechanisms and the frame of the sofa. Follow these steps to unbolt the armrests:
1. Locate the attachment points: Examine the armrests and identify the attachment points where they connect to the main frame of the recliner sofa. These attachment points may be located underneath the armrests or on the sides, depending on the design of your sofa.
2. Remove any screws or bolts: Look for any screws or bolts securing the armrests to the main frame. Using a suitable screwdriver or Allen wrench, carefully loosen and remove these fasteners. Place the screws or bolts in a container or bag for safekeeping.
3. Disconnect any connectors: Some recliner sofas may have connectors or hooks that join the armrests to the main frame. Check for any connectors and gently disconnect them by sliding or pulling them apart. Take note of the connection mechanism for reassembly.
4. Lift and remove the armrests: Once the fasteners and connectors are removed, carefully lift the armrests upward to detach them from the recliner sofa. Set the armrests aside in a safe location.
During the process of unbolting the armrests, it’s crucial to handle them with care to avoid any damage to the armrests themselves or the surrounding components. If you encounter any resistance or difficulty, double-check for any missed screws, bolts, or connectors that may still be securing the armrests. Refer to the manufacturer’s manual for specific instructions if needed or seek professional assistance if uncertain.
Now that the armrests are successfully unbolted, you can proceed to the next step of taking apart the frame of the recliner sofa.
Taking Apart the Frame
After removing the seat cushions and unbolt the armrests, the next step in disassembling your recliner sofa is taking apart the frame. This step will allow you to access the inner mechanisms and separate the main components of the sofa. Follow these steps to take apart the frame:
1. Examine the frame: Take a close look at the frame of your recliner sofa to identify any visible screws, bolts, or connectors that are holding it together. These may be located at the base, sides, or back of the sofa.
2. Remove fasteners: Use the appropriate tools, such as a screwdriver or Allen wrench, to carefully remove any screws, bolts, or connectors that are securing the frame. Keep the fasteners in a container or bag for safekeeping.
3. Disassemble the base: If the recliner sofa has a separate base, detach it from the main frame by removing any fasteners or connectors. Gently lift and separate the base from the rest of the frame.
4. Separate other frame components: If there are any additional removable parts, such as side panels or back panels, carefully detach them by unscrewing or unbolting the fasteners. Keep track of where each component is removed from for reassembly.
5. Take apart any remaining connections: Inspect the frame for any remaining connections, such as hooks or latches. Disengage these connections by carefully pulling or releasing them, allowing for complete separation of the frame components.
During the process of taking apart the frame, it’s important to handle each component with care to avoid any damage. Take your time and double-check for any missed fasteners or connectors before proceeding to the next step. Refer to the manufacturer’s manual if you need specific instructions or reach out to a professional for assistance if necessary.
Now that the frame of your recliner sofa is disassembled, you can move on to the next step of disassembling the reclining mechanism.
Disassembling the Reclining Mechanism
After taking apart the frame of your recliner sofa, the next step in the disassembly process is to disassemble the reclining mechanism. This mechanism is responsible for the comfortable reclining function of the sofa. Follow these steps to disassemble the reclining mechanism:
1. Identify the reclining mechanism: Examine the underside of the recliner sofa to locate the reclining mechanism. It may be attached to the frame or integrated within the base of the sofa.
2. Inspect for attachment points: Look for any screws, bolts, or connectors that hold the reclining mechanism in place. These attachment points may vary depending on the sofa model.
3. Remove fasteners: Using the appropriate tools, such as a screwdriver or Allen wrench, carefully remove the screws, bolts, or connectors that secure the reclining mechanism to the frame or base.
4. Disconnect cables or rods: If your recliner sofa has cables or rods connecting the reclining mechanism to the footrest or backrest, gently detach them by carefully releasing any tension or clips.
5. Separate the reclining mechanism: Once all fasteners and attachments have been removed, you can separate the reclining mechanism from the frame or base of the sofa. Lift and remove it carefully to avoid any damage or injury.
During the process of disassembling the reclining mechanism, be cautious of any springs or tension-loaded components that may be present. Take your time and pay attention to the specific attachments and connections of your recliner sofa. If you encounter any difficulties or are unsure about any step, refer to the manufacturer’s manual or seek professional assistance.
Now that the reclining mechanism is disassembled, you can proceed to the next step of removing the upholstery from the sofa.
Removing the Upholstery
After disassembling the reclining mechanism, the next step in the process of taking apart your recliner sofa is removing the upholstery. This step allows you to access the inner padding, springs, and other components of the sofa for repair or replacement. Follow these steps to remove the upholstery:
1. Locate attachment points: Examine the underside of the sofa to identify the attachment points where the upholstery is secured. These attachment points may be in the form of staples, screws, or fabric fasteners.
2. Remove the staples or fasteners: If the upholstery is held in place with staples or fabric fasteners, use a staple remover or pliers to carefully remove them. Take your time to avoid ripping or damaging the fabric.
3. Unzip any zippers: Some recliner sofas have removable upholstery with zippers. Locate the zippers and unzip them to separate the upholstery from the main frame.
4. Detach any fabric connectors: Check for any fabric connectors that may be holding the upholstery to the frame. These connectors could be in the form of Velcro strips, snaps, or fabric hooks. Gently detach them as needed.
5. Slowly remove the upholstery: Once all fasteners and connectors are undone, carefully peel back or remove the upholstery from the frame of the sofa. Take care not to tear or damage the fabric in the process.
During the process of removing the upholstery, be gentle and patient. Take note of the attachment points and connectors for reassembly or future reference. If you encounter any difficulties or are unsure about any step, refer to the manufacturer’s manual or consult a professional for guidance.
With the upholstery successfully removed, you have now completed the disassembly of your recliner sofa. Proceed with caution and keep all the disassembled parts organized for ease of reassembly or potential repairs.
Reassembling the Recliner Sofa Parts
After successfully disassembling your recliner sofa, it’s now time to reassemble the parts and put your sofa back together. Follow these steps to ensure a proper reassembly:
1. Organize the disassembled parts: Before you begin reassembling, take a moment to organize all the disassembled parts. Sort them according to their respective components and keep any screws, bolts, or fasteners in a safe container.
2. Start with the frame: Begin the reassembly process by aligning and connecting the main frame components. Use the screws, bolts, or connectors to fasten them securely. Refer to any markings or labels on the frame for guidance.
3. Attach the reclining mechanism: Once the frame is assembled, reattach the reclining mechanism to its designated position. Secure it tightly using the appropriate screws, bolts, or connectors. Make sure it functions properly and smoothly.
4. Reinstall the upholstery: Carefully drape or attach the upholstery back onto the frame of the recliner sofa. Follow the reverse order of the removal steps—secure any fabric connectors, zip up any zippers, and use staples or fabric fasteners to reattach the fabric securely.
5. Affix the seat cushions and armrests: Place the seat cushions back into their designated positions and ensure they fit snugly. Then, reattach the armrests, making sure they align properly and secure them with screws or bolts if necessary.
6. Test the functionality: Once everything is reassembled, test the reclining function of your sofa to ensure it operates smoothly and correctly. Make any adjustments if needed, such as tightening any loose screws or bolts.
Throughout the reassembly process, refer to the manufacturer’s manual for any specific instructions or guidelines. Take your time and double-check that all components are properly secured to avoid any issues or accidents.
Now that your recliner sofa is successfully reassembled, take a moment to sit back, relax, and enjoy the comfort it provides.