
Choosing the Right Fabric
When it comes to making a baby blanket, selecting the right fabric is essential for both comfort and durability. As babies have delicate skin, it is crucial to choose fabrics that are soft, hypoallergenic, and gentle against their sensitive skin. Here are some factors to consider when choosing the perfect fabric for your baby blanket:
- Softness: Look for fabrics that feel incredibly soft to the touch. Popular options include cotton flannel, minky fabric, bamboo, and organic cotton.
- Hypoallergenic: Babies often have sensitive skin and can be prone to allergies. Opt for hypoallergenic fabrics that are free from harsh chemicals and dyes to minimize the risk of irritation.
- Breathability: Babies can easily overheat, so it is crucial to select breathable fabrics that allow air circulation. Fabrics like cotton are known for their breathability and are ideal for all seasons.
- Durability: Babies can be messy, so choose fabrics that can withstand regular washing and wear. Fabric blends with polyester or nylon can offer added durability and resistance to shrinking.
- Prints and Patterns: Consider the aesthetic appeal of the fabric. You can find a wide variety of prints, patterns, and colors to suit your personal style or match your nursery theme.
Remember to always check the fabric care instructions before purchasing to ensure that it is machine washable and easy to maintain. By considering these factors, you can select a fabric that not only provides comfort but also meets the practical needs of a baby blanket.
Measuring and Cutting the Fabric
Accurate measurements and precise cutting are crucial steps in creating a well-fitted and symmetrical baby blanket. Follow these steps to ensure that you measure and cut the fabric correctly:
- Determine the desired size: Decide on the size of the baby blanket you want to create. Standard sizes for baby blankets are typically around 30×40 inches or 36×45 inches. If you prefer a custom size, make sure to adjust your measurements accordingly.
- Prepare the fabric: Before measuring, ensure that your fabric is free from wrinkles and lays flat on a clean surface. This will make it easier to get accurate measurements.
- Measure and mark: Use a measuring tape or ruler to measure and mark the dimensions of the desired size on the fabric. Be precise and use a fabric marker or pins to clearly indicate the measurements.
- Cut the fabric: With a sharp pair of fabric scissors, carefully cut along the marked lines. Take your time and make clean, straight cuts to ensure a professional-looking finish.
Remember to double-check your measurements before cutting to avoid any mistakes. It’s always better to measure twice and cut once to prevent wastage of fabric and potential rework.
If your baby blanket design includes additional decorative borders, make sure to account for those measurements as well. You can cut separate strips of fabric in contrasting colors or patterns to add an attractive border to your blanket.
By following these steps and being meticulous in your measurements and cutting, you’ll be on your way to creating a beautifully tailored baby blanket that fits perfectly and looks stunning.
Preparing the Fabric for Sewing
Before you begin sewing your baby blanket, it’s essential to properly prepare the fabric. These preparation steps will ensure that your sewing process goes smoothly and result in a high-quality finished product:
- Wash and pre-shrink the fabric: Start by washing the fabric using a mild detergent. This step will pre-shrink the fabric and remove any chemicals or residues. It’s an important precaution to prevent the blanket from shrinking or warping in later washes.
- Iron the fabric: After washing, iron the fabric using a low heat setting. This will remove any creases and ensure that the fabric lies flat for accurate sewing.
- Prepare the sewing machine: Set up your sewing machine with a fresh needle suitable for the type of fabric you’re using. Wind a compatible thread onto the bobbin and thread the machine following the manufacturer’s instructions.
- Pin the fabric: Place the fabric pieces right sides together and use straight pins to secure the edges. This will prevent the fabric from shifting during sewing and create clean and even seams.
- Consider using stabilizers: Some lightweight or stretchy fabrics may require additional support. In such cases, you can use stabilizers or interfacing to reinforce the fabric and improve stitch quality.
- Test the stitches: Before sewing on your actual fabric, it’s a good idea to test the stitches on a small scrap piece. This will allow you to check the tension and adjust the settings if needed.
Taking the time to properly prepare the fabric before sewing will result in a more professional and polished final product. It ensures that the fabric is clean, flat, and ready for stitching. By following these steps, you’ll be well-prepared to move onto the next stage of sewing your baby blanket.
Sewing the Blanket Edges
Now that you have prepared the fabric, it’s time to sew the edges of your baby blanket. This step not only gives the blanket a neat and finished appearance but also ensures that the fabric layers are securely held together. Follow these steps to sew the edges of your baby blanket:
- Choose a sewing method: Determine the type of edge finish you want for your baby blanket. Popular options include a simple straight stitch, a zigzag stitch, or a serger if you have one. The chosen method depends on personal preference and the desired look.
- Align the fabric edges: Place the fabric pieces right sides together, aligning the edges that need to be sewn. Pin the layers together to secure them and prevent any shifting during sewing.
- Select the stitch length and width: Adjust the stitch length and width on your sewing machine according to your chosen sewing method. For a straight stitch or zigzag stitch, a medium stitch length and width are usually suitable.
- Start sewing: Position the fabric under the sewing machine foot and lower the foot to secure it in place. Slowly guide the fabric along the edge, keeping the stitches straight and consistent. Take care to remove the pins as you sew to avoid damage to the sewing machine needle.
- Backstitch at the beginning and end: To secure the stitches, backstitch a few stitches at the beginning and end of your sewing line. This helps to prevent the thread from unraveling and ensures a strong seam.
- Trim excess thread and fabric: Once you have completed sewing the edges, trim any excess thread or fabric using sharp fabric scissors. Be careful not to cut into the seam itself.
It’s important to maintain a steady pace while sewing and to keep the fabric evenly fed through the machine. Take breaks as needed and don’t rush the process to maintain accuracy and avoid mistakes. With these steps, you’ll successfully sew the edges of your baby blanket, creating a secure and attractive finish.
Adding a Decorative Border
Adding a decorative border to your baby blanket can elevate its appearance and give it a personalized touch. A border not only enhances the aesthetic appeal but also provides additional stability and durability to the edges of the blanket. Follow these steps to add a decorative border to your baby blanket:
- Select the border fabric: Choose a fabric that complements the main fabric of the blanket. Consider using a contrasting color, pattern, or texture to create visual interest.
- Measure and cut the border strips: Measure the length of each side of the blanket and add a few inches for seam allowance. Cut long strips of the border fabric to match these measurements.
- Prepare the border strips: Fold the border strips in half lengthwise with right sides together. Press the folds to create a crease, and then unfold.
- Attach the border strips: Place one border strip along one side of the blanket, aligning the raw edges. Pin the strip in place, starting at one corner and working your way around. Repeat the process for the remaining sides of the blanket.
- Sew the border strips: Using a straight stitch, sew along the pinned edge of the border strip. Backstitch at the beginning and end to secure the stitches. Repeat the process for all sides.
- Trim excess fabric and threads: Trim any excess fabric or threads using fabric scissors, being careful not to cut into the seam. This will give your border a clean and finished look.
Depending on your preference, you can also consider adding decorative touches to the border, such as lace trim, ribbon, or embroidery. These embellishments can add a unique and personalized element to your baby blanket.
Remember to take your time and sew slowly and accurately when attaching the border. By following these steps, you’ll be able to add a beautiful decorative border to your baby blanket, giving it a stylish and customized finish.
Sewing the Corner Miter
Creating a corner miter adds a professional and polished touch to the edges of your baby blanket. It helps to eliminate bulk and ensures that the corners lay flat when the blanket is finished. Follow these steps to sew the corner miters for your baby blanket:
- Prepare the corner fabric: Cut a square of fabric that matches the width of the border strips. This will be used to create the mitered corners.
- Place the corner fabric: Fold the corner fabric in half diagonally to create a triangle. Position the triangle at one corner of the blanket, aligning the raw edges with the border strips on each side.
- Pin in place: Pin the corner fabric in place, ensuring that all layers are securely held together. This will keep everything aligned during the sewing process.
- Sew the corner miter: Using a straight stitch, start sewing from the edge of the border strip, securing the layers together. Sew diagonally across the corner fabric, gradually angling towards the adjacent border strip. Stitch until you reach the end of the border strip. Backstitch to secure the stitches.
- Trim excess fabric: Once sewn, trim any excess fabric from the corner fabric and border strip, leaving a small seam allowance. Be careful not to cut into the seam itself.
- Repeat for all corners: Repeat the above steps for each corner of the baby blanket, ensuring that the mitered corners are consistent in size and shape.
When sewing the corner miters, it’s important to keep the fabric layers flat and avoid any puckering or bunching. Take your time and sew slowly, ensuring that the stitches are straight and secure.
By sewing the corner miters, you’ll achieve a professional and tidy finish for your baby blanket. The clean corners will contribute to the overall aesthetic appeal and durability of the blanket, ensuring that it looks well-crafted and visually pleasing.
Turning the Blanket Right Side Out
After completing the sewing and corner miters, it’s time to turn the baby blanket right side out. This step is essential to reveal the beautiful fabric and finishing touches of your blanket. Follow these steps to carefully turn the baby blanket right side out:
- Locate the opening: Identify the section of the blanket where you intentionally left an opening during the sewing process. This opening will allow you to turn the blanket inside out.
- Reach inside the blanket: Insert your hand through the opening and grasp the opposite corner of the blanket. Gently pull the fabric through the opening, gradually turning the entire blanket right side out.
- Smooth out the corners: Once the blanket is mostly turned right side out, use your fingers or a blunt object like a knitting needle to carefully push out the corners. This will ensure that the corners are fully formed and look crisp and well-defined.
- Push out the edges: Run your fingers along the edges of the blanket, gently pushing the fabric outwards to fully extend and smooth the seams. Take your time to ensure that the blanket is evenly turned and all edges are properly formed.
- Close the opening: Use pins or clips to secure the opening that was left during the sewing process. This will allow you to easily close it later with a hidden stitch or topstitching.
Turning the baby blanket right side out requires patience and care to avoid damaging the fabric or distorting the corners. Take your time and work slowly, ensuring that the fabric is smoothly turned without any twists or bunching.
Once the blanket is fully turned right side out, it’s ready for the final steps of pressing and topstitching to give it a polished and professional finish.
Pressing and Topstitching
Pressing and topstitching are important final touches that give your baby blanket a polished and finished look. These steps help to smooth out any wrinkles or creases, as well as reinforce the seams for added durability. Follow these steps to properly press and topstitch your baby blanket:
- Prepare the iron: Set your iron to the appropriate temperature for the fabric you are working with. It’s important to check the fabric care instructions to ensure that you don’t use excessive heat that could damage the fabric.
- Press the seams: Use the iron to gently press the seams on the backside of the blanket. Start with the center seams and work your way outwards to the corners, ensuring that the seams lie flat and open. This process will give your blanket a neat and professional appearance.
- Topstitch the edges: Select a decorative stitch on your sewing machine or use a straight stitch to create a topstitch along the edges of the blanket. This step adds extra reinforcement to the seams and gives the blanket a decorative finish. Start at one corner and sew all around the edges, backstitching at the beginning and end to secure the stitches.
- Remove pins or clips: As you topstitch, remove any pins or clips that were used to secure the opening that you previously left. Be cautious not to sew over them as you stitch, and remove them as you approach.
Pressing and topstitching help to give your baby blanket a professional and crisp appearance. The process not only enhances the overall look of the blanket but also strengthens the seams for added durability. Take your time during these steps to ensure that the seams are neatly pressed and the topstitching is even and secure.
Once you have completed the pressing and topstitching, your baby blanket is now ready for the final step of adding personalized embellishments.
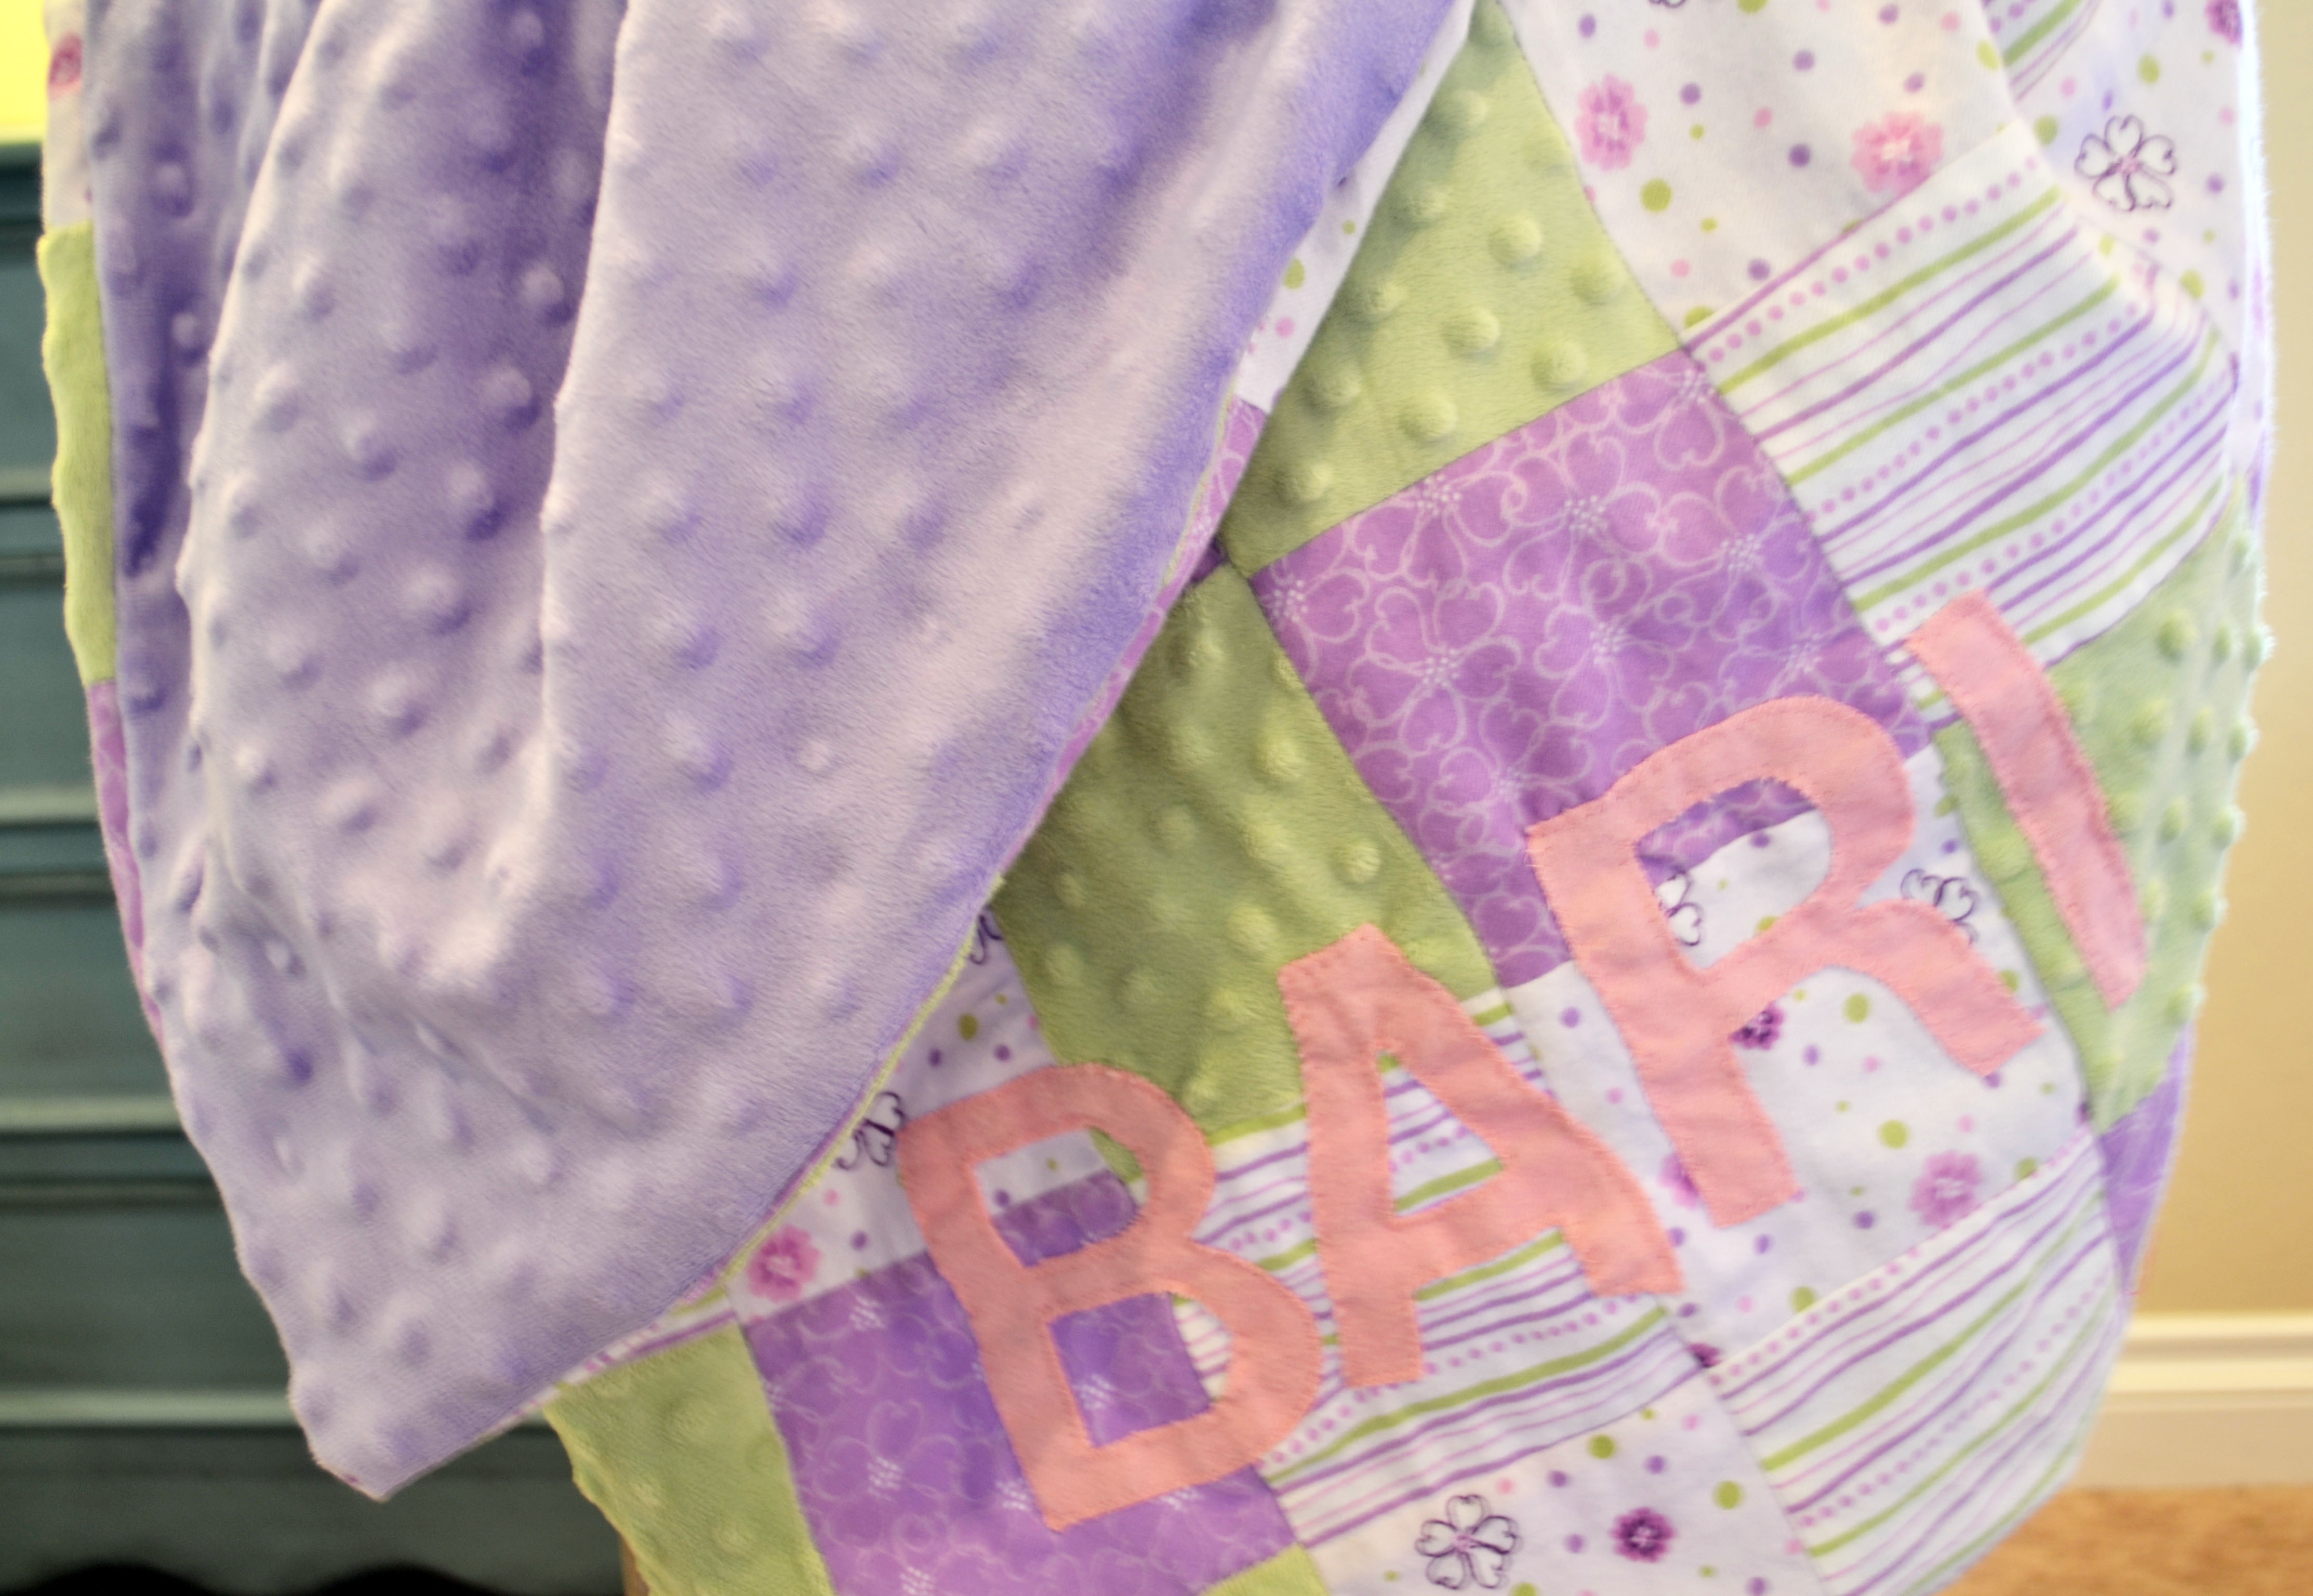
Adding Personalized Embellishments
To make your baby blanket truly unique, you can add personalized embellishments that reflect your creativity and individual style. These embellishments can include embroidery, appliqué, fabric patches, or even personalized name tags. Here are some ideas to consider when adding personalized embellishments to your baby blanket:
- Embroidery: Use embroidery thread and a needle or an embroidery machine to add custom designs, patterns, or monograms to the fabric. You can embroider the baby’s name, birthdate, or a meaningful image to make the blanket extra special.
- Appliqué: Cut out fabric shapes, letters, or images and sew them onto the blanket using a straight stitch or a satin stitch. This technique allows you to add colorful and playful elements to the design.
- Fabric patches: Sew fabric patches onto the blanket to create a patchwork effect. Choose fabrics that have sentimental value or represent something meaningful to you or the baby.
- Personalized name tags: Create personalized name tags using fabric, ribbon, or even leather. Attach them to the blanket using decorative stitches or by sewing them onto a corner or edge.
- Ribbon or lace trim: Sew decorative ribbon or lace along the edges of the blanket to add a touch of elegance and charm. Choose a trim that complements the fabric and enhances the overall aesthetic of the blanket.
Adding personalized embellishments allows you to infuse your baby blanket with love and individuality. It creates a special keepsake that will be cherished for years to come. Consider the style and theme of the blanket when selecting the embellishments to ensure that they enhance the overall design.
When sewing the embellishments, take care to anchor them securely and trim any excess threads or fabric to maintain a neat appearance. Be mindful of the placement and spacing to ensure a balanced and visually appealing composition.
With personalized embellishments, your baby blanket will become a truly one-of-a-kind piece that reflects your creativity and reflects your personal touch.
Washing and Caring for the Baby Blanket
Proper washing and care are essential to maintain the quality and longevity of your baby blanket. By following these guidelines, you can ensure that the blanket stays clean, soft, and in excellent condition:
- Check the fabric care instructions: Before washing the baby blanket, always check the fabric care instructions provided by the manufacturer. This will help you determine the appropriate washing method and temperature.
- Pre-treat stains: To prevent stains from setting in, treat any spots or stains on the baby blanket as soon as possible. Use a gentle stain remover or baby-safe detergent and follow the instructions provided.
- Choose a gentle detergent: Opt for a mild, baby-friendly detergent that is free from harsh chemicals or fragrances. This will help to minimize any potential skin irritation for the baby.
- Separate colors: If the blanket contains different colored fabrics, separate them by color to prevent bleeding and color transfer during the wash.
- Use a gentle cycle: Select a delicate or gentle cycle on your washing machine to protect the fabric and preserve the stitching of the blanket.
- Use a gentle drying method: Air-drying is the preferred method for preserving the quality of the baby blanket. Lay it flat on a clean surface or hang it on a clothesline away from direct sunlight. If using a dryer, choose a low heat setting to prevent shrinking or damage to the fabric.
- Avoid harsh chemicals and bleach: Harsh chemicals and bleach can damage the fabric and the delicate fibers of the baby blanket. It is best to avoid using them when washing or treating stains.
- Inspect and mend: Regularly inspect the blanket for any loose threads or small tears. Mend them promptly to prevent further damage and ensure the longevity of the blanket.
- Store properly: When not in use, store the baby blanket in a clean, dry, and dust-free environment. Consider using a breathable fabric bag or storage container to protect it from dust and pests.
By following these washing and care guidelines, you can keep the baby blanket fresh, clean, and soft for your little one to enjoy. Regular maintenance and attention will ensure that the blanket remains a cherished item that can be passed down to future generations.