
Checking the Contents of the Box
Before you start setting up your La Crosse Technology Projection Clock, it’s important to ensure that you have received all the necessary components. The contents of the box may vary depending on the specific model you purchased, but here are some common items you should check for:
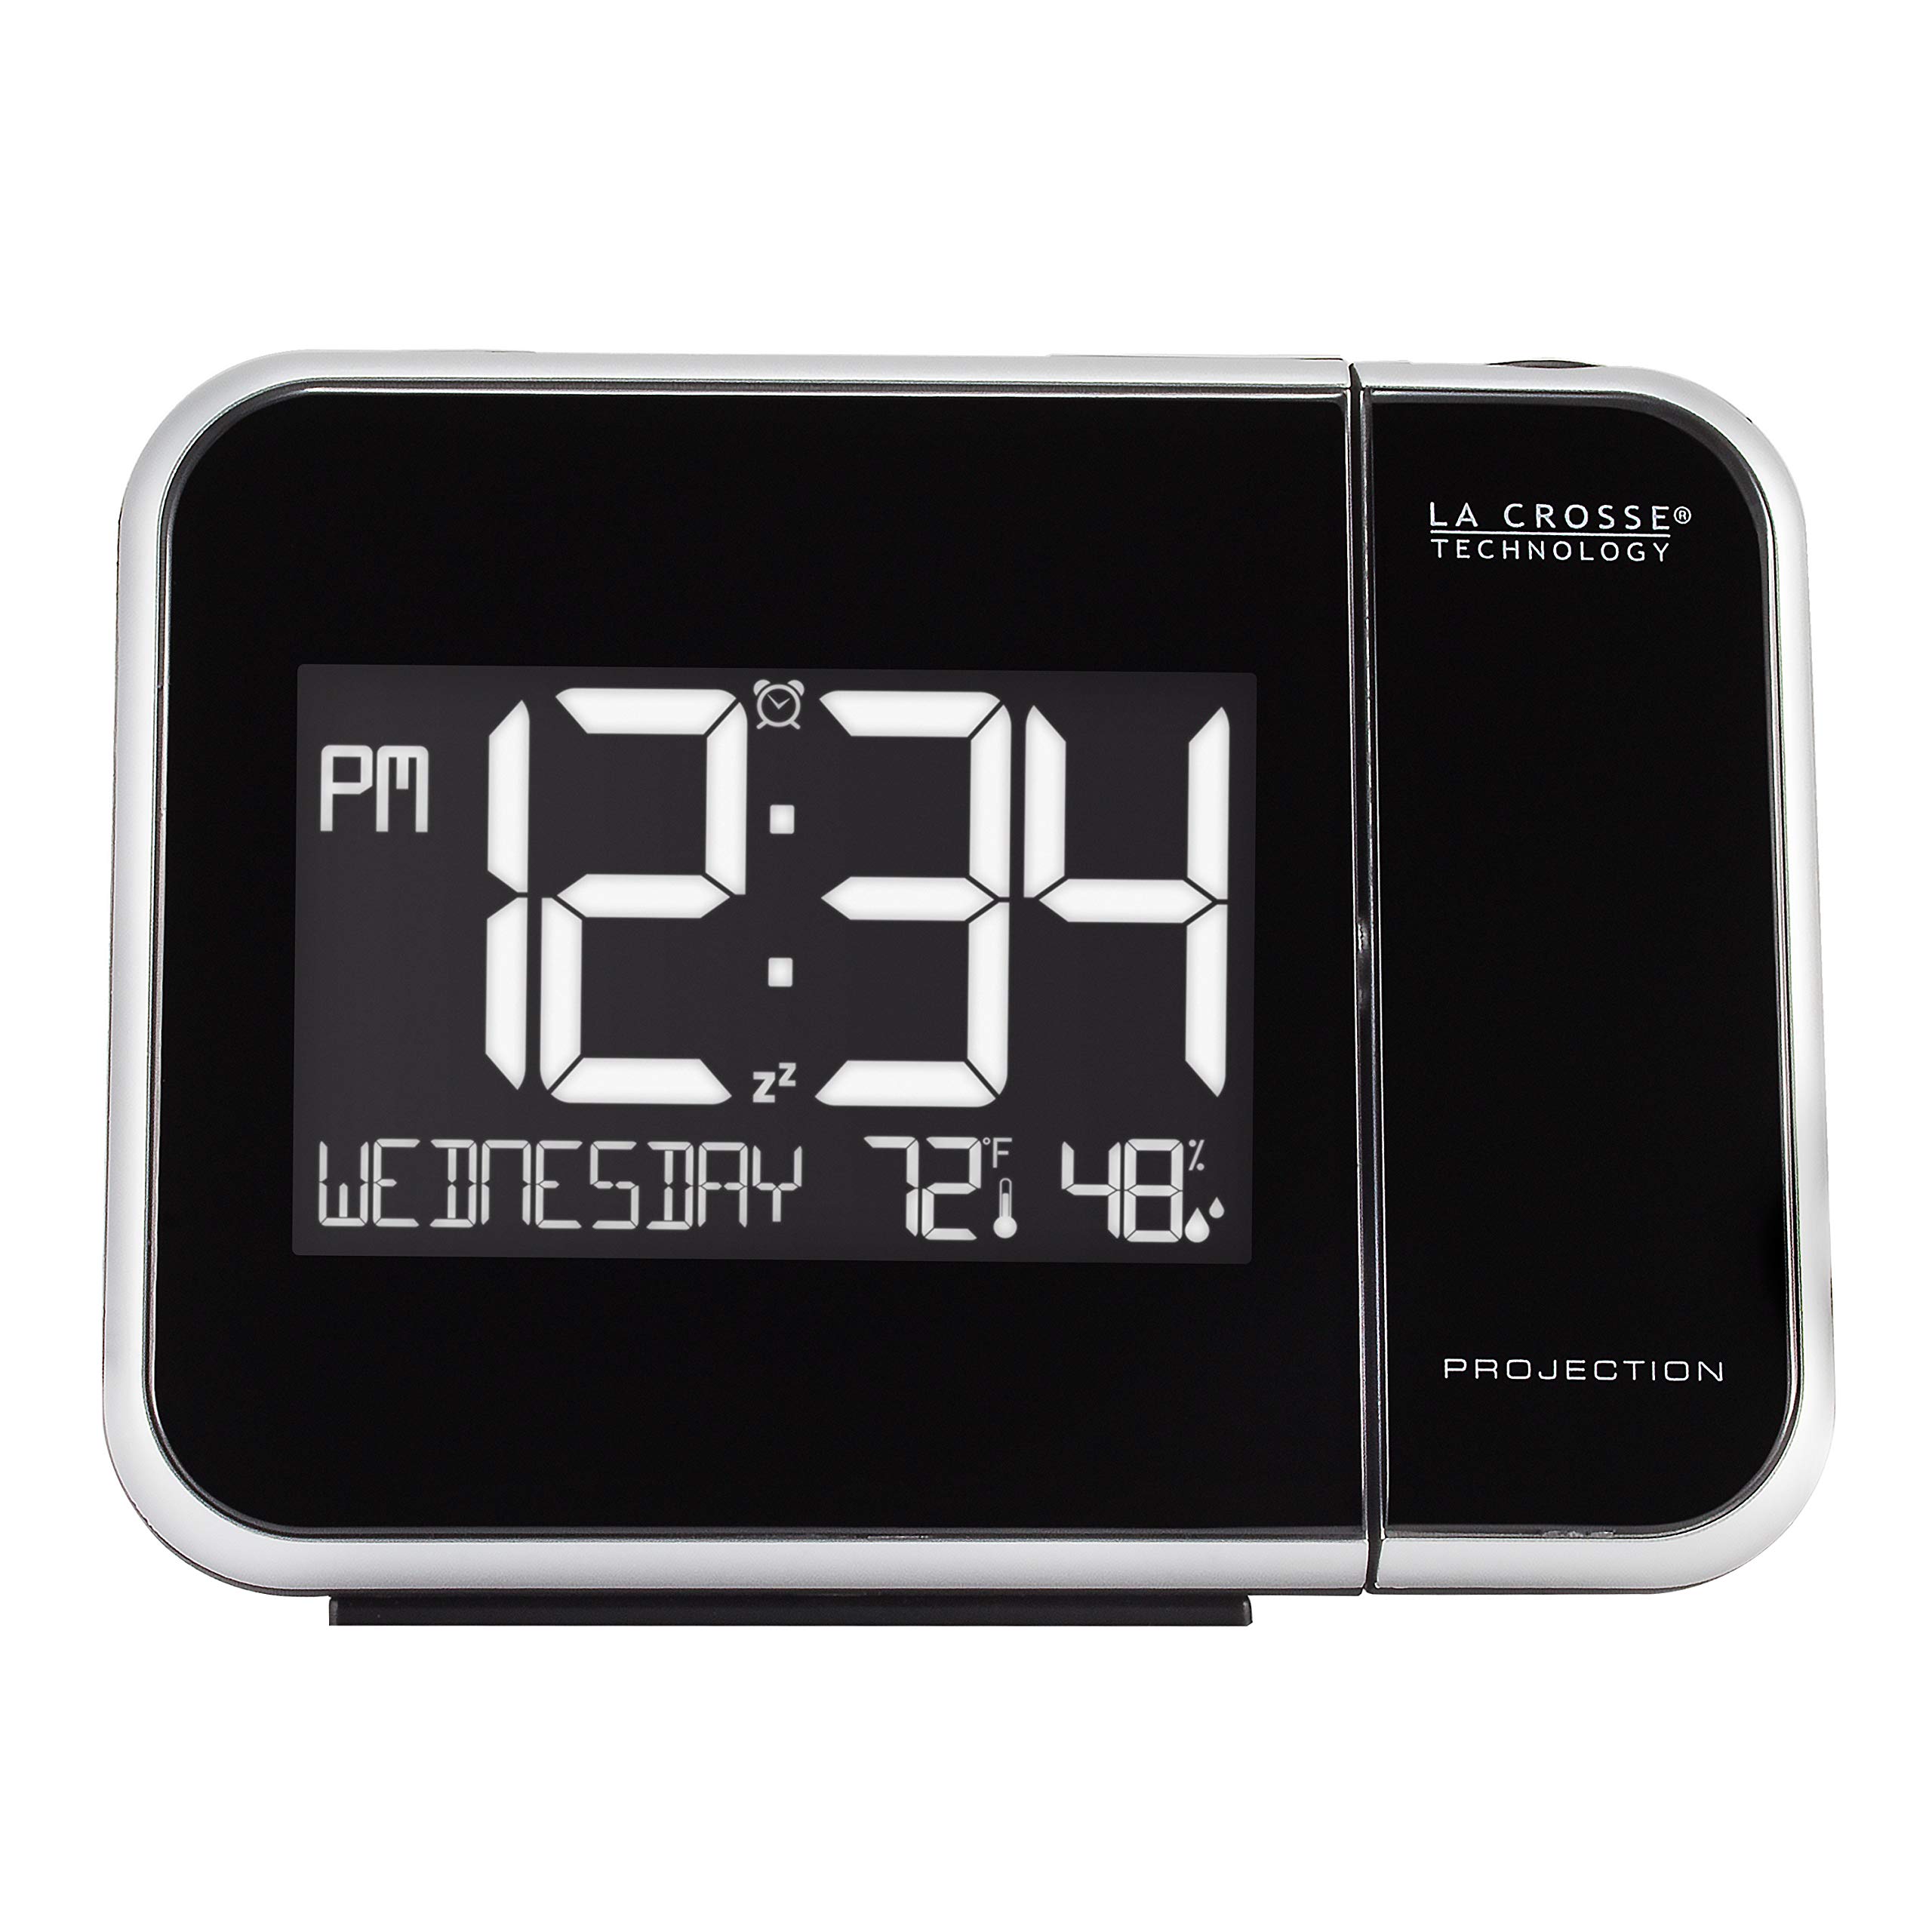
1. Projection Clock – This is the main unit that displays the time and projects it onto a wall or ceiling.
2. Power Adapter – A power adapter is typically included to provide a continuous power supply to the clock. Make sure it is included and in good condition.
3. User Manual – The user manual contains important instructions and guidelines for setting up and operating the clock. Check for the presence of a comprehensive user manual.
4. Batteries – Some models may require batteries as a backup power source. Confirm if batteries are included and which type is needed.
5. Projection Screen – Certain models come with a dedicated projection screen for optimal display clarity. Verify if a projection screen is included in the package.
6. Remote Control (if applicable) – Some models may come with a remote control for convenient operation from a distance. Check if a remote control is included.
7. Additional Features – Depending on the model, your La Crosse Technology Projection Clock may include additional features such as a radio function, USB charging ports, or a customizable alarm sound. Check the box for any additional accessories or features.
It’s crucial to thoroughly check the contents of the box before proceeding with the setup. If you find any missing or damaged items, reach out to the customer support of La Crosse Technology for assistance. Once you have confirmed all the necessary components, you can proceed to the next steps to set up and enjoy your Projection Clock.
Plugging in the Clock
Once you have ensured that all the necessary components are present, it’s time to plug in your La Crosse Technology Projection Clock and provide it with power. Follow these steps to correctly plug in the clock:
- Locate a suitable power outlet near where you plan to place the clock. Ensure that the outlet is easily accessible and not too far away from the clock.
- Take the power adapter that came with the clock and carefully insert the plug into the power input port located on the back or bottom of the clock.
- Once the plug is securely inserted, connect the other end of the power adapter into the power outlet. Make sure the connection is snug and not loose.
- If your model of La Crosse Technology Projection Clock also requires batteries as a backup power source, this is the perfect time to insert them. Follow the instructions in the user manual to determine the correct battery type and insertion method.
- After plugging in the clock and, if necessary, inserting batteries, wait for a few moments to allow the clock to power up and initialize. You may notice a brief display on the clock indicating that it is receiving power and configuring its settings.
- Once the clock has powered on, you can proceed to the next steps for setting the time, date, and other customizations.
It is highly recommended to use the provided power adapter for a consistent power supply to your La Crosse Technology Projection Clock. Using third-party adapters can potentially harm the clock or cause malfunctions.
By correctly plugging in your La Crosse Technology Projection Clock, you have established a solid foundation for its functionality. Now you can move on to the next steps to set up and personalize your clock according to your preferences.
Setting the Time
Setting the correct time on your La Crosse Technology Projection Clock ensures that it provides accurate and reliable information. Follow these steps to set the time:
- Press the “Settings” button on the clock or the corresponding button on the remote control, if applicable. This will take you to the clock’s settings menu.
- Look for the “Time” or “Clock” option within the settings menu. Use the directional buttons on the clock or remote control to navigate to this option.
- Once you have selected the “Time” option, you can typically increment or decrement the hours and minutes using the “+” and “-” buttons, respectively. Some clocks may have a dial or a scroll wheel for time adjustments.
- Adjust the hours and minutes using the appropriate buttons or controls until the desired time is displayed on the clock’s main screen. Keep in mind whether you are setting the time for AM or PM, based on your local time format.
- After setting the time, press the “OK” or “Set” button to confirm and save the changes. The clock will then continue operating with the newly set time.
It is important to ensure that you set the time accurately, especially if your La Crosse Technology Projection Clock is used as a primary timekeeping device. If you are unsure of the correct time, you can reference a reliable source such as an atomic clock or an online timekeeping service.
Remember to periodically check and adjust the time on your La Crosse Technology Projection Clock, especially during daylight saving time changes or when traveling across time zones, to maintain accurate timekeeping.
By setting the time correctly, you can rely on your La Crosse Technology Projection Clock to provide you with accurate time information at a quick glance, allowing you to stay on schedule and organized.
Setting the Date
Setting the date on your La Crosse Technology Projection Clock ensures that it displays the correct date along with the time. Follow these steps to set the date:
- Press the “Settings” button on the clock or the corresponding button on the remote control, if applicable. This will take you to the clock’s settings menu.
- Look for the “Date” or “Calendar” option within the settings menu. Use the directional buttons on the clock or remote control to navigate to this option.
- Once you have selected the “Date” option, you can typically increment or decrement the month, day, and year using the “+” and “-” buttons. Some clocks may have a dial or a scroll wheel for date adjustments.
- Adjust the month, day, and year using the appropriate buttons or controls until the desired date is displayed on the clock’s main screen.
- After setting the date, press the “OK” or “Set” button to confirm and save the changes. The clock will then continue displaying the newly set date in addition to the time.
It’s important to keep the date accurate on your La Crosse Technology Projection Clock, especially if you rely on it for planning and scheduling. Ensure that the date you set corresponds to the current date in your time zone.
In some cases, La Crosse Technology Projection Clocks may have the option to automatically update the date when they are connected to an atomic clock or receive time and date information from a reliable source. Refer to the user manual for instructions on enabling this feature, if available on your model.
By setting the date correctly, you can rely on your La Crosse Technology Projection Clock to not only provide you with accurate time but also ensure that you stay informed about the current date in a convenient and visible manner.
Setting the Alarm
The alarm function of your La Crosse Technology Projection Clock allows you to wake up to your desired time. Follow these steps to set the alarm:
- Press the “Alarm” button on the clock or the corresponding button on the remote control, if applicable. This will take you to the alarm settings menu.
- Look for the “Set Alarm” or “Alarm Time” option within the settings menu. Use the directional buttons on the clock or remote control to navigate to this option.
- Once you have selected the “Set Alarm” option, you can typically increment or decrement the hours and minutes using the “+” and “-” buttons. Some clocks may have a dial or a scroll wheel for alarm time adjustments.
- Adjust the hours and minutes using the appropriate buttons or controls until the desired alarm time is set for your wakeup call.
- After setting the alarm time, press the “OK” or “Set” button to confirm and save the changes. The clock will then activate the alarm at the specified time.
Depending on your model of La Crosse Technology Projection Clock, you may have additional options to customize the alarm function:
- Alarm Sound – Some clocks allow you to choose from a variety of alarm sounds such as beeps, chimes, or even nature sounds. Explore the settings menu to select your preferred alarm sound.
- Snooze Function – Many clocks have a snooze function which allows you to temporarily silence the alarm for a few extra minutes of sleep. Look for the snooze button or option in the alarm settings to enable this feature.
- Alarm Volume – You may have the option to adjust the volume of the alarm to your desired level. Refer to the user manual for instructions on adjusting the alarm volume.
By setting the alarm on your La Crosse Technology Projection Clock, you can wake up to your favorite time and start your day on schedule. Customize the alarm settings according to your preferences to ensure a pleasant waking experience.
Adjusting the Projection Focus
The projection feature of your La Crosse Technology Projection Clock allows you to display the time on a wall or ceiling for easy viewing. Follow these steps to adjust the projection focus:
- Locate the focus dial or button on the clock. It is typically located on the side or back of the device.
- Turn the focus dial or press the focus button to start adjusting the projection focus.
- While observing the projected time display, carefully rotate the focus dial or press the focus button in small increments until the projected numbers are clear and sharp.
- Continue to fine-tune the focus until you are satisfied with the clarity of the projection.
It’s important to note that the optimal distance for projection may vary depending on the specific model of your La Crosse Technology Projection Clock. Consult the user manual for guidelines on the recommended distance between the clock and the projected surface.
Additionally, make sure that the surface onto which you are projecting is smooth and preferably light in color. A dark or textured surface may result in a less clear projection.
By adjusting the projection focus, you can ensure that the displayed time is legible and easily readable from a distance. Take the time to experiment with different focus settings to find the perfect balance of clarity and visibility for your specific environment.
Setting the Projection
The projection feature on your La Crosse Technology Projection Clock allows you to display the time on a wall or ceiling for easy viewing. Follow these steps to set up and adjust the projection:
- Position your clock in a suitable location where you want the time to be projected. Typically, this is a wall or ceiling within your line of sight.
- Adjust the orientation of the clock to ensure that the projection is facing in the desired direction. This may involve tilting or rotating the clock accordingly.
- Locate the projection button on the clock or the corresponding option in the settings menu. Press the button or navigate to the option to activate the projection function.
- Once the projection is activated, you may be able to adjust the projection angle. Look for a tilt or rotation mechanism on the clock that allows you to fine-tune the projection angle to your preference.
- If your clock allows it, you may also have the option to adjust the projection size. Refer to the user manual for instructions on how to adjust the size of the projected time.
Keep in mind that the projection feature works best in dim or darker environments. If the room is too bright or has excessive ambient light, the projected time may appear less visible or washed out. Consider lowering the brightness of the room or positioning the clock in a darker area for optimal projection visibility.
Experiment with the positioning and adjustment settings of your La Crosse Technology Projection Clock to find the best projection setup for your specific needs and preferences. Whether it’s projecting the time onto the ceiling for easy viewing from bed or onto a wall for a quick glance, the projection feature adds convenience to your daily routine.
Using the Snooze Function
The snooze function on your La Crosse Technology Projection Clock allows you to temporarily silence the alarm for a few extra minutes of sleep. Follow these steps to use the snooze function:
- When the alarm sounds, locate the snooze button on the clock or the corresponding button on the remote control, if applicable.
- Press the snooze button to activate the snooze function. This will temporarily silence the alarm and provide you with a few additional minutes of rest.
- The snooze duration is typically set to a default time, such as 5 or 10 minutes. However, some clocks allow you to customize the snooze duration. Refer to the user manual for instructions on adjusting the snooze time on your specific model.
- The clock will resume sounding the alarm after the snooze duration has elapsed. If you want to end the snooze and dismiss the alarm completely, you can press the “Alarm Off” button or an equivalent button on the clock or remote control.
The snooze function can be a helpful feature to gradually wake up and ease into your day. However, it’s important to use it judiciously, as relying too heavily on the snooze function can disrupt your sleep patterns and make it harder to wake up in the long run.
Some La Crosse Technology Projection Clocks may offer additional options or features related to the snooze function, such as increasing the snooze duration with each press of the snooze button or setting multiple alarms with different snooze intervals. Consult the user manual for your specific model for more details on these advanced snooze functionalities.
By utilizing the snooze function on your La Crosse Technology Projection Clock, you can enjoy a few extra moments of rest before starting your day while still ensuring that you wake up on time.
Changing the Display Color
Your La Crosse Technology Projection Clock may offer the option to change the display color to suit your personal preference or to match the ambiance of your room. Follow these steps to change the display color:
- Check if your clock has the option to change the display color. This feature may vary depending on the specific model you own. Consult the user manual to confirm if your clock supports changing the display color.
- If your clock supports changing the display color, locate the color change button on the clock or the corresponding option in the settings menu. This button or option may be labeled as “Color” or “Display Color”.
- Press the color change button or navigate to the color change option in the settings menu to cycle through the available display colors. Depending on your clock, you may have options such as red, blue, green, white, or even a color-changing mode.
- Keep pressing the color change button or selecting the color change option until you find the desired display color. The clock’s display will update in real-time to reflect the selected color.
Changing the display color of your La Crosse Technology Projection Clock can add a fun and personalized touch to your clock’s appearance. You can select a color that matches your room’s décor or find one that is pleasing to your eyes.
It’s important to note that not all La Crosse Technology Projection Clock models have the capability to change the display color. If your clock does not offer this feature, you will not be able to adjust the display color.
Experiment with different display colors to create a unique and visually appealing look for your La Crosse Technology Projection Clock. Whether you prefer a soothing blue or a vibrant red, changing the display color allows you to customize your clock’s appearance to reflect your style and preferences.
Adjusting the Brightness
The brightness level of your La Crosse Technology Projection Clock can be adjusted to suit your personal preference and to ensure optimal visibility in different lighting conditions. Follow these steps to adjust the brightness:
- Locate the brightness control button on the clock or the corresponding option in the settings menu. This button or option may be labeled as “Brightness” or “Display Brightness”.
- Press the brightness control button or navigate to the brightness control option in the settings menu.
- Your clock may offer multiple levels of brightness, ranging from low to high. Use the directional buttons or the +/- buttons to cycle through the available brightness levels.
- Observe the clock’s display as you adjust the brightness to find the desired level. The display will change in real-time to reflect the selected brightness level.
- Once you have found the ideal brightness level, press the “OK” or “Set” button to confirm and save the changes. The clock will then continue to display at the adjusted brightness level.
The ability to adjust the brightness level allows you to customize the display to your specific lighting conditions. If the clock is located in a bright room, you may want to increase the brightness for better visibility. On the other hand, if the clock is in a dimly lit bedroom, lowering the brightness can help prevent the display from being too intense during nighttime.
Keep in mind that not all La Crosse Technology Projection Clock models have adjustable brightness levels. Some clocks may have automatic brightness adjustment based on ambient light or may have a fixed brightness setting. Refer to the user manual for your specific clock model to determine if brightness adjustment is available.
By adjusting the brightness of your La Crosse Technology Projection Clock, you can ensure that the display is easily readable and comfortable for your eyes, providing you with optimal visibility regardless of the lighting conditions in your space.
Using the Radio Function
Your La Crosse Technology Projection Clock may have a built-in radio function, allowing you to listen to your favorite radio stations. Follow these steps to use the radio function:
- Press the “Radio” button on the clock or the corresponding button on the remote control, if applicable. This will activate the radio mode.
- Use the directional buttons or the +/- buttons to tune into the desired radio frequency. The clock’s display will typically show the current radio frequency as you navigate through the available stations.
- Once you have selected a radio station, you can adjust the volume using the volume control buttons or options. Increase or decrease the volume to your desired level.
- If your La Crosse Technology Projection Clock supports saving radio presets, you can save your favorite radio stations for quick access. Consult the user manual for instructions on how to save and recall radio presets on your specific model.
- To turn off the radio function, simply press the “Radio” button again or switch to a different clock mode, such as the time or alarm mode.
Enjoying your favorite radio stations on your La Crosse Technology Projection Clock adds an extra level of convenience and entertainment to your daily routine. Whether you listen to music, news, or talk shows, the radio function allows you to stay connected and informed.
Keep in mind that the radio reception may vary depending on your location and the quality of the signal. To improve reception, make sure that the clock is positioned in an area with good radio signal coverage.
Experiment with different radio stations and explore the functionality of the radio feature on your La Crosse Technology Projection Clock to make the most of this built-in entertainment option.
Troubleshooting Common Issues
While La Crosse Technology Projection Clocks are designed to work reliably, you may encounter certain issues during setup or operation. Here are some common issues that you may encounter and troubleshooting steps to resolve them:
- No power: If your clock is not turning on, check the power connection. Ensure that the clock is properly plugged into a power outlet or that the batteries are inserted correctly.
- Display not clear: If the projected time or the display on the clock is not clear, adjust the projection focus or the brightness settings. Also, make sure that the clock is positioned correctly and the surface onto which it’s projecting is smooth and light-colored.
- Inaccurate time: If the clock is not displaying the correct time, ensure that you have set the time and date accurately. Check if your clock supports automatic time synchronization with an atomic clock and enable this feature if available.
- Alarm not sounding: If the alarm is not sounding as expected, check if the alarm is enabled and the volume is set to an audible level. Double-check the alarm time settings to ensure they are correctly set.
- Radio reception issues: If you are experiencing poor radio reception, reposition the clock to improve signal strength. Try adjusting the antenna for better reception, or select a different radio station if the issue persists.
- Buttons or controls not working: If certain buttons or controls on the clock are not responding, check if any buttons are stuck or if the clock needs a software update. You can also try resetting the clock to factory settings as a troubleshooting step.
- Remote control not working: If you are using a remote control with your clock and it is not functioning correctly, check if the batteries are inserted properly. Also, ensure there is no obstruction between the remote control and the clock that might be affecting the signal.
If you continue to experience issues with your La Crosse Technology Projection Clock, consult the user manual for specific troubleshooting guidelines or contact La Crosse Technology’s customer support for further assistance. They will provide you with expert guidance to resolve any persistent problems you may encounter.
By troubleshooting common issues that may arise with your La Crosse Technology Projection Clock, you can ensure smooth functionality and enjoy the full benefits of this convenient timekeeping device.