
Tools and Materials Needed
Before you start replacing the water filter housing on your Whirlpool refrigerator, make sure you have the following tools and materials handy:
- An adjustable wrench
- A towel or cloth
- A new water filter compatible with your Whirlpool refrigerator model
These items are essential to ensure a smooth and successful replacement process, so it’s important to gather them before getting started.
An adjustable wrench will come in handy for loosening and tightening fittings, while a towel or cloth will help you clean any spills or leaks that may occur during the process.
As for the water filter, make sure you have a compatible replacement that is specifically designed for your Whirlpool refrigerator model. Using the wrong filter can lead to inefficiency or even damage to your appliance.
When purchasing a new water filter, refer to your Whirlpool refrigerator’s user manual or look for specific instructions online to ensure you choose the correct model.
Once you have gathered all the necessary tools and materials, you’re ready to proceed with the water filter housing replacement process.
Step 1: Turn Off the Refrigerator
Before beginning the process of replacing the water filter housing on your Whirlpool refrigerator, it is crucial to turn off the appliance to ensure your safety.
To turn off the refrigerator, locate the control panel usually located on the front or top of the appliance. Look for the power or on/off button and press it to turn off the refrigerator.
Alternatively, you can unplug the refrigerator from the power outlet if the control panel does not have a power button. This will ensure that the refrigerator is completely powered off.
By turning off the refrigerator, you are minimizing the risk of any electrical accidents or malfunctions during the replacement process. It is essential to prioritize your safety and follow proper precautions when working with any electrical appliance.
Once the refrigerator is turned off, you can proceed to the next steps of replacing the water filter housing on your Whirlpool refrigerator.
Remember, safety first! Ensure the refrigerator is powered off or unplugged before moving on to the next steps.
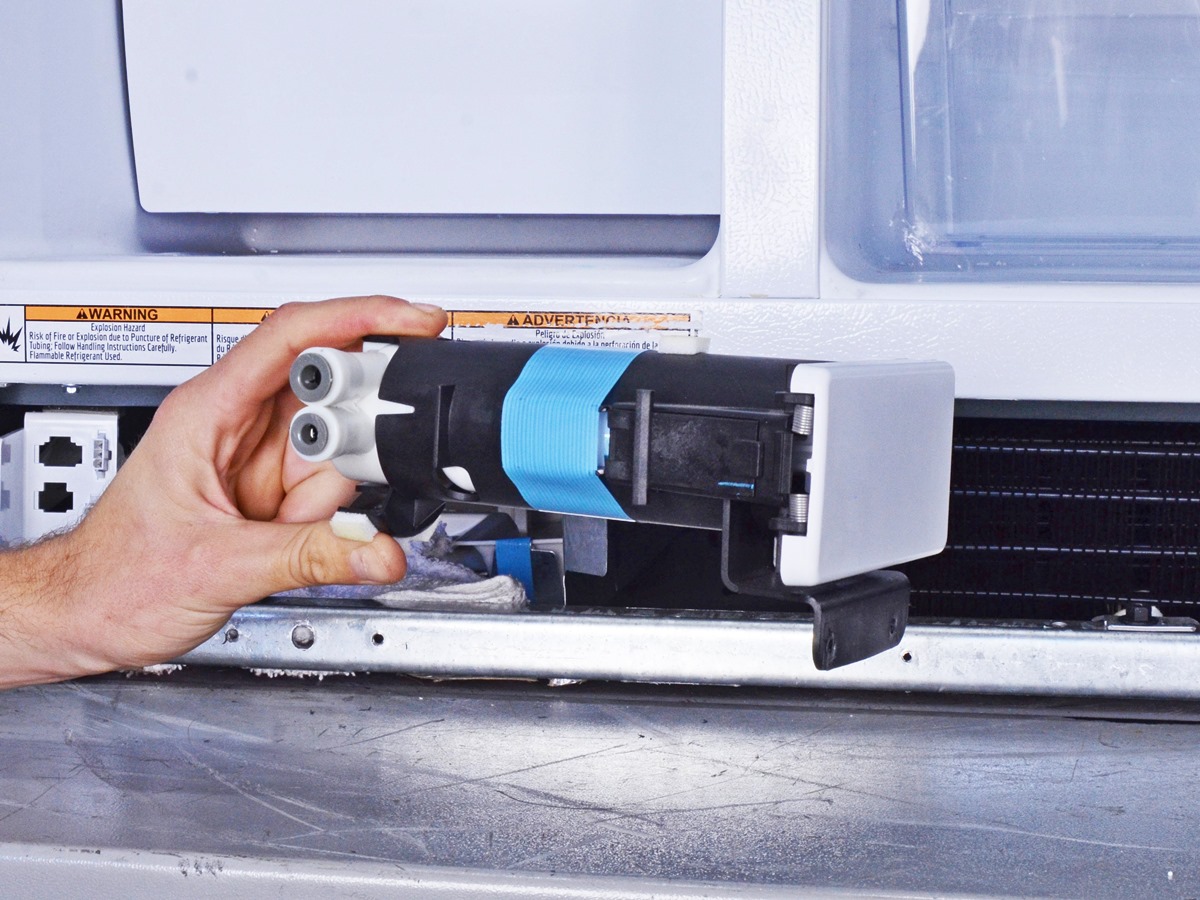
Step 2: Locate the Water Filter Housing
In order to replace the water filter housing on your Whirlpool refrigerator, you need to locate the existing housing.
The water filter housing is typically located in the upper right-hand corner of the refrigerator compartment. It can sometimes be hidden behind a plastic cover or panel, so you may need to remove any covers or panels to fully access it.
Check your Whirlpool refrigerator’s user manual for specific instructions on locating the water filter housing for your particular model. It may also be helpful to search for model-specific diagrams or online tutorials.
Once you have located the water filter housing, visually inspect it to familiarize yourself with its structure and any connections. This will help you better understand how to remove and replace it in the following steps.
Take note of any screws, clips, or mechanisms that may be securing the housing in place. This will assist you in safely detaching the old housing and installing the new one.
It’s important to approach this step with caution and precision. By properly locating the water filter housing, you will be better equipped to proceed with the subsequent steps and successfully replace it.
Once you are confident in your understanding of the water filter housing’s location and structure, you can move on to the next step of the replacement process.
Step 3: Remove the Old Water Filter
With the water filter housing located, it’s time to remove the old water filter from your Whirlpool refrigerator. Follow these steps to safely remove the old filter:
- First, make sure the refrigerator is still turned off or unplugged to avoid any accidents.
- Look for a release button or tab on the water filter housing. This button or tab is typically located near the bottom of the housing.
- Press the release button or tab firmly and hold it down. This will release the old water filter from its housing.
- Gently pull the old water filter out of the housing. Be prepared for some water spillage, so it’s a good idea to have a towel or cloth nearby to absorb any drips or leaks.
- Inspect the old filter for any signs of damage or clogging. If the filter appears dirty or damaged, it’s a clear indication that it needs to be replaced.
- Dispose of the old water filter properly. Check your local recycling guidelines or contact the manufacturer for guidance on how to properly dispose of used water filters.
Removing the old water filter is an important step in the replacement process. By following these instructions, you can safely and efficiently remove the old filter from the water filter housing.
Once the old water filter is removed, you can proceed to the next step of preparing the new water filter for installation.
Step 4: Prepare the New Water Filter
Now that you have removed the old water filter from your Whirlpool refrigerator, it’s time to prepare the new water filter for installation. Follow these steps to ensure that the new filter is ready to be installed:
- Take the new water filter out of its packaging. Before handling the filter, be sure to wash your hands thoroughly to maintain cleanliness and prevent any contaminants from entering the filter.
- Check the new filter for any protective covers or seals. If there are any, carefully remove them before proceeding.
- If the new filter has a cap or plug on the outlets, remove it as well. This is essential to ensure a proper flow of water through the filter.
- Inspect the new filter for any visual defects or damages. It’s crucial to ensure that the filter is in good condition before installation.
- Refer to the user manual or instructions provided with the new filter to determine if any additional steps or preparations are required for your specific model.
Preparing the new water filter is an important step as it ensures that the filter is clean, free of obstructions, and ready to be installed in the next step.
By following these instructions, you can ensure the proper installation and functioning of the new water filter in your Whirlpool refrigerator.
Once the new water filter is properly prepared, you’re ready to proceed to the next step of installing it in the water filter housing.
Step 5: Install the New Water Filter
With the new water filter prepared, it’s time to install it in the water filter housing of your Whirlpool refrigerator. Follow these steps to ensure a proper installation:
- Hold the new water filter in your hand and align it with the opening in the water filter housing. Make sure the filter is facing the correct direction, as indicated by any arrows or labels on the filter.
- Gently insert the new filter into the housing and push it in until it stops. You may need to use a bit of force to ensure a secure fit, but be careful not to apply too much pressure that could damage the filter or housing.
- Once the filter is securely inserted, give it a slight twist in a clockwise direction. This will help lock the filter in place and create a tight seal.
- Check the filter housing for any leaks or gaps. If you notice any, double-check the installation and ensure that the filter is properly aligned and tightened.
It’s important to note that each Whirlpool refrigerator model may have slight variations in the installation process. Therefore, it’s always a good idea to refer to the user manual or specific instructions for your particular model to ensure a proper installation of the new water filter.
By following these steps, you can successfully install the new water filter in the water filter housing of your Whirlpool refrigerator.
Once the new filter is securely installed, you can move on to the next step of securing the water filter housing in place.
Step 6: Secure the Water Filter Housing
After installing the new water filter in your Whirlpool refrigerator, the next step is to secure the water filter housing in place. Follow these steps to ensure that the housing is properly secured:
- If you removed any covers or panels to access the water filter housing, make sure to reattach them now.
- Align the water filter housing with its original position in the refrigerator compartment.
- Carefully slide the housing back into place, making sure it fits snugly and aligns properly with any retaining clips or brackets.
- If your particular model has screws or fasteners to secure the housing, use the appropriate tool to tighten them until the housing is securely held in place.
- Double-check the housing for any signs of instability or loose attachments. Ensure that the housing is securely fastened before moving on to the next step.
By properly securing the water filter housing, you ensure that it remains stable during operation and that the new water filter functions effectively.
It’s important to note that the securing process may vary slightly depending on the Whirlpool refrigerator model. Therefore, it’s advisable to refer to the user manual or any specific instructions provided with your refrigerator to ensure proper securing of the water filter housing.
Once the housing is securely in place, you’re ready to move on to the next step of turning on the refrigerator and testing the water dispenser.
Step 7: Turn On the Refrigerator
After successfully securing the water filter housing in your Whirlpool refrigerator, it’s time to turn on the appliance. Following proper steps for turning on the refrigerator ensures that the new water filter functions correctly. Follow these instructions:
- Locate the control panel of your Whirlpool refrigerator, usually found on the front or top of the appliance.
- Look for the power or on/off button and press it to turn on the refrigerator. Alternatively, plug the refrigerator back into the power outlet if you had previously unplugged it.
- Allow the refrigerator to power on and stabilize for a few minutes. This allows the internal systems to calibrate and adjust to the new water filter.
- While the refrigerator is powering on, listen for any unusual noises or vibrations. If you notice any unusual sounds or issues, double-check the installation of the water filter and housing.
- Additionally, check for any signs of leaks or drips around the water filter housing. If you spot any, ensure that the housing is properly sealed and connected.
Turning on the refrigerator allows the appliance to resume its normal operation and ensures that the new water filter is integrated into the system.
Remember to exercise patience as the refrigerator may take a bit of time to reach its optimal cooling temperature. Once the refrigerator is powered on, you can proceed to the next step of testing the water dispenser functionality.
Step 8: Test the Water Dispenser
With the refrigerator powered on, it’s time to test the water dispenser to ensure that the new water filter is working properly. Follow these steps to test the functionality of the water dispenser:
- Locate the water dispenser panel on the front of your Whirlpool refrigerator. This panel typically includes buttons or levers to dispense water.
- Make sure a glass or container is ready to collect the water from the dispenser.
- Press or activate the water dispenser button or lever. Keep it pressed or activated for a few seconds to allow the water to flow freely.
- Observe if the water flows smoothly and without any unusual tastes, odors, or discoloration.
- If the water dispenser does not dispense water, or if you notice any issues such as low water pressure or unusual tastes, repeat the previous steps to ensure proper installation of the new water filter.
Testing the water dispenser allows you to confirm that the new water filter is properly installed and providing clean and fresh drinking water. It also ensures that any air trapped in the system during the replacement process is purged.
If you encounter any issues with the water dispenser, refer to the user manual or contact Whirlpool customer service for troubleshooting assistance.
Once you have confirmed that the water dispenser is functioning correctly, you can proceed to the final step of properly disposing of the old water filter.
Step 9: Dispose of the Old Water Filter Properly
Properly disposing of the old water filter is an important step in completing the replacement process for your Whirlpool refrigerator. Follow these guidelines to ensure that the old filter is disposed of responsibly:
- Check the manufacturer’s instructions or packaging of the new water filter for specific disposal guidelines. Some filters may come with specific instructions on how to properly dispose of them.
- Research local recycling options for water filters. Some areas have recycling centers or drop-off locations that accept used water filters for proper disposal.
- If recycling is not available, seal the old water filter in a plastic bag to minimize any potential leaks. This will help contain any contaminants and prevent them from entering the environment.
- Place the sealed plastic bag containing the old water filter in your regular household trash. Make sure to check local regulations or guidelines regarding the proper disposal of trash.
It’s important to dispose of the old water filter properly to minimize any potential environmental impact and to follow local regulations. Improper disposal may lead to the contamination of water sources or harm to the ecosystem.
If you are unsure about the proper disposal methods for your specific area, consider contacting your local waste management department or recycling center for guidance.
By responsibly disposing of the old water filter, you can complete the replacement process and enjoy clean and fresh water from your Whirlpool refrigerator.
Additional Tips and Troubleshooting
Here are some additional tips and troubleshooting steps to consider when replacing the water filter housing on your Whirlpool refrigerator:
- Regularly check the indicator light or timer on your refrigerator to determine when it’s time to replace the water filter. This will help ensure optimal filtration and prevent any issues caused by a clogged or expired filter.
- If you experience low water flow or a decrease in water pressure after replacing the water filter housing, make sure to check for any kinks or blockages in the water supply line. Clearing any obstructions can help restore proper water flow.
- Consider flushing the new water filter before use. This involves running a few gallons of water through the filter to remove any carbon dust or impurities, ensuring cleaner and better-tasting water.
- If you encounter any leaks during or after the replacement process, double-check the installation of the water filter and housing. Make sure that all connections are secure and tightened properly.
- Take note of the lifespan of the new water filter. It’s important to replace the filter according to the manufacturer’s recommended schedule to ensure continued filtration efficiency.
- If you experience any persistent issues with the water dispenser or filter system, refer to the user manual or contact Whirlpool customer support for further assistance.
Following these additional tips and troubleshooting steps will help ensure a smooth and successful water filter housing replacement process for your Whirlpool refrigerator.
Remember to refer to your specific Whirlpool refrigerator model’s documentation for any model-specific guidelines or instructions.
By properly maintaining and replacing the water filter housing, you can enjoy clean and crisp drinking water from your Whirlpool refrigerator for an extended period of time.