
Why Remove the Roller Brush?
The roller brush, also known as the beater bar or brush roll, is an essential component of a Shark vacuum cleaner. Its purpose is to effectively agitate the carpet fibers, loosening dirt and debris for easy suction. Over time, however, the roller brush can become clogged with hair, strings, and other debris, causing it to lose its efficiency. Removing the roller brush is necessary for regular maintenance and cleaning to ensure optimum performance of your Shark vacuum.
By removing the roller brush, you can remove any tangled hair or debris that might be hindering its rotation. This will not only improve the cleaning performance but will also extend the life of the roller brush. Additionally, removing the roller brush allows for a more thorough cleaning of the brush itself, preventing the buildup of dirt and grime that can negatively affect its performance.
Regularly removing and cleaning the roller brush is especially important for pet owners, as pet hair tends to accumulate on the brush, leading to decreased performance over time. By removing the roller brush, you can easily remove all the pet hair and ensure that your vacuum continues to effectively pick up pet-related messes.
Furthermore, removing the roller brush provides an opportunity to visually inspect the brush for any signs of wear or damage. If the bristles are worn or the roller brush is damaged in any way, it is important to replace it to maintain the vacuum’s efficiency and prevent any scratching or damage to your floors.
Tools Needed
Before you begin the process of removing the roller brush from your Shark vacuum, it is essential to gather the necessary tools. Having the right tools on hand will make the removal process easier and more efficient. Here are the tools you will need:
- Screwdriver: Depending on the model of your Shark vacuum, you may need either a Phillips or a flathead screwdriver to remove the roller brush cover. Check the user manual or inspect the cover to determine which type of screwdriver is required.
- Tweezers or Scissors: These tools will come in handy to remove any stubborn debris that is tangled around the roller brush. Tweezers can be particularly useful for pulling out hair or strings while scissors can be used to cut through any tangled material.
- Cleaning Brush or Toothbrush: A small cleaning brush or an old toothbrush will be useful for gently scrubbing the roller brush and removing any dirt, dust, or debris that may have accumulated on its surface. It’s important to use a brush with soft bristles to avoid damaging the bristles of the roller brush.
- Old Towel or Cloth: To protect your work area from dirt and dust, it’s a good idea to place an old towel or cloth underneath the vacuum. This will catch any debris that may fall from the roller brush during the removal process and make cleanup easier.
By gathering these tools before starting the roller brush removal process, you will be well-equipped to tackle any debris or tangled materials and perform a thorough cleaning of the brush. Having the necessary tools on hand will save you time and ensure a smoother experience when removing and cleaning the roller brush.
Step 1: Prepare Your Workspace
Before you begin removing the roller brush from your Shark vacuum, it is essential to set up a clean and organized workspace. This will not only make the process easier but also help prevent any damage to your vacuum or surrounding area. Follow these steps to prepare your workspace:
- Select a Well-lit Area: Choose a location with ample lighting to ensure good visibility during the process. It will be easier to see and navigate the different components of the vacuum.
- Clean the Surrounding Area: Remove any loose dirt, debris, or objects from the floor or table where you will be working. A clean workspace will prevent any foreign objects from interfering with the removal process.
- Gather All the Necessary Tools: Refer to the previous section on the tools needed and gather them before starting the process. Having all the tools readily available will save time and prevent unnecessary disruptions during the removal process.
- Turn Off and Unplug the Vacuum: Safety should always be a priority. Before working on any part of the vacuum, make sure to turn it off and unplug it from the power source to avoid any accidents.
- Place an Old Towel or Cloth: Place an old towel or cloth underneath the vacuum to collect any debris that may fall during the removal process. This will make cleanup easier and prevent any damage to the floor or working surface.
- Read the User Manual: If you are unfamiliar with the specific steps for removing the roller brush from your Shark vacuum, consult the user manual for guidance. Each model may have unique instructions or precautions that need to be followed.
By preparing your workspace properly, you will create an environment that is conducive to safely and effectively removing the roller brush from your Shark vacuum. This will help you avoid any unnecessary complications and ensure a smooth and successful removal process.
Step 2: Turn off and Unplug the Vacuum
Before you begin the process of removing the roller brush from your Shark vacuum, it is crucial to ensure your safety by turning off the vacuum and disconnecting it from the power source. This step will prevent any accidents or injuries that could occur while working on the vacuum. Follow these steps to turn off and unplug your vacuum:
- Switch Off the Vacuum: Locate the power switch on your Shark vacuum and turn it off. This will shut down the vacuum’s motor and prevent any accidental activation while you are working on the roller brush.
- Unplug the Vacuum: Once the vacuum is switched off, unplug it from the power outlet. This step ensures that there is no electricity flowing through the appliance, reducing the risk of electrical shocks or damage.
- Allow the Vacuum to Cool Down: Some Shark vacuums may become hot during operation. It is important to give the vacuum enough time to cool down before you start handling its components. This will prevent any burns or discomfort while working on the roller brush.
- Check the Power Indicator: Double-check the power indicator light on the vacuum to ensure that it is not illuminated. This confirms that the vacuum is indeed powered off and unplugged.
Turning off and unplugging the vacuum is a critical safety measure that should never be overlooked. By following these steps, you can proceed with the removal process confidently, knowing that the vacuum is safely disconnected from the power source and poses no hazards.
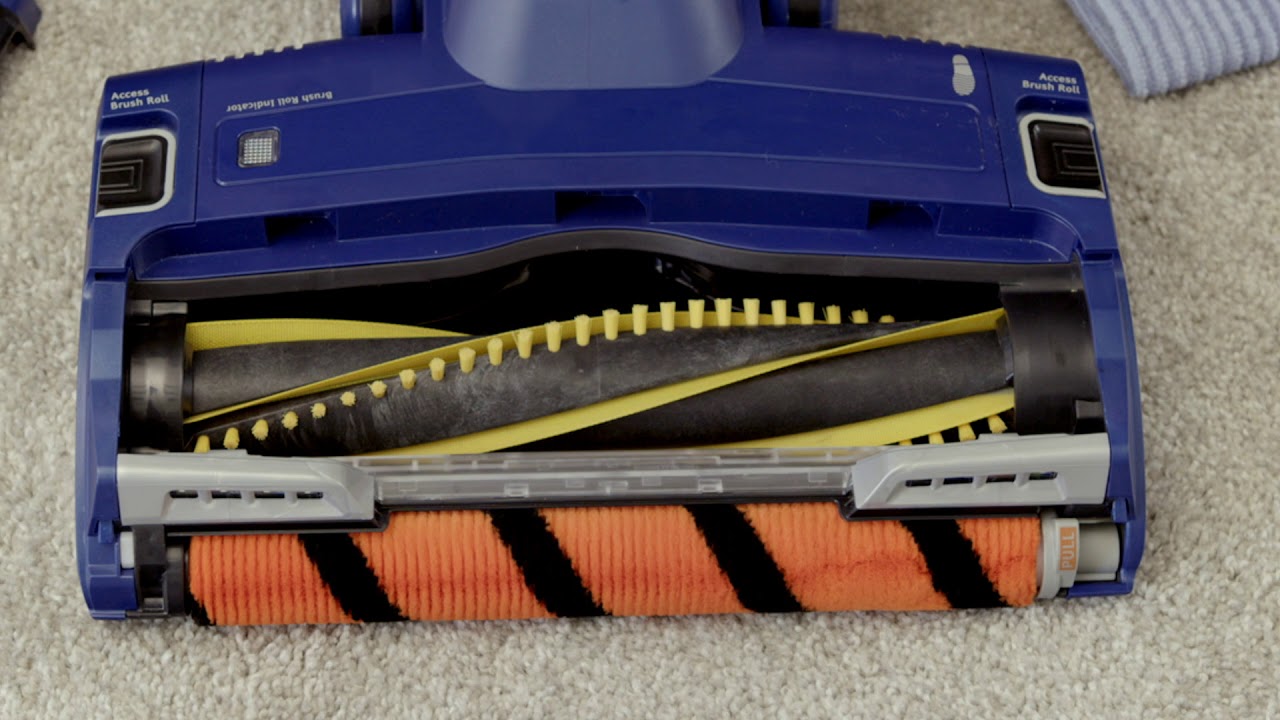
Step 3: Locate the Roller Brush Cover
Before you can remove the roller brush from your Shark vacuum, you need to locate the roller brush cover. This cover protects the roller brush and secures it in place. Follow these steps to find the roller brush cover:
- Refer to the User Manual: If you are uncertain about the exact location of the roller brush cover, refer to the user manual for your specific Shark vacuum model. The manual will provide detailed instructions and illustrations to help you identify the cover.
- Inspect the Vacuum Head: Typically, the roller brush cover is located on the underside of the vacuum head. Flip your Shark vacuum over and carefully examine the bottom of the vacuum head to locate the cover.
- Look for Indicators or Markings: Some Shark vacuums have visual indicators or markings on the vacuum head to help you identify the roller brush cover. These indicators may include arrows or labels indicating the location of the cover.
- Feel for a Bump or Recess: Gently run your fingers along the underside of the vacuum head. You may be able to feel a slight bump or recess that indicates the presence of the roller brush cover.
- Identify Screw Holes: In some models, the roller brush cover is secured with screws. Look for small screw holes near the edges of the vacuum head, as these may indicate the presence of the cover.
Once you have located the roller brush cover, you are ready to proceed with the next step of removing it. Remember to take your time and be cautious while inspecting the vacuum head to avoid any accidental damage to the cover or vacuum itself.
Step 4: Remove the Roller Brush Cover
With the roller brush cover located, you can now proceed to remove it. The roller brush cover is typically held in place by screws or clips. Follow these steps to safely remove the roller brush cover from your Shark vacuum:
- Gather the Necessary Tools: Depending on your vacuum model, you may need a Phillips or flathead screwdriver to remove the screws securing the roller brush cover. Ensure that you have the correct tool on hand before proceeding.
- Inspect the Cover: Take a moment to examine the roller brush cover. Look for any visible screws or clips that might be securing it in place. Note the number and location of the screws, as this will be crucial when it comes time to reassemble the vacuum.
- Remove the Screws or Unclip the Cover: If your vacuum has screws, use the appropriate screwdriver to carefully remove them. Turn the screwdriver counterclockwise to loosen and remove each screw. If your vacuum has clips, locate the tabs or levers near the edges of the cover and gently push or release them to unclip the cover.
- Set the Screws or Clips Aside: Once the roller brush cover is free, set the screws or clips aside in a safe place. It’s important to keep these components together to ensure that they are readily available when it’s time to reassemble the vacuum.
- Remove the Roller Brush Cover: With the screws or clips removed, carefully lift the roller brush cover off the vacuum. Be gentle to avoid any damage to the cover or vacuum head. Set the cover aside in a clean and secure location.
By following these steps, you can effectively remove the roller brush cover from your Shark vacuum. Take care to keep track of the screws or clips and handle the cover with care to avoid any accidental damage. With the cover removed, you will be able to access and remove the roller brush in the next step.
Step 5: Remove the Roller Brush
Now that you have successfully removed the roller brush cover, you can proceed to remove the roller brush itself from your Shark vacuum. Follow these steps to safely detach the roller brush:
- Inspect the Roller Brush: Take a moment to examine the roller brush and familiarize yourself with its structure. Note the position of the brush in relation to the vacuum head and the direction of the bristles.
- Hold the Roller Brush: Grasp the roller brush firmly at one end. Apply gentle pressure to hold the brush in place, preventing it from rotating as you remove it.
- Slide or Wiggle the Roller Brush: Depending on your Shark vacuum model, you may need to slide or wiggle the roller brush to dislodge it from its housing. Take care not to force or pull excessively, as this can damage the brush or the vacuum head.
- Remove the Roller Brush: Once the roller brush is loosened, carefully lift it out of the vacuum head. Pay attention to any connections or attachments that may be present, such as drive belts or end caps. If necessary, disconnect these components before fully removing the roller brush.
- Set Aside the Roller Brush: Place the roller brush in a clean and safe area, away from dirt or debris. This will prevent any contamination and make the cleaning process easier in the next step.
By following these steps, you can easily remove the roller brush from your Shark vacuum. Take your time and handle the brush with care to avoid any damage. With the roller brush removed, you can proceed to clean it thoroughly before reassembling it back into the vacuum.
Step 6: Clean the Roller Brush
After removing the roller brush from your Shark vacuum, it’s important to clean it thoroughly to maintain its performance and prolong its lifespan. Here are the steps to effectively clean the roller brush:
- Inspect the Roller Brush: Take a closer look at the roller brush to identify any tangles, hair, or debris that may have accumulated. Use your fingers or a pair of tweezers to carefully remove any large clumps of hair, strings, or other visible obstructions.
- Prepare a Cleaning Solution: Fill a basin or sink with warm water and a mild detergent. You can also add a few drops of dish soap for extra cleaning power. Mix the solution to create a soapy mixture.
- Soak the Roller Brush: Submerge the roller brush in the cleaning solution, ensuring that the bristles are fully covered. Allow it to soak for a few minutes to loosen any dirt or grime that may be stuck on the brush.
- Scrub the Roller Brush: After soaking, use a small cleaning brush or an old toothbrush with soft bristles to gently scrub the roller brush. Pay close attention to the bristles and any visible debris that may still cling to the brush. Scrub in a back-and-forth motion to dislodge and remove any stubborn dirt or residue.
- Rinse the Roller Brush: Rinse the roller brush thoroughly under warm running water to remove any soap residue and loosened debris. Continue rinsing until the water runs clear and the brush feels clean to the touch.
- Dry the Roller Brush: Pat the roller brush gently with a clean towel to remove excess water. Allow it to air dry completely before reassembling it back into the vacuum. Avoid using heat or direct sunlight to speed up the drying process, as this can cause damage to the bristles.
By following these steps, you can effectively clean the roller brush of your Shark vacuum. Regular cleaning of the roller brush will help maintain its performance by removing trapped hair and debris. Once the roller brush is clean and dry, you can proceed to reassemble it back into the vacuum and continue enjoying optimal cleaning performance.
Step 7: Reassemble the Roller Brush
Once you have cleaned and dried the roller brush of your Shark vacuum, it’s time to reassemble it back into the vacuum. Follow these steps to ensure proper reassembly:
- Inspect the Roller Brush: Before reassembling, double-check the roller brush for any remaining debris or tangled hair. Remove any additional obstructions using your fingers or a pair of tweezers.
- Attach any End Caps or Drive Belts: If your roller brush has end caps or drive belts that were detached during the removal process, make sure they are securely attached back in place. Consult the user manual if needed to ensure proper alignment.
- Align the Roller Brush: Position the roller brush correctly within the vacuum head. Ensure that the bristles are facing downward and aligned with the appropriate slots or grooves.
- Secure the Roller Brush: If your Shark vacuum has a roller brush cover, place it back on the vacuum head. Align the screw holes or tabs with the corresponding openings on the vacuum head and press or screw the cover into place.
- Tighten the Screws: If your roller brush cover is secured with screws, use the appropriate screwdriver to tighten them in a clockwise motion. Be careful not to overtighten the screws, as this may cause damage to the cover or vacuum head.
- Test the Roller Brush: Once the roller brush is reassembled, plug in your Shark vacuum and turn it on. Test the roller brush by running the vacuum over a small area. Ensure that the brush rotates smoothly and makes contact with the surface, picking up any debris in its path.
By following these steps, you can successfully reassemble the roller brush back into your Shark vacuum. Take your time to ensure proper alignment and a secure fit. Testing the roller brush after reassembly will give you peace of mind that everything is functioning as it should, allowing you to resume your regular cleaning routine with confidence.
Step 8: Test the Roller Brush
After reassembling the roller brush into your Shark vacuum, it is important to test its functionality before putting the vacuum back into full use. Follow these steps to ensure that the roller brush is working properly:
- Prepare a Test Area: Choose a small section of flooring that is free from debris or objects. This can be a carpeted area or a hard floor surface.
- Turn on the Vacuum: Plug in the vacuum and switch it on. Allow the motor to power up and the brushes to start rotating.
- Engage the Roller Brush: If your Shark vacuum has an option to control the roller brush, make sure it is engaged or activated. This may involve pressing a button or switching a control on the vacuum.
- Run the Vacuum Over the Test Area: Gently run the vacuum over the test area, ensuring that the roller brush comes into contact with the floor surface. Observe how the brush agitates the carpet or picks up debris on hard floors.
- Check for Proper Functionality: As you move the vacuum, check for the following signs of proper functionality:
- The roller brush rotates smoothly and evenly.
- The brush makes contact with the surface and effectively agitates the carpet or picks up debris on hard floors.
- The brush does not make any unusual noises or vibrations.
- Adjust or Troubleshoot as Needed: If you notice any issues during the test, such as the brush not rotating properly or unusual sounds, consult the user manual for troubleshooting tips. Make any necessary adjustments or seek the assistance of a professional if required.
By performing a thorough test of the roller brush after reassembly, you can ensure that it is functioning correctly and effectively helping to clean your floors. If any issues arise, addressing them promptly will help maintain the performance and longevity of your Shark vacuum.