
Gather the necessary tools and materials
Before you begin the process of removing a mirror from wall clips, it is important to gather all the necessary tools and materials. This will ensure that you are well-prepared and have everything you need at your fingertips. Here’s a list of items you will need:
- Safety goggles: Safety should always be a top priority when working with glass. Protect your eyes by wearing safety goggles throughout the removal process.
- Gloves: To protect your hands from any potential glass shards or sharp edges, it is advisable to wear a pair of sturdy gloves.
- Step ladder or sturdy stool: Most mirrors are installed at a height, so having a step ladder or a sturdy stool will help you safely reach the necessary areas.
- Screwdriver or drill: Depending on the type of wall clips holding the mirror in place, you will need either a screwdriver or a drill to loosen the screws.
- Drop cloth or plastic sheet: To protect the floor or any nearby furniture from breaking glass or debris, spread a drop cloth or plastic sheet underneath the mirror before starting the removal process.
- Duct tape: Use duct tape to create a temporary protective shield on the mirror’s surface. This will prevent the mirror from shattering into multiple pieces if it accidentally breaks during removal.
- Plastic bags or a box: Once the mirror is removed, you will need a place to safely store the broken glass and mirror pieces. Use plastic bags or a sturdy box for this purpose.
- Cleaning supplies: After removing the mirror, you will need cleaning supplies such as glass cleaner, microfiber cloths, and a vacuum cleaner to clean up any residual dust or debris.
Gathering these tools and materials beforehand will save you time and ensure that the mirror removal process goes smoothly. Once you have everything ready, you can move on to the next steps with confidence.
Safety precautions
Removing a mirror from wall clips can be a potentially hazardous task, as it involves working with fragile glass and sharp objects. Therefore, it is crucial to take the necessary safety precautions to protect yourself and minimize the risk of accidents. Here are some important safety measures to keep in mind:
- Wear safety goggles: To shield your eyes from flying glass shards or any debris, always wear safety goggles while working on removing the mirror.
- Use gloves: Protective gloves will help prevent cuts or injuries from sharp edges or broken glass. Make sure to wear sturdy gloves throughout the removal process.
- Secure the area: Clear the area around the mirror and ensure there are no obstacles or trip hazards. Keep pets and children away from the work zone to avoid accidents.
- Stabilize the ladder: If you are using a step ladder, make sure it is on a stable and level surface. Double-check that all the ladder’s legs are secure before climbing up.
- Secure the mirror: Before loosening the screws on the wall clips, use duct tape to create a temporary protective shield on the mirror’s surface. This will prevent it from shattering into multiple pieces if it accidentally breaks during removal.
- Work slowly and cautiously: Take your time while removing the mirror and avoid using excessive force. Rushing the process can lead to accidents or damage to the mirror and surrounding areas.
- Dispose of broken glass safely: When disposing of broken glass or mirror pieces, make sure to seal them in a plastic bag or a sturdy box to prevent injuries. Label the container as “fragile” to alert others of its contents.
- Clean up thoroughly: After removing the mirror, clean up any broken glass or debris using a vacuum cleaner and dispose of it properly. Wipe down the area with a damp cloth to ensure there are no remaining shards.
By following these safety precautions, you can significantly reduce the risk of accidents or injuries while removing a mirror from wall clips. Remember to prioritize safety at every step of the process.
Step 1: Prepare the space
Before you begin removing the mirror from wall clips, it’s important to prepare the space to ensure a smooth and efficient process. Taking a few minutes to properly set up the area will help prevent any accidental damage and make the removal process easier. Follow these steps to prepare the space:
- Cover the floor and nearby objects: Lay down a drop cloth or a plastic sheet on the floor directly beneath the mirror. This will protect the floor from any glass shards or debris that may fall during the removal process. Additionally, cover nearby furniture or objects with a cloth or plastic sheet to prevent any accidental damage.
- Clear the area: Remove any obstructions or objects that could hinder your access to the mirror. This includes furniture, decorations, or anything else that is in close proximity to the mirror. Create a clear path for yourself and ensure there is enough space to safely maneuver.
- Secure the mirror: Before proceeding, inspect the mirror to ensure that it is securely held in place by the wall clips. Check for any signs of damage or loose clips that may pose a risk during removal. Make sure the mirror is stable and won’t shift or fall unexpectedly.
- Turn off the electricity: If the mirror is located near any electrical outlets or switches, it is a good idea to turn off the electricity in that area as a precaution. This will prevent any accidental shocks or electrical hazards while working on the removal.
- Prepare the necessary tools: Double-check that you have all the necessary tools and materials mentioned earlier in the article. Having them within reach will save you time and ensure a smooth removal process.
By following these steps to prepare the space before removing the mirror, you will create a safe and organized environment for the task at hand. Taking the time to properly prepare will make the entire process more efficient and minimize the risk of accidents or damage.
Step 2: Locate the wall clips
The next step in removing a mirror from wall clips is to locate where the clips are positioned on the mirror. Wall clips are typically used to secure the mirror to the wall and are usually located on the top, bottom, and sides of the mirror. Follow these steps to locate the wall clips:
- Inspect the mirror edges: Carefully examine the edges of the mirror to identify any visible metal or plastic clips. These clips are usually attached to the frame of the mirror and hold it in place against the wall.
- Feel for any protrusions: Run your fingers along the edges of the mirror to feel for any raised areas or protrusions. Wall clips are often slightly raised or have a distinct shape that can be detected by touch.
- Look for screw holes: Some wall clips may have screws that secure them to the wall. Search for small holes near the edges of the mirror where the screws may be inserted. These holes are a clear indication of the position of the wall clips.
- Use a flashlight if needed: In case the wall clips are not immediately visible, use a flashlight to illuminate the edges of the mirror. This can help you spot wall clips that are recessed or hidden from view.
Take your time to thoroughly locate the wall clips to ensure you accurately identify their position. This will guide your next steps and enable you to remove the mirror safely. Once you have located the wall clips, you’re ready to proceed to the next step.
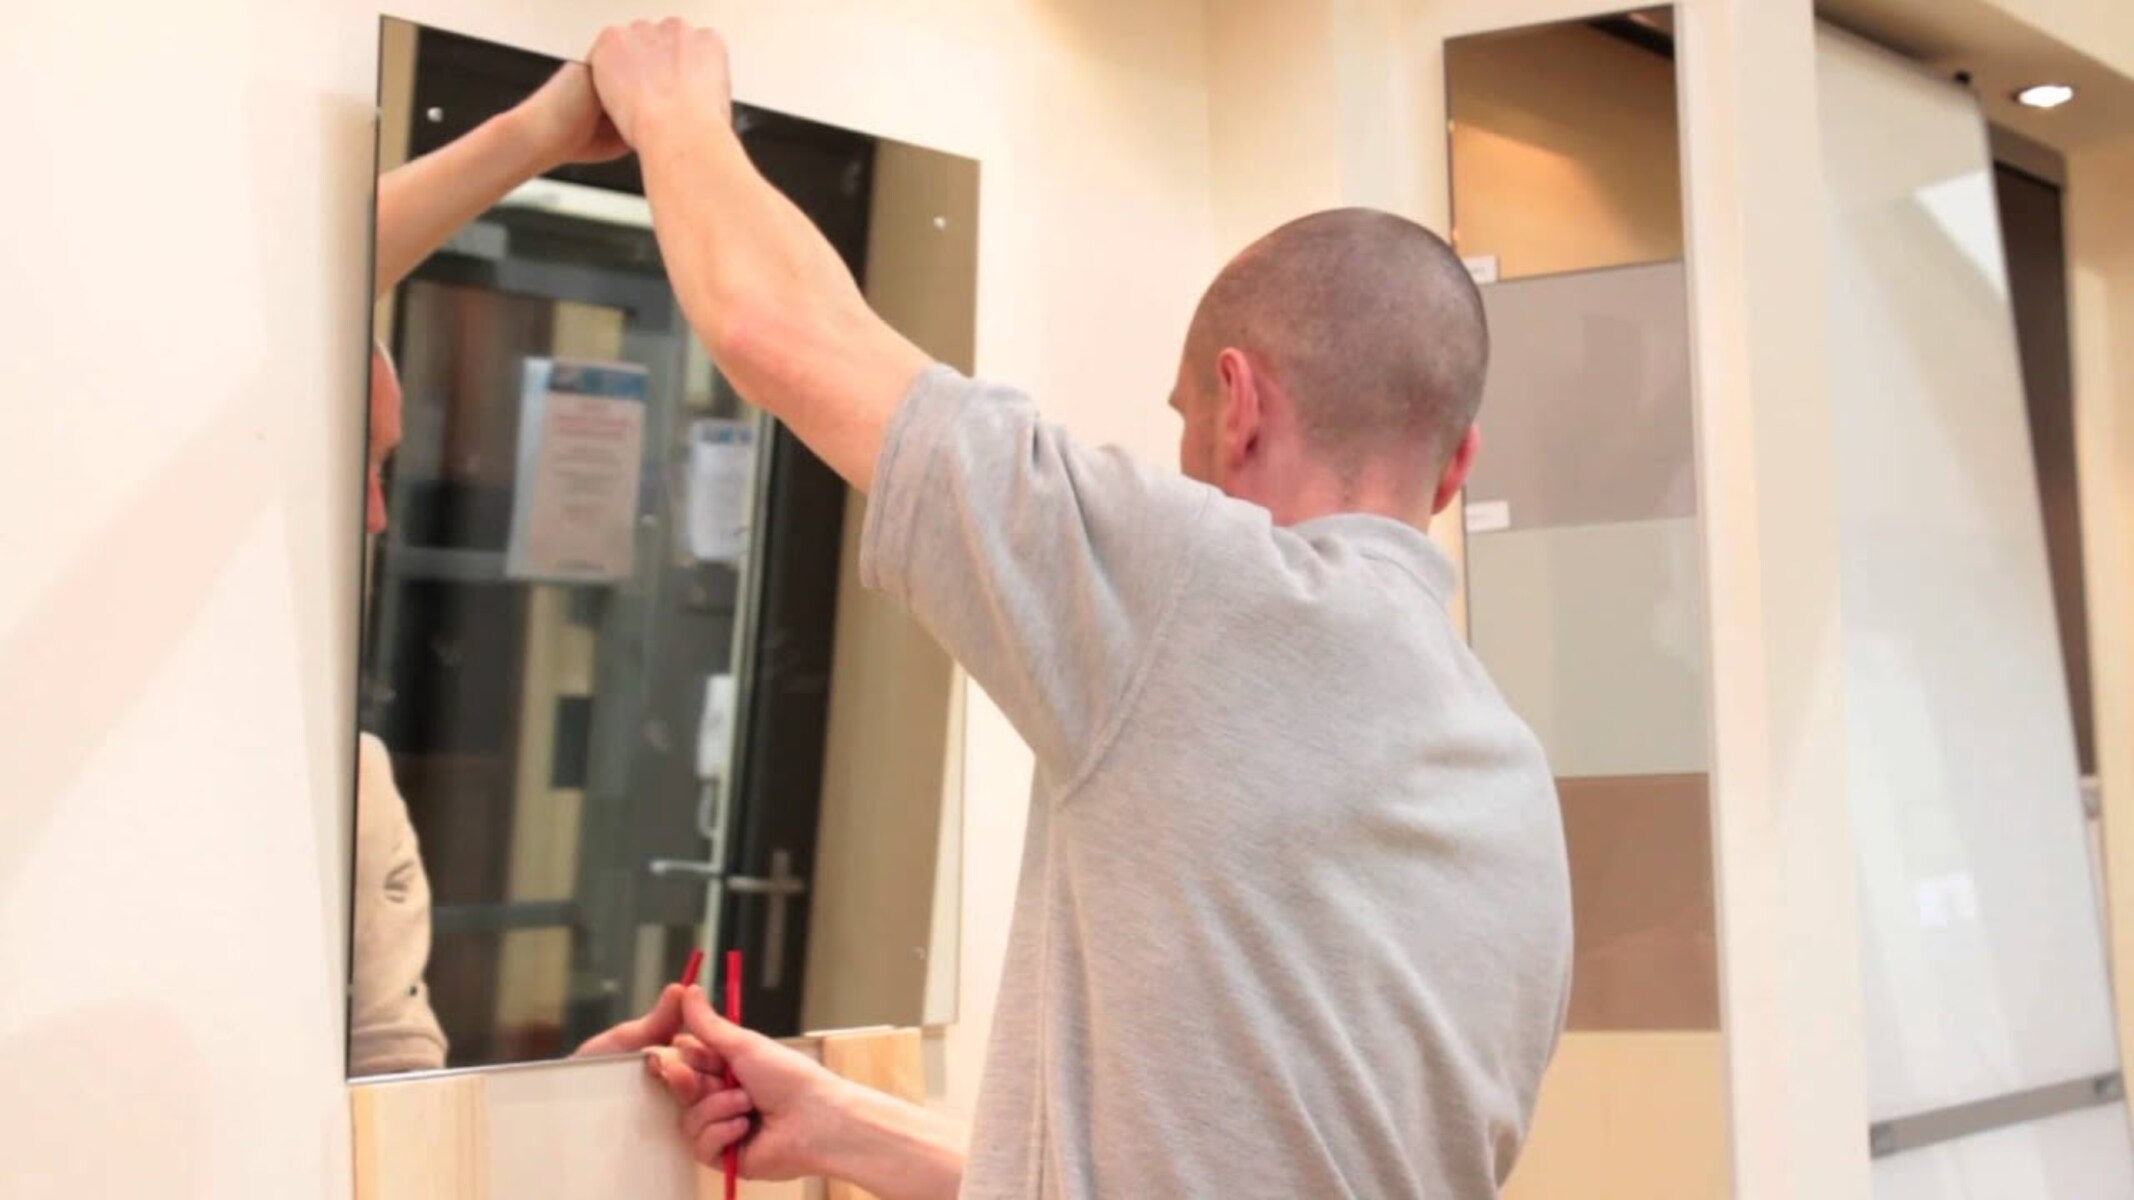
Step 3: Loosen the screws on the wall clips
Once you have located the wall clips that are holding the mirror in place, it’s time to loosen the screws that secure them. By loosening the screws, you will release the tension on the wall clips and make it easier to remove the mirror. Follow these steps to loosen the screws on the wall clips:
- Choose the appropriate tool: Depending on the type of screws used in the wall clips, select a suitable screwdriver or drill bit. Ensure that the tool fits securely into the screw heads to avoid slipping and causing damage to the mirror or surrounding area.
- Position yourself safely: Stand or step on a stable platform, such as a ladder or stool, to reach the wall clips comfortably. Make sure the ladder or stool is secure and stable.
- Hold the mirror: Gently hold the mirror with one hand while using the other hand to loosen the screws. This will prevent the mirror from falling or shifting unexpectedly during the process.
- Turn the screws counterclockwise: Using the chosen tool, turn the screws counterclockwise to loosen them. Start with the outermost screws and gradually work your way towards the center. Apply steady pressure but avoid excessive force to prevent stripping the screws or damaging the wall.
- Continue with all the screws: Loosen all the screws on the wall clips until they are loose enough to enable the mirror to be removed. Take your time and ensure that each screw is adequately loosened before moving on to the next.
- Check the stability of the mirror: Once all the screws are loosened, gently check the stability of the mirror. If it feels loose or moves slightly, it means the screws have been sufficiently loosened. If it is still firmly attached, double-check that all screws have been properly loosened.
By following these steps to loosen the screws on the wall clips, you will ensure that the mirror is no longer securely attached. This will allow you to proceed with removing the mirror from the wall clips, which will be explained in the following steps.
Step 4: Remove the mirror gently
Now that the screws on the wall clips have been loosened, you can proceed to remove the mirror from the clips. It’s important to handle the mirror with care to avoid any damage or injuries. Follow these steps to safely remove the mirror:
- Position yourself safely: Stand firmly on a stable platform, such as a ladder or stool, that allows you to comfortably reach and support the mirror.
- Enlist the help of a partner (if necessary): If the mirror is large or heavy, it’s recommended to have someone assist you in lifting and holding the mirror during the removal process.
- Gently lift the mirror: Using both hands, grip the sides or edges of the mirror firmly but gently. Lift the mirror straight up, applying even pressure to avoid any twisting or bending.
- Check for any resistance: As you lift the mirror, keep an eye out for any remaining resistance from the wall clips. If you encounter resistance, lower the mirror slightly and ensure that all the screws on the wall clips have been completely loosened.
- Lower the mirror down: Once the mirror is free from the wall clips, carefully lower it down and place it on a soft surface, such as a blanket or foam pads, to prevent any damage or breakage. If working with a partner, communicate and coordinate the movement to ensure a smooth and controlled descent.
Remember to be cautious and take your time when removing the mirror. If the mirror feels heavier than anticipated or you are unsure about handling it safely, consider seeking assistance from a professional. By following these steps, you will be able to remove the mirror from the wall clips without causing any harm.
Step 5: Clean the clips and the wall
After removing the mirror from the wall clips, it’s essential to clean both the clips and the wall to ensure they are in good condition and ready for future use. Additionally, cleaning the area will help remove any dust or debris that may have accumulated during the removal process. Follow these steps to clean the clips and the wall:
- Inspect the clips: Take a close look at the wall clips to check for any dirt, grime, or residue. If needed, use a soft brush or cloth to gently remove any surface debris.
- Clean with a mild detergent: Fill a bucket or basin with warm water and a small amount of mild detergent. Dip a cloth or sponge into the soapy water and gently clean the wall clips, ensuring to remove any stains or buildup. You can also use a soft brush to scrub the clips if necessary.
- Rinse the clips: Once you have cleaned the clips, rinse them thoroughly with clean water. This will remove any soap residue and ensure they are free from any cleaning agents.
- Dry the clips: Using a soft cloth or towel, carefully dry the wall clips to prevent any water spots or rusting. Make sure they are completely dry before reinstalling or storing them.
- Inspect the wall surface: Check the wall surface where the clips were attached for any dirt, adhesive residue, or damage. If there are any remnants of adhesive, carefully remove them using a scraper or a gentle adhesive remover. Wipe the wall with a damp cloth to remove any remaining debris.
- Dry the wall: After cleaning, ensure that the wall surface is completely dry before proceeding. This will prevent any moisture from causing damage or affecting the installation of future mirrors or wall decor.
By taking the time to clean the wall clips and the wall, you are ensuring their longevity and keeping the space tidy. Once the clips and the wall are clean and dry, you can move on to the next step of the mirror removal process.
Step 6: Patch up any holes or damage
When removing a mirror from wall clips, it’s common to find small holes or damage left behind on the wall surface. To restore the wall to its original condition and create a smooth finish, it’s important to patch up any holes or damage. Follow these steps to effectively patch up the wall:
- Clean the area: Before patching up the holes or damage, ensure that the wall surface is clean and free from any dust or debris. Use a damp cloth to wipe the area and allow it to dry completely.
- Select the appropriate filler: Depending on the size of the holes and the type of wall material, choose the appropriate filler. For small holes, a lightweight spackling compound or putty can be used. For larger holes or deeper damage, a wall patch kit or joint compound may be needed.
- Apply the filler: Take a small amount of filler material and apply it to the hole or damaged area using a putty knife or a filling knife. Smooth it out, ensuring that the filler is level with the surrounding wall surface. Follow the manufacturer’s instructions for proper application and drying time.
- Sand the patched area: Once the filler has dried, use fine-grade sandpaper to gently sand the patched area. This will help create a seamless finish and ensure that the repaired area blends in with the rest of the wall. Wipe away any dust from sanding with a clean cloth.
- Apply touch-up paint: If needed, touch up the patched area with matching paint to blend it in with the surrounding wall. Use a small brush or a mini roller to apply the paint, feathering it out to achieve a smooth transition.
- Allow the paint to dry: Allow the touch-up paint to dry completely according to the manufacturer’s instructions. This will ensure a consistent finish and help the patched area seamlessly blend with the rest of the wall.
By patching up any holes or damage left behind from the mirror removal, you will restore the wall to its original condition and maintain a visually appealing space. Taking the time to properly patch up the wall ensures a professional-looking result and prepares the surface for future use.
Step 7: Dispose of the mirror properly
Once you have successfully removed the mirror from the wall clips, it’s important to dispose of it properly to ensure safety and environmental responsibility. Mirrors are made of glass and can be hazardous if not handled correctly. Follow these steps to dispose of the mirror properly:
- Assess the condition of the mirror: Check the mirror for any cracks or damage. If the mirror is broken or shattered, take extra precautions to handle the pieces safely.
- Wear protective gloves: Put on a pair of protective gloves before handling the mirror. This will help prevent cuts or injuries from any sharp edges or glass fragments.
- Wrap the mirror securely: Use thick moving blankets, bubble wrap, or cardboard to wrap the mirror. Start by laying the mirror face down on the protective material and wrap it tightly, securing it with packing tape.
- Dispose of the mirror in a proper container: Place the wrapped mirror in a durable and puncture-resistant container, such as a labeled cardboard box or a suitable plastic bag. Make sure to seal the container securely to prevent any glass shards from escaping.
- Label the container: Clearly label the container as “Broken Glass” or “Fragile” to alert others to its contents. This will help ensure safe handling during disposal.
- Research local disposal options: Contact your local waste management or recycling center to inquire about the proper disposal of mirrors or broken glass. They can provide guidance on drop-off locations or scheduled pickups for disposal.
- Follow local regulations: Adhere to any specific regulations or guidelines for disposing of mirrors in your area. Different regions may have different requirements, so it’s essential to follow local regulations to prevent environmental harm.
- Transport the container safely: If transporting the container to a waste disposal facility, handle it with care and ensure it is securely placed to prevent any potential breakage or spillage.
- Consider recycling options: Recycling may be available for mirrors in some areas. Research local recycling facilities to determine if they accept mirrors and follow their specific guidelines for drop-off or collection.
By following these steps, you can ensure the proper disposal of the mirror, minimizing any risks and environmental impact associated with broken glass. Always prioritize safety when handling and disposing of mirrors to protect yourself and others.
Step 8: Tips for removing stubborn wall clips
In some cases, the wall clips holding the mirror in place may be stubborn and difficult to remove. If you encounter resistance or find it challenging to loosen the screws, here are some tips to help you remove stubborn wall clips:
- Apply lubricant: Spray a small amount of lubricant, such as WD-40 or a similar product, onto the screws and wall clips. Allow the lubricant to penetrate for a few minutes before attempting to loosen the screws again. The lubricant can help loosen any rust or corrosion that may be causing the resistance.
- Use a hammer and chisel: Carefully tap a chisel or a flat-head screwdriver with a hammer to create a small dent at the end of the screw head. This will provide extra grip and leverage when attempting to loosen the screws.
- Heat the screws: Use a heat gun or a hairdryer to apply heat to the screws and wall clips. The heat can help expand the metal, making it easier to loosen the screws. Be cautious not to overheat the area or cause any damage to the mirror or surrounding surfaces.
- Use a power tool: If the wall clips and screws are particularly stubborn, consider using a power drill or impact driver. Use the appropriate screwdriver bit and apply controlled force while attempting to loosen the screws. Start with low speed and gradually increase if necessary.
- Seek professional assistance: If all else fails or if you are uncomfortable attempting to remove the wall clips yourself, it may be best to seek help from a professional handyman or glass specialist. They have the experience and tools to safely remove stubborn wall clips without causing damage.
Remember to exercise caution and take your time when using any of these techniques. If you feel unsure or encounter excessive resistance, it’s always wise to seek professional assistance to avoid any potential harm or damage. Removing stubborn wall clips may require extra effort, but with the right approach, you can successfully remove them and complete the mirror removal process.
Step 9: Final cleaning and inspection
After removing the mirror and dealing with the wall clips, it’s important to perform a final cleaning and inspection to ensure everything is in order. This step will allow you to leave the area clean, tidy, and ready for whatever comes next. Follow these steps to complete the process:
- Remove any remaining debris: Inspect the area where the mirror was located and remove any remaining pieces of glass, broken mirror fragments, or other debris. Use gloves and a vacuum cleaner to carefully clean up the area.
- Wipe down surfaces: Use a soft, damp cloth to wipe down the surrounding surfaces, including the wall, adjacent furniture, and any other areas that may have been affected by the mirror removal process. This will help remove any dust, fingerprints, or leftover residue.
- Inspect for damage: Carefully inspect the wall for any damage or marks that may have been caused during the removal process. If necessary, touch up or repair the wall using appropriate methods, such as repainting or applying a patching compound.
- Check for loose fixtures: Take a moment to check if any other fixtures, such as towel bars or hooks, were attached to the mirror and may have become loose during the removal process. Tighten any loose screws or brackets as needed.
- Dispose of waste properly: Dispose of any broken glass, packaging materials, or other waste generated during the removal process in accordance with local regulations. Separate recyclables from non-recyclables and make sure to dispose of hazardous materials responsibly.
- Perform a final inspection: Step back and visually inspect the area to ensure it is clean, safe, and free from any hazards. Double-check that the mirror is no longer attached to the wall and is safely wrapped or contained for disposal.
By completing these final cleaning and inspection steps, you can ensure that the removal process is fully finished and the space is left in a tidy and safe condition. This final attention to detail will give you peace of mind and contribute to a successful mirror removal project.