
Choosing the Right Melon Variety
When it comes to planting melons, choosing the right variety is crucial for a successful harvest. With so many different types of melons available, it’s important to consider factors such as taste preferences, growing conditions, and maturation time. Here are some tips on how to choose the right melon variety for your garden:
1. Determine your taste preferences: Melons come in a variety of flavors, from sweet and juicy to tangy and refreshing. Decide whether you prefer watermelons, cantaloupes, honeydews, or other melon varieties to narrow down your options.
2. Consider your growing conditions: Different melon varieties have different requirements when it comes to sunlight, temperature, and soil conditions. Some melons thrive in hot, dry climates, while others prefer cooler weather. Choose a variety that is well-suited to your specific growing conditions.
3. Check the days to maturity: Melon varieties have varying maturation times, ranging from 70 to 100 days or more. Consider the length of your growing season and select a variety that can reach maturity within that timeframe.
4. Assess disease resistance: Some melon varieties are more resistant to common diseases like powdery mildew or fusarium wilt. If you’ve had issues with specific diseases in the past, choose varieties that are known for their resistance to those diseases.
5. Consider space requirements: Certain melon varieties, such as watermelons, can sprawl and take up a lot of garden space, while others, like bush melons, have a more compact growth habit. Take into account the available space in your garden and choose a variety that fits your needs.
6. Read reviews and recommendations: Look for reviews and recommendations from other gardeners or consult local experts to get insights into the performance and flavor of different melon varieties in your region.
By considering these factors, you can choose a melon variety that suits your taste preferences, grows well in your specific conditions, and has a higher chance of yielding a bountiful harvest. This careful selection process will lay the foundation for a successful melon growing season.
Selecting an Ideal Location for Planting Melons
Choosing the right location for planting melons is essential for their successful growth and development. Melons require specific environmental conditions to thrive and produce a flavorful harvest. Here are some key factors to consider when selecting an ideal location for planting melons:
1. Sunlight: Melons are sun-loving plants and require at least 6-8 hours of direct sunlight daily. Choose a location in your garden that receives ample sunlight throughout the day. Avoid areas shaded by tall trees or buildings that can obstruct sunlight.
2. Soil Quality: Melons prefer nutrient-rich, well-draining soil. Conduct a soil test to determine the pH level and nutrient content of your chosen location. Ideally, the soil should have a pH of 6.0 to 7.0. Amend the soil as needed by incorporating organic matter, such as compost or well-rotted manure, to improve fertility and drainage.
3. Air Circulation: Good air circulation helps prevent fungal diseases, such as powdery mildew, which can be detrimental to melon plants. Avoid planting melons in areas with poor air movement, such as low-lying spots or crowded areas. Allow space between plants to ensure adequate airflow.
4. Frost-Free Zone: Melons are warm-season crops and are highly sensitive to frost. Plant them only after the danger of frost has passed and the soil has warmed up to around 60°F (15°C). Avoid planting melons too early in the season when cold temperatures may stunt their growth or even kill the plants.
5. Water Availability: Melons require consistent moisture, especially during fruit development. Choose a location that is easily accessible to a water source. Avoid areas prone to waterlogging or areas where water tends to pool, as excessive moisture can cause rotting of the melon roots.
6. Proximity to Pollinators: Melons require pollination for fruit set and development. Planting melons close to flowering plants that attract bees and other pollinators can increase the chances of successful pollination. Consider including flowers such as lavender, zinnias, or marigolds nearby to attract pollinators.
By considering these factors, you can select an ideal location that provides the necessary sunlight, good soil quality, proper airflow, protection from frost, access to water, and pollinator presence. These conditions will create a favorable environment for the healthy growth of your melon plants, leading to a fruitful and delicious harvest.
Preparing the Soil for Melon Planting
Preparing the soil properly before planting melons is essential to provide them with the optimal growing conditions for healthy root development and abundant fruit production. Here are the steps to prepare the soil for planting melons:
1. Clear the area: Start by removing any weeds, rocks, or debris from the planting area. Melons thrive in weed-free environments, so it’s crucial to eliminate any potential competition for nutrients and sunlight.
2. Loosen the soil: Melons require well-drained soil with good aeration. Use a garden fork or tiller to loosen the soil to a depth of about 12 inches (30 cm). This will promote root penetration and allow for better water and nutrient absorption.
3. Amend the soil: If the soil lacks organic matter, incorporate compost or well-rotted manure into the topsoil. This will increase the soil’s fertility, moisture retention, and drainage capabilities. Aim to mix in about 2-3 inches (5-7.5 cm) of compost or manure evenly throughout the planting area.
4. Adjust the pH: Melons prefer a slightly acidic to neutral soil pH level of 6.0-7.0. Test the soil’s pH using a kit or send a sample to a soil testing laboratory. If the pH is too high or too low, adjust it accordingly by adding lime to raise the pH or sulfur to lower it.
5. Incorporate organic fertilizer: Before planting melons, apply an organic fertilizer with a balanced ratio of nutrients, such as 10-10-10 or 5-5-5. Follow the package instructions for the recommended application rates. This will provide essential macronutrients to support healthy plant growth.
6. Rake and level the soil: After adding amendments and fertilizer, use a garden rake to smooth and level the soil surface. This will create a uniform bed for planting and facilitate proper water distribution.
By following these soil preparation steps, you are providing the optimal growing conditions for your melons. Well-drained, fertile, and properly adjusted soil will ensure that the plants have access to the essential nutrients they need to thrive. This will ultimately lead to vigorous growth, strong root development, and abundant, delicious melons.
Starting Melon Seeds Indoors
Starting melon seeds indoors is a great way to get a head start on the growing season, especially in regions with shorter summers. By starting seeds indoors, you can ensure optimal germination and give your melon plants a healthy head start. Here’s how to start melon seeds indoors:
1. Timing: Start melon seeds indoors 4-6 weeks before the last expected frost date in your area. Consult a local frost chart or gardening calendar to determine the appropriate timing for starting your melon seeds.
2. Choose the right containers: Use seed trays or small biodegradable pots that have drainage holes to prevent waterlogging. This will ensure good air circulation and prevent damping-off, a common fungal disease that affects seedlings.
3. Select quality seeds: Choose high-quality melon seeds from a reputable source. Look for seeds that are labeled as disease-resistant if you’ve had previous issues with plant diseases in your garden.
4. Prepare the growing medium: Use a well-draining seed-starting mix or a combination of peat moss, vermiculite, and perlite to create a lightweight, moisture-retaining medium. Moisten the mix before filling the containers.
5. Sow the seeds: Plant the melon seeds about ½ to 1 inch (1.3 to 2.5 cm) deep in the prepared containers. Place two to three seeds per container to ensure germination. Gently cover the seeds with the growing medium and lightly press it down.
6. Provide proper conditions: Place the seed trays or containers in a warm location with temperatures around 70-85°F (21-29°C). Melon seeds prefer warmer temperatures for germination. Use a plastic cover or a clear plastic bag to create a greenhouse-like environment that retains moisture.
7. Maintain moisture: Keep the growing medium consistently moist but not waterlogged. Use a spray bottle or a mister to avoid disturbing the seeds. Check the moisture levels daily and water as needed.
8. Provide adequate light: Once the melon seedlings emerge, place them under a source of bright, indirect light or fluorescent grow lights. Aim for 12-16 hours of light per day to promote healthy growth.
9. Harden off the seedlings: About a week before transplanting the seedlings outdoors, gradually expose them to outdoor conditions by placing them outside for a few hours each day. Start with protected areas and gradually expose them to full sunlight and outdoor temperatures.
By following these steps, you can successfully start your melon seeds indoors and give them a strong and healthy start. Starting melons indoors allows you to control the growing conditions and extend the growing season for a more abundant and early harvest of delicious melons.
Direct Sowing Melon Seeds
Directly sowing melon seeds in the garden is an alternative method to starting seeds indoors. This approach is best suited for regions with longer growing seasons or areas where the weather conditions are already warm and stable. Here’s a step-by-step guide to successfully direct sow melon seeds:
1. Choose the right time: Wait until all danger of frost has passed and the soil temperature has warmed to at least 60°F (15°C) before direct sowing melon seeds. Melons need warm soil to germinate and grow vigorously.
2. Select a sunny location: Choose a spot in your garden that receives at least 6-8 hours of direct sunlight per day. Melons thrive in sunny conditions and need ample light for optimal growth and fruit production.
3. Prepare the soil: Clear the area of any weeds, rocks, or debris. Loosen the soil to a depth of about 12 inches (30 cm) using a garden fork or tiller. Incorporate organic matter into the soil, such as compost or well-rotted manure, to improve its fertility and drainage.
4. Create mounds or hills: For better soil drainage and to warm the soil faster, create mounds or hills that are 12-18 inches (30-45 cm) in diameter. Space the mounds at least 3-4 feet (90-120 cm) apart to provide enough room for the melon plants to spread and grow.
5. Sow the seeds: Plant 4-5 melon seeds about 1 inch (2.5 cm) deep in each mound. Space the seeds evenly within the mound. Gently cover the seeds with soil and pat it down lightly. Water the area thoroughly but gently after planting.
6. Thinning: Once the melon seedlings have emerged and developed a few true leaves, thin them, leaving only the strongest and healthiest plant in each mound. Thinning ensures that the remaining plants have adequate space to grow and receive proper airflow.
7. Provide support if needed: Some melon varieties, such as vining watermelons, may require support as they grow. Install trellises, cages, or stakes near the plants to provide support for the vines and prevent them from sprawling on the ground.
8. Water and maintain: Keep the soil consistently moist but avoid overwatering, as melon plants are susceptible to root rot. Water deeply and regularly, especially during dry periods or when the fruit is developing. Mulching around the plants can help retain moisture and suppress weeds.
9. Monitor for pests and diseases: Regularly inspect the melon plants for signs of pests, such as aphids or cucumber beetles, and take appropriate measures to control them. Additionally, watch for any signs of fungal diseases, such as powdery mildew, and treat them promptly if necessary.
By following these steps, you can successfully direct sow your melon seeds and grow healthy and productive melon plants in your garden. Direct sowing is a convenient and straightforward method that allows you to enjoy the process of growing melons from seed to harvest.
Transplanting Melon Seedlings
Transplanting melon seedlings is a critical step in the growth process, as it allows the young plants to establish themselves in their final growing location. Proper timing, preparation, and technique are key to ensuring successful transplanting. Here’s a guide on how to transplant melon seedlings:
1. Assess seedling readiness: Wait until the melon seedlings have developed 2-3 true leaves and are around 4-6 inches (10-15 cm) tall. This usually takes about 3-4 weeks after germination. The seedlings should have a sturdy stem and healthy foliage.
2. Choose the right timing: Plan to transplant melon seedlings after the danger of frost has passed and the soil temperature has reached at least 60°F (15°C). Transplanting too early can stunt the growth of the seedlings or even kill them.
3. Prepare the planting holes: Dig holes in the garden that are slightly larger than the root ball of the seedlings. Space the holes according to the recommended spacing for the specific melon variety you are growing, typically 3-4 feet (90-120 cm) apart.
4. Water the seedlings: Before transplanting, water the seedlings thoroughly to ensure the roots are well-hydrated. This will help minimize transplant shock and assist in the successful establishment of the seedlings in their new location.
5. Gently remove seedlings from their containers: Carefully remove the seedlings from their seed trays or pots, taking care not to damage the roots. You can use a small trowel or your fingers to gently loosen the soil around the root ball and lift the seedling out.
6. Place the seedlings in the planting holes: Set each melon seedling into its respective planting hole, making sure to position it at the same depth it was previously growing. Be careful not to bury the stem too deeply, as this can lead to stem rot.
7. Backfill and firm the soil: Gently backfill the hole with soil around the melon seedling, firming it gently to ensure good root-to-soil contact. Avoid compacting the soil too firmly, as this can impede root growth.
8. Water the transplanted seedlings: Immediately after transplanting, give the seedlings a thorough watering to settle the soil around the roots and help them recover from transplant shock. Maintain consistent moisture levels during the initial days after transplanting.
9. Provide shade or protection: If the weather is particularly hot or sunny, consider providing temporary shade to the transplanted seedlings using shade cloth, row covers, or even a homemade shade structure made from stakes and fabric. This will help reduce stress and prevent wilting.
By following these steps, you can ensure a successful transplanting process for your melon seedlings. Proper timing, careful handling, and providing adequate moisture and protection will help the plants establish themselves quickly and continue thriving throughout the growing season.
Providing Proper Care for Melon Plants
Providing proper care for melon plants is essential to help them grow vigorously, produce high-quality fruits, and ward off pests and diseases. By following these care guidelines, you can foster healthy growth and maximize the yield of your melon plants:
1. Watering: Melons thrive in moist soil, so consistent watering is crucial. Water deeply at the base of the plants to encourage deep root growth. Avoid overhead watering, as wet foliage can promote fungal diseases. Aim to keep the soil consistently moist, especially during fruit development.
2. Mulching: Apply a layer of organic mulch, such as straw or shredded leaves, around the base of the melon plants. This helps to maintain soil moisture, regulate soil temperature, and suppress weed growth. Mulching also acts as a barrier, preventing direct contact between the fruits and the soil to minimize disease transmission.
3. Fertilizing: Melons are heavy feeders and benefit from regular fertilization. Apply a balanced, slow-release fertilizer or organic compost mixture at planting time. Additionally, side-dress the plants with a nitrogen-rich fertilizer or compost halfway through the growing season to provide a boost of nutrients.
4. Pruning: To promote better airflow and reduce the risk of disease, selectively prune melon plants. Remove any yellowing or diseased leaves, as well as excessive foliage that may shade the fruits. Thin out crowded areas to allow for good air circulation and light penetration to the lower foliage.
5. Supporting Vines: Some melon varieties, like vining watermelons, benefit from support to keep the fruit off the ground. Use trellises, cages, or stakes to provide support for the vines. This not only prevents fruit rotting but also helps save space in the garden.
6. Pest and Disease Management: Regularly monitor the melon plants for signs of pests, such as aphids, cucumber beetles, or squash bugs. At the first sign of infestation, take appropriate measures to control the pests, such as handpicking, applying organic insecticides, or using physical barriers like row covers. Prevent and manage diseases by practicing good sanitation, proper spacing, and ensuring adequate airflow.
7. Harvesting: Monitor the melon plants closely for optimal harvesting time. Harvest melons when they reach full maturity, as indicated by their color, size, and aroma. Different melon varieties have specific ripeness indicators. Cut the melons from the vine using a clean knife or shears, leaving a short stem attached.
By following these care practices, you can provide the necessary attention and maintenance for your melon plants. A combination of proper watering, mulching, fertilizing, pruning, supporting vines, and managing pests and diseases will contribute to robust plant growth and an abundant harvest of delicious melons.
Watering Melon Plants Correctly
Watering melon plants correctly is crucial to their overall health and productivity. Melons require consistent moisture to thrive and produce juicy, flavorful fruits. Here are some guidelines to help you water your melon plants effectively:
1. Consistent Moisture: Melons prefer consistently moist soil. Irrigate the plants regularly to keep the soil damp but not waterlogged. Avoid allowing the soil to become bone dry between watering sessions, as this can stress the plants and result in poor fruit development.
2. Deep Watering: When watering melons, it’s important to provide deep and thorough watering. This encourages the development of deep root systems, which can access water from deeper soil layers. Water around the base of the plants rather than overhead, as wet foliage can promote disease.
3. Watering Frequency: The frequency of watering depends on various factors such as climate, soil type, and plant growth stage. In general, aim to water melon plants deeply about 1-2 times per week. Adjust the frequency based on weather conditions; increase watering during hot, dry spells and decrease during cooler periods.
4. Soil Moisture: Regularly monitor the soil moisture around melon plants. Check the soil’s moisture level by sticking your finger into the top few inches of soil. If it feels dry at that level, it’s time to water. Avoid overwatering, as excessive moisture can lead to root rot or other fungal diseases.
5. Morning Watering: Water melon plants in the morning to allow the foliage to dry before evening. This helps prevent the development of fungal diseases. Morning watering also ensures that the plants have enough moisture to withstand the heat of the day.
6. Drip Irrigation or Soaker Hoses: Consider using a drip irrigation system or soaker hoses for watering melon plants. These methods deliver water directly to the plant roots, minimizing water waste and reducing the risk of foliage diseases. Mulching around the plants will further help retain soil moisture.
7. Adjusting for Fruit Development: As the melon fruits begin to develop, pay closer attention to their water needs. Increase the frequency and depth of watering to ensure adequate hydration for proper fruit expansion. Dry conditions during fruit development can lead to stunted growth or reduced flavor.
8. Rainwater Harvesting: Whenever possible, utilize rainwater to irrigate your melon plants. Collect rainwater in barrels or use rain barrels connected to your downspouts. Rainwater is natural and free of chlorine and other chemicals, making it ideal for watering plants.
By following these watering practices, you can provide the optimal moisture levels for your melon plants. Consistent, deep watering while monitoring the soil moisture will help ensure healthy plant growth, vigorous fruit development, and a bountiful harvest of delicious melons.
Mulching Melon Plants
Mulching melon plants is a highly beneficial practice that provides numerous advantages for their growth and development. By applying a layer of organic mulch around the base of the plants, you can enhance soil health, conserve moisture, suppress weeds, regulate soil temperature, and protect the fruits from direct contact with the ground. Here’s how mulching benefits melon plants:
1. Moisture Retention: One of the key benefits of mulching melon plants is its ability to conserve soil moisture. Mulch acts as a protective barrier, reducing evaporation and helping to maintain adequate soil moisture levels. This is particularly crucial during hot and dry periods, as melons require consistent moisture for proper growth and fruit development.
2. Weed Suppression: Mulching helps suppress the growth of weeds around melon plants. The layer of mulch prevents weed seeds from receiving adequate light, reducing their germination and growth. This not only saves time and effort spent on weed control but also minimizes competition for nutrients and water, allowing melon plants to thrive without unnecessary competition.
3. Temperature Regulation: Melons appreciate warm soil for optimal growth, and mulch can play a role in regulating soil temperature. During cooler periods, the mulch insulates the soil, keeping it warmer and promoting healthy root development. In hot weather, the mulch acts as a natural buffer, protecting the roots from excessive heat and preventing soil temperature fluctuations.
4. Soil Health Improvement: Organic mulch gradually breaks down over time, enriching the soil with organic matter. This improves soil structure, fertility, and microbial activity. As the mulch decomposes, it releases nutrients that are essential for the healthy growth of melon plants. The improved soil health facilitates better nutrient uptake and root development.
5. Disease Prevention: Mulching around melon plants can help prevent soil-borne diseases. By creating a barrier between the fruits and the soil, mulch reduces the risk of fruit rot and other diseases that can occur when melons come into direct contact with the ground. It also minimizes the splashing of soilborne pathogens, reducing the chances of soil-borne diseases infecting the plants.
6. Fruit Protection: Mulching melon plants helps keep the fruits clean and free from soilborne pathogens. This is beneficial for fruits that have a tendency to develop rot or blemishes when in contact with the ground. Mulch acts as a clean, protective layer, preventing direct contact and reducing the risk of fruit damage.
7. Easy Maintenance: Mulching simplifies garden maintenance by reducing the need for frequent weeding. With fewer weeds to contend with, you can spend more time tending to other important tasks and enjoying the growing process.
Applying a layer of organic mulch, such as straw, wood chips, or shredded leaves, around melon plants provides a multitude of benefits. It conserves moisture, suppresses weeds, regulates soil temperature, improves soil health, prevents disease, protects fruits, and eases overall garden maintenance. Incorporate mulching into your melon cultivation routine and reap the rewards of healthier plants and a more abundant harvest.
Providing Support for Melon Vines
Providing adequate support for melon vines is an important aspect of melon plant care, particularly for vining varieties like watermelons and some types of cantaloupes. Supporting the vines helps prevent them from sprawling on the ground, promotes better air circulation, reduces the risk of fruit rot, and maximizes space in the garden. Here are some methods for providing support for melon vines:
1. Trellises: Trellises are a popular option for supporting melon vines. Install sturdy trellising material, such as wire mesh or nylon netting, vertically in the garden. Train the melon vines to grow upward by gently tying them to the trellis using soft plant ties or twine. As the vines grow, continue securing them to the trellis to keep them upright.
2. Cages: Melon cages can be constructed using stakes or wire fencing. Create cylindrical or semi-circular cages around the melon plants, leaving enough space for the vines to grow and spread. As the plants grow, gently guide the vines into the cages and secure them loosely to the support using plant ties or twine.
3. Stakes: Using stakes is another method to support melon vines. Place sturdy stakes into the ground near each plant and tie the vines to the stakes as they grow. It’s important to use soft materials for tying, as this prevents any damage to the vines. Regularly check and adjust the ties to ensure the vines are properly supported.
4. Slings and Hammocks: For exceptionally heavy melons or to prevent them from touching the ground, you can create slings or hammocks using old pantyhose, cloth bags, or netting. Gently cradle the melons with the slings and secure them to the supporting structure to keep them off the ground and reduce the risk of rotting.
5. Pruning: Proper pruning can help manage the size and spread of melon vines, reducing the need for extensive support. Regularly remove any lateral branches or side shoots that extend beyond the desired growing area. Pruning also promotes better airflow and sun exposure, leading to healthier plants and improved fruit ripening.
6. Vertical Gardening: Consider implementing vertical gardening techniques, such as using a wall-mounted trellis or a sturdy fence, to support melon vines. By utilizing vertical space, you can maximize your garden’s growing area and keep the melon vines off the ground.
7. Monitor Growth and Adjust: Regularly monitor the growth of the melon vines and make adjustments to the support as needed. As the plants grow, they may require additional tying or repositioning to ensure proper support and prevent the vines from sagging or dragging along the ground.
Providing support for melon vines not only helps prevent disease and promotes better fruit development but also saves space in the garden. Whether using trellises, cages, stakes, or other support structures, the goal is to keep the vines upright and minimize contact with the ground. By utilizing these methods, you can ensure healthier, more productive melon plants and enjoy an abundant harvest of delicious melons.
Controlling Weeds in the Melon Patch
Weeds can quickly overtake a melon patch, competing with the plants for valuable nutrients, sunlight, and water. Effective weed control is essential to ensure the optimal growth and productivity of melon plants. Here are several methods for effectively controlling weeds in the melon patch:
1. Mulching: Mulching is one of the most effective methods to suppress weed growth in the melon patch. Apply a layer of organic mulch, such as straw, wood chips, or shredded leaves, around the melon plants. This creates a barrier that suppresses weed germination and growth, while also conserving moisture in the soil. Regularly monitor the mulch and replenish it as needed throughout the growing season.
2. Hand Weeding: Regularly inspect the melon patch and manually remove any weeds that may emerge. Use a hand tool, like a garden fork or a hoe, to carefully loosen the soil around the weeds and remove them from the roots. Prompt and consistent hand weeding can prevent weeds from establishing a foothold and spreading.
3. Cultivation: Use a cultivating tool, such as a hoe or a hand cultivator, to lightly disturb the soil surface between the melon plants. This breaks up weed seedlings and disrupts their growth, making it easier to remove them. Take care not to disturb the shallow root system of the melon plants during cultivation.
4. Weed Barrier Fabric: Consider using weed barrier fabric in the melon patch. This non-woven fabric is placed on the soil surface between the melon rows and around the plants. It prevents weeds from growing while still allowing water and air to penetrate the soil. Secure the fabric with landscape staples and cut holes for the melon plants to grow through.
5. Organic Herbicides: If hand weeding and cultivation are not sufficient, you can use organic herbicides to target persistent or problematic weeds. These herbicides contain natural ingredients and are safe for use in organic gardening. Be sure to carefully follow the instructions on the label and apply them only to the weeds, avoiding any contact with the melon plants.
6. Timing: Regularly monitor the melon patch and take immediate action when weeds start to emerge. Removing weeds when they are small and before they have a chance to mature and spread their seeds is crucial for effective weed control. Regularly revisit the melon patch to stay on top of weed growth.
7. Crop Rotation and Cover Crops: Implement proper crop rotation and cover cropping techniques to naturally suppress weeds. Avoid planting melons in the same area year after year, as this can lead to an accumulation of weed seeds. Instead, rotate to other non-related crop families. Consider planting cover crops during the off-season to smother weeds and improve soil health.
By employing a combination of these weed control methods, you can effectively manage weed growth in the melon patch and provide the melon plants with the best growing conditions. Consistent monitoring, timely weed removal, and utilizing mulch or other weed management strategies will help ensure that your melon plants have the greatest chance of thriving and producing a bountiful harvest.
Protecting Melon Plants from Pests and Diseases
Melon plants are susceptible to a variety of pests and diseases that can impact their growth, yield, and overall health. Taking proactive measures to protect melon plants from these threats is essential for a successful harvest. Here are several methods to safeguard melon plants from pests and diseases:
1. Monitor Regularly: Regularly inspect your melon plants for any signs of pests or diseases. Look for visible damage, wilting, discoloration, holes in leaves, or presence of pests such as aphids, cucumber beetles, or squash bugs. Early detection allows for prompt intervention and treatment.
2. Companion Planting: Utilize companion planting to repel or deter pests. Companion plants such as marigolds, nasturtiums, or basil can discourage certain pests from attacking melon plants. Additionally, planting herbs like dill or fennel can attract beneficial insects that prey on common melon pests.
3. Crop Rotation: Practice crop rotation by avoiding planting melons in the same area year after year. Rotating melons with non-related crops helps break the life cycle of pests and pathogens that target melon plants and reduces the risk of recurring issues.
4. Remove Infested Plants: If you notice any melon plants that are severely infested or diseased, promptly remove and dispose of them to prevent the spread of pests or pathogens to healthy plants. Do not compost the infested plants, as this can lead to contamination.
5. Beneficial Insects: Attract and release beneficial insects such as ladybugs, lacewings, or parasitic wasps that feed on common melon pests. You can encourage these beneficial insects by providing nectar-producing flowers and avoiding the use of broad-spectrum insecticides that also harm beneficial insects.
6. Organic Pest Control: Utilize organic pest control methods such as insecticidal soaps, neem oil, or homemade botanical sprays to target specific pests. These options are safer for the environment and do not leave harmful residues on the melon fruits.
7. Proper Sanitation: Maintain good sanitation practices in the melon patch. Remove fallen leaves, prunings, or any plant debris that can harbor pests or diseases. Clean and disinfect gardening tools regularly to prevent the spread of pathogens between plants.
8. Water Management: Avoid overwatering melon plants, as excessive moisture can create favorable conditions for certain plant diseases. Water at the base of the plants, keeping the foliage as dry as possible. Use proper irrigation techniques, such as drip irrigation or soaker hoses, to minimize wet foliage and reduce disease risk.
9. Disease-Resistant Varieties: When selecting melon varieties, consider choosing disease-resistant cultivars. These varieties are bred to exhibit resistance or tolerance to specific diseases, reducing the likelihood of severe infections and the need for chemical interventions.
Implementing these protective measures can greatly reduce the impact of pests and diseases on melon plants. By being vigilant, implementing preventative strategies, and taking prompt action when necessary, you can increase the chances of a healthy, pest- and disease-free melon harvest.
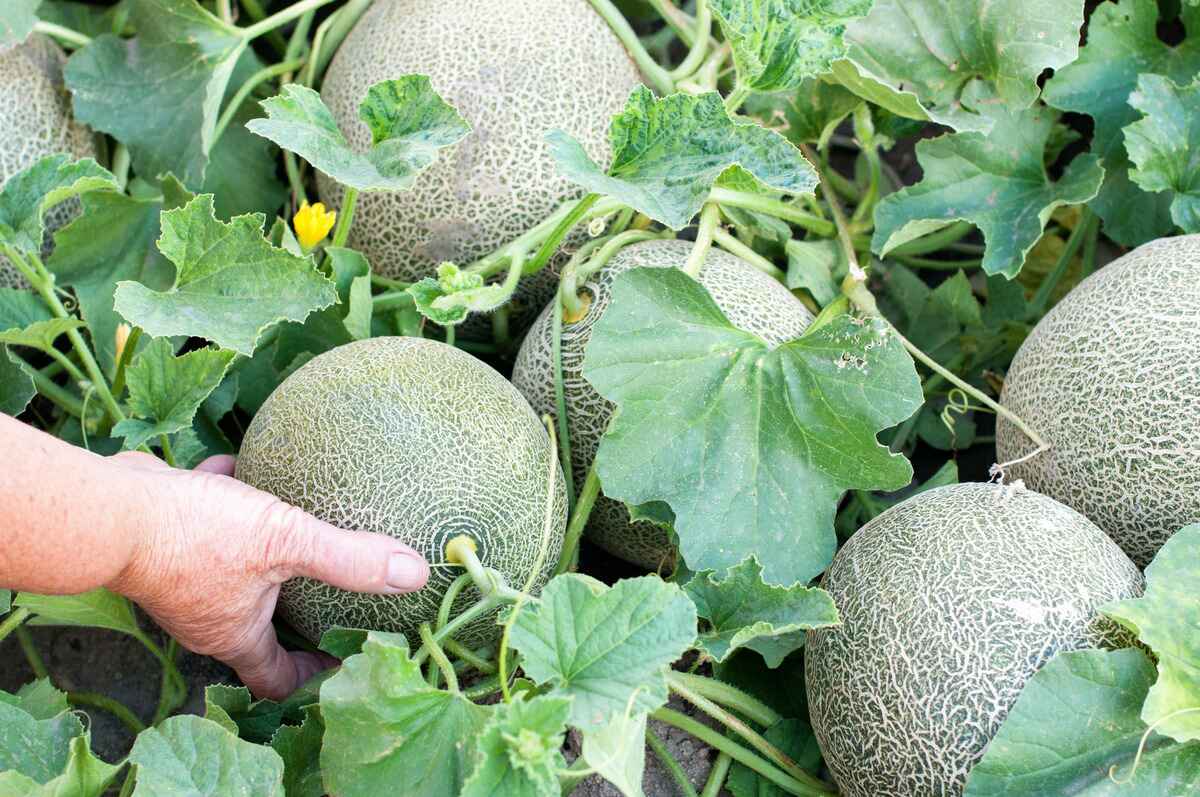
Harvesting Ripe Melons
Knowing when to harvest melons is key to enjoying their peak flavor and sweetness. Harvesting melons at the right time ensures that you experience their juicy and delicious taste. Here are some guidelines for harvesting ripe melons:
1. Observe the Fruit: Pay close attention to the melon’s appearance. Look for obvious signs that the melon is ripe, such as a change in color or texture. For example, watermelons tend to develop a duller skin color and have a matte appearance when fully ripe. Cantaloupes and honeydews often exhibit a strong fragrance and yield slightly to gentle pressure at the blossom end.
2. Check the Rind: Examine the rind of the melon. A fully ripe melon typically has a firm and intact rind without any signs of greenness or soft spots. The color of the rind may vary depending on the variety, so familiarize yourself with the typical color of the melon you are growing.
3. Evaluate the Stem: Assess the stem attached to the melon. For melons that have a stem, it should be completely dry and easily separable from the fruit. A green or stubborn stem indicates that the melon is not fully ripe.
4. Perform the Thump Test: Use the thump test for watermelons. Give the watermelon a gentle tap with your knuckles. If you hear a deep and hollow sound, it is a good indication that the watermelon is ripe. A dull or flat sound may indicate that it is not yet ready to be harvested.
5. Taste a Sample: If you are unsure about the ripeness of the melon, sample one to make a judgment. Remember that taste is the ultimate test for melon ripeness. Pick a smaller, mature melon and cut it open to assess its sweetness, texture, and flavor. Adjust your harvesting schedule accordingly based on your taste test.
6. Harvest Time: Harvest melons in the early morning when temperatures are cooler. Use a sharp knife or shears to cut the melon from the vine, leaving a short stem attached, which helps extend the storage life. Avoid pulling or twisting the fruit, as this can damage the plant and the melon itself.
7. Proper Storage: After harvesting, handle the melons gently to prevent bruising. Store them in a cool, dry location, such as a cellar or refrigerator, away from other fruits and vegetables. Watermelons can be stored at room temperature for a short period, but it is best to refrigerate them to maintain their freshness and flavor.
Remember that the ripeness indicators may vary slightly depending on the melon variety and personal preference. Regularly inspect your melons and harvest them when they exhibit the desired characteristics. By following these tips, you can enjoy the full sweetness and juiciness of ripe and freshly harvested melons.
Storing Melons Properly for Maximum Flavor
Proper storage is crucial for preserving the flavor, texture, and quality of melons after harvest. Melons are highly perishable fruits and require specific conditions to maintain their freshness. Here are some guidelines for storing melons properly:
1. Harvest at the Right Time: Ensure that you harvest melons at their peak ripeness to maximize their flavor and sweetness. Fully ripe melons tend to have the best taste and texture when stored.
2. Handle with Care: Handle melons gently to prevent bruising or damage. Rough handling can lead to premature spoilage and negatively impact the melon’s quality. Avoid dropping or stacking melons heavily on each other.
3. Wash and Dry: Before storing, gently rinse the melons with cool water and pat them dry with a clean cloth or paper towel. Excess moisture can promote the growth of mold or cause the melons to spoil more quickly during storage.
4. Store in a Cool Location: Melons prefer cool temperatures for storage. Ideally, store them in a cellar, cool basement, or refrigerator. The temperature should be around 45-55°F (7-13°C) for optimal freshness and extended shelf life.
5. Store Separately: Keep melons separate from other fruits and vegetables. They release ethylene gas, a natural ripening agent, which can accelerate the ripening process and cause spoilage in other produce. To prevent cross-contamination, store melons in a separate container or on a dedicated shelf.
6. Avoid Cutting Until Ready to Consume: It is best to avoid cutting melons until you are ready to eat them. Once a melon is cut, it starts to lose moisture and flavor more quickly. Instead, store whole melons and cut them as needed to retain maximum freshness.
7. Use Plastic Wrap or Bags: To maintain moisture and prevent the melon from drying out, you can wrap it in plastic wrap or place it in a plastic bag before refrigerating. This helps create a microclimate around the melon, preserving its texture and flavor.
8. Label and Rotate: If you have multiple melons in storage, label them with the harvest date to keep track of their freshness. Consume the oldest melons first to prevent any from overripening or going to waste.
9. Check Regularly: Periodically check stored melons for signs of spoilage or mold. If you notice any rotten spots or an unpleasant odor, discard the melon to prevent contamination of other stored fruits or vegetables.
By following these storage guidelines, you can maximize the flavor and shelf life of your melons. Proper handling, temperature control, and avoiding exposure to ethylene-producing fruits will help ensure that your stored melons retain their delicious taste and quality for an extended period.
Troubleshooting Common Melon Growing Issues
While melons are generally easy to grow, they can encounter various issues that may affect their growth and productivity. Identifying and addressing these common melon growing problems in a timely manner is crucial for successful cultivation. Here are some typical issues you may encounter and tips for troubleshooting them:
1. Poor Fruit Set: If your melon plants have many blooms but low fruit set, inadequate pollination may be the cause. Lack of pollinators or unfavorable weather conditions can hinder pollination. Consider hand-pollinating the plants by transferring pollen from the stamen to the pistil using a small brush or cotton swab.
2. Blossom End Rot: Blossom end rot appears as sunken, dark brown or black spots on the bottom of the melon. It is caused by calcium deficiency or inconsistent soil moisture levels. Ensure the soil has adequate calcium levels and water the plants evenly to prevent moisture fluctuations.
3. Splitting Fruits: Overly rapid growth caused by sudden, heavy rainfall or irregular watering can lead to melon fruits splitting. To prevent this, maintain consistent soil moisture levels by watering deeply and evenly. Mulching around the plants can also help regulate soil moisture and minimize splitting.
4. Powdery Mildew: Powdery mildew is a fungal disease characterized by a white, powdery coating on the leaves. It thrives in warm, humid conditions. To manage powdery mildew, practice proper spacing between plants to allow for adequate air circulation, remove affected leaves, and apply organic fungicides if necessary.
5. Pest Infestation: Melons can be targeted by pests such as aphids, cucumber beetles, and squash bugs. Monitor regularly for signs of pest activity, including wilting leaves, discoloration, or visible pests on plant surfaces. Remove pests by hand, use organic insecticides, or introduce beneficial insects to control pest populations.
6. Lack of Fruit Flavor: If your melons lack the expected sweetness or flavor, it may be due to factors such as improper timing of harvest or suboptimal growing conditions. Harvest melons when they are fully ripe and mature. Ensure the plants receive adequate sunlight, proper nutrients, and consistent moisture for optimal flavor development.
7. Stunted Growth: Stunted growth in melon plants can result from insufficient nutrients, poor soil quality, or pest and disease damage. Provide proper nutrients through organic fertilizers, amend the soil with organic matter, and take action to address any pest or disease issues promptly. Avoid over-fertilizing, as this can also cause stunted growth.
8. Yellowing Leaves: Yellowing leaves can indicate various problems, including nutrient deficiencies, overwatering, or diseases. Conduct a soil test to assess nutrient levels and adjust fertilization accordingly. Ensure proper watering practices, allowing the soil to dry slightly between waterings. Address any disease issues promptly with appropriate treatments.
By identifying and addressing these common melon growing issues, you can promote healthier plant growth and increase the chances of a successful melon harvest. Regular monitoring, providing proper care, and taking timely corrective actions will help you overcome these challenges and enjoy a bountiful and flavorful melon crop.