
The Benefits of Growing Lavender
Lavender, with its beautiful purple flowers and captivating scent, is not only a stunning addition to any garden but also offers a host of benefits for both your well-being and your surroundings. From its therapeutic properties to its ability to attract beneficial insects, here are some of the top benefits of growing lavender:
- Relaxation and Stress Relief: Lavender is renowned for its calming and soothing properties. The aroma of lavender has been scientifically proven to reduce stress, anxiety, and promote better sleep. Growing lavender in your garden can provide you with a tranquil space to unwind and find peace.
- Aromatherapy: The delightful scent of lavender has long been used in aromatherapy to promote relaxation and rejuvenation. You can harvest the flowers and create your own essential oil, which can be used for massages, baths, or as a natural air freshener.
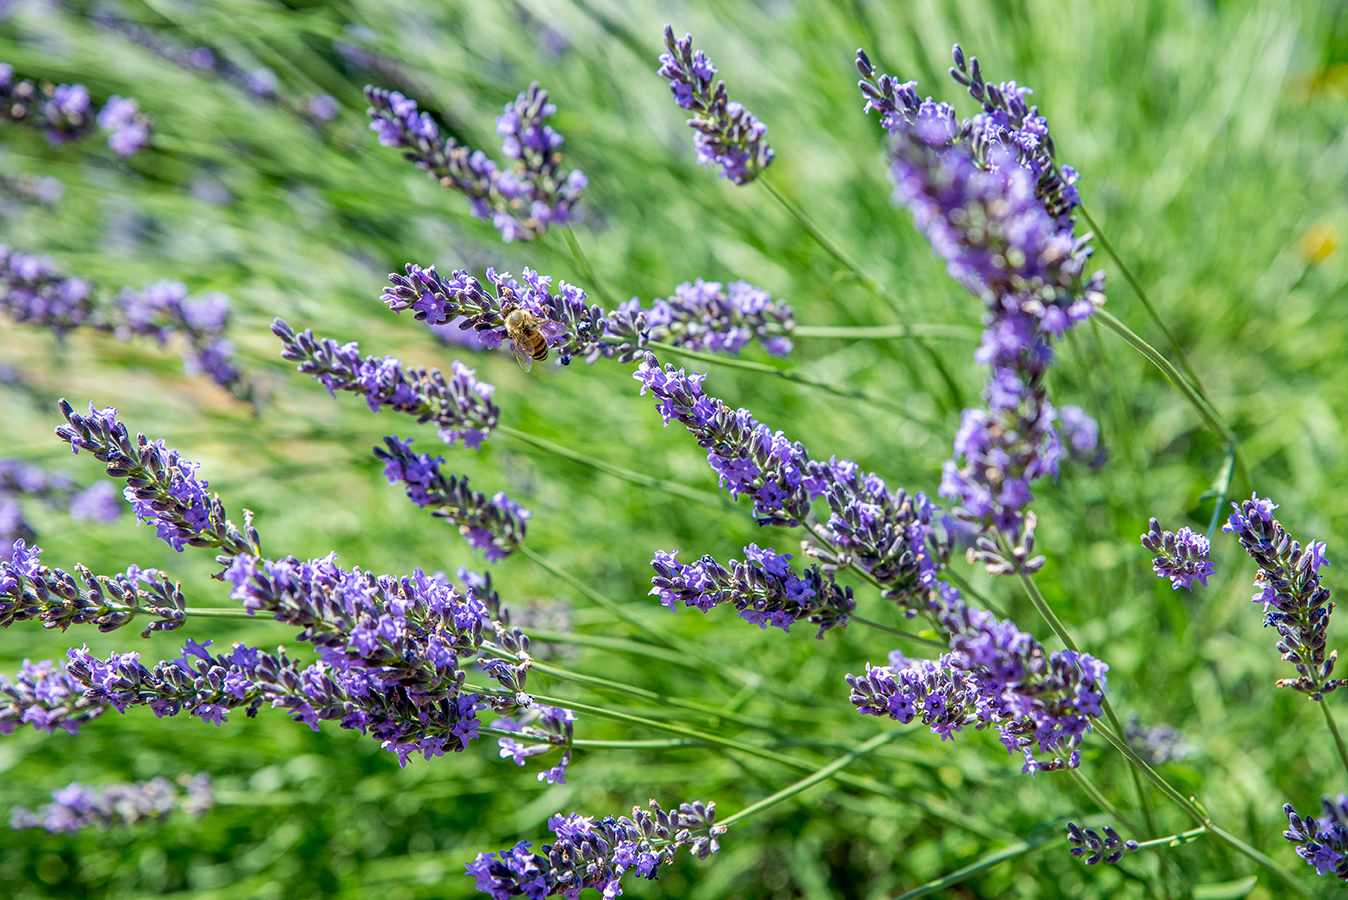
- Attracting Beneficial Insects: Lavender is a magnet for beneficial insects such as bees, butterflies, and ladybugs. These pollinators play a crucial role in the ecosystem, aiding in the pollination of other plants in your garden. By growing lavender, you are not only beautifying your space but also supporting the local ecosystem.
- Natural Pest Repellent: While lavender attracts beneficial insects, it also repels unwanted pests such as mosquitoes, moths, and fleas. The strong scent of lavender acts as a natural deterrent, helping to keep your outdoor area insect-free without the need for harmful chemicals.
- Medicinal Uses: Lavender has been used for centuries for its medicinal properties. It can help alleviate headaches, soothe insect bites and skin irritations, and aid in relaxation. Infusions made from lavender flowers can be used as a natural remedy for various ailments.
- Culinary Delights: Lavender is not just for its beauty and aroma; it can also be used to add a unique flavor to your culinary creations. The delicate floral notes of lavender can enhance dishes such as desserts, baked goods, teas, and even cocktails.
With its multiple benefits and versatility, growing lavender is a rewarding experience that can enhance both your garden and your overall well-being. Whether you’re seeking relaxation, natural pest control, or a touch of culinary inspiration, lavender is the perfect addition to any garden.
Choosing the Right Variety
When it comes to growing lavender, choosing the right variety is essential for a successful and thriving garden. There are numerous lavender varieties available, each with its unique characteristics and uses. Consider the following factors before selecting the perfect lavender variety for your garden:
- Climate: Lavender thrives in sunny and dry climates. Different varieties have varying heat and cold tolerance. Make sure to choose a variety that is well-suited to your climate to ensure its longevity and health.
- Size: Lavender plants come in different sizes, ranging from compact varieties that are suitable for containers or small gardens to larger varieties that can reach several feet in height and width. Consider the available space in your garden and the desired aesthetic when selecting a lavender size.
- Color: Lavender flowers come in various colors, including shades of purple, blue, and pink. Think about the color scheme of your garden and choose a lavender variety that complements or adds a pop of color to your existing flora.
- Intended Use: Lavender has multiple uses, such as culinary purposes, aromatherapy, or ornamental display. Some varieties are specifically bred for certain uses, so consider the intended purpose of growing lavender and select a variety that aligns with your needs.
- Fragrance: The scent of lavender is one of its most beloved features. Different varieties have distinct fragrance profiles, ranging from sweet and floral to more herbal and earthy. Choose a lavender variety with a fragrance that appeals to you and fits your desired sensory experience.
It’s important to do some research and consult with local garden centers or experienced gardeners to determine which lavender varieties perform best in your specific region. Consider the specific requirements of each variety, such as watering needs and pruning requirements, to ensure a successful and thriving lavender garden.
Remember, selecting the right lavender variety is crucial for not only the health and growth of the plants but also for achieving the desired visual and olfactory impact in your garden. Take your time, explore the options, and choose the perfect lavender variety that will bring beauty and joy to your outdoor space.
Finding the Perfect Location
When it comes to growing lavender, finding the perfect location is key to ensuring its health and vitality. Lavender is a sun-loving plant that thrives in warm and dry conditions. Here are some important considerations when selecting the ideal location for your lavender plants:
- Sun Exposure: Lavender requires at least 6 to 8 hours of direct sunlight each day to flourish. Choose a location in your garden that receives ample sunlight, preferably a south-facing or west-facing spot that gets sun throughout the day.
- Well-Draining Soil: Lavender prefers soil that is well-draining and on the sandy side. It does not thrive in heavy clay or waterlogged soil. Ensure that the location you choose has soil that allows water to drain away quickly after a rainfall or watering.
- Wind Protection: While lavender enjoys good air circulation, it is important to protect the plants from strong winds that can damage the delicate stems and flowers. Consider planting lavender in a location shielded by trees, shrubs, or a garden wall to provide some wind protection.
- Space: Lavender plants need enough space to grow and spread. Ensure that the location you choose allows for adequate plant spacing, as overcrowding can lead to poor air circulation and increased risk of disease.
- Proximity to Walkways or Seating Areas: Lavender’s exquisite fragrance makes it a popular choice for garden pathways and seating areas. Consider planting lavender near walkways or seating areas where you can enjoy the intoxicating scent as you pass by or relax in the garden.
In addition to these considerations, it’s important to assess the microclimate of your garden. Take note of any areas that receive excessive heat or have poor air circulation, as these conditions can negatively impact lavender plants. By finding the perfect location for your lavender, you are creating an environment where the plants can thrive and showcase their beauty.
Keep in mind that proper spacing and good air circulation are crucial for preventing disease and promoting healthy growth. Also, regular observation and maintenance are important to ensure that the chosen location continues to be suitable as the plants grow and mature over time.
When you find the ideal location for your lavender plants, you are setting the stage for a garden filled with vibrant, fragrant blooms and a sensory experience that will delight both you and your visitors.
Preparing the Soil
Proper soil preparation is essential for the successful growth and development of lavender plants. Lavender thrives in well-draining soil with good fertility. Follow these steps to prepare the soil before planting your lavender:
- Clear the Area: Start by removing any weeds, rocks, or debris from the planting area. This will allow the lavender plants to establish without competition and ensure optimal root growth.
- Soil Testing: It’s a good idea to conduct a soil test to determine the pH and nutrient levels of your soil. Lavender prefers a slightly alkaline soil with a pH range between 6.5 and 7.5. Based on the test results, you can amend the soil to achieve the ideal pH if necessary.
- Improve Drainage: Lavender plants are susceptible to root rot if planted in waterlogged soil. If you have heavy clay or poorly draining soil, you can improve drainage by incorporating organic matter such as compost or well-rotted manure. This will lighten the soil and enhance its drainage capacity.
- Amend Soil: Lavender thrives in moderately fertile soil. If your soil lacks nutrients, add some balanced organic fertilizer or slow-release granular fertilizer to provide the necessary nutrients for healthy plant growth.
- Loosen the Soil: Use a garden fork or tiller to loosen the soil to a depth of around 12 inches. This will improve aeration and root penetration, allowing the lavender plants to establish more effectively.
- Remove Excess Moisture: If your soil tends to be overly moist, consider incorporating sand or perlite into the soil mixture to increase drainage. This will help prevent water from pooling around the roots of the lavender plants.
It’s important to note that lavender prefers soil that is slightly on the sandy side, as it allows for optimal drainage. If your soil is heavy clay or retains too much moisture, consider creating raised beds or planting mounds to improve the drainage further.
Remember to water the soil before planting, as this will help settle it around the roots and provide a good start for the lavender plants. By preparing the soil properly, you are setting the foundation for healthy growth and ensuring the long-term success of your lavender garden.
Planting Lavender Seeds
Planting lavender from seeds is an exciting and rewarding way to grow this aromatic herb. While it may require some patience and care, the process of planting lavender seeds can be a fulfilling journey. Follow these steps to successfully plant lavender seeds:
- Timing: Lavender seeds should be planted indoors 6 to 8 weeks before the last frost date in your region. This will give them ample time to germinate and develop into healthy seedlings before transplanting them outdoors.
- Seed Tray or Pots: Fill a seed tray or individual pots with a well-draining seed starting mix. Moisten the mix with water to ensure its proper hydration before planting the seeds.
- Sowing the Seeds: Sprinkle the lavender seeds evenly on the damp seed starting mix. Press them lightly into the surface, ensuring good seed-to-soil contact, but do not bury them too deeply as lavender seeds require light to germinate.
- Covering the Seeds: Cover the seeds lightly with a thin layer of vermiculite or seed starting mix to help retain moisture and provide a stable environment for germination.
- Creating a Mini Greenhouse: Place a clear plastic dome or wrap the tray with plastic wrap to create a mini greenhouse effect that will maintain temperature and humidity for optimal seed germination. Keep the tray in a warm and bright location, but away from direct sunlight.
- Maintaining Moisture: Check the moisture level regularly and mist the soil surface if it starts to dry out. Avoid overwatering, as excessive moisture can lead to damping-off disease that affects seedlings.
- Germination: Lavender seeds typically germinate within 14-30 days. Once the seedlings have developed a couple of sets of true leaves, you can remove the plastic dome or wrap to allow for air circulation.
- Providing Ample Light: Place the seedlings in a location where they can receive at least 12-14 hours of bright light per day. Supplemental grow lights can be used if natural sunlight is limited.
- Transplanting: When the lavender seedlings have grown sturdy enough, and all frost danger has passed, they can be transplanted outdoors into well-prepared soil. Be sure to harden off the seedlings gradually by exposing them to outdoor conditions over a period of 7-10 days before planting.
It’s important to note that not all lavender seeds will germinate. However, with proper care and suitable conditions, a majority of the seeds should successfully sprout. Remember to be patient and continue to provide proper care to the lavender seedlings as they grow.
Planting lavender seeds allows you to witness the complete life cycle of this beautiful herb, from its humble beginnings as a tiny seed to a flourishing plant that fills your garden with fragrance and beauty.
Transplanting Lavender
Transplanting lavender is an important step in the growth process that allows you to establish your lavender plants in their permanent outdoor location. Transplanting should be done when the lavender seedlings are sturdy enough and all frost dangers have passed. Follow these steps to successfully transplant your lavender seedlings:
- Choose the Right Timing: Wait until the soil has warmed up and all risk of frost has passed before transplanting your lavender seedlings. This is usually around spring or early summer, depending on your location.
- Prepare the Planting Hole: Dig a hole around the same depth and slightly larger in diameter than the root ball of the lavender seedling. Ensure that the hole is wide enough to accommodate the roots without bending or crowding.
- Amend the Soil (if necessary): Lavender prefers well-draining soil. If your soil is heavy or clay-like, consider amending it with organic matter, such as compost or peat moss, to improve drainage and create a favorable growing environment.
- Remove the Seedling: Gently remove the lavender seedling from its container, taking care not to damage the delicate roots. If roots are tightly wound or circling the pot, gently tease them apart to encourage outward growth.
- Place the Seedling in the Hole: Position the seedling in the center of the planting hole, making sure that the top of the root ball is level with or slightly above the surrounding soil. Backfill the hole with soil, gently tamping it down to eliminate any air pockets.
- Water Thoroughly: Give the newly transplanted lavender seedling a thorough watering to settle the soil and ensure good root-to-soil contact. Avoid overwatering, as lavender prefers soil that is slightly on the drier side.
- Mulch and Protect: Apply a layer of organic mulch around the base of the lavender plant, leaving a small space around the stem to prevent moisture buildup and potential rot. Mulching helps retain soil moisture, suppresses weeds, and insulates the roots.
- Provide Proper Care: After transplanting, it’s important to continue providing care to help the lavender seedlings establish. Regularly water the plants, especially during the first few weeks, to keep the soil lightly moist but not overly saturated. Gradually reduce watering as the plants become established.
Keep in mind that lavender plants are sensitive to excessive moisture and root rot. It’s crucial to ensure that the soil drains well and to avoid overwatering. Also, provide adequate spacing between plants to promote air circulation and reduce the risk of disease.
By following these steps, you can successfully transplant your lavender seedlings and continue their growth into mature, thriving plants that will grace your garden with their beautiful form and aromatic fragrance.
Caring for Lavender Plants
Caring for lavender plants is relatively easy once they are established. With a little attention and the right practices, you can ensure that your lavender thrives and remains healthy. Follow these care tips to keep your lavender plants in optimal condition:
- Sun and Water: Lavender thrives in full sun, so make sure your plants receive at least 6-8 hours of direct sunlight each day. Additionally, lavender is drought-tolerant and prefers dry conditions, so be careful not to overwater. Water deeply but infrequently, allowing the soil to dry out between watering sessions.
- Well-Drained Soil: Lavender prefers well-draining soil. If your soil doesn’t drain well, consider using raised beds or adding organic matter like sand or gravel to improve drainage.
- Mulching: Apply a layer of organic mulch, such as wood chips or straw, around the base of the plants. Mulching helps retain moisture, suppress weeds, and regulate soil temperature.
- Pruning: Pruning is essential to keep lavender plants compact, promote bushy growth, and delay woody stems. Prune about one-third of the plant’s height in early spring, just as new growth begins. Additionally, remove faded blooms throughout the season to encourage continuous blooming.
- Fertilization: Lavender plants don’t typically require heavy feeding. However, you can apply a light application of well-balanced organic fertilizer in early spring to support healthy growth. Be cautious not to over-fertilize, as this can lead to excessive foliage and reduced flower production.
- Dealing with Weeds: Regularly inspect your lavender plants for weeds and promptly remove them. Weeds can compete for nutrients and water, potentially stunting the growth of your lavender plants.
- Protecting from Frost: While lavender is hardy, severe frost can damage the plants. If you live in an area with harsh winters, consider protecting your lavender with a layer of mulch or covering it with a frost cloth during freezing temperatures.
- Dividing and Transplanting: Over time, lavender plants can become crowded and lose their vigor. Dividing and transplanting every 3-4 years can help rejuvenate the plants and promote better growth.
- Monitoring for Pests and Diseases: Lavender is relatively pest and disease-resistant. However, occasional pests like aphids or spider mites may appear. Monitor your plants regularly, and if needed, treat with organic pest control options. Proper spacing, good air circulation, and well-drained soil can help prevent most disease issues.
By providing the right amount of sun, water, well-draining soil, and occasional maintenance, you can ensure that your lavender plants flourish and continue to fill your garden with their delightful scent and vibrant blooms.
Watering Lavender
Proper watering is crucial for the health and vitality of lavender plants, as they have specific water requirements to thrive. While lavender is known for its drought tolerance, it’s important to provide sufficient moisture during critical stages of growth. Here are a few guidelines to follow when watering lavender:
- Establishment Phase: When first planting lavender, it’s important to keep the soil consistently moist to encourage root establishment. Water the plants deeply, ensuring that the root zone is adequately saturated. After the first few weeks, gradually reduce watering frequency to encourage the development of deep, drought-tolerant roots.
- Established Plants: Lavender plants prefer dry conditions and are more likely to suffer from overwatering than underwatering. Once established, water your lavender plants sparingly and allow the soil to dry out between waterings. Aim for deep, infrequent watering rather than light, frequent watering, as this will encourage the roots to grow deeper in search of moisture.
- Timing: Water lavender plants in the early morning to allow the foliage to dry out before evening. This helps prevent moisture-related diseases, such as root rot or fungal infections. Avoid watering in the late afternoon or evening, as prolonged moisture on the leaves can create a favorable environment for diseases to thrive.
- Avoid Overwatering: Lavender plants are susceptible to root rot if they sit in overly moist soil. Water only when the top few inches of soil feel dry to the touch. Stick your finger into the soil to assess moisture levels or use a moisture meter to determine when it’s time to water.
- Watering Techniques: When watering, aim to soak the soil around the base of the plant rather than wetting the foliage. Direct the water towards the root zone, ensuring that it penetrates deep into the soil. Drip irrigation or a soaker hose is ideal for delivering water directly to the roots without wetting the leaves.
- Rainfall: Lavender plants can generally tolerate short periods of rainfall. However, it’s important to monitor the moisture levels and adjust watering accordingly. If the rainfall is excessive or prolonged, provide additional time for the soil to dry out before the next watering session.
- Container-grown Lavender: If growing lavender in containers, ensure that the pots have proper drainage holes to prevent waterlogged roots. Monitor the moisture levels in the container, as they can dry out more quickly than garden soil. Water container-grown lavender when the top inch of soil feels dry.
Remember that it’s better to slightly underwater lavender plants than to overwater them. Overwatering can lead to root rot and poor growth. By providing the right amount of water at the appropriate times, you can help your lavender plants thrive and maintain their beautiful form and fragrance.
Pruning Lavender
Pruning lavender is essential for maintaining the health, shape, and longevity of the plant. Proper pruning encourages bushier growth, promotes flower production, and helps prevent the lavender from becoming woody and unattractive. Here are some guidelines to follow when pruning lavender:
- Timing: The best time to prune lavender is in early spring, just as new growth begins. Avoid pruning in late fall or winter, as this can leave the plant vulnerable to frost damage.
- Cutting Back: Begin by cutting back about one-third of the plant’s height. Use hand pruners or shears to make clean cuts just above a set of healthy, green leaves. Do not cut into the woody part of the stems, as lavender has limited ability to produce new growth from old wood.
- Blooming Stems: To encourage continuous blooming, remove faded flower stems throughout the growing season. Cut just above a set of healthy leaves or flower buds below the spent flower stem.
- Shape and Size: Regular pruning helps maintain a compact and well-shaped lavender plant. Trim the outer branches to shape the plant and prevent a leggy appearance. Aim for a rounded, mounded shape or a slightly tapered form at the top.
- Avoid Overpruning: While it’s important to prune lavender, avoid overpruning, as this can result in reduced flower production. Leave some green growth on the plant, especially at the base, to ensure the survival of the plant.
- Renewal Pruning: Over time, lavender plants can become overly woody and produce fewer flowers. To rejuvenate the plant, consider performing a more severe pruning every few years. Cut back the entire plant by one-third to one-half its size, close to the woody base. This renewal pruning stimulates new growth from the base and helps revive the lavender plant.
- Disinfect Tools: Before pruning, disinfect your pruning tools with rubbing alcohol or a bleach solution to prevent the spread of diseases between plants. This is especially important if you have pruned diseased or infected plants.
Proper pruning not only keeps your lavender plants looking tidy and well-maintained but also encourages healthy growth and an abundance of flowers. Regularly pruning your lavender will help extend its lifespan, keeping the plant vibrant and beautiful for years to come.
Dealing with Pests and Diseases
Lavender plants are generally considered to be relatively pest and disease-resistant. However, they may still encounter certain issues that can impact their health and appearance. By staying vigilant and taking appropriate measures, you can effectively deal with pests and diseases that may affect your lavender. Here are some common pests and diseases to watch for, along with recommended control methods:
- Aphids: Aphids are tiny, sap-sucking insects that can infest lavender plants. To control aphids, you can use a strong stream of water to dislodge them from the plant or apply insecticidal soap or neem oil. Ladybugs and lacewings are natural predators that help control aphid populations.
- Spider Mites: These tiny arachnids feed on the underside of leaves, causing yellowing and webbing. Regularly inspect your lavender plants for signs of spider mite infestation. Prune affected areas and treat with insecticidal soap or horticultural oil to control the population.
- Root Rot: Lavender plants are susceptible to root rot if the soil remains consistently waterlogged. To prevent root rot, ensure proper drainage by incorporating organic matter into the soil and avoid overwatering. If root rot occurs, dig up affected plants and amend the soil before replanting.
- Fungal Diseases: Lavender can be susceptible to fungal diseases such as powdery mildew and gray mold (botrytis blight). To prevent fungal infections, provide proper spacing to allow for good airflow, avoid overhead watering, and ensure plants receive adequate sunlight. If signs of fungal diseases appear, prune affected areas and apply a suitable fungicide as directed.
- Slugs and Snails: These slimy pests can feed on the leaves and young shoots of lavender. To control slugs and snails, you can use physical barriers like copper tape or diatomaceous earth around the plants. Beer traps and handpicking can also help reduce their population.
- Deer and Rabbits: Lavender is generally deer and rabbit resistant due to its strong fragrance. However, hungry animals may still browse on young or tender lavender plants. Use physical barriers or repellents to deter them from feeding on your lavender.
Regularly monitor your lavender plants for any signs of pests or diseases. Early detection and prompt action are key to preventing further damage. Ensuring proper cultural practices, such as good sanitation, proper watering, and providing optimal growing conditions, can also help prevent many pest and disease issues.
If necessary, consult with local gardening experts or extension services for specific pest and disease control recommendations in your area. By staying proactive and taking appropriate measures, you can help keep your lavender plants healthy and beautiful throughout the growing season.
Harvesting Lavender
Harvesting lavender is an exciting and rewarding process that allows you to enjoy the fragrant blooms and harness the natural benefits of this versatile herb. Timing and techniques play a crucial role in ensuring a successful lavender harvest. Here’s a guide on how to properly harvest lavender:
- Timing: Lavender blooms in summer, typically from June to August, depending on the variety and location. Harvest lavender when the flowers are in full bloom, just as the buds start to open. This is when the essential oils are at their peak concentration.
- Choose the Right Time of Day: Harvest lavender in the morning after the dew has dried, but before the heat of the day. The essential oils are most potent during this time, and harvesting in the morning helps retain the fragrance and quality of the flowers.
- Method 1: Bundling Harvest: Gently grasp a handful of lavender stems just below the flower buds. Use sharp gardening shears or scissors to cut the stems about 1-2 inches above the foliage. Bundle the stems together, securing them with a rubber band or twine.
- Method 2: Selective Harvest: Alternatively, you can selectively harvest individual lavender stems or flowers. This method is ideal if you plan to use lavender for crafting, culinary purposes, or drying individual flowers.
- Handling: Handle the harvested lavender with care to avoid damaging the flowers and preserving their natural oils. Avoid crushing or bruising the blossoms, as this can diminish the aroma and quality.
- Preservation: If you’re not using the lavender immediately, it’s essential to preserve its fragrance and color. Hang the bundled lavender upside down in a cool, well-ventilated area away from direct sunlight. Allow the lavender to air dry for several weeks until the stems and flowers feel dry and crumbly to the touch.
- Storage: Once the lavender is fully dried, remove the flowers from the stems by gently rubbing them between your hands or using a sieve. Store the dried lavender flowers in an airtight container, away from moisture and light, to preserve their potency and fragrance. Keep them in a cool, dark place until ready to use.
Lavender flowers can be used for various purposes, including making potpourri, sachets, essential oils, culinary preparations, and homemade beauty products. Enjoy the delightful scent and the versatility of lavender by incorporating it into your favorite recipes and crafts.
Remember, the joy of harvesting lavender extends beyond the actual act. It’s an opportunity to connect with nature, indulge in the beauty of the blooms, and embark on a journey of creativity and relaxation through the many uses of this remarkable herb.
Preserving Lavender
Preserving lavender allows you to enjoy its beauty and fragrance long after the blooming season has ended. Whether you want to savor the scent, use it in culinary creations, or incorporate it into various crafts and DIY projects, there are several methods to preserve the vibrant qualities of lavender. Here are some effective ways to preserve lavender:
- Drying: Air drying is the most common and traditional method of preserving lavender. To dry lavender, gather a small bunch of stems, secure them together with a rubber band or string, and hang them upside down in a cool, well-ventilated area. Allow the lavender to dry for a few weeks until the stems and flowers feel brittle to the touch.
- Pressed Lavender: Pressing lavender is a technique that preserves its beauty for decorative purposes, such as in art projects, cards, or framed displays. Place freshly harvested lavender between layers of absorbent paper or inside a flower press, and apply pressure to flatten the flowers. Leave them pressed for a few weeks until completely dry and flat.
- Lavender Sachets: Create delightful sachets by filling small fabric pouches or muslin bags with dried lavender flowers. These sachets can be placed in drawers, closets, or near your pillow to provide a pleasant fragrance and help repel moths. Refresh the scent by gently crushing the flowers.
- Lavender Infusions: Transform the aromatic qualities of lavender into culinary delights by infusing the flowers in various liquids. Lavender-infused honey, vinegar, or oils can add a unique twist to your recipes. Simply place dried lavender flowers in a container with the desired liquid and let it infuse for a few weeks, shaking occasionally.
- Lavender Essential Oil: Extract the concentrated fragrance of lavender by making your own lavender essential oil. This requires a more elaborate process, involving distillation using a still, but it allows you to capture the true essence of lavender for use in aromatherapy, skincare, or homemade beauty products.
- Lavender Potpourri: Combine dried lavender flowers with other fragrant botanicals, such as dried rose petals, dried citrus peels, or aromatic herbs, to create a beautiful and aromatic potpourri. Place the mixture in a decorative bowl or sachet to add a pleasant scent to your living space.
Regardless of the method you choose, it’s best to store preserved lavender in a cool, dark place away from moisture and direct sunlight. This will help retain its scent and color for an extended period.
Preserving lavender allows you to enjoy its many benefits and incorporate its natural fragrance and beauty into various aspects of your life. Whether you use the preserved lavender for its aromatic qualities, culinary uses, or as a decorative element, it will continue to bring joy and a touch of nature to your surroundings.