
Choosing the Right Pot
When it comes to planting in large pots, choosing the right pot is essential. The right pot not only enhances the aesthetics of your garden but also ensures the healthy growth of your plants. Here are some factors to consider when selecting the perfect pot for your plants:
- Size: The size of the pot is crucial as it determines the amount of space available for the plant’s roots to grow. Opt for a large pot, at least 12 to 16 inches in diameter, to provide ample room for root expansion.
- Material: Pots come in various materials, such as terracotta, ceramic, plastic, and metal. Each material has its pros and cons. Terracotta pots are porous and allow for better airflow, but they tend to dry out quickly. Ceramic pots are sturdy and retain moisture well, but they can be heavy. Plastic pots are lightweight and retain moisture, making them ideal for hot climates. Metal pots are durable but can heat up quickly in direct sunlight. Choose a material that suits your specific needs and weather conditions.
- Drainage: Proper drainage is crucial to prevent waterlogging, which can lead to root rot. Look for pots with drainage holes at the bottom to ensure excess water can flow out freely.
- Style: Consider the overall style and theme of your garden when choosing a pot. Opt for a pot that complements the aesthetics of the surrounding environment, whether you prefer sleek and modern or rustic and traditional designs.
- Mobility: If you plan to move your large pot frequently or want the flexibility to rearrange your garden, consider pots with built-in wheels or lightweight materials.
By taking these factors into account, you can choose the perfect pot that not only suits your plants’ needs but also adds a touch of style to your garden. Remember, the right pot lays the foundation for healthy and thriving plants.
Selecting the Right Plants
Choosing the right plants for your large pots is crucial for creating a visually stunning and thriving garden. Here are some factors to consider when selecting plants:
- Climate and Sunlight: Consider the climate and amount of sunlight your pot receives throughout the day. Some plants thrive in full sun, while others prefer shade or partial shade. Select plants that are suitable for the specific light conditions of your garden.
- Size and Growth Habit: Take into account the mature size and growth habit of the plants. Choose plants that won’t outgrow the pot too quickly and leave enough space for them to develop their roots and foliage comfortably.
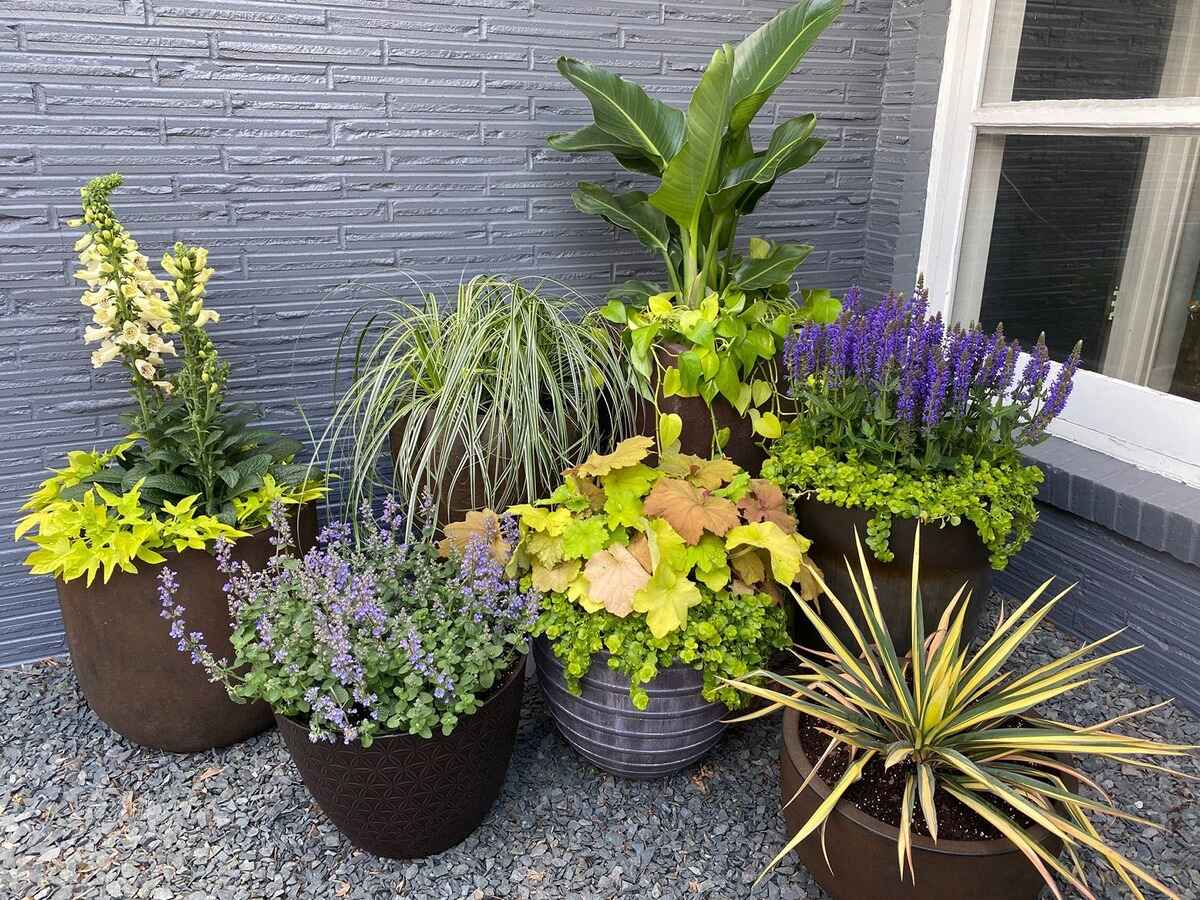
- Colors and Textures: Plan a visually appealing arrangement by selecting plants with contrasting colors and textures. Add pops of vibrant flowers, complemented by foliage with various shapes and shades of green.
- Seasonality: Consider the different seasons and the lifespan of the plants. If you want a year-round display, choose a mix of annuals, perennials, and evergreen plants. This way, you’ll have a continuous bloom or greenery throughout the year.
- Watering Needs: Different plants have different watering requirements. Ensure that the plants you select have similar water needs or can tolerate the same watering schedule. This will make watering and plant care more manageable.
- Companion Planting: Choose plants that are compatible when planted together in the same pot. Some plants may have mutual benefits, such as repelling pests or improving soil health. Research companion planting to create a harmonious and mutually beneficial plant arrangement.
- Personal Preference: Ultimately, select plants that you personally enjoy and resonate with. Whether it’s fragrant flowers, edible herbs, or colorful foliage, choose plants that bring you joy and reflect your unique taste.
By considering these factors, you can create a stunning display with a variety of plants that not only thrive in your pot but also create a beautiful visual impact. Remember to consider both the functional and aesthetic aspects when selecting the right plants for your large pots.
Preparing the Pot
Before planting in your large pot, it’s essential to properly prepare it to create an optimal environment for your plants. Follow these steps to prepare your pot for planting:
- Clean the Pot: If you are reusing a pot, clean it thoroughly to remove any dirt, debris, or remnants from previous plants. Use warm water and mild soap or a mixture of equal parts water and vinegar to clean the pot. Rinse it well and let it dry completely.
- Inspect for Damage: Check the pot for any cracks, chips, or damage that may impact its structural integrity. Make sure there are no sharp edges that could harm the roots of your plants. Repair or replace the pot if necessary.
- Elevate the Pot: To ensure proper drainage and prevent waterlogging, place the pot on pot feet or elevate it using bricks or blocks. This will allow excess water to escape from the drainage holes, preventing root rot.
- Prepare the Pot Interior: Line the bottom of the pot with a layer of porous material, such as landscape fabric or a coffee filter, to prevent soil from escaping through the drainage holes while still allowing water to flow through.
- Add a Protective Layer: Place a layer of gravel or small rocks at the bottom of the pot. This will further aid in drainage and prevent the soil from becoming compacted.
- Consider Adding a Water Reservoir: For large pots that require frequent watering, you can create a water reservoir system by adding a layer of water-absorbing crystals or a water tray at the bottom. This will help retain moisture and reduce the frequency of watering.
By properly preparing your pot, you create a healthy and functional environment for your plants. This preparation ensures that your plants have proper drainage, protection from soil erosion, and a stable foundation to thrive in. Take the time to prepare your pot adequately, and you’ll set the stage for successful planting in your large pot.
Adding Proper Drainage
Proper drainage is crucial when planting in large pots to prevent waterlogged soil and root rot. Here are some essential steps to ensure proper drainage in your pot:
- Choose a Pot with Drainage Holes: Select a pot that has drainage holes at the bottom. These holes allow excess water to drain out, preventing water from pooling at the bottom of the pot.
- Add a Layer of Small Rocks: Before adding soil, place a layer of small rocks or pebbles at the bottom of the pot. This layer acts as a barrier, preventing the soil from blocking the drainage holes. It also helps in creating air pockets for better circulation.
- Use Pot Feet or Elevate the Pot: Elevate the pot slightly by using pot feet or placing it on bricks or blocks. This elevation allows water to flow freely through the drainage holes without obstruction.
- Consider Using a Drainage Layer: In addition to rocks or pebbles, you can create a drainage layer using materials like broken pottery shards, clay granules, or horticultural charcoal. This layer aids in keeping the soil loose and provides additional drainage.
- Use Well-Draining Soil: Choose a high-quality, well-draining potting mix specifically formulated for container gardening. Avoid using regular garden soil, as it tends to become compacted and does not promote good drainage.
- Avoid Overwatering: One of the main causes of poor drainage is overwatering. Always water your plants in moderation, allowing the top inch or two of soil to dry out before watering again. This prevents excess water from accumulating in the pot.
- Monitor the Drainage: Regularly check the drainage of your pot after watering. If water is taking too long to drain or is pooling at the bottom, adjust the drainage layers or consider drilling additional holes in the pot.
By ensuring proper drainage in your pot, you create a healthier and more oxygenated environment for your plants. Adequate drainage helps prevent water-related problems, promotes root growth, and maintains overall plant health. Don’t overlook the importance of proper drainage when planting in large pots.
Preparing the Soil
Proper soil preparation is vital to provide an optimal growing environment for your plants when planting in large pots. Follow these steps to prepare the soil effectively:
- Choose the Right Potting Mix: Select a high-quality potting mix specifically designed for container gardening. Avoid using regular garden soil, as it can become compacted and hinder proper drainage.
- Amend the Soil: Depending on the type of plants you are growing, you may need to amend the potting mix. Add compost or aged manure to improve the soil structure, enhance water retention, and provide essential nutrients for plant growth.
- Ensure Good Drainage: Incorporate materials such as perlite or vermiculite into the potting mix to improve drainage. This will prevent the soil from becoming waterlogged, which can lead to root rot.
- Check pH Levels: Different plants have different soil pH requirements. Test the pH of your potting mix and adjust it accordingly using pH-specific amendments if necessary. Most plants prefer a slightly acidic to neutral pH range.
- Add Slow-Release Fertilizer: Mix in a slow-release fertilizer into the soil to provide a steady supply of nutrients to your plants over time. This helps promote healthy growth and reduces the need for frequent fertilization.
- Moisten the Soil: Before planting, moisten the potting mix with water to ensure it is evenly damp. Avoid soaking the soil, as this can lead to compaction and poor drainage.
- Leave Room for Expansion: Fill the pot with enough soil, leaving a slight gap between the soil surface and the top of the pot. This space allows for watering without overflow and provides room for mulching.
- Consider Adding Mulch: Once you have planted your plants, consider adding a layer of organic mulch, such as wood chips or straw, to the soil surface. Mulch helps conserve moisture, suppresses weed growth, and moderates soil temperature.
By properly preparing the soil in your large pot, you create an ideal growing medium that provides the necessary nutrients, drainage, and moisture retention for your plants. Take the time to prepare the soil, and you’ll provide a solid foundation for healthy and thriving plants.
Watering Techniques
Proper watering is essential for the health and vitality of your plants when planting in large pots. Here are some watering techniques to ensure your plants receive the right amount of moisture:
- Check Moisture Levels: Before watering, check the moisture levels in the soil. Stick your finger about an inch into the soil to determine if it feels dry. If the soil is still moist, hold off on watering.
- Water at the Base: When watering your plants, direct the water at the base near the stems. Avoid wetting the foliage excessively, as this can lead to fungal diseases and sunburn.
- Water in the Morning: It’s best to water your plants in the early morning when temperatures are cooler. This allows the plants sufficient time to dry off before nightfall, reducing the risk of fungal diseases.
- Avoid Overwatering: Overwatering is a common mistake. Ensure that the soil is evenly moist but not soggy. Overwatering can lead to root rot and other water-related problems.
- Use Your Environment as a Guide: Adjust your watering frequency based on the weather conditions and the needs of your plants. During hot and dry periods, you may need to water more frequently. In cooler and rainy weather, reduce watering frequency.
- Use a Watering Can or Drip System: Use a watering can with a fine nozzle or a drip irrigation system to provide a gentle and consistent water flow. This helps prevent soil erosion and ensures water reaches the roots effectively.
- Monitor Plant Responses: Pay attention to your plants for signs of both over- and under-watering. Wilting, yellowing leaves, and stunted growth can be indications of either problem. Adjust your watering accordingly.
- Consider Using a Watering Schedule: Establish a watering schedule based on your plants’ needs and the environmental conditions. Consistency is key to providing a stable moisture environment for your plants.
By employing proper watering techniques, you provide your plants with the right amount of moisture they need for healthy growth. Remember to be attentive to your plants’ needs and adjust your watering practices accordingly. With the right watering regimen, your plants will thrive in your large pots.
Fertilizing Tips
Fertilizing plays a crucial role in keeping your plants healthy and promoting robust growth when planting in large pots. Here are some important tips to consider when fertilizing your plants:
- Choose the Right Fertilizer: Select a fertilizer specifically formulated for container plants. Look for a balanced fertilizer with a ratio of nitrogen (N), phosphorus (P), and potassium (K). This balanced blend provides essential nutrients for overall plant health.
- Read and Follow Package Instructions: Each fertilizer will have specific instructions on how much to apply and how often. It’s important to read and follow these instructions carefully to avoid over- or under-fertilizing your plants.
- Fertilize Regularly: To provide a consistent supply of nutrients, fertilize your plants regularly throughout the growing season. Typically, fertilizing every 4-6 weeks is sufficient, but the frequency may vary depending on the fertilizer and the specific needs of your plants.
- Avoid Fertilizer Burn: Over-fertilizing can lead to fertilizer burn, which can damage or kill your plants. Always follow the recommended dosage and avoid applying fertilizer to dry soil or onto the plant’s foliage.
- Consider Slow-Release Fertilizers: Slow-release fertilizers provide a steady and controlled release of nutrients over an extended period. These can be especially beneficial for large pots, as they reduce the need for frequent fertilization.
- Supplement with Organic Matter: To enhance soil fertility and provide additional nutrients, consider incorporating organic matter into your potting mix. Compost, well-rotted manure, or organic fertilizers can help enrich the soil and nourish your plants naturally.
- Fertilize During Active Growth: Focus on fertilizing your plants during their active growth phases, typically in the spring and summer. This is when plants have increased nutrient demands and can benefit the most from fertilization.
- Monitor Plant Responses: Pay attention to how your plants respond to fertilization. Ensure they show signs of healthy growth, such as vibrant leaves, abundant blooms, and strong root development. Adjust your fertilization routine if necessary.
By following these fertilizing tips, you can provide your plants with the necessary nutrients for optimal growth and development. Remember to select the right fertilizer, follow instructions carefully, and monitor your plants’ responses to ensure they receive the balanced nutrition they need.
Planting and Arranging the Plants
Planting and arranging the plants in your large pots requires careful consideration to create an aesthetically pleasing and harmonious display. Here are some tips to help you plant and arrange your plants effectively:
- Plan the Arrangement: Before planting, envision how you want your pot to look. Consider the height, color, texture, and growth habit of each plant. Create a plan that ensures a balanced and visually appealing arrangement.
- Start with the Tallest Plants: Begin by placing the tallest plants towards the center or back of the pot. This creates a focal point and forms the backbone of your arrangement. Position the taller plants where they won’t shade or overshadow smaller plants.
- Consider Spacing: Allow enough space between each plant to accommodate their mature size. Overcrowding can lead to competition for resources and hinder proper growth. Follow spacing guidelines provided for each plant species.
- Vary Plant Heights and Shapes: Incorporate plants with varying heights, shapes, and textures to add depth and visual interest to your arrangement. Combine upright plants with cascading or trailing ones to create dynamic and layered displays.
- Group Plants with Similar Needs: Group plants with similar watering and sunlight requirements together. This makes it easier to maintain proper care and ensures all plants in the group thrive together.
- Consider Color Combinations: Choose plant combinations that create pleasing color harmonies. Consider contrasting colors, complementary shades, or monochromatic schemes to create visual impact. Incorporate foliage plants to add contrasting greens to flower-dominated arrangements.
- Plant at Proper Depths: When planting, ensure that plants are positioned at the same depth as they were in their nursery containers. Avoid planting too deep, as it can lead to root suffocation, or too shallow, which leaves roots exposed and vulnerable.
- Fill Gaps with Decorative Elements: If any gaps remain after planting, fill them with decorative elements such as small rocks, moss, or ornaments. This adds visual interest and completes the overall look of your arrangement.
By following these tips, you can plant and arrange your plants in a way that creates a visually stunning and cohesive display. Remember to consider the height, spacing, color, and needs of each plant to create a satisfying arrangement that showcases the beauty of your large pots.
Maintaining the Pot
To ensure the long-term health and beauty of your plants in large pots, proper maintenance is essential. Here are some important tasks to keep your pot in excellent condition:
- Regular Watering: Consistently monitor the moisture levels in the soil and water your plants as needed. Be mindful of changes in weather conditions, seasons, and the specific needs of your plants.
- Weeding: Regularly inspect your pot for weeds and remove them promptly. Weeds compete with your plants for nutrients, water, and sunlight, affecting their overall health and growth.
- Pruning and Deadheading: Prune your plants as needed to remove dead or damaged foliage or encourage a more compact shape. Deadhead flowers to prolong blooming and divert energy towards new growth.
- Fertilizing: Continue fertilizing your plants according to the recommended schedule or as indicated by their specific needs. Regular fertilization helps maintain the nutrient levels necessary for healthy growth and vibrant blooms.
- Pest and Disease Prevention: Monitor your plants for any signs of pests or diseases. Take immediate action if you notice any infestation or infection, such as applying organic or chemical treatments, or modifying environmental conditions.
- Monitoring Drainage: Regularly check the drainage of your pot. Ensure that the drainage holes are not blocked with roots or debris, and that water flows freely. Adjust the pot’s elevation if necessary to enhance drainage.
- Adjust Placement: As the seasons change, adjust the placement of your pot to ensure your plants are receiving the appropriate sunlight and protection from extreme weather conditions.
- Cleaning the Pot: Clean the pot periodically to remove dirt, algae, or any debris that may accumulate on the surface. Use mild soap and water or a dilute bleach solution for stubborn stains or algae growth.
- Winter Protection: Before the onset of winter, take precautions to protect your pot and plants from freezing temperatures. Move pots to sheltered areas or wrap them with insulating materials to prevent damage.
- Regular Inspections: Regularly inspect your plants for signs of stress, nutrient deficiencies, or any other issues. Being proactive allows you to address problems before they escalate and ensures the overall health and longevity of your plants.
By following these maintenance tasks, you can keep your pot in optimal condition and provide the care necessary for your plants to thrive. Regular attention and care will result in a beautiful, thriving, and healthy garden in your large pots.