Choosing the Right Window Box
A window box can add a touch of beauty and charm to any home. It’s the perfect way to display colorful flowers, herbs, or even small vegetables, and create a mini garden right outside your window. However, choosing the right window box is crucial for the success of your plants. Here are a few factors to consider when making your selection.
1. Size and Shape: Window boxes come in various sizes and shapes. Consider the available space on your window sill or railing and choose a box that fits well. Ensure it is wide and deep enough to accommodate the root systems of your chosen plants.
2. Material: Window boxes are made from different materials such as wood, plastic, metal, or fiberglass. Each material has its pros and cons. Wood boxes offer a rustic look but may require more maintenance. Plastic boxes are lightweight and easy to clean but can fade over time. Metal boxes can be durable but may rust if not properly coated. Fiberglass boxes are lightweight and weather resistant but can be expensive.
3. Drainage: Proper drainage is essential for the health of your plants. Look for a window box that has drainage holes or slots at the bottom to prevent water from accumulating and causing root rot.
4. Style: Choose a window box that complements the style of your home. Consider the color, texture, and design of the box to ensure it enhances the overall aesthetic appeal.
5. Maintenance: Consider how much time and effort you are willing to invest in maintaining the window box. Some materials require more upkeep than others. If you prefer low-maintenance options, choose a material that won’t require frequent staining, painting, or sealing.
6. Budget: Set a budget for your window box purchase. The cost can vary depending on the material, size, and design. Keep in mind that investing in a good quality box may save you money in the long run as it will last longer and provide better functionality.
By considering these factors, you can choose a window box that not only enhances the appearance of your home but also provides the right conditions for your plants to thrive. Take your time to research and browse through various options before making your final decision.
Selecting the Perfect Location
Choosing the right location for your window box is crucial to ensure the health and beauty of your plants. Here are some important factors to consider when selecting the perfect spot:
1. Sunlight: Most plants require a certain amount of sunlight to thrive. Before installing your window box, observe the amount of sunlight the area receives throughout the day. Full sun exposure means the location receives six or more hours of direct sunlight, while partial shade means it gets a few hours of direct sunlight with some shade during the rest of the day. Choose plants that are suitable for the available sunlight in your chosen location.
2. Accessibility: Consider how easily you can access your window box for watering, pruning, and maintenance. Make sure it’s within reach so that you can take care of your plants without any hassle. Avoid installing the box in areas that require climbing or stretching too far.
3. Protection from Elements: It’s important to protect your window box from extreme weather conditions. Avoid locations that are exposed to strong winds, as it can damage or knock over the box. Similarly, consider if the area receives excessive rainfall or is prone to flooding. If so, ensure that your window box has proper drainage to prevent waterlogging.
4. Aesthetics: The location of your window box should visually enhance your home’s exterior. Consider the architectural style and color scheme of your house. Choose a spot that complements the overall aesthetics and doesn’t obstruct any important features, such as windows or doors. Your window box should seamlessly blend in with the surrounding environment.
5. Weight Considerations: Before installing your window box, consider the weight it will add to your window sill or railing. Some materials, like soil and water, can become heavy when wet. Ensure that the chosen location can support the weight of a filled window box. If necessary, reinforce the structure or opt for lightweight materials.
6. Privacy and View: If you’re using a window box to add privacy or enhance your view, carefully choose the location. Consider the height and position of the window box to achieve the desired effect. For privacy, place the box at the desired eye level. For enhanced views, position the box to frame the best scenery.
By considering these factors, you can choose the perfect location for your window box and create a beautiful and functional display. Take your time to evaluate different areas and envision how your window box will enhance the overall aesthetics of your home.
Preparing the Window Box
Before you start planting, it’s essential to properly prepare your window box to create the optimal growing environment for your plants. Here are the necessary steps to get your window box ready:
1. Clean the Window Box: If you are reusing a window box from a previous season or have just purchased a new one, give it a good cleaning. Remove any debris, dirt, or old plant matter that may be stuck in the box. Use a brush or sponge and mild soap to clean both the inside and outside of the window box. Rinse thoroughly and allow it to dry completely.
2. Check for Damage: Inspect your window box for any signs of damage, such as cracks or rot. Repair or replace any damaged parts before proceeding. A structurally sound and sturdy window box is essential for long-term use.
3. Line the Window Box: To help retain moisture and prevent soil from directly contacting the walls of the box, consider lining the window box with a plastic liner or a layer of burlap. This lining will protect the integrity of the box and improve drainage.
4. Add Drainage Material: Place a layer of drainage material, such as gravel or broken pottery, at the bottom of the window box. This layer will help prevent water from pooling and causing root rot. It promotes adequate drainage and ensures healthier plants.
5. Fill with Quality Soil: Choose a high-quality potting mix or soil specifically formulated for container gardening. Fill the window box with the soil, leaving a few inches of space at the top to allow room for watering. Avoid using garden soil, as it can complicate drainage and contain unwanted pests or weed seeds.
6. Level and Firm the Soil: Use your hands or a trowel to level and gently firm the soil in the window box. Make sure it’s evenly spread and not too tightly packed. This step ensures proper root growth and prevents the soil from settling or shifting over time.
By properly preparing your window box, you’re setting a solid foundation for healthy plant growth. Taking the time to clean, inspect, line, and add drainage material will help create a favorable environment for your plants to thrive. Remember to choose the right soil mix and level it appropriately to ensure optimal growing conditions.
Choosing the Right Soil
When it comes to planting a window box, selecting the right soil is essential for the success and health of your plants. The soil provides the necessary nutrients, water retention, and aeration that plants need to thrive. Here are some factors to consider when choosing the right soil for your window box:
1. Lightweight and Well-Draining: Opt for a lightweight potting mix or soil that offers good drainage. Heavy or compacted soil can hinder root growth and lead to waterlogged conditions that are detrimental to plants. Look for soil that contains organic matter, such as perlite or vermiculite, which helps improve drainage.
2. Nutrient-Rich: The soil should have an adequate nutrient content to support plant growth. Look for a quality potting mix that includes nutrients like nitrogen, phosphorus, and potassium. You can also enrich the soil with organic matter, such as compost or well-rotted manure, to provide additional nutrients for your plants.
3. Moisture Retention: Consider the water retention capacity of the soil. Balancing moisture retention with proper drainage is crucial. The soil should be able to hold enough moisture for the plants’ needs without becoming waterlogged. Look for soil mixes that contain moisture-retaining additives, like peat moss or coconut coir, to help retain moisture.
4. pH Level: Check the pH level of the soil, as different plants have different pH preferences. Some plants thrive in acidic soil, while others prefer alkaline or neutral conditions. Ensure that the soil pH matches the requirements of the plant species you intend to grow in your window box.
5. Sterility: Using sterilized soil reduces the risk of pests, diseases, and weed seeds. Sterile soil minimizes the chances of unwanted organisms taking hold and causing damage to your plants. Look for soil mixes that are labeled as sterilized or pasteurized for added plant protection.
6. Sustainable and Eco-Friendly: Consider using organic or compost-based soil mixes that are eco-friendly and sustainable. These mixes are often free from harmful chemical additives and promote healthy soil biology. They not only benefit your plants but also contribute to a more sustainable gardening approach.
By selecting the right soil mix for your window box, you are laying the foundation for successful plant growth. Lightweight, well-draining, nutrient-rich soil with proper moisture retention and a suitable pH level will provide an ideal environment for your plants to thrive. Consider the specific needs of your plant species and aim for a sustainable, eco-friendly approach when choosing your soil.
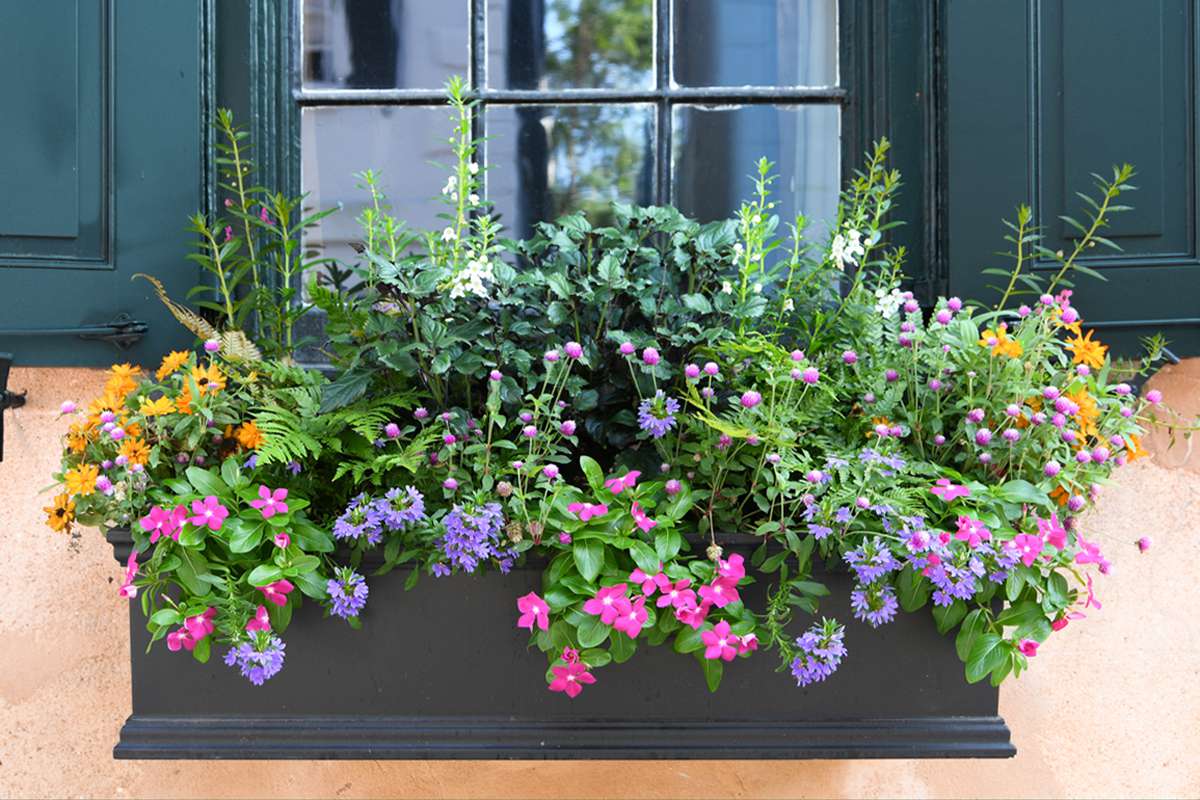
Selecting the Right Plants
Choosing the right plants for your window box is crucial to ensure a beautiful and thriving display. Consider the following factors when selecting the plants that will adorn your window box:
1. Sunlight Requirements: Assess the amount of sunlight your window box receives throughout the day. Choose plants that match the available sunlight levels. Some plants thrive in full sun, while others prefer partial shade. Matching your plants’ sunlight requirements with the conditions of your window box will promote healthy growth.
2. Size and Growth Habit: Consider the mature size and growth habit of the plants to ensure they will fit the window box and not overcrowd each other. Choose plants that stay compact or have a trailing or cascading habit, as they will create a visually pleasing arrangement. Pair taller plants with shorter ones to add depth and interest to your display.
3. Complementary Colors and Textures: Select plants with complementary colors and textures to create an appealing visual impact. Choose a combination of flowers and foliage plants that vary in shape, size, and texture. This will add depth and dimension to your window box and create a captivating display.
4. Seasonal Interest: Consider the seasons you wish to display your window box. Choose plants that will provide interest and color throughout the desired period. Select plants that bloom in different seasons or have foliage that changes colors throughout the year. This will ensure your window box remains appealing and vibrant with changing seasons.
5. Maintenance Requirements: Assess the level of maintenance you are willing to commit to. Some plants require more care and attention, while others are more low-maintenance. Consider factors such as watering needs, deadheading requirements, and susceptibility to pests and diseases. Choose plants that align with your available time and gardening preferences.
6. Suitability to Climate: Take into account your local climate and the conditions your window box will be exposed to. Select plants that are suitable for your climate zone and can withstand the temperature fluctuations, wind, and rainfall typical in your area. This will improve the chances of success and longevity of your window box display.
By considering these factors, you can choose a diverse and visually appealing selection of plants for your window box. Pairing plants with similar light requirements, considering their size and growth habit, and incorporating complementary colors and textures will create a stunning display. Additionally, selecting plants that provide seasonal interest and align with your maintenance preferences and local climate will help ensure a thriving and enjoyable window box garden.
Planting the Window Box
After selecting the right plants and preparing the window box, it’s time to start the actual planting process. Follow these steps to ensure successful planting in your window box:
1. Arrange Plants: Before planting, arrange the plants in the window box to determine the best placement. Consider the height, growth habit, and color combinations of the plants. Rearrange them until you are satisfied with the overall look and balance of the arrangement.
2. Fill with Soil: Fill the window box with the prepared soil, leaving enough space for proper watering and root growth. Gently firm the soil to eliminate any air pockets, taking care not to compact it too tightly.
3. Planting Depth: Dig small holes in the soil for each plant, ensuring the hole is deeper than the root ball. Place the plants in the holes, positioning them at the same depth they were growing in their original containers. Firmly press the soil around the roots to secure the plants in place.
4. Watering: After planting, thoroughly water the window box to settle the soil and ensure good root-to-soil contact. This will help the plants establish and reduce the risk of transplant shock. Water until you see water flowing out of the drainage holes at the bottom of the box.
5. Mulch: Consider adding a thin layer of mulch on top of the soil to help conserve moisture, suppress weed growth, and maintain a tidy appearance. Organic mulch, such as bark chips or straw, can be used for this purpose.
6. Pruning and Pinching: As the plants grow, regularly prune or pinch back any leggy or overgrown stems to maintain a compact and tidy appearance. This will also encourage bushier growth and promote more blooms.
7. Support for Climbing Plants: If you have chosen climbing or vine-type plants for your window box, provide support structures such as trellises or stakes for them to climb on. Proper support will help them grow vertically and prevent them from overpowering other plants in the box.
By following these steps, you can ensure a successful planting process for your window box. Pay attention to the arrangement, proper planting depth, watering, and pruning as your plants grow. With time and care, your window box will flourish and become a delightful focal point for your home.
Watering and Fertilizing
Proper watering and fertilizing are essential to keep your window box plants healthy and vibrant. Follow these guidelines to ensure your plants receive the necessary nutrients and moisture:
1. Watering: Regular and consistent watering is crucial for the success of your window box garden. Monitor the moisture level by inserting your finger about an inch into the soil. If it feels dry, it’s time to water. Water the box until you see water draining out of the bottom of the container. Avoid overwatering, as it can lead to root rot or other moisture-related issues.
2. Watering Frequency: The frequency of watering depends on various factors such as plant type, weather conditions, and the size of your window box. As a general rule, thoroughly water the window box when the top inch of the soil feels dry. In hot weather, you may need to water more frequently to prevent drying out.
3. Fertilizing: Regular fertilization is necessary to replenish the nutrients in the soil, as container plants can quickly deplete them. Apply a balanced, slow-release fertilizer or use a liquid fertilizer according to the product’s instructions. Start fertilizing about a month after planting and continue on a regular schedule throughout the growing season.
4. Fertilizer Type: Choose a fertilizer specifically formulated for container plants. Look for a balanced fertilizer that provides a mix of nitrogen, phosphorus, and potassium (N-P-K). This will promote healthy overall growth, strong root development, and abundant blooms.
5. Application Method: Follow the instructions on the fertilizer label for the appropriate application method. Slow-release granules can be sprinkled on the soil surface and mixed in lightly. Liquid fertilizers can be diluted in water and applied directly to the soil around the plants. Avoid getting the fertilizer on the leaves, as it can cause leaf burn.
6. Additional Nutrients: In addition to regular fertilization, consider providing additional nutrients to your plants throughout the growing season. Organic options like compost, fish emulsion, or seaweed extract can help enrich the soil and provide beneficial micronutrients.
By following proper watering and fertilizing practices, you can provide the necessary moisture and nutrients for your window box plants. Regular monitoring of soil moisture, timely watering, and appropriate fertilization will help your plants thrive and ensure a beautiful display throughout the growing season.
Providing Proper Drainage
Proper drainage is crucial for the health and well-being of your window box plants. Without adequate drainage, plants can suffer from root rot and other moisture-related issues. Here are some tips to ensure proper drainage in your window box:
1. Drainage Holes: Check if your window box already has drainage holes at the bottom. If not, use a drill to create several small holes evenly spaced along the box’s base. These holes allow excess water to escape, preventing water from pooling and causing root rot.
2. Drainage Material: Place a layer of drainage material, such as gravel or broken pottery shards, at the bottom of the window box. This layer helps to create an air gap between the soil and the drainage holes. It allows water to flow freely through the soil column, preventing it from becoming waterlogged.
3. Lining: Consider lining the inside of the window box with a permeable landscape fabric or a layer of burlap. This lining helps prevent soil from clogging the drainage holes while still allowing water to pass through. It also helps to protect the integrity of the box’s walls.
4. Soil Mix: Use a well-draining soil mix specifically designed for container gardening. Avoid using heavy garden soil, as it can trap excess moisture and impede proper drainage. A lightweight potting mix that contains organic matter, such as perlite or vermiculite, ensures adequate aeration and drainage for your plants.
5. Elevate the Box: If your window box is directly resting on a flat surface, consider elevating it slightly using small blocks or bricks. This allows water to flow freely from the drainage holes and helps prevent water from pooling around the box, which can lead to waterlogged soil.
6. Monitor Watering: Be mindful of your watering practices to prevent overwatering. Water the window box thoroughly, allowing water to freely drain from the bottom. Avoid letting the box sit in standing water, as this can lead to root rot. Adjust your watering schedule based on the requirements of your plants and the prevailing weather conditions.
By ensuring proper drainage in your window box, you provide a healthy growing environment for your plants. Good drainage allows excess water to escape, prevents waterlogged soil, and promotes healthy root development. Implement these practices to maintain optimal drainage for your window box plants.
Maintaining and Pruning
Maintaining and pruning your window box plants is essential to keep them healthy, attractive, and flourishing. Regular maintenance helps to promote growth, manage plant size, and prevent pest or disease issues. Here are some tips for maintaining and pruning your window box plants:
1. Regular Inspection: Take the time to regularly inspect your window box plants for any signs of pests, diseases, or nutrient deficiencies. Look for yellowing leaves, wilting, discoloration, or any unusual growth. Early detection allows for prompt treatment and ensures the optimum health of your plants.
2. Deadheading: Deadheading involves removing faded or spent flowers to encourage continuous blooms and prevent seed production. Pinch or snip off dead flowers just above a healthy set of leaves or a bud. Regular deadheading not only promotes new flower growth but also keeps the window box looking tidy and fresh.
3. Pruning: Pruning helps to maintain the shape and size of your plants and encourages bushier growth. Use clean and sharp pruning shears or scissors to trim back overgrown or leggy branches. Prune any damaged, diseased, or dead foliage or stems. Also, consider pruning to thin out crowded areas, providing better airflow and reducing the risk of disease.
4. Watering and Fertilizing: Continue to monitor the watering needs of your plants and adjust accordingly. Avoid overwatering, which can lead to root rot, and ensure that the soil remains moist but not waterlogged. Make sure to follow a regular fertilizing schedule to provide your plants with the necessary nutrients for healthy growth.
5. Weed Control: Regularly inspect your window box for any signs of weeds and promptly remove them. Weeds compete with your plants for nutrients and can hinder their growth. Gently pull out the weeds, making sure to remove the entire root system, to prevent them from regrowing.
6. Soil Maintenance: Occasionally refresh the soil in your window box by removing the top layer and replacing it with fresh potting mix. This helps to replenish nutrients, improves soil structure, and reduces the risk of soil-borne diseases.
7. Consider Seasonal Changes: Keep in mind that different seasons may require different maintenance practices. Adjust your watering, fertilizing, and pruning routines as the weather conditions and sunlight levels change throughout the year.
By regularly maintaining and pruning your window box plants, you promote their health, vitality, and longevity. From inspecting for pests and diseases to deadheading and pruning, these practices help ensure your window box remains an eye-catching and vibrant display of plants.
Dealing with Pests and Diseases
While it’s disheartening to discover pests or diseases in your window box, taking prompt action can help prevent further damage and save your plants. Here are some strategies for effectively dealing with pests and diseases:
1. Identify the Issue: First, accurately identify the pest or disease affecting your plants. Look for visible signs such as chewed leaves, discoloration, spots, or unusual growth patterns. Identifying the problem correctly allows you to choose the most appropriate treatment method.
2. Prevention is Key: Implement preventative measures to minimize the risk of pests and diseases. Start with healthy plants from reputable sources and avoid overcrowding your window box. Maintain proper watering and fertilizing practices while ensuring adequate airflow around the plants.
3. Natural Predators and Beneficial Insects: Encourage the presence of natural predators and beneficial insects in your garden. Ladybugs, lacewings, and praying mantises are voracious consumers of aphids and other pests. Consider introducing these beneficial insects or planting companion plants that attract them.
4. Organic Treatments: If pests or diseases persist, consider organic treatments. Neem oil, insecticidal soap, or horticultural oil are effective against aphids, scales, mealybugs, and spider mites. However, always follow the product instructions carefully and apply treatments only when necessary, as they can harm beneficial insects as well.
5. Chemical Treatments: As a last resort, if pests or diseases become severe and traditional methods fail, synthetic chemical treatments may be considered. However, exercise caution and strictly follow label instructions to protect yourself, your plants, and the environment. Be mindful of the potential negative impact on beneficial insects and pollinators.
6. Proper Sanitation: Regularly remove any dead or diseased plant material from your window box. This helps prevent the spread of diseases and breaks the breeding cycle of pests. Dispose of affected plant material appropriately, either by burning or sealing it in a bag and discarding it in the trash.
7. Crop Rotation: If diseases recur in your window box, practice crop rotation by replacing susceptible plant species with unrelated ones. This helps disrupt the life cycle of disease-causing organisms and reduces the build-up of pathogens in the soil.
8. Monitoring and Vigilance: Regularly monitor your window box plants for any signs of pests or diseases. Early detection allows for prompt intervention and treatment before the problem worsens. Be vigilant in checking both the foliage and the soil.
By implementing these strategies, you can effectively manage pests and diseases in your window box. Remember, prevention, early detection, and a combination of organic treatments and cultural practices are the key to maintaining healthy and thriving plants.