
Choosing the Right Wax
Choosing the right wax is crucial when it comes to making whipped candle wax. The type of wax you use will affect the texture, scent throw, and overall quality of your finished product. Here are some factors to consider when selecting the perfect wax for whipping:
- Type of Wax: There are various types of wax available in the market, including soy wax, paraffin wax, and beeswax. Each type has its own unique characteristics. Soy wax is known for its clean burn and excellent scent throw. Paraffin wax is widely used and provides a smooth and shiny finish. Beeswax is natural and adds a beautiful honey-like aroma to the candles.
- Melt Point: The melt point of the wax determines its firmness and how well it holds its shape. Higher melt-point waxes are more suitable for creating whipped candles as they stay firm and maintain their texture for longer periods. Opt for a wax with a melt point of around 125-130°F (51-54°C) for best results.
- Container Size: Consider the size and shape of the containers you plan to use for your whipped candles. If you’re using small containers, a softer wax that melts easily may be more suitable. For larger containers, a harder wax that holds its shape better is recommended.
- Additives: Some waxes come pre-blended with additives like stearic acid or vybar to enhance their performance. These additives can improve scent throw, color retention, and the overall appearance of the whipped wax. Check the product specifications or consult with the supplier to determine if any additives are included.
Remember, experimenting with different waxes is part of the fun when it comes to making whipped candle wax. Don’t be afraid to try out different types and combinations to find the perfect formula that suits your preferences and artistic vision.
Gathering the Materials
Before you begin making whipped candle wax, it’s important to gather all the necessary materials. Having everything prepared and within reach will help streamline the process and ensure a smooth candle-making experience. Here are the essential materials you’ll need:
- Wax: Of course, the main ingredient is the wax itself. Make sure you have enough wax to fill your desired number of containers. Use high-quality wax that is suitable for whipping.
- Fragrance Oil or Essential Oil: Select a fragrance oil or essential oil that complements your desired scent profile. Choose scents that are specifically formulated for candle-making to ensure proper scent throw.
- Coloring: If you want to add color to your whipped wax, consider using candle dye or dye blocks. These are specifically designed to be safely incorporated into wax and provide vibrant coloration.
- Mixing Tools: You will need heat-resistant utensils for mixing the wax, fragrance, and coloring. Wooden or silicone spatulas are ideal options as they do not conduct heat and are easy to clean.
- Heat Source: A heat source like a stove or a double boiler is necessary for melting the wax. Ensure that you have a safe and heat-resistant surface to work on.
- Thermometer: It’s essential to monitor the temperature of the wax throughout the process. A reliable thermometer will help you maintain the correct temperature range for whipping the wax.
- Containers and Wicks: Choose suitable containers for your whipped candles. Glass jars, tins, or ceramic containers work well. Additionally, select appropriate wicks that are compatible with the container size.
- Optional Additives: Depending on your preferences, you may also consider additional additives like texture enhancers, glitter, or botanical elements to add a creative touch to your whipped candles.
Having all the necessary materials before you start will save you time and make the candle-making process more enjoyable. Once you have everything together, you’ll be ready to move on to the next steps of preparing and whipping the wax.
Preparing the Wax
Before you can start whipping the wax, you need to properly prepare it. This involves melting the wax and ensuring it is at the right temperature for whipping. Here’s a step-by-step guide on how to prepare the wax:
- Weigh the Wax: Begin by accurately measuring the required amount of wax using a kitchen scale. This ensures you have the correct wax-to-additive ratio for optimal results.
- Melt the Wax: Use a double boiler or a wax melting pot to melt the wax. Place the desired amount of wax into the top pot of the double boiler or the melting pot. Heat the wax over low to medium heat, stirring occasionally to ensure even melting. Avoid overheating and maintain a safe temperature for the type of wax you are using.
- Monitor the Temperature: As the wax melts, use a thermometer to keep an eye on the temperature. Different waxes have different melting points, so it’s important to follow the instructions specific to the type of wax you are using. Typically, a temperature of around 180-185°F (82-85°C) is suitable for melting most waxes.
- Optional: Add Color or Fragrance: If you wish to add color or fragrance to your whipped wax, this is the time to do it. Carefully stir in the desired amount of candle dye or dye blocks for color, and fragrance oil or essential oil for scent. Mix well until the color and fragrance are evenly distributed throughout the melted wax.
- Allow the Wax to Cool: Once the color and fragrance are incorporated, let the melted wax cool down to the appropriate temperature for whipping. For most waxes, a temperature range of 120-130°F (49-54°C) is ideal. This allows the wax to thicken slightly, improving its consistency for whipping.
Properly preparing the wax sets the foundation for successful whipped candle-making. Take your time to melt the wax gently, monitor the temperature closely, and ensure that any color or fragrance is added evenly. With the wax now ready, it’s time to move on to the next step of whipping the wax to create the desired texture.
Adding Fragrance and Color
Adding fragrance and color to your whipped candle wax is a creative step that allows you to customize the appearance and scent of your candles. Here’s how you can add fragrance and color effectively:
- Fragrance Selection: Choose a fragrance oil or essential oil that aligns with your desired scent profile. Consider scents that complement the season, occasion, or personal preference. Be sure to use fragrance oils specifically formulated for candle-making, as they are designed to withstand the heat and provide optimal scent throw.
- Measuring: Accurate measurement of fragrance oil is crucial to achieve the desired scent strength. Follow the recommended fragrance load percentage for the particular wax type you are using. Generally, a fragrance load of 6-10% is recommended for most waxes, but it’s important to check the guidelines provided by the fragrance supplier or wax manufacturer.
- Incorporating the Fragrance: Wait until the melted wax has cooled to the appropriate temperature specified by the fragrance oil supplier. Typically, this temperature is around 120-130°F (49-54°C) to prevent the fragrance from evaporating. Add the measured fragrance oil to the melted wax and stir gently but thoroughly to ensure it is evenly distributed.
- Adding Color: If you desire colored whipped candle wax, it’s time to add the color. Use candle dye or dye blocks specifically designed for candles, as they are safe to use and provide vibrant shades. Start by adding a small amount of dye or a small piece of dye block to the melted wax and stir well. Gradually increase the amount of color until you achieve the desired shade, keeping in mind that a little goes a long way.
- Testing: Perform a small test by pouring a small amount of the colored and scented wax into a container. Allow it to cool and harden to assess the final color and scent throw. Adjust the fragrance or color as needed to achieve the desired result before moving on to the next steps.
By incorporating fragrance and color into your whipped candle wax, you can create a visually appealing and fragrant product. The key is to accurately measure and thoroughly mix the fragrance, and carefully add the color in small increments. Taking the time to experiment and fine-tune the scent and color will allow you to make candles that truly reflect your artistic vision.
Temperature Control
Temperature control plays a crucial role in the process of making whipped candle wax. Maintaining the correct temperatures at different stages ensures the desired texture, consistency, and overall quality of the finished product. Here’s a breakdown of the key temperature points to consider:
- Melting Temperature: When melting the wax, it’s important to do so at the appropriate temperature. Different types of wax have specific melting points, so follow the guidelines provided by the wax manufacturer. Generally, a temperature range of 180-185°F (82-85°C) is suitable for melting most waxes.
- Cooling Temperature: After adding fragrance and color, allow the melted wax to cool down to the proper temperature for whipping. For most waxes, a range of 120-130°F (49-54°C) is recommended. This temperature range allows the wax to thicken slightly, enhancing its consistency for whipping.
- Whipping Temperature: The ideal whipping temperature is around 95-100°F (35-38°C). At this temperature, the wax is pliable and easily whipped into a fluffy texture. Use a thermometer to monitor the wax temperature and make sure it’s within this range before proceeding.
- Container Filling Temperature: When filling the containers with the whipped wax, the temperature should be around 85-90°F (29-32°C). This temperature ensures that the whipped wax maintains its texture while being poured into the containers. It also helps to prevent the formation of air pockets and uneven surfaces.
- Setting Temperature: After filling the containers, allow the whipped wax to cool and set at room temperature. Avoid rapid temperature changes or exposure to extreme heat or cold, as this can impact the quality and longevity of the candles. Let the candles sit undisturbed until they are fully hardened and ready for use.
By carefully controlling the temperature at each stage, you can achieve whipped candle wax with the perfect texture, consistency, and appearance. Keep a close eye on the temperature throughout the process and make adjustments as necessary to ensure the best results.
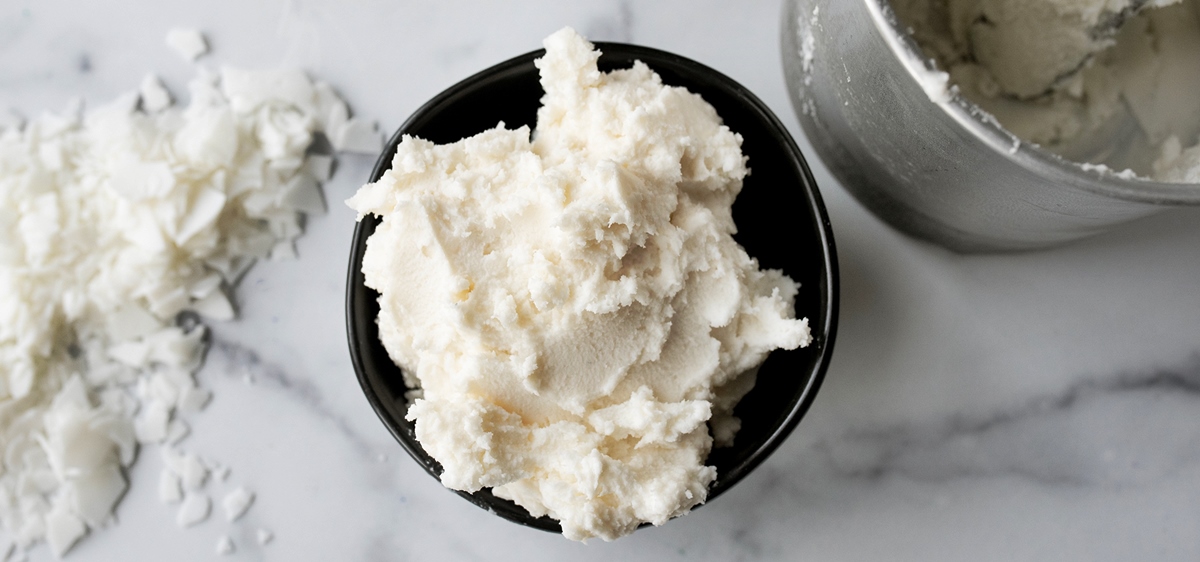
Whipping the Wax
Whipping the wax is the most exciting part of making whipped candle wax. This process transforms the melted wax into a light, airy, and visually appealing texture. Follow these steps to achieve the perfect whipped consistency:
- Stir and Cool: Begin by stirring the cooled melted wax to ensure it is smooth and free from any lumps or clumps. It’s important to work with cooled wax to avoid damaging the whipping equipment or overworking the wax.
- Choose the Right Equipment: Use an electric mixer or a hand whisk for whipping the wax. Ensure that the equipment is clean and dry before starting. It’s preferable to have a dedicated mixer or whisk specifically for candle-making to avoid any cross-contamination of scents or colors.
- Start Slowly: Begin whipping the wax at a low speed to prevent splattering. Gradually increase the speed to medium-high as the wax starts to thicken. Whipping at a high speed from the beginning may cause the wax to splatter and create a mess.
- Whip to Peaks: Continue whipping the wax until it reaches a peak-like consistency. Peaks should form and hold their shape when you lift the whisk or mixer out of the wax. This indicates that the wax has been adequately whipped and has a light and fluffy texture.
- Avoid Over-Whipping: Be careful not to over-whip the wax, as this can lead to a grainy texture or a collapse of the peaks. Keep a close eye on the consistency and stop whipping once you achieve the desired texture. Over-whipped wax can still be used, but it may not retain its shape or fluffiness as well.
Whipping the wax brings a unique and decorative element to your candles. The whipped texture not only looks visually pleasing but also adds an extra dimension to the overall candle experience. Experiment with different techniques and speeds to achieve various textures and create beautiful whipped candle wax designs.
Filling the Containers
Once you have whipped the wax to the desired texture, it’s time to fill the containers with the fluffy goodness. Here’s how you can effectively fill the containers with whipped candle wax:
- Prepare the Containers: Ensure that the containers you plan to use for your whipped candles are clean, dry, and at room temperature. Wipe them down if necessary to remove any dust or debris that might affect the appearance of the finished candles.
- Transfer the Whipped Wax: Scoop the whipped wax into a piping bag or a ziplock bag with a corner snipped off. This will make it easier to transfer the wax into the containers. Gently squeeze the bag to dispense the wax into the containers, filling them evenly to the desired level.
- Work in Small Batches: Depending on the size of your containers, it’s best to work in small batches to ensure consistent filling. This will allow you to control the amount of whipped wax going into each container and minimize any potential wastage.
- Tap and Level: After filling each container, gently tap them on a stable surface to help settle the wax and eliminate any air bubbles. If needed, use a spatula or the back of a spoon to level the wax surface for a smooth and even finish.
- Optional: Layering and Swirling: For added visual appeal and creativity, consider layering different colors of whipped wax or swirling contrasting colors together. To achieve this, fill the containers with one color, allow it to set, and then repeat the process with another colored batch of whipped wax.
- Wipe off Spills: If there are any spills or excess wax on the container rims or sides, wipe them off immediately with a clean cloth or paper towel. This will ensure a neat and professional-looking finished product.
Filling the containers with whipped wax requires a steady hand and attention to detail. Take your time to evenly distribute the whipped wax into each container and ensure a smooth, level surface. With the containers now filled, it’s time to let the candles cool and solidify before adding any finishing touches.
Cooling and Finishing Touches
After filling the containers with whipped candle wax, the final steps involve allowing the candles to cool and adding any desired finishing touches. Follow these guidelines to ensure the candles set properly and to add those extra special details:
- Cooling Process: Place the filled containers in a cool and undisturbed area to allow the whipped wax to solidify. Avoid moving or touching the candles during the cooling process to prevent any disruptions in the texture or appearance of the wax.
- Patience is Key: Be patient and allow the candles to cool and harden completely. The cooling time will vary depending on the size and thickness of the candles. It’s recommended to leave them untouched for at least 24 hours to ensure they have fully set.
- Trimming the Wicks: Once the candles have cooled and solidified, trim the wicks to a desirable length. Keep the wick trimmed to about ¼ inch to optimize the burning performance and minimize soot or excessive flame height.
- Labeling: Attach labels to each container, noting the fragrance and any other pertinent information. This not only adds a professional touch but also helps you and others remember the specific details of each candle.
- Decorative Accents: To add a personal touch, consider adding decorative accents to your whipped candles. This could include ribbons, charms, dried flowers, or other embellishments that enhance the visual appeal of the candles. Be mindful of flammable materials, ensuring they are positioned away from the flame during burning.
- Package and Store: If you plan to give or sell your whipped candles, consider packaging them in a way that protects them and showcases their beauty. Gift boxes, organza bags, or attractive containers can be used to present the candles in an appealing manner. Store the candles in a cool, dry place away from direct sunlight to preserve their quality.
Cooling and adding finishing touches to your whipped candles are the final steps in the candle-making process. Take the time to let the candles cool fully, and then carefully trim the wicks and add any additional decorative elements. Packaging and storing your whipped candles properly will ensure that they remain visually stunning and ready for enjoyment or gifting.