
Materials Needed
To make a simple water filter, you will need the following materials:
- A clean, empty plastic bottle or container with a lid: This will serve as the main body of your water filter. Choose a container that is large enough to hold a sufficient amount of water.
- A drill or a knife: You will need a tool to create holes in the bottle or container.
- Activated carbon or charcoal: This will be the primary filtering material that helps to remove impurities and odors from the water.
- Gravel or small rocks: These will act as a layer to prevent the charcoal from escaping and help with the filtration process.
- Sand: Clean sand helps to trap smaller particles and further purify the water.
- Cotton or cheesecloth: This will act as a final layer to prevent any remaining impurities from passing through.
- A source of water: You will need water to test and filter. It’s best to use tap water or non-potable water for testing purposes.
- A clean container for filtered water: This will be used to collect the filtered water that comes out of the filter.
These are the basic materials required to create a simple water filter. However, you can also consider additional supplies such as rubber bands, hose, or tubing to improve the functionality and ease of use of your filter. It’s important to ensure that all the materials you use are clean and free from contaminants to avoid further contamination of the water.
Step 1: Gather the Necessary Tools
Before you begin constructing your water filter, it’s important to gather all the necessary tools. Here are the tools you will need:
- A clean, empty plastic bottle or container with a lid: Choose a container that is large enough to hold the desired amount of water that you want to filter.
- A drill or a knife: You will need a tool to create small holes in the bottle or container for water flow.
- Activated carbon or charcoal: This will be the main filtering material that helps to remove impurities and odors from the water.
- Gravel or small rocks: These will act as a layer to prevent the charcoal from escaping while allowing water to pass through.
- Sand: Clean sand helps to trap smaller particles and further purify the water.
- Cotton or cheesecloth: This will act as a final layer to prevent any remaining impurities from passing through.
- A source of water: It’s best to use tap water or non-potable water for testing purposes.
- A clean container for filtered water: This will be used to collect the filtered water that comes out of the filter.
Once you have gathered these tools, you are ready to move on to the next step of preparing the filtering materials. Make sure that the bottle or container you use is clean and free from any residues to ensure the purity of the filtered water.
Step 2: Prepare the Filtering Materials
After gathering the necessary tools, it’s time to prepare the filtering materials for your water filter. Here’s how to do it:
- Activated carbon or charcoal: If you don’t have activated carbon, you can use regular charcoal that doesn’t contain any additives or chemicals. Rinse the carbon or charcoal thoroughly to remove any dust or residue.
- Gravel or small rocks: Clean the gravel or small rocks with water to remove any dirt or debris.
- Sand: Similarly, rinse the sand to ensure it is free from impurities.
- Cotton or cheesecloth: Cut a piece of cotton or cheesecloth into a size that can cover the opening of your bottle or container.
Set aside the prepared materials in separate containers or bowls to keep them organized during the next steps of constructing the filter.
It’s important to note that the quantities of filtering materials may vary based on the size of your bottle or container. The ratio of each material will depend on personal preference and the water quality you are dealing with. However, a general guideline to follow is to have approximately equal layers of activated carbon, gravel, and sand, with the cotton or cheesecloth serving as the final layer.
With the filtering materials prepared, you are now ready to move on to the next step of creating the filtering system for your homemade water filter.
Step 3: Create the Filtering System
Now that you have all the materials prepared, it’s time to create the filtering system for your water filter. Follow these steps:
- Take the clean, empty plastic bottle or container and remove the lid.
- Using a drill or a knife, create small holes near the bottom of the container. These holes will allow the filtered water to flow out.
- Place a layer of cotton or cheesecloth over the mouth of the container. Secure it in place using a rubber band or by tightly wrapping it around the opening.
- Next, add a layer of activated carbon or charcoal on top of the cotton or cheesecloth. Spread it evenly to create a uniform layer.
- Follow it with a layer of clean gravel or small rocks. This layer will help prevent the carbon or charcoal from escaping while facilitating water flow.
- Finally, add a layer of clean sand on top of the gravel. This layer will further filter the water by trapping smaller particles.
Make sure to pack each layer tightly to prevent any gaps that could allow unfiltered water to pass through. It’s important to create a sturdy and secure filtering system to ensure effective filtration.
Once you have completed constructing the filtering system, your homemade water filter is taking shape. In the next step, you will learn how to set up the water filtering equipment for use.
Step 4: Set Up the Water Filtering Equipment
Now that you have created the filtering system, it’s time to set up the water filtering equipment. Follow these steps:
- Take the prepared filtering system and carefully place it inside the plastic bottle or container. Make sure it fits securely and occupies the majority of the space.
- Position the bottle or container in a stable and elevated position, such as on a table or a stand. This will allow the filtered water to flow out smoothly.
- Place a clean container or pitcher beneath the bottle or container to collect the filtered water.
- Slowly pour the water you want to filter into the bottle or container. It will flow through the filtering system and collect in the container below.
- Allow the filtered water to accumulate in the container, monitoring the flow rate and the level of the water.
It’s important to note that the flow rate may vary based on factors such as the size of the holes in the container and the density of the filtering materials. If the water is taking too long to filter, you can gently tap or shake the container to encourage better water flow.
Remember, this is a simple water filter that is best suited for filtering small quantities of water for personal use. It may not be suitable for filtering large volumes of water or removing certain types of contaminants. Therefore, it’s recommended to use this filter for non-potable water or as a temporary solution.
In the next step, you will learn how to test the effectiveness of your homemade water filter.
Step 5: Test the Water Filter
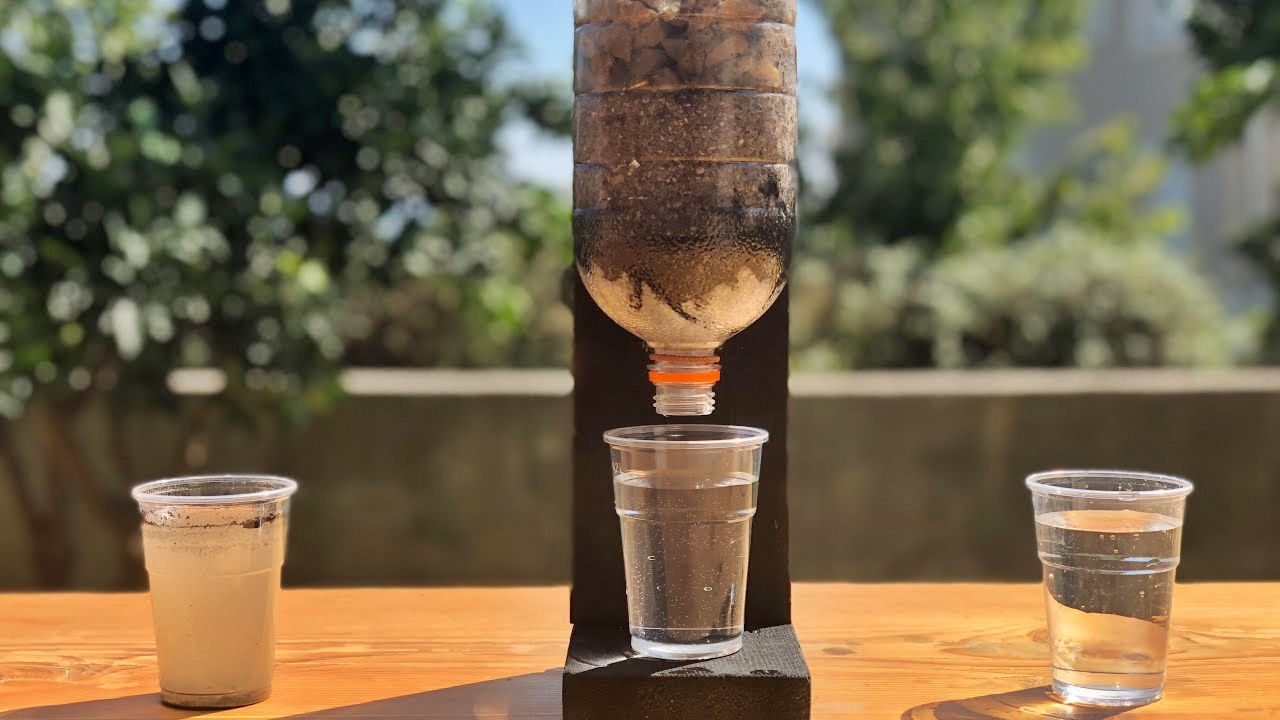
After setting up the water filtering equipment, it’s important to test the effectiveness of your homemade water filter. Follow these steps:
- Collect a sample of water that you want to test. This can be tap water or non-potable water.
- Pour the collected water into the top of the filtering system.
- Observe the flow of water through the filter. Take note of any visible impurities or particles that are being trapped by the filtering materials.
- Collect the filtered water in a separate container and compare it to the untreated water sample.
- Inspect the clarity and odor of the filtered water. If it appears clearer and has a reduced or eliminated odor, your water filter is effectively removing impurities.
It’s important to remember that homemade water filters may not remove all types of contaminants. They are primarily designed for basic filtration and may not eliminate harmful bacteria, viruses, or heavy metals. If you have concerns about the quality of your water, it’s advisable to seek alternative water purification methods or consult with a water treatment professional.
Testing the effectiveness of your water filter will give you confidence in its performance and allow you to make any necessary adjustments or improvements if needed.
In the next step, you will learn how to properly maintain your water filter to ensure its longevity and optimal performance.
Step 6: Maintain the Water Filter
Maintaining your water filter is crucial to ensure its longevity and optimal performance. By following these steps, you can keep your filter in good condition:
- Regularly clean the filtering system: After each use, disassemble the filter and rinse each component thoroughly. Remove any trapped debris or particles and scrub away any residue using a soft brush or cloth.
- Replace the filtering materials: Over time, the activated carbon, gravel, sand, and cotton or cheesecloth will become less effective due to accumulation or clogging. Replace these materials periodically to maintain the filter’s efficiency.
- Inspect the filter for any damages: Check for any cracks, leaks, or signs of wear and tear. If any parts of the filter are damaged, repair or replace them promptly to ensure proper functioning.
- Store the filter properly: When not in use, store the filter in a clean and dry place to prevent the growth of mold or mildew. Make sure the filter is completely dry before storing to avoid any unpleasant odors or bacterial growth.
- Monitor the flow rate: Over time, the flow rate of the filtered water may decrease due to clogged or compacted filtering materials. If you notice a significant decrease in flow rate, it’s time to clean or replace the filtering materials.
By regularly maintaining your water filter, you can enjoy clean and filtered water for a longer period of time. Proper care and attention to your filter will also ensure that it continues to work effectively in removing impurities from the water.
In the final step, you will learn how to troubleshoot common issues that may arise with your homemade water filter.
Step 7: Troubleshooting Common Issues
While using your homemade water filter, you may encounter some common issues that can affect its performance. Here are some troubleshooting tips to address these problems:
- Slow flow rate: If the water is filtering too slowly, it may be due to clogged filtering materials. Disassemble the filter and clean or replace the activated carbon, gravel, and sand to improve the flow rate.
- Water leakage: If you notice any water leaking from the filter, check for any cracks or damages in the container or lid. Repair or replace any damaged parts to prevent water leakage.
- Foul odor: If the filtered water has an unpleasant smell, it could be a sign that the filtering materials need to be replaced. Also, check the cleanliness of the container and lid to eliminate any odor-causing bacteria or mold.
- Poor filtration: If the filter is not effectively removing impurities or particles from the water, consider adjusting the layering of the filtering materials. Ensure that each layer is packed tightly to prevent bypassing of unfiltered water.
- Excessive residue: If you notice excessive residue or particles in the filtered water, it could indicate that the filtering materials are not effectively trapping them. Double-check the layering and amount of activated carbon, gravel, and sand to improve filtration.
By addressing these common issues and performing regular maintenance, you can troubleshoot and resolve any problems that may arise with your homemade water filter. If the issues persist or you suspect significant contamination in the water, it is recommended to seek professional assistance or consider alternative filtration methods.
Now that you have completed all the steps and learned how to troubleshoot common issues, you can confidently enjoy the benefits of using your homemade water filter.