
Benefits of Homemade Plant Food
Feeding your plants with homemade plant food is not only a cost-effective solution but also offers several benefits that can contribute to the overall health and growth of your plants. Here are some of the key advantages of using homemade plant food:
1. Cost-effective: One of the primary benefits of creating your own plant food is that it is much more affordable compared to store-bought options. The ingredients used in homemade plant food are often readily available and inexpensive, making it a budget-friendly choice for gardeners.
2. Environmentally friendly: Homemade plant food recipes often utilize organic materials such as kitchen scraps, coffee grounds, and eggshells. By repurposing these waste products, you are reducing your ecological footprint and minimizing the amount of waste that ends up in landfills.
3. Customizable nutrient mix: When you make your own plant food, you have the flexibility to customize the nutrient content to suit the specific needs of your plants. Different plant varieties require different levels of nutrients, and homemade plant food allows you to tailor the formula accordingly.
4. Improved soil fertility: Homemade plant food can enhance the fertility of your soil, promoting healthier root development and nutrient absorption. By nourishing the soil with organic ingredients, you are creating a nutrient-rich environment that supports optimal plant growth.
5. Reduced chemical exposure: Commercial plant food products often contain synthetic chemicals and additives that may have negative effects on both plants and the environment. By using homemade plant food, you have better control over the ingredients, ensuring a natural and chemical-free solution.
6. Enhanced plant health: Homemade plant food provides essential nutrients that plants need for their overall health and vitality. The organic ingredients used in homemade plant food supply a wide range of micronutrients and trace elements that are beneficial for robust plant growth, disease resistance, and flower/fruit production.
7. Sustainable gardening approach: Making your own plant food aligns with the principles of sustainable gardening. It encourages resourcefulness, reusing materials, and reducing dependency on commercially produced fertilizers, contributing to a greener and more environmentally conscious gardening practice.
Incorporating homemade plant food into your gardening routine can have significant benefits for both your plants and the planet. Not only does it save you money, but it also allows you to have more control over what goes into your plants and helps create a more sustainable and eco-friendly garden. So, why not give it a try and see the positive impact it can have on your plants’ growth and overall well-being?
Choosing the Right Ingredients for Plant Food
When it comes to making homemade plant food, selecting the right ingredients is crucial for providing the necessary nutrients to your plants. Here are some factors to consider when choosing ingredients for your plant food:
1. Nutrient requirements: Different plants have varying nutrient needs. Before selecting ingredients, it’s important to identify the specific nutrients your plants require for healthy growth. For example, leafy greens may benefit from nitrogen-rich ingredients, while flowering plants might need more phosphorus and potassium.
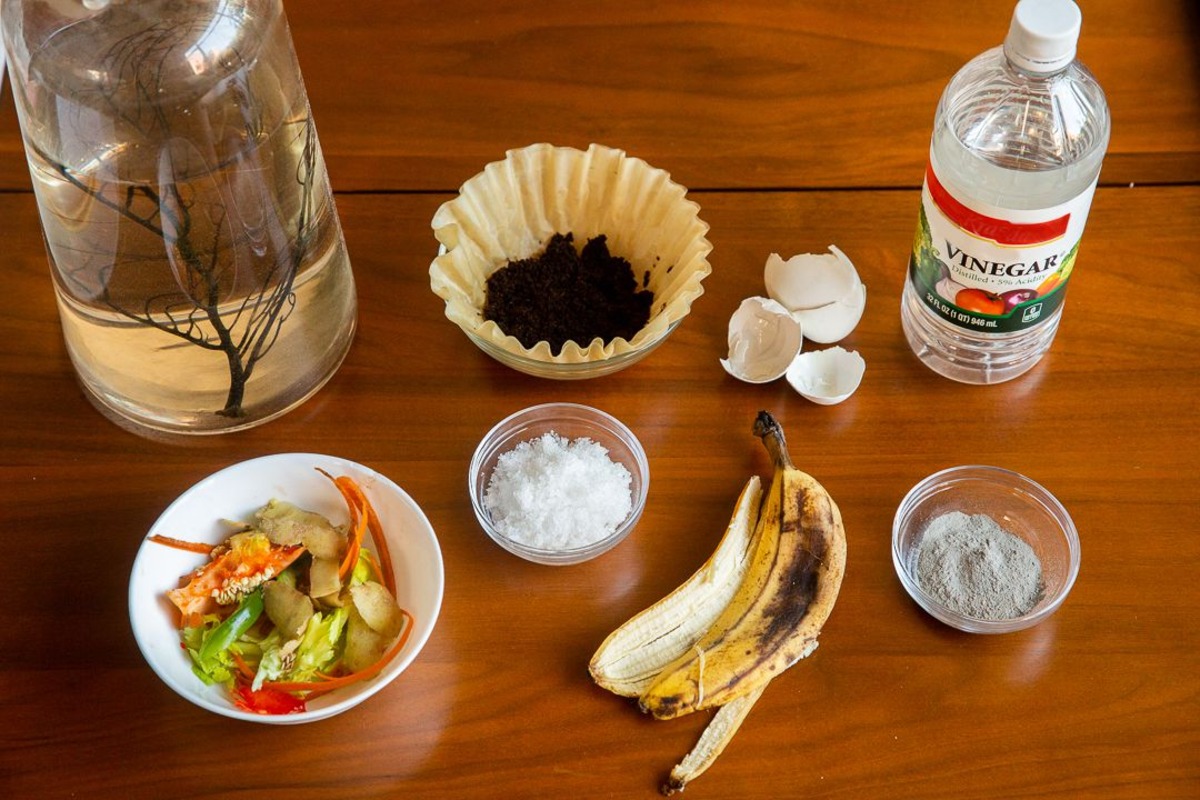
2. Organic materials: Opt for organic materials that are rich in nutrients. Consider using kitchen scraps, such as fruit and vegetable peels, which contain essential vitamins and minerals. Coffee grounds provide nitrogen, while crushed eggshells and bones are excellent sources of calcium.
3. Availability: Look for ingredients that are readily available in your kitchen or garden. Recycling kitchen waste, such as coffee grounds or vegetable scraps, not only saves money but also reduces food waste.
4. Compatibility: Ensure that the ingredients you choose are compatible with your plants. Some plants may be sensitive to certain substances. For instance, avoid using citrus peels or acidic ingredients on plants that prefer alkaline soil.
5. Balanced nutrients: Aim for a well-rounded nutrient mix in your homemade plant food. Include ingredients that provide a good balance of essential nutrients, including nitrogen, phosphorus, potassium, and trace minerals like iron, magnesium, and zinc.
6. Avoid chemicals and additives: Keep your plant food free from harmful chemicals and additives. Use organic ingredients to ensure a natural and chemical-free solution for your plants. Avoid ingredients that may contain pesticides or preservatives.
7. Experimentation and observation: Don’t be afraid to experiment with different ingredients and recipes. Keep track of the results and observe how your plants respond to the homemade plant food. This will help you fine-tune the nutrient mix for optimal plant growth.
Remember, the key to choosing the right ingredients for your homemade plant food is to provide a balanced and nutrient-rich blend that meets the specific needs of your plants. By understanding the nutrient requirements of different plants and being mindful of the ingredients you use, you can create a personalized plant food recipe that promotes healthy growth and flourishing plants.
Organic Plant Food Recipes
Making your own organic plant food is a great way to nourish your plants naturally and promote their growth and vitality. Here are some simple and effective homemade plant food recipes you can try:
1. Banana Peel Plant Food: Save your banana peels and use them to create a nutrient-rich plant food. Cut the peels into small pieces and soak them in water for a few days. Strain the liquid and dilute it with water. Use this banana peel solution to water your plants, providing them with potassium and other beneficial nutrients.
2. Coffee Ground Plant Food: Coffee grounds are an excellent source of nitrogen. Collect your used coffee grounds and mix them with water. Let the mixture sit for a day or two, then strain it. Dilute the resulting liquid with water and use it to water your plants. Coffee ground plant food can help promote healthy foliage growth.
3. Eggshell Plant Food: Eggshells are rich in calcium, which plays a crucial role in plant growth. Crush the eggshells into small pieces and mix them with water in a container. Let the mixture steep for a week, occasionally stirring it. Strain the liquid and use it to water your plants. The calcium-rich solution will help strengthen their stems and promote overall plant health.
4. Vegetable Scrap Plant Food: Don’t throw away those vegetable scraps! Collect vegetable peels, ends, and other scraps and place them in a container. Add water and let the scraps ferment for a few weeks. Strain the resulting liquid and dilute it with water. Use this nutrient-rich solution to fertilize your plants, providing them with essential vitamins and minerals.
5. Alcohol-Based Plant Food: Alcohol-based plant food can stimulate root growth and enhance overall plant health. Mix one part alcohol (such as beer or wine) with ten parts water. Use this diluted solution to water your plants once a month. The alcohol content provides a source of nutrients and promotes robust root development.
6. Seaweed Plant Food: Seaweed is packed with nutrients and trace minerals that can benefit your plants. Mix a handful of dried seaweed with water in a container and let it soak for a few days. Strain the liquid and dilute it with water. Use this seaweed solution to nourish your plants, promoting healthy growth and increased resistance to stress.
7. Epsom Salt Plant Food: Epsom salt is a great source of magnesium, which helps improve nutrient absorption and promotes chlorophyll production. Dissolve one tablespoon of Epsom salt in a gallon of water and use it to water your plants. This solution is especially beneficial for flowering plants and vegetables.
8. Compost Tea: Compost tea is a great all-around plant food that provides a boost of nutrients to your plants. Place compost in a breathable bag or container and steep it in water for a few days. Strain the liquid and use it to water your plants. Compost tea adds beneficial microorganisms and nutrients to the soil, enhancing overall plant health.
These organic plant food recipes offer simple and effective ways to provide your plants with the nutrients they need to thrive. Remember to test each recipe on a small scale and observe how your plants respond. Enjoy the satisfaction of knowing that you are nourishing your plants naturally and contributing to a healthier, more sustainable garden.
Recipe 1: Banana Peel Plant Food
Banana peels are not only a tasty treat for us, but they also offer numerous benefits for our plants. Rich in potassium, magnesium, and other essential nutrients, banana peels can be transformed into a nutrient-rich plant food with just a few simple steps.
Ingredients:
- 3-4 ripe banana peels
- 1 gallon of water
Instructions:
- Collect 3-4 ripe banana peels.
- Cut the peels into small pieces to speed up decomposition.
- Place the banana peel pieces in a large container or bucket.
- Add 1 gallon of water to the container, ensuring that the peels are fully immersed.
- Cover the container and let it sit for 3-7 days to allow the nutrients to leach out into the water.
- Stir the mixture occasionally to aid the decomposition process.
- After the designated time has passed, strain the liquid to separate the plant food from the banana peel remnants.
- Dilute the strained liquid by combining it with an equal amount of water.
- Your homemade banana peel plant food is now ready to use!
Application:
Water your plants with the diluted banana peel solution. Apply the plant food to the soil around the base of the plants, ensuring it reaches the root zone. It’s best to do this early in the morning or late in the day to minimize evaporation.
Tips:
- You can store the homemade banana peel plant food in a sealed container for up to a week before using it.
- Apply the plant food every 2-4 weeks during the growing season to provide continuous nourishment to your plants.
- Vary the concentration of the solution based on the plant’s needs and response. Start with a diluted mixture and increase the concentration gradually.
Banana peel plant food is an excellent organic option for providing essential nutrients to your plants. As the peels decompose, they release potassium and other beneficial minerals that promote healthy plant growth, improve root development, and enhance overall plant vigor.
Next time you enjoy a banana, don’t discard the peel! Transform it into a nutrient-packed plant food that will contribute to the success and vitality of your garden.
Recipe 2: Coffee Ground Plant Food
Do you love your morning cup of coffee? Well, don’t toss those used coffee grounds into the trash! They can be repurposed into a nutrient-rich plant food that your plants will love. Coffee grounds are an excellent source of nitrogen, which promotes healthy foliage growth and overall plant development.
Ingredients:
- Used coffee grounds
- Water
Instructions:
- Collect the used coffee grounds from your coffee maker or filter.
- Spread the coffee grounds out on a flat surface to dry. This step is optional but can help prevent the grounds from molding during storage.
- Once the coffee grounds are dry, transfer them to an airtight container for storage until you’re ready to use them.
Application:
There are two main methods for using coffee grounds as plant food:
- Top Dressing: Sprinkle a handful of coffee grounds around the base of your plants, avoiding direct contact with the stems. Gently work the coffee grounds into the top layer of soil and water as usual. This method provides a slow release of nutrients as the coffee grounds break down gradually.
- Coffee Ground “Tea”: Fill a bucket or watering can with water, then add a generous amount of coffee grounds. Let the mixture steep for at least 24 hours or up to a week, stirring occasionally. Strain the liquid to remove the coffee grounds, and use the resulting “tea” to water your plants. This method provides a more concentrated dose of nutrients and can be applied once every 2-4 weeks.
Tips:
- Use coffee grounds in moderation. While they are beneficial, excessive use can lead to acidic soil conditions, which may not be ideal for all plants.
- Combine coffee grounds with other organic materials, such as compost or dried leaves, to create a well-balanced plant food mix.
- If you don’t drink coffee, many coffee shops give away their used coffee grounds for free, so you can still take advantage of this nutrient-rich resource.
By repurposing your used coffee grounds as plant food, you’re not only providing valuable nutrients to your plants but also reducing waste and promoting a sustainable gardening practice. So, save those coffee grounds and let them work their magic to nourish your plants and keep them thriving!
Recipe 3: Eggshell Plant Food
Did you know that eggshells can be transformed into a nutrient-rich plant food? Packed with calcium and other essential minerals, eggshells can provide a natural boost for your plants’ growth and overall health. Plus, making eggshell plant food is incredibly easy and cost-effective.
Ingredients:
- Eggshells (collected from your kitchen)
- Water
Instructions:
- Start by collecting and rinsing the eggshells from your kitchen. Remove any residual egg white or membrane.
- Allow the eggshells to dry thoroughly. You can let them air dry for a day or place them in a low-temperature oven for a few minutes to speed up the process.
- Once the eggshells are dry, crush them into small pieces. You can use a mortar and pestle, a rolling pin, or simply crush them with your hands.
- Transfer the crushed eggshells into a jar or container that has a lid.
- Fill the container with water until the eggshells are completely submerged.
- Seal the container with a lid and let it sit for a week. During this time, the water will gradually absorb the calcium and other minerals from the eggshells.
- After a week, strain the liquid to separate the eggshell remnants and collect the nutrient-rich plant food.
Application:
Use the strained eggshell liquid as a natural plant food for your plants. This can be done by either spraying it directly onto the leaves or pouring it into the soil around the base of the plants.
Tips:
- Start with a small amount of eggshell plant food, especially for delicate or sensitive plants, and gradually increase the concentration as you observe their response.
- Apply the eggshell plant food every two weeks during the growing season to provide a continuous supply of nutrients.
- You can also add crushed eggshells directly to the soil as a natural source of calcium. Simply sprinkle them around the base of your plants.
- If you prefer a powdered form of eggshell plant food, you can grind the dry eggshells into a fine powder using a blender or food processor.
By repurposing your eggshells into plant food, you are providing essential minerals, particularly calcium, to your plants. This helps strengthen their cell walls, promote proper nutrient absorption, and support overall plant growth and development. So, save those eggshells from the kitchen and give your plants the natural boost they deserve!
Recipe 4: Vegetable Scrap Plant Food
Do you often find yourself with leftover vegetable scraps after preparing meals? Don’t throw them away! Instead, transform those kitchen scraps into a nutrient-rich plant food that will benefit your plants. Vegetable scraps are packed with vitamins and minerals, making them an excellent resource for homemade plant food.
Ingredients:
- Assorted vegetable scraps (such as carrot tops, onion skins, celery leaves, and other unused parts)
- Water
Instructions:
- Collect a variety of vegetable scraps from your kitchen. Ensure that they are clean and free of any oils, sauces, or seasonings.
- Chop or tear the vegetable scraps into smaller pieces. This will help speed up the decomposition process and make it easier to extract the nutrients.
- Place the vegetable scraps in a large container or bucket.
- Add enough water to submerge the vegetable scraps fully.
- Stir the mixture well to ensure even distribution of the scraps.
- Cover the container and let it sit at room temperature for 2-4 weeks. Stir the mixture every few days to aerate it and aid decomposition.
- After the designated time has passed, strain the liquid to separate the plant food from the solid remnants.
- Dilute the strained liquid by mixing it with an equal amount of water.
- Your homemade vegetable scrap plant food is now ready to use!
Application:
Water your plants with the diluted vegetable scrap solution. Apply the plant food to the soil around the base of the plants, making sure it reaches the root zone. Avoid direct contact with the plant foliage. Repeat the application every 2-4 weeks during the growing season.
Tips:
- While any vegetable scraps can be used, avoid using those from plants that have been treated with pesticides or herbicides.
- If you have an abundance of vegetable scraps, you can create larger batches of plant food by scaling up the ingredients accordingly.
- For added nutritional benefits, mix in other organic materials, such as coffee grounds or crushed eggshells, to create a well-rounded plant food mix.
By repurposing your vegetable scraps into plant food, you’re reducing waste and providing valuable nutrients to your plants. This natural and cost-effective solution not only benefits your garden, but it also promotes sustainable and eco-friendly gardening practices. So, embrace the potential of your kitchen scraps and give your plants a nutrient boost they’ll love!
Recipe 5: Alcohol-Based Plant Food
Believe it or not, alcohol-based plant food can provide a beneficial boost to your plants’ growth and overall health. The alcohol content helps stimulate root development and enhances nutrient absorption, resulting in healthier and more vigorous plants. You can easily create your own alcohol-based plant food using common alcoholic beverages.
Ingredients:
- Any alcoholic beverage (such as beer or wine)
- Water
Instructions:
- Choose a beer or wine that is not carbonated and doesn’t contain added sugars, flavors, or high alcohol content.
- In a container, mix one part of the chosen alcoholic beverage with ten parts of water. For example, if you use one cup of beer, mix it with ten cups of water.
- Stir the mixture well to achieve a homogeneous consistency.
Application:
Use the diluted alcohol-based plant food to water your plants. Apply the solution to the soil around the base of the plants, ensuring it reaches the root zone. It’s best to do this in the morning or evening when the sun is not at its peak.
Tips:
- Use alcohol-based plant food sparingly, as excessive use can negatively impact plant growth and health.
- Apply alcohol-based plant food once a month during the growing season to provide a periodic nutrient boost.
- If you have access to homemade fermented liquids, such as homemade wine or beer, you can use them as plant food as well.
Alcohol-based plant food can be a beneficial addition to your gardening routine. The alcohol acts as a catalyst for root development and nutrient absorption, contributing to healthier and more robust plants. So, raise a glass to your plants and give them a natural boost with this alcohol-based plant food!
Recipe 6: Seaweed Plant Food
Seaweed is a fantastic natural resource that offers a wide range of benefits for your plants. Packed with trace minerals, amino acids, and growth-promoting hormones, seaweed can be transformed into a nutrient-rich plant food that helps plants thrive. Whether you have access to fresh seaweed or dried seaweed, making seaweed plant food is simple and effective.
Ingredients:
- Fresh seaweed or dried seaweed
- Water
Instructions:
- If you’re harvesting fresh seaweed, ensure that you collect it from a clean, unpolluted source. Rinse the seaweed well to remove any sand or debris.
- If using dried seaweed, you can find it at garden centers or natural food stores.
- If using fresh seaweed, chop it into smaller pieces to aid decomposition and extraction of nutrients.
- Place the seaweed in a bucket or container, filling it about halfway.
- Add water to submerge the seaweed fully. The water-to-seaweed ratio should be approximately 1:1.
- Allow the seaweed to steep in the water for a few days, stirring the mixture occasionally.
- After a few days, strain the liquid from the seaweed, separating the liquid from the solid seaweed remnants. Compost the seaweed or use it as mulch.
- Dilute the strained liquid with water, using a 1:1 ratio, before applying it to your plants.
Application:
Use the diluted seaweed solution to water your plants. Apply it to the soil around the base of the plants, ensuring it reaches the root zone. Alternatively, you can use the solution as a foliar spray by misting it onto the leaves.
Tips:
- For optimum results, apply seaweed plant food every 2-4 weeks during the growing season.
- If using dried seaweed, you can soak it in water overnight before straining and diluting the liquid.
- Take advantage of the seaweed’s natural plant growth hormones by applying the solution during the early morning or late afternoon when the plants are in their active growth phase.
Seaweed plant food is a fantastic organic solution for promoting healthy plant growth and enhancing the overall vigor of your plants. By harnessing the power of seaweed, you’re providing your plants with essential nutrients and beneficial compounds that contribute to their overall well-being. So, harness the power of the ocean and give your plants a natural boost with this seaweed plant food!
Recipe 7: Epsom Salt Plant Food
Epsom salt, also known as magnesium sulfate, can be a valuable addition to your plant care routine. It is a rich source of magnesium, an essential nutrient that plays a crucial role in plant growth and development. Creating an epsom salt plant food is a simple and effective way to boost your plants’ nutrient intake and overall health.
Ingredients:
- Epsom salt
- Water
Instructions:
- Start by obtaining high-quality Epsom salt from a reputable source. Look for pure Epsom salt without any additives.
- In a container, dissolve one tablespoon of Epsom salt in one gallon of water. Stir the mixture well to ensure the salt is fully dissolved.
Application:
Apply the epsom salt plant food to the soil around the base of your plants. Make sure to distribute it evenly and avoid direct contact with the foliage. Water your plants as normal, allowing the nutrients from the solution to reach the root zone.
Tips:
- Apply the epsom salt plant food once every 4-6 weeks during the growing season. Avoid overuse, as excessive magnesium can lead to nutrient imbalances.
- For a foliar spray application, dilute the solution to half strength and mist it onto the leaves. This can provide a quick absorption of magnesium for the plants.
- Before applying epsom salt, make sure your plants actually need magnesium. Conduct a soil test to determine any deficiencies or consult with a local extension service for guidance.
- Some plants, like citrus trees, roses, and tomatoes, tend to benefit more from epsom salt than others. Tailor your application accordingly.
Epsom salt plant food can be an excellent supplemental nutrient source for your plants, especially if magnesium deficiency is identified. By providing magnesium in a soluble form, you are supporting key plant functions, such as chlorophyll production and nutrient uptake. So, give your plants this boost of magnesium with this simple and effective epsom salt plant food recipe!
Recipe 8: Compost Tea
Compost tea is a nutrient-rich liquid fertilizer that is made by extracting the beneficial compounds and microorganisms from compost. It is a natural, organic way to feed your plants and enhance soil fertility. The process requires some patience, but the benefits it offers to your plants are worth it.
Ingredients:
- Compost
- Water
Instructions:
- Start by selecting high-quality compost that has been fully decomposed. Avoid using compost that is still “hot” or contains fresh green waste.
- Fill a burlap sack, mesh bag, or a bucket with the compost. The amount of compost to use depends on the size of your container.
- Submerge the compost-filled container in a larger vessel such as a bucket or a large barrel filled with water. The ratio of compost to water should be approximately 1:5 (1 part compost to 5 parts water).
- If possible, use non-chlorinated water, as chlorine can harm the beneficial microorganisms in the compost tea. If using tap water, let it sit out for a day to allow chlorine to dissipate.
- Leave the compost-filled container in the water for 1-2 weeks. Stir or agitate the compost occasionally to promote the extraction of nutrients.
- After the designated time has passed, remove the compost-filled container from the water. The resulting liquid is your compost tea.
- Strain the liquid through a fine mesh or cheesecloth to remove any solid particles.
- Dilute the compost tea with water before applying it to your plants. The recommended dilution ratio is 1 part compost tea to 4 parts water.
Application:
Use the diluted compost tea to water your plants or apply it as a foliar spray. Make sure to thoroughly saturate the soil around the base of your plants, or lightly mist the foliage surfaces if using it as a foliar spray.
Tips:
- Apply compost tea during the early morning or late afternoon to minimize evaporation and ensure optimal absorption by the plants.
- Store any leftover compost tea in a covered container in a cool, dark place. It can be used within a few days, but it is best to use it as soon as possible to maintain the viability of the beneficial microorganisms.
- As an alternative, you can create an aerated compost tea by using an aquarium pump and air stone, which helps increase the microbial activity in the tea.
- Remember not to use compost tea as a substitute for regular watering. It is best used in conjunction with a regular watering routine.
Compost tea is a fantastic way to harness the nutrients and beneficial microorganisms from compost and deliver them directly to your plants. By nourishing your plants with compost tea, you are improving the soil structure, enhancing plant health, and fostering a thriving garden ecosystem. So, grab your compost and start brewing some nutrient-dense compost tea for your plants’ benefit!
How to Apply Homemade Plant Food
Now that you have created your homemade plant food, it’s important to know how to apply it effectively to maximize its benefits for your plants. Here are some guidelines to follow when applying homemade plant food:
1. Watering the Soil:
The most common method of applying plant food is by watering the soil around the base of your plants. This ensures that the nutrients seep into the root zone where they are needed most. Use a watering can or a hose with a gentle spray nozzle to apply the homemade plant food directly to the soil.
2. Avoiding Foliage Contact:
Avoid direct contact between the plant food solution and the foliage, especially when using concentrated solutions or those that may have the potential to cause leaf burn. This can be done by directing the flow of water towards the base of the plants, rather than soaking the leaves.
3. Frequency of Application:
Follow the recommended frequency of application for the specific homemade plant food recipe you are using. Generally, homemade plant food can be applied every 2-4 weeks during the growing season, but it’s important to adjust the frequency based on the needs of your plants and their responsiveness to the plant food.
4. Dilution:
If the homemade plant food recipe calls for dilution, make sure to follow the instructions for the proper dilution ratio. Diluting the plant food helps prevent nutrient burn and ensures that the plants receive a balanced amount of nutrients. Using concentrated plant food solutions can potentially harm the plants.
5. Watering Schedule:
After applying the homemade plant food, water your plants as usual. This helps to further distribute the nutrients into the soil and ensures proper absorption by the roots. It’s important to maintain a regular watering schedule to prevent the soil from drying out or becoming waterlogged.
6. Observation and Adjustments:
Monitor your plants’ response to the homemade plant food. Observe changes in foliage color, growth rate, and overall plant health. If you notice any adverse effects, such as wilting or yellowing leaves, it may be a sign of over-fertilization. Adjust the frequency or concentration of the plant food accordingly to avoid nutrient imbalances.
7. Compatibility with Other Fertilizers:
If you are using other fertilizers, ensure that the homemade plant food is compatible with them. Some fertilizers can react negatively when combined. It is generally recommended to not mix homemade plant food with synthetic fertilizers and to allow a gap between applications if using different types of fertilizers.
Following these guidelines will help ensure that your plants receive the right amount of nutrients from the homemade plant food. Remember that each plant has different needs, so it’s important to observe and adjust the application based on the specific requirements of your plants. With proper application, your homemade plant food will contribute to the overall health and thriving of your garden.
Tips for Successful Plant Feeding
Feeding your plants with homemade plant food is a great way to nurture their growth and ensure their overall well-being. To achieve the best results, consider the following tips for successful plant feeding:
1. Understand Your Plants’ Needs:
Each plant has unique nutrient requirements. Take the time to research and understand the specific needs of your plants, including their preferred soil pH, nutrient preferences, and growth stage. This knowledge will help you create homemade plant food recipes that cater to their specific needs.
2. Use High-Quality Ingredients:
Choose fresh, organic, and high-quality ingredients for your homemade plant food. Using fresh kitchen scraps, organic compost, and quality sources of nutrients, such as eggshells or seaweed, will provide the best nutritional value for your plants.
3. Test and Observe:
Perform soil tests to determine any nutrient deficiencies or imbalances. This will guide you in customizing your homemade plant food recipes and addressing specific nutritional needs. Observe your plants regularly for signs of nutrient deficiency or excess, such as yellowing leaves or stunted growth.
4. Stick to Recommended Application Rates:
Follow the recommended application rates for your homemade plant food recipes. Avoid overfeeding as excess nutrients can harm plants and cause nutrient imbalances. When in doubt, start with a lower concentration of plant food and gradually increase it based on your observations of the plants’ response.
5. Water Properly:
Proper watering is essential for effective nutrient absorption. Water your plants before applying homemade plant food to ensure the soil is moist and ready to receive the nutrients. After applying the plant food, water the plants as usual to help nutrients penetrate the root zone.
6. Rotate Plant Food:
Vary the types of homemade plant food you use to provide a wide spectrum of nutrients to your plants. Rotate between different recipes to ensure a balanced nutrient intake and prevent nutrient imbalances or deficiencies. This approach will support overall plant health and growth.
7. Apply Plant Food in Multiple Ways:
Experiment with different application methods based on the specific needs of your plants. You can apply homemade plant food through soil drenching, foliar spraying, or even as a top dressing. Understanding the optimal application method for each plant will maximize nutrient availability and absorption.
8. Monitor and Adjust:
Regularly monitor your plants’ response to the homemade plant food. Observe for any changes in their growth, foliage color, flowering, or fruiting. If necessary, make adjustments to the frequency, concentration, or type of plant food used to meet the evolving needs of your plants.
By following these tips, you can ensure successful plant feeding with homemade plant food. Customizing your approach based on your plants’ needs, using high-quality ingredients, and being vigilant in monitoring their response will promote robust growth, vibrant foliage, and bountiful blooms or harvests. Enjoy the rewards of nurturing your plants with homemade plant food!