
Materials Needed
Before you can embark on creating your very own laser projection keyboard, you will need to gather the necessary components. Here is a list of the materials you will need to get started:
1. Raspberry Pi: This powerful single-board computer is the heart of the projection keyboard system. Ensure you have a Raspberry Pi model that is compatible with the chosen software.
2. Laser diode: This is the key component that emits the laser beam used for projection. Look for a high-quality laser diode that is suitable for keyboard projection.
3. Projection module: You will need a projection module that can display the virtual keyboard onto a surface. Choose a module that is compact yet powerful enough to produce clear and accurate projections.
4. Keyboard module: This module will detect the keystrokes made by users on the projected keyboard. Find a keyboard module that is compatible with the Raspberry Pi and offers reliable input detection.
5. Power supply: Make sure you have a reliable power supply to provide sufficient power to both the Raspberry Pi and the projection module. Check the power requirements of each component to ensure compatibility.
6. Micro-USB cable: You will need a micro-USB cable to connect the Raspberry Pi to a power source. Ensure the cable is of good quality and provides a stable connection.
7. HDMI cable: To connect the Raspberry Pi to a projector or display device, you will need an HDMI cable. Choose a high-quality cable that offers reliable audio and video transmission.
8. Projector or display device: You will need a projector or display device to project the virtual keyboard onto a surface. Make sure the projector or display device is capable of producing clear and sharp images.
9. Protective case: To safeguard the Raspberry Pi and other components from potential damage, consider investing in a protective case. Look for a case that provides adequate ventilation and easy access to ports.
10. Optional: If you plan to use the laser projection keyboard on the go, you may want to consider a portable power bank to ensure uninterrupted power supply.
Once you have gathered all the necessary materials, you are ready to move on to the next step of creating your laser projection keyboard.
Step 1: Gather the Necessary Components
Before you can start building your laser projection keyboard, it’s important to gather all the necessary components. Here is a step-by-step guide on how to assemble the materials:
1. Raspberry Pi: Begin by ensuring you have a Raspberry Pi model that is compatible with the software you plan to use. The Raspberry Pi will serve as the central hub for your keyboard system.
2. Laser Diode: Look for a high-quality laser diode that is suitable for keyboard projection. Check the specifications to ensure it meets the necessary power and emitting requirements.
3. Projection Module: Find a projection module that can display the virtual keyboard onto a surface. Opt for a module that is compact yet powerful enough to produce clear and accurate projections. Make sure it is compatible with the Raspberry Pi.
4. Keyboard Module: The keyboard module will detect the keystrokes made by users on the projected keyboard. Choose a module that is compatible with the Raspberry Pi and offers reliable input detection.
5. Power Supply: It’s crucial to have a reliable power supply that can provide sufficient power to both the Raspberry Pi and the projection module. Check the power requirements of each component to ensure compatibility.
6. Micro-USB Cable: You will need a micro-USB cable to connect the Raspberry Pi to a power source. Choose a cable that is of good quality and provides a stable connection.
7. HDMI Cable: To connect the Raspberry Pi to a projector or display device, obtain an HDMI cable. Ensure it is high-quality and capable of reliable audio and video transmission.
8. Projector or Display Device: The laser projection keyboard requires a projector or display device to project the virtual keyboard onto a surface. Make sure it is capable of producing clear and sharp images.
9. Protective Case: To safeguard the Raspberry Pi and other components from potential damage, consider investing in a protective case. Look for a case that provides adequate ventilation and easy access to ports.
10. Optional: If you plan to use the laser projection keyboard on the go, you may want to consider a portable power bank to ensure uninterrupted power supply.
Once you have gathered all the necessary components, ensure they are in good working condition before moving on to the next steps of building your laser projection keyboard.
Step 2: Use the Raspberry Pi to Create a Virtual Keyboard
Now that you have gathered all the necessary components, it’s time to use the Raspberry Pi to create your virtual keyboard. Follow these steps:
1. Install the Operating System: Begin by installing the chosen operating system on your Raspberry Pi. Follow the instructions provided by the manufacturer to ensure a successful installation.
2. Set Up the Configuration: Once the operating system is installed, configure the Raspberry Pi by connecting it to a monitor, keyboard, and mouse. Follow the on-screen prompts to complete the initial setup process.
3. Install Keyboard Software: Depending on your preference, choose and install a keyboard software suitable for the Raspberry Pi. There are various options available, such as “Matchbox Keyboard” or “Florence Virtual Keyboard”. Install the software by following the documentation provided.
4. Configure the Keyboard: Once the software is installed, customize the settings of the virtual keyboard according to your preferences. You may adjust the layout, language, and other parameters to create a personalized typing experience.
5. Test the Virtual Keyboard: With the configuration complete, it’s time to test the virtual keyboard. Open a text editor or any application that requires keyboard input and start typing using the virtual keyboard. Ensure that the keystrokes are detected accurately.
6. Fine-Tune the Settings: If you encounter any issues or inconsistencies, you can fine-tune the settings of the virtual keyboard software. Adjust parameters such as sensitivity, key repeat rate, and layout until you achieve the desired performance.
7. Save and Apply the Changes: Once you are satisfied with the virtual keyboard’s functionality, save the changes and ensure they are applied every time the Raspberry Pi is booted up. This way, you won’t need to reconfigure the keyboard each time.
By utilizing the capabilities of the Raspberry Pi, you have successfully created a functional virtual keyboard. Now, it’s time to move on to the next step and set up the laser projection system for an immersive typing experience.
Step 3: Set Up the Laser Projection System
With the virtual keyboard configured on the Raspberry Pi, it’s time to move on to setting up the laser projection system. Follow these steps to get started:
1. Position the Projector: Choose a suitable location to position the projector or display device. Ensure that it is stable and allows for optimal projection onto a flat surface.
2. Connect the Raspberry Pi: Use an HDMI cable to connect the Raspberry Pi to the projector or display device. Ensure a secure connection to enable the transmission of audio and video signals.
3. Align the Laser Diode: Position the laser diode in a way that aligns with the keyboard layout you desire to project. Make sure it is securely mounted and pointing towards the surface where the projection will take place.
4. Calibrate the Projection Area: Adjust the focus and angle of the projector to achieve a clear and sharp projection onto the surface. This may require some trial and error to ensure accurate keyboard representation.
5. Test the Projection: Turn on the laser projection system and verify that the virtual keyboard is being projected onto the surface. Ensure that the keystrokes are accurately detected when interacting with the projected keyboard.
6. Make Adjustments as Needed: If the projected keyboard is not clear or the keystrokes are not being detected accurately, make the necessary adjustments. Experiment with the projector settings, laser diode placement, and projection angle to improve visibility and accuracy.
7. Optimize Lighting Conditions: Consider the ambient lighting conditions in the projection area. Dim the lights or adjust the display settings to enhance the contrast between the projected keyboard and the surface for better visibility.
8. Ensure Safety Measures: Take precautions to ensure the laser projection system is safe. Avoid direct eye contact with the laser, and make sure it is not projected towards reflective surfaces or sensitive materials.
By following these steps, you have successfully set up the laser projection system for your virtual keyboard. The next step involves installing and configuring the necessary software to ensure its proper functioning.
Step 4: Install and Configure the Necessary Software
In order to ensure the smooth operation of your laser projection keyboard, you need to install and configure the necessary software. Follow these steps to get started:
1. Research and Choose the Software: Explore different software options available for the laser projection keyboard. Look for ones that are compatible with your Raspberry Pi model and offer the features you desire.
2. Download the Software: Once you have chosen the software, download the appropriate installation package or source files from the official website or a trusted source. Make sure you are downloading the most up-to-date version.
3. Install the Software: Follow the installation instructions provided with the software to install it on your Raspberry Pi. This may involve running a setup wizard, executing commands in the terminal, or using a package manager like apt-get or pip.
4. Configure the Software: After the installation is complete, you may need to configure the software to match your specific laser projection keyboard setup. Refer to the software’s documentation or user guide for instructions on how to configure it.
5. Customize Settings: Take the time to explore the software’s settings and customize them according to your preferences. This may include adjusting the keyboard layout, setting keystroke sensitivity, or enabling additional features like gesture recognition.
6. Test the Software: Once you have configured the software, it’s crucial to test its functionality. Ensure that the projected keyboard accurately detects keystrokes, responds promptly, and provides a smooth typing experience.
7. Troubleshoot Issues: If you encounter any issues or challenges during the installation or configuration process, consult the software’s documentation or online forums to find solutions. Troubleshoot common problems such as connectivity issues, calibration errors, or compatibility conflicts.
8. Update the Software: Regularly check for software updates and install them to ensure you have the latest features and bug fixes. Updates often improve the performance and stability of the software.
By installing and configuring the necessary software, you have taken a significant step towards making your laser projection keyboard fully functional. Now, it’s time to proceed to the next step, which involves connecting the Raspberry Pi to the projector or display device.
Step 5: Connect the Raspberry Pi to the Projector
Now that you have installed and configured the necessary software, it’s time to connect the Raspberry Pi to the projector or display device. Follow these steps to ensure a seamless connection:
1. Identify the Ports: Locate the HDMI port on both the Raspberry Pi and the projector or display device. This is typically a rectangular port with multiple pins.
2. Connect the HDMI Cable: Take the HDMI cable and securely connect one end to the HDMI port on the Raspberry Pi. Then, connect the other end to the HDMI port on the projector or display device.
3. Power On the Devices: Turn on both the Raspberry Pi and the projector or display device. Ensure that they are both connected to power sources and powered on.
4. Select the Correct Input Source: Use the remote control or menu buttons on the projector or display device to select the appropriate input source. This will typically be labeled as “HDMI” or may have a specific HDMI port number assigned.
5. Verify the Connection: Check the projector or display device to ensure that the Raspberry Pi’s display is being projected. You should now see the interface of the virtual keyboard on the projected display.
6. Adjust Display Settings (if needed): In some cases, you may need to adjust the display settings on the projector or display device to optimize the projection quality. This may include adjusting brightness, contrast, or aspect ratio to achieve the desired visual experience.
7. Test the Connection: Interact with the projected virtual keyboard using the laser diode or the keyboard module. Ensure that the keystrokes are accurately detected and that the projection remains stable.
8. Fine-Tune if Necessary: If you encounter any issues, such as a distorted or misaligned projection, make adjustments to the projector alignment or settings. Experiment with the projection angle, focus, or other settings to achieve the best projection quality.
By successfully connecting the Raspberry Pi to the projector or display device, you are one step closer to experiencing the full functionality of your laser projection keyboard. The next step involves calibrating the laser projection for optimal performance.
Step 6: Calibrate the Laser Projection Keyboard
Calibrating the laser projection keyboard is crucial to ensure its accuracy and performance. Follow these steps to properly calibrate your system:
1. Set Up a Calibration Surface: Prepare a smooth and flat surface, ideally a white or light-colored wall or desk, to serve as the calibration surface. Make sure the surface is clean and free from any obstructions or distractions.
2. Adjust Projection Distance: Position the projector or adjust the projection distance so that the projected keyboard is displayed evenly and clearly on the calibration surface. Experiment with different distances until you find the optimal projection size.
3. Verify Keystroke Detection: Begin by testing the keyboard module or laser diode’s ability to detect keystrokes accurately. Interact with the projected keyboard and confirm that each keystroke is detected and registered correctly.
4. Fine-Tune Projection Alignment: Use the projector adjustment controls to align the projected keys with their corresponding positions on the calibration surface. Make adjustments to ensure the projected keys accurately match the physical layout of a standard keyboard.
5. Adjust Projection Brightness: If necessary, adjust the projector’s brightness settings to optimize the visibility of the projected keys. Strike a balance between a bright enough projection for clear visibility and avoiding an overly bright display that might cause glare or discomfort.
6. Validate Key Recognition: Test each key on the projected keyboard to ensure it is being recognized correctly. Pay close attention to any keys that might have alignment issues or poor recognition, and make necessary adjustments accordingly.
7. Fine-Tune Keystroke Sensitivity: Adjust the sensitivity settings on the keyboard module or software to ensure it accurately detects keystrokes with the desired level of responsiveness. Find the balance between being too sensitive, causing accidental keystrokes, and being unresponsive to deliberate keystrokes.
8. Test Various Typing Scenarios: Perform typing exercises and test the keyboard’s performance under different scenarios, such as typing speed and simultaneous keystrokes, to ensure it can handle real-world usage without major issues.
9. Repeat Calibration as Needed: If you encounter any issues or make significant changes to your setup, it may be necessary to repeat the calibration process to ensure optimal performance.
By properly calibrating your laser projection keyboard, you can ensure accurate keystroke detection and a seamless typing experience. With the calibration complete, you can move on to testing and troubleshooting the projection keyboard in the next step of the process.
Step 7: Test and Troubleshoot the Projection Keyboard
Now that you have calibrated the laser projection keyboard, it’s time to test its functionality and address any potential issues. Follow these steps to test and troubleshoot your projection keyboard:
1. Test Keystrokes: Begin by typing on the projected keyboard and verify that each keystroke is accurately detected and registered. Pay attention to any keys that may have inconsistent detection or require excessive force to register.
2. Test Different Typing Speeds: Vary your typing speed to ensure that the projection keyboard can keep up with rapid keystrokes without missing any input or causing delays in registering keystrokes.
3. Test Multiple Keystrokes: Test the projection keyboard by pressing multiple keys simultaneously, including combinations such as Ctrl + Alt + Del. Verify that all the keys are detected correctly and that there are no issues with key rollover.
4. Evaluate Accuracy and Responsiveness: Assess the accuracy and responsiveness of the projection keyboard. Ensure that there is no delay between pressing a key and the corresponding action occurring on the connected device.
5. Check for Alignment Issues: Pay attention to any misalignment between the projected keys and their corresponding physical positions. Adjust the projector or projection settings if necessary to achieve accurate alignment.
6. Test in Different Lighting Conditions: Test the projection keyboard in different lighting conditions to ensure that the visibility and accuracy of the projected keys are not significantly affected by ambient light levels.
7. Troubleshoot Projection Distortion: If you notice any distortion or blurriness in the projected keys, adjust the projector’s focus, projection distance, or other settings to achieve a clear and crisp projection.
8. Address Connectivity Issues: If you experience any connectivity problems between the Raspberry Pi and the projector, check the HDMI cable and ensure it is securely connected. Test with a different HDMI cable if needed.
9. Consult Software Documentation: If you encounter any software-related issues, consult the documentation or user guide of the projection keyboard software. Look for troubleshooting tips or contact the software support team for assistance.
10. Seek Community Support: Engage with online communities or forums dedicated to laser projection keyboards. Seek advice and assistance from others who have encountered similar issues or have expertise in troubleshooting.
By thoroughly testing and troubleshooting your projection keyboard, you can identify and address any issues that may affect its performance. Once you have resolved any issues, you can move on to further customizing the keyboard layout and functionality in the next step.
Step 8: Customize the Keyboard Layout and Functionality
With the laser projection keyboard fully functional and tested, it’s time to customize the keyboard layout and functionality to suit your preferences. Follow these steps to personalize your projection keyboard:
1. Choose a Layout: Decide on the keyboard layout you want to use. Options include QWERTY, AZERTY, Dvorak, or a specialized layout for specific languages or purposes. Select the layout that you are most comfortable with or that best suits your needs.
2. Configure Key Mapping: Customize the mapping of keys to match the layout you have chosen. Use the software or settings of your projection keyboard to remap keys if necessary. This allows you to define your own arrangement or include specialized keys or characters.
3. Add Special Functionality: Consider adding special functionality to your projection keyboard. This can include additional keys or modifiers that perform specific actions or trigger shortcuts. Examples include media keys, volume control, or programmable function keys.
4. Implement Macros or Shortcuts: Take advantage of the software capabilities to create and assign macros or shortcuts that automate repetitive tasks or execute complex commands with a single keystroke. This can greatly increase your productivity and efficiency.
5. Customize Key Colors or Symbols: Some projection keyboards allow you to customize the color or symbol displayed for each key. Personalize the keyboard by assigning different colors or symbols to specific keys, making it visually appealing and easier to navigate.
6. Enable Gesture Recognition: If supported by your projection keyboard software, explore the option of enabling gesture recognition. This allows you to perform actions based on hand movements or gestures, enhancing the overall user experience.
7. Consider Keyboard Themes: Some projection keyboards offer pre-designed themes or allow you to create your own visual themes. Experiment with different themes to find the one that suits your style or matches your workspace aesthetic.
8. Test and Refine: After customizing the layout and functionality, thoroughly test the keyboard to ensure the changes have been implemented correctly. Verify that all keys and functions work as intended and that the overall usage experience meets your expectations.
By customizing the keyboard layout and functionality, you can create a projection keyboard that aligns perfectly with your preferences and work style. With these customizations in place, you can now focus on improving the projection visibility and accuracy in the next step of the process.
Step 9: Improve the Projection Visibility and Accuracy
Ensuring optimal projection visibility and accuracy is essential for an effective laser projection keyboard experience. Follow these steps to enhance the visibility and accuracy of your projection:
1. Adjust Projection Angle: Experiment with the projection angle to achieve the best visibility. Avoid projecting at extreme angles that may cause distortion or make it difficult to see the projected keys clearly. Find the angle that provides a clear and direct view of the projected keyboard.
2. Optimize Projection Surface: Use a smooth and flat surface that allows for clear and precise projection. Avoid surfaces that are reflective, uneven, or textured, as they can affect the accuracy and visibility of the projected keys. Consider using surfaces with high contrast to enhance visibility.
3. Enhance Room Lighting: Adjust the room lighting to optimize visibility. Dim the lights or use ambient lighting that does not create excessive glare on the projection surface. Ensure sufficient lighting while avoiding any source of direct light on the projection surface that may interfere with the visibility of the projected keys.
4. Clean Projection Surface: Regularly clean the projection surface to remove any dust, fingerprints, or smudges that may obstruct the visibility of the projected keys. Use a lint-free cloth or appropriate cleaning solution to maintain a clean and clear projection surface.
5. Adjust Projection Brightness: Achieve an optimal balance of projection brightness. Adjust the brightness settings on the projector to ensure the projected keys are easy to see without causing discomfort or eye strain. Fine-tuning the brightness can greatly improve the overall visibility and readability of the projection.
6. Ensure Laser Diode Alignment: Check the alignment of the laser diode with the projection surface. Make sure it is accurately aligned with the intended projection area and that there is no misalignment causing distorted or skewed projection. Make adjustments as necessary to improve alignment.
7. Test Different Projection Distances: Experiment with different projection distances to find the optimal distance that provides a clear and well-defined projection. Adjust the projector position accordingly to achieve the desired projection size and clarity.
8. Regularly Calibrate: Regularly recalibrate the laser projection keyboard to maintain accuracy. Over time, factors such as temperature changes or components shifting can cause misalignment. Regular calibration helps ensure consistent and accurate projection performance.
9. Monitor for Interference: Be aware of any potential sources of interference that may affect the projection, such as other light sources or electronic devices. Place the projection setup away from sources of interference to maintain clear and accurate projection visibility.
By following these steps to improve the projection visibility and accuracy, you can enhance the overall user experience of your laser projection keyboard. With these improvements in place, you can focus on fine-tuning the settings to achieve optimal performance in the next step of the process.
Step 10: Fine-Tune the Settings for Optimal Performance
To achieve optimal performance from your laser projection keyboard, it’s important to fine-tune the settings. Follow these steps to refine the settings for an improved user experience:
1. Adjust Keystroke Sensitivity: Fine-tune the sensitivity settings of your projection keyboard to ensure accurate detection of keystrokes. Find the right balance between sensitivity that allows for effortless typing and avoiding false or accidental keystrokes.
2. Customize Key Response Time: Adjust the key response time to your liking. Some users prefer a faster response, while others prefer a slight delay. Experiment with different response time settings to find the one that feels most comfortable and natural to you.
3. Optimize Repeat Rate: Configure the repeat rate of keystrokes to match your typing speed. Increase the repeat rate if you are a fast typist, or decrease it if you find the keys repeating too quickly. Fine-tuning this setting ensures smooth and accurate typing.
4. Configure Sound Feedback: Enable or disable sound feedback for keystrokes according to your preference. Some laser projection keyboards provide audible feedback, while others allow you to turn off sounds completely. Choose the option that suits your preferences and avoids disturbances.
5. Enable Gesture Recognition Features: If your projection keyboard supports gesture recognition, explore the available gestures and customize them to perform specific commands or actions. Assign gestures for tasks such as scrolling, zooming, or opening applications to enhance the functionality of your keyboard.
6. Customize Visual Feedback: Some projection keyboards offer visual feedback options, such as displaying a visual indicator when a key is pressed. Explore the settings to customize the visual feedback according to your preference, such as adjusting the visibility or opacity of the feedback element.
7. Test Different Typing Styles: Try out various typing styles, such as touch typing or thumb typing, to assess the performance of the projection keyboard. Fine-tune the settings to optimize the typing experience for your preferred style, ensuring accurate and comfortable typing.
8. Consider Word Prediction or Correction: Some projection keyboards offer word prediction or correction features. Enable and configure these features if available, and customize the settings to improve typing speed and accuracy, while also reducing the chances of errors.
9. Save and Backup Settings: Once you have fine-tuned the settings to your liking, make sure to save and back up the configuration. This way, you can easily restore your preferred settings if you need to reinstall or reset the keyboard in the future.
10. Regularly Evaluate and Refine: Regularly evaluate the performance of your laser projection keyboard, and make refinements to the settings as needed. As you gain more experience using it, you may discover new ways to optimize its performance or adapt it to your evolving needs.
By fine-tuning the settings of your laser projection keyboard, you can achieve optimal performance, accuracy, and customization. This step enhances the overall user experience and helps you maximize the benefits of your projection keyboard.
Step 11: Tips and Tricks for Using the Laser Projection Keyboard
Using a laser projection keyboard can be a unique and exciting experience. To make the most of your keyboard and enhance your productivity, consider these tips and tricks:
1. Practice Proper Typing Technique: Familiarize yourself with the correct typing technique for the laser projection keyboard. Use your fingers to tap on the projected keys gently and avoid excessive force, as it can lead to inaccurate typing and potential damage to the projection surface.
2. Optimize Keyboard Placement: Ensure that the keyboard projection is well-positioned in front of you, aligning with your natural hand placement and typing ergonomics. Find a comfortable position and adjust the projection angle or distance if needed to achieve a natural typing posture.
3. Minimize Background Noise: Find a quiet environment or use a noise-cancelling microphone to reduce background noise while using the projection keyboard. This ensures accurate keystroke detection and improves focus during typing.
4. Familiarize Yourself with Gestures: If your projection keyboard supports gesture recognition, take the time to learn and practice the gestures. This feature can offer additional productivity shortcuts, such as swiping to switch between applications or pinching to zoom in or out.
5. Master Keyboard Shortcuts: Learn and utilize keyboard shortcuts on your projection keyboard. Keyboard shortcuts can help you perform actions more efficiently, such as copying and pasting, opening new tabs, or navigating through menus.
6. Use Word Prediction/Correction: If your projection keyboard supports word prediction or correction, take advantage of it to streamline your typing process. Allow the keyboard to suggest or automatically correct words as you type, saving you time and reducing errors.
7. Customize Key Layout for Efficiency: If the projection keyboard software allows, consider rearranging the key layout to match your muscle memory or frequently used keys. Customizing the layout can improve typing speed and accuracy, especially if you have specialized needs or preferences.
8. Regularly Clean the Projection Surface: Keep the projection surface clean and free from dust or smudges. Regularly wipe the surface with a lint-free cloth to maintain clear and accurate projection, ensuring long-term visibility and performance.
9. Calibrate Regularly: Perform regular calibration of the laser projection keyboard to maintain optimal accuracy and performance. Changes in temperature or usage patterns may require occasional recalibration to ensure precise detection of keystrokes.
10. Explore Additional Features: Dive into the documentation or user guide of your projection keyboard software to discover any additional features or hidden functionalities. This allows you to unlock the full potential of your keyboard and maximize its usefulness.
By following these tips and tricks, you can fully immerse yourself in the experience of using a laser projection keyboard and optimize your productivity. Adapt and customize these suggestions based on your specific needs and preferences.
Step 12: Frequently Asked Questions about Laser Projection Keyboards
As you explore the world of laser projection keyboards, you may come across some common questions. Here are answers to frequently asked questions to help you gain a better understanding:
1. Are laser projection keyboards easy to use?
Yes, laser projection keyboards are designed to be user-friendly. They project a virtual keyboard onto any surface, allowing you to type as you would on a physical keyboard. However, adaptability to the virtual keys may require a short adjustment period.
2. How does a laser projection keyboard work?
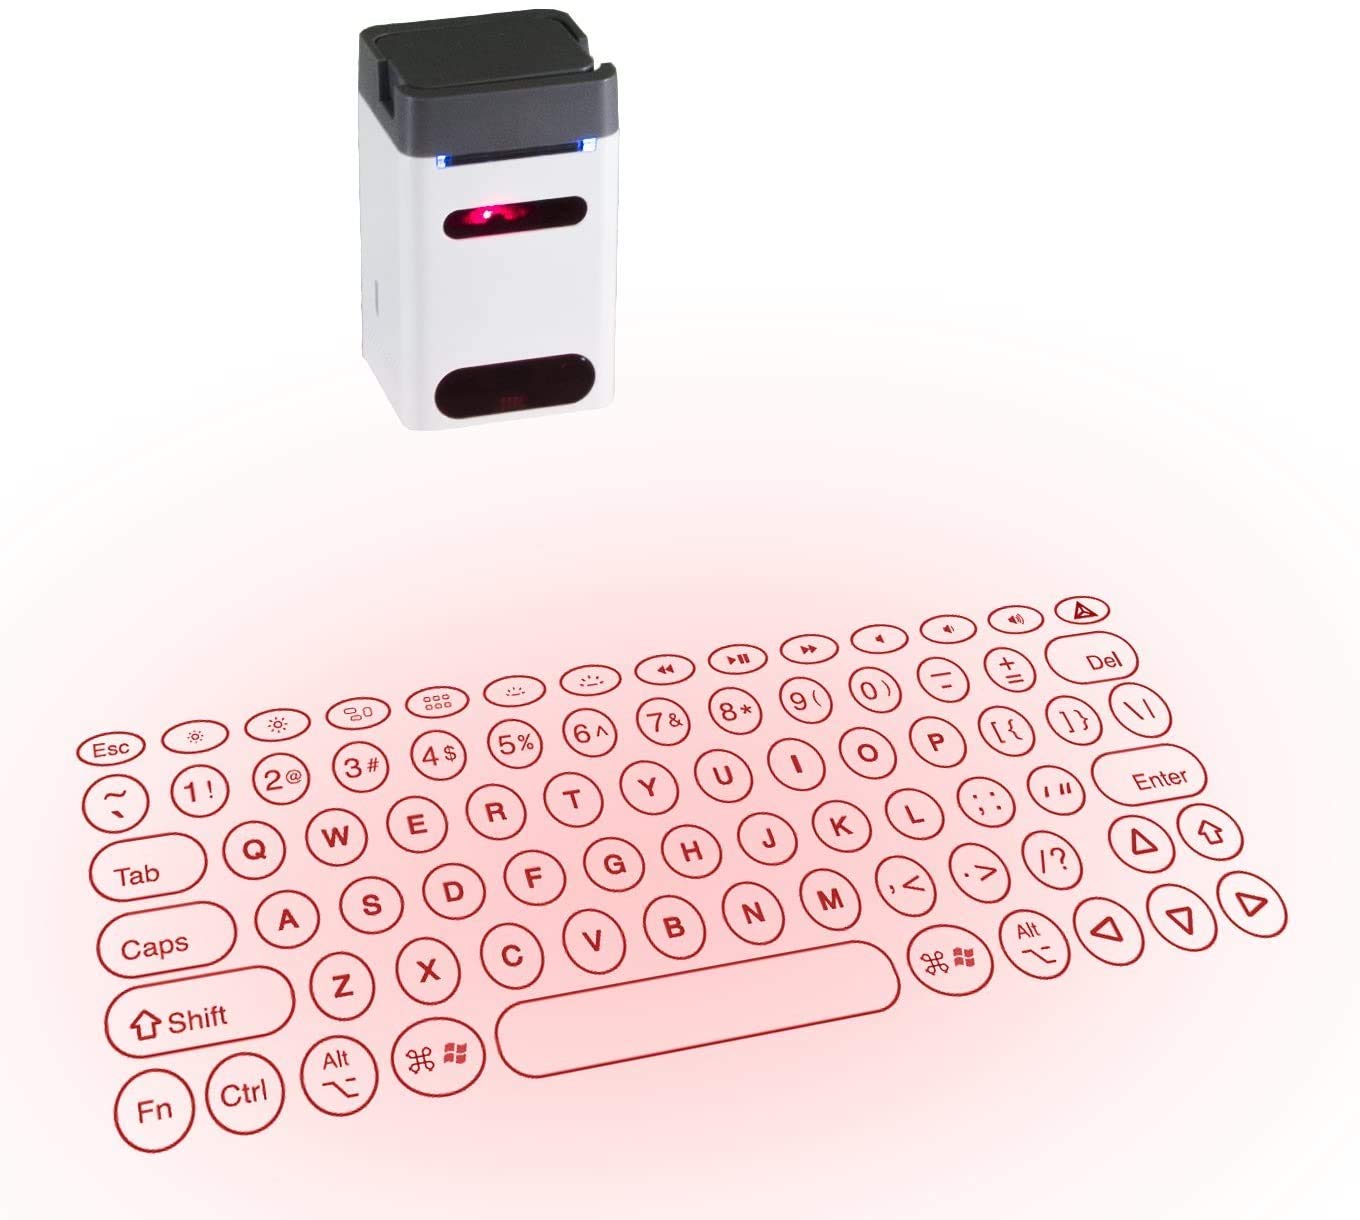
Laser projection keyboards use infrared or laser light to project a keyboard layout onto a surface. As you type on the projected keys, the keyboard module or laser diode detects the interruption of the light, converting it into keystrokes that are sent to the connected device.
3. Do laser projection keyboards work on all surfaces?
While laser projection keyboards can technically work on any surface, it is recommended to use a clean, smooth, and non-reflective surface for accurate detection and optimal visibility. Surfaces with high contrast to the projected keys tend to work best.
4. Can laser projection keyboards be used in various lighting conditions?
Yes, laser projection keyboards can be used in various lighting conditions. However, it is best to avoid direct, intense light sources that may affect the visibility of the projected keys. Dimming the ambient lighting can help enhance the projection visibility.
5. Can the projection keyboard be adjusted for different hand sizes or typing preferences?
Yes, many projection keyboards allow for customization and adjustment. You can often customize the key layout, adjust the sensitivity, and even map special functions to specific keys to cater to different hand sizes and individual typing preferences.
6. Can laser projection keyboards be used with mobile devices?
Yes, laser projection keyboards can typically be connected to mobile devices with Bluetooth or a USB connection, allowing you to type on smartphones and tablets. However, compatibility may vary depending on the specific device and operating system.
7. Are projection keyboards suitable for long typing sessions?
Projection keyboards can be suitable for shorter typing sessions, but they may not provide the same level of comfort as physical keyboards for extended use. It’s important to maintain good typing posture and take breaks to avoid any potential discomfort or fatigue.
8. How durable are laser projection keyboards?
Laser projection keyboards are generally designed to be durable and withstand regular use. However, individual product quality may vary. It’s important to use the keyboard with care, avoid excessive force on the keys, and protect it from any potential damage or impact.
9. Can laser projection keyboards be used in noisy environments?
Laser projection keyboards can function in noisy environments, but background noise may affect the microphone’s ability to accurately pick up keystrokes. It’s recommended to use the keyboard in a relatively quiet environment or consider using a noise-cancelling microphone.
10. Can I connect the projection keyboard to multiple devices?
Sometimes, laser projection keyboards may have the capability to connect to multiple devices simultaneously, allowing you to easily switch between devices. Consult the product documentation or specifications to learn more about the specific connectivity options.
By addressing these frequently asked questions, you can gain a deeper understanding of laser projection keyboards and make informed decisions about their usage and suitability for your needs.