
Materials Needed
In order to make your very own homemade lava lamp, you will need a few key materials. Don’t worry, these materials are easily accessible and can be found in most households or purchased inexpensively at a local store. Here’s what you’ll need:
- A clear container or bottle
- Water
- Vegetable or mineral oil
- Food coloring
- Effervescent tablets (such as Alka-Seltzer)
The clear container or bottle will serve as the base of your lava lamp, allowing you to see the mesmerizing colors and patterns. You can use any clear container or bottle of your choice, as long as it has a tight-fitting lid or cap to prevent any leakage.
Next, you’ll need water to create the liquid element of the lava lamp. Any regular tap water will do the trick, so there’s no need for any special water source.
To achieve the lava effect, you’ll need oil. Vegetable oil or mineral oil can both be used. The oil will float on top of the water, creating a separation between the two liquids that is essential for the lamp to function properly.
To add a touch of vibrancy and excitement to your lava lamp, you’ll need food coloring. Choose any colors of your preference to personalize your lamp and create stunning visual effects.
Lastly, you’ll need effervescent tablets, such as Alka-Seltzer. These tablets will create the mesmerizing lava effect in your lamp by reacting with the water and oil. The fizzing and bubbling action of the tablets will mimic the movement of lava, providing an eye-catching and dynamic display.
With these materials in hand, you’re now ready to embark on the journey of creating your own homemade lava lamp. Get ready to be amazed by the beautiful swirling colors and mesmerizing motion that will brighten up any room!
Step 1: Gathering the Ingredients
Before you can begin creating your homemade lava lamp, it’s important to gather all the necessary ingredients and materials. Having everything within reach will make the process smooth and enjoyable. Follow these simple steps to gather your ingredients:
- Clear Container or Bottle: Start by selecting a clear container or bottle as the base of your lava lamp. The size and shape are up to you, but make sure it has a secure lid or cap to prevent leaks.
- Water: Fill a measuring cup with the desired amount of water. This will depend on the size of your container and the desired height of the liquid in your lava lamp.
- Vegetable or Mineral Oil: Measure out the same amount of vegetable or mineral oil as you did for the water. The oil will separate from the water and create the lava effect.
- Food Coloring: Choose your favorite colors and add a few drops of food coloring to a small bowl. Use separate bowls if you want multiple colors in your lava lamp.
- Effervescent Tablets: Break off a few small pieces of effervescent tablets, such as Alka-Seltzer, and place them in a separate container. You’ll use these tablets to create the fizzing and bubbling effect in your lava lamp.
Once you have all the ingredients and materials gathered, you’re ready to move on to the next step in creating your homemade lava lamp. Remember, the quality of the materials and their proportions can affect the outcome, so be sure to use fresh and high-quality ingredients.
Step 2: Preparing the Container
Now that you have all your ingredients ready, it’s time to prepare the container that will house your homemade lava lamp. Follow these simple steps to ensure that your container is clean and ready for the exciting experiment:
- Clean the Container: Start by thoroughly washing the container or bottle with warm soapy water. Make sure to remove any dirt, residue, or labels. Rinse it well to ensure there are no soap bubbles left behind.
- Dry the Container: After washing, dry the container completely with a clean cloth or paper towel. Any moisture left in the container can affect the performance of your lava lamp, so take extra care to dry it thoroughly.
- Inspect for Damage: Check for any cracks, chips, or other damages on the container. It’s important to use a container that is in good condition and can securely hold the liquid without any leaks.
- Tighten the Lid or Cap: Ensure that the lid or cap of the container is tightly secured. This will prevent any oil or water from leaking out during the experiment and keep your workspace clean.
By taking the time to properly prepare the container, you will minimize any potential issues and create a stable environment for your homemade lava lamp. A clean and secure container will also enhance the overall visual appeal of the final result. Now that your container is ready, it’s time to move on to the next step and start assembling your lava lamp!
Step 3: Adding Water to the Container
Once you’ve prepared your container, it’s time to start building the layers of your homemade lava lamp. Follow these simple steps to add water to the container:
- Open the Lid or Cap: Remove the lid or cap from the container to create an opening for adding the water.
- Pour the Water: Carefully pour the measured amount of water into the container. The amount will depend on the size of your container and the desired height of the liquid in your lava lamp.
- Avoid Overfilling: Be cautious not to overfill the container, as you need to leave some space for the oil and the air needed for the lava effect. Leave approximately 1 to 2 inches of empty space at the top of the container.
- Handle with Care: As you’re adding the water, make sure to handle the container with care to avoid any spills or accidents. Having a steady hand will ensure a neat and clean setup.
- Close the Lid or Cap: Once you’ve filled the container with water, securely close the lid or cap to prevent any leakage during the experiment. Double-check that it’s tightly sealed.
Adding water to the container is an essential step in creating the liquid foundation of your lava lamp. The water will serve as the base on which the oil and food coloring will float. With this step complete, you’re now ready to move on to the next phase of assembling your homemade lava lamp.
Step 4: Adding Oil to the Container
With the water in place, it’s time to add the oil to your homemade lava lamp. Follow these steps to create the separation between the oil and water, which is key to achieving the dynamic lava effect:
- Open the Lid or Cap: Remove the lid or cap from the container to access the water-filled section.
- Pour the Oil: Slowly pour the vegetable or mineral oil into the container, allowing it to float on top of the water. The amount of oil you add will depend on the size of your container and the desired appearance of your lava lamp. Aim to fill the container about three-quarters full with oil.
- Observe the Separation: As you pour the oil, you will notice it forming a distinct layer on top of the water. This separation between the two liquids is vital for the lava lamp effect. Take your time to pour the oil steadily and avoid mixing it with the water.
- Wait for Settling: After pouring the oil, allow it to settle for a few minutes. Observe how the oil floats on the water and creates a mesmerizing visual contrast between the two liquids.
- Check the Lid or Cap: Before proceeding, ensure that the lid or cap is securely closed to prevent any leakage. A tight seal is crucial to maintaining the integrity of your homemade lava lamp.
Adding oil to the container creates the captivating lava effect in your homemade lava lamp. The oil and water will remain separated due to their different densities, setting the stage for the mesmerizing movements that will occur later. With this step complete, your lava lamp is beginning to take shape!
Step 5: Adding Food Coloring
Now that you have the oil and water layers set up, it’s time to add a burst of color to your homemade lava lamp by incorporating food coloring. Follow these simple steps to bring your lava lamp to life:
- Choose Your Colors: Decide on the colors you want to use in your lava lamp. You can choose one color for a monochromatic look or multiple colors for a vibrant and eye-catching display.
- Prepare the Food Coloring: In small separate bowls, add a few drops of your chosen food coloring to each bowl. The number of drops will depend on the intensity of color you desire. A few drops are usually sufficient, but you can adjust if needed.
- Add the Food Coloring: Carefully pour the colored mixture from the small bowls into the container of your lava lamp. It’s common to use a dropper or pipette to control the flow of the colored liquid and prevent any spills.
- Observe the Color Mix: As you add the food coloring, it will disperse within the oil layer and create captivating swirls and patterns. Watch as the colors mix and dance, transforming your lava lamp into a mesmerizing visual experience.
- Experiment with Colors: Feel free to get creative and experiment with different color combinations. You can add colors one by one, creating layers of colors, or mix them together to achieve unique effects. The choice is yours!
- Secure the Lid or Cap: Ensure that the lid or cap is securely closed after adding the food coloring to prevent any leakage or spills. A tight seal will keep the colors contained within the lamp and maintain its stunning appearance.
By adding food coloring, you introduce vibrant hues to your homemade lava lamp, elevating its visual appeal and creating a captivating display. The colors will add depth and dimension to the swirling motion that is yet to come. With this step complete, your lava lamp is ready for the finishing touch!
Step 6: Making the Lava Effect with Alka-Seltzer
The moment has come to bring your homemade lava lamp to life! By adding Alka-Seltzer tablets, you will create the mesmerizing lava effect that sets your lamp in motion. Follow these steps to activate the bubbling and swirling motion:
- Break the Alka-Seltzer Tablets: Start by breaking the Alka-Seltzer tablets into smaller pieces. You can use your hands or a utensil to crush them gently, creating several smaller chunks.
- Drop the Alka-Seltzer Pieces: Carefully drop a few small pieces of the crushed Alka-Seltzer tablets into the oil and water mixture. Start with a small amount and observe the reaction before adding more. Remember, it’s easier to add more later if needed than to remove excess tablets.
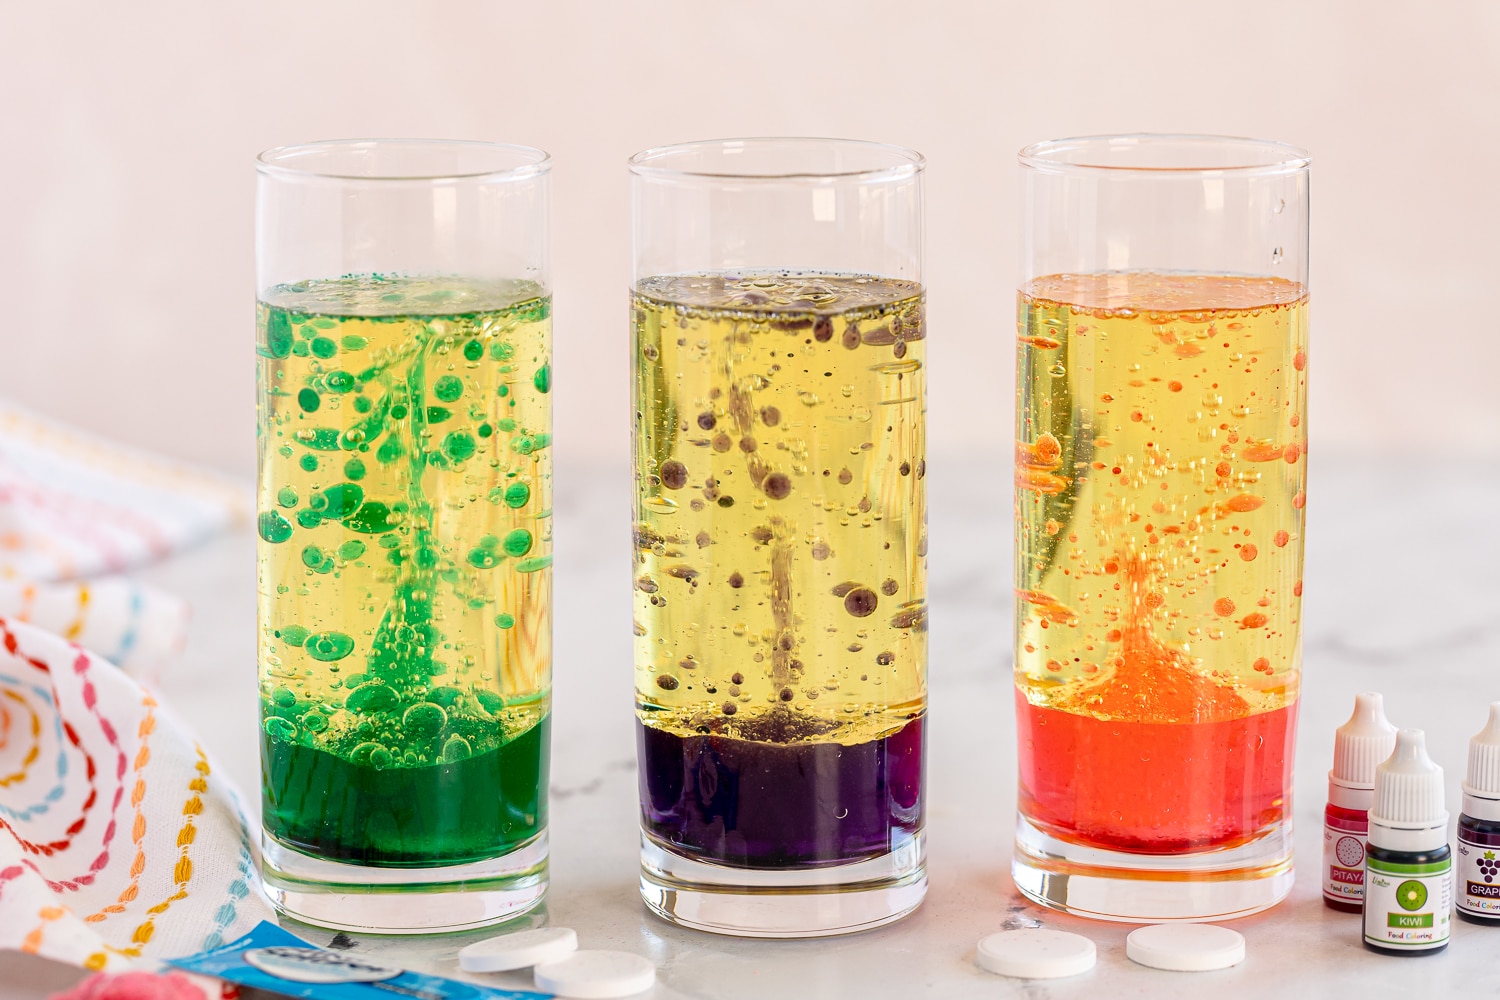
- Watch the Lava Effect: As the Alka-Seltzer tablets react with the water, they release carbon dioxide gas, creating bubbles that rise through the oil. These bubbles carry some oil with them, creating the mesmerizing lava-like motion. Watch as the colored bubbles rise and fall, transforming your lava lamp into a captivating visual spectacle.
- Add More Alka-Seltzer if Needed: If the lava effect isn’t as active as desired, you can add more small pieces of Alka-Seltzer to intensify the bubbling and swirling motion. Adjust the amount based on your preference and the size of your container, taking care not to overcrowd the lamp.
- Enjoy the Moving Lava: Sit back, relax, and enjoy the mesmerizing show as the lava-like bubbles continue to dance and swirl within your homemade lava lamp. Take in the soothing motion and the vibrant colors as your lamp becomes the focal point of any room.
- Use Caution: Remember to exercise caution when handling the Alka-Seltzer tablets and avoid inhaling the gas produced during the reaction. Additionally, be mindful of the temperature of the lamp, as prolonged use can cause it to become warm.
With the addition of Alka-Seltzer tablets, your homemade lava lamp comes alive with a captivating lava effect. The combination of the bubbling motion and the vibrant colors creates an enchanting display that will fascinate anyone who sees it. Enjoy the magical experience that your lava lamp provides!
Step 7: Enjoying Your Homemade Lava Lamp
Congratulations! You’ve successfully created your very own homemade lava lamp. Now it’s time to sit back, relax, and enjoy the mesmerizing display. Here are some tips to fully embrace the experience:
- Find a Suitable Spot: Choose a location where you can display your lava lamp. Make sure it’s on a stable surface away from direct sunlight, as excessive heat can affect the performance of the lamp.
- Turn off the Lights: To enhance the visual impact of your lava lamp, dim the lights or create a cozy atmosphere. The gentle glow from the lamp combined with the vibrant colors will create an ambiance that is both relaxing and captivating.
- Observe the Motion: Take the time to appreciate the dynamic motion of the lava effect. Watch as the bubbles rise and fall, creating fascinating shapes and patterns. Let your mind wander as you follow the swirling motion of the colored liquid.
- Experiment with Colors and Effects: Don’t be afraid to get creative! Add more food coloring or try different color combinations to change the appearance of your lava lamp. You can even adjust the amount of Alka-Seltzer tablets to alter the intensity of the lava effect.
- Invite Others to Enjoy: Share the magic of your homemade lava lamp with friends, family, or guests. It can serve as a unique conversation piece or a playful addition to a relaxing evening at home.
- Remember Safety Precautions: While enjoying your lava lamp, ensure that it is placed out of reach of children and pets. Also, avoid touching the lamp or removing the lid while it’s in operation to prevent any accidental spills or injuries.
- Interact and Relax: Your homemade lava lamp is meant to be both a visual spectacle and a source of relaxation. Take some time to de-stress, meditate, or simply enjoy the peaceful ambiance created by the soothing motion and vibrant colors.
With your homemade lava lamp, you’ve created a mesmerizing piece of decor that brings a touch of wonder and tranquility to any space. Sit back, immerse yourself in the captivating motion, and let your homemade lava lamp be a source of joy and fascination.