
Materials and Tools Needed
To create a shot glass shelf, you will need the following materials and tools:
- Wood: Select a sturdy wood material of your choice, such as pine, oak, or plywood.
- Measuring Tape: A measuring tape is essential for accurately measuring the dimensions of the shelf.
- Saw: Use a handsaw or a power saw for cutting the wood to the desired dimensions.
- Sandpaper: Choose sandpaper with medium to fine grit for smoothing the surface of the wood.
- Finish: Decide on a finish that suits your aesthetic preference, such as paint, stain, or varnish.
- Drill: A power drill will be needed to create holes for the mounting brackets.
- Mounting Brackets: These brackets will securely hold the shelf to the wall.
- Screws: Opt for screws that are appropriate for your mounting brackets and the type of wall you have.
- Level: Use a level to ensure that the shelf is properly aligned and straight.
- Pencil: A pencil will be used for marking the position of the mounting brackets and drilling holes.
- Cloth: Have a soft cloth handy for wiping away any dust or debris during the construction process.
- Decorative Elements: Enhance the visual appeal of your shelf with decorative items like paint, stencils, or decals.
- Shot Glasses: Finally, gather your collection of shot glasses to proudly display on the finished shelf.
By having these materials and tools on hand, you will be fully prepared to embark on your journey of creating a stunning shot glass shelf that will showcase your collection and add a touch of style to your space.
Step 1: Measuring and Planning
The first step in creating a shot glass shelf is to accurately measure and plan the dimensions of the shelf. Follow these steps to ensure a precise and well-designed shelf:
- Measure the available space: Use a measuring tape to determine the length, width, and height of the area where you intend to install the shelf. Consider any obstructions, such as light switches or outlets, and make note of their positions.
- Determine the size of the shelf: Based on the available space and the number of shot glasses you wish to display, decide on the dimensions of the shelf that will best accommodate your collection. Keep in mind that the shelf should be wide enough to hold the shot glasses without them being too crowded.
- Create a plan: Sketch a rough design of the shelf, taking into account the desired length, width, and height. You can include additional features such as decorative elements or storage compartments if desired.
- Consider the weight-bearing capacity: If you plan to display a substantial number of shot glasses or other items on the shelf, ensure that the chosen wood and mounting brackets can support the weight. It’s crucial to prioritize safety and avoid overloading the shelf.
- Check for levelness: Using a level, ensure that the area where you plan to install the shelf is level and straight. If needed, make adjustments to ensure a balanced and visually appealing installation.
By measuring accurately and carefully planning the design, you will have a solid foundation for successfully creating a shot glass shelf that fits seamlessly into your space. This step sets the stage for the rest of the construction process, allowing you to move forward with confidence.
Step 2: Selecting a Design
Choosing the right design for your shot glass shelf is an important step in creating a visually appealing and functional display. Consider the following factors when selecting a design:
- Theme and Style: Determine the overall theme or style you want to achieve with your shelf. Whether you prefer a rustic, modern, or eclectic look, there are various design options to choose from. The design should complement the existing decor in your space.
- Number of Shelves: Decide whether you want a single shelf or multiple tiers to accommodate your shot glass collection. Additional shelves can provide extra storage and add visual interest to the display.
- Open or Closed Back: Consider whether you want the back of the shelf to be open or closed. An open-back design allows for easy access to the shot glasses and creates an airy aesthetic. A closed-back design provides a solid background and can create a more formal look.
- Additional Features: Think about incorporating additional features into the design, such as hooks for hanging shot glasses, built-in lighting to showcase the collection, or even a mirror backing to create a sense of depth.
- Personalization: Explore ways to personalize the shelf design to reflect your individual style and interests. This could include adding engraved initials, a favorite quote or saying, or incorporating colors that resonate with you.
Take the time to research different designs and gather inspiration from magazines, websites, or social media platforms. Create a visual mood board or a collection of images that resonate with you to help narrow down your design choices. Remember, the design you select should not only showcase your shot glass collection but also enhance the overall aesthetics of the space.
Step 3: Choosing the Right Wood
When creating a shot glass shelf, selecting the right type of wood is crucial for both the durability and aesthetic appeal of the finished product. Consider the following factors when choosing the wood for your shelf:
- Sturdiness: Look for wood that is strong and durable enough to support the weight of the shot glasses. Hardwoods like oak or walnut are excellent choices as they are known for their durability.
- Aesthetic Appeal: Consider the overall look and feel you want to achieve. Different wood types have distinctive grains and colors. For a more rustic and natural look, consider using reclaimed or weathered wood. Alternatively, if you prefer a sleek and modern aesthetic, opt for woods with a smoother and more uniform finish.
- Budget: Take into account the cost of the wood. Some types of wood can be more expensive than others. If you’re on a tight budget, consider using engineered woods or plywood as they are more affordable and can still provide a good finish.
- Finishing Options: Consider how the chosen wood will interact with different finishing options, such as paint, stain, or varnish. Some woods may take finishes more readily than others, and the final result can vary depending on the wood type.
- Eco-Friendly Options: If sustainability is important to you, explore options for using responsibly sourced or reclaimed wood. This helps minimize environmental impact and adds character to your shot glass shelf.
Visit local hardware stores or specialty wood suppliers to see and feel the different wood options firsthand. Keep in mind the overall design of your space and select a wood type that not only meets your functional requirements but also enhances the overall aesthetic appeal of the shelf and complements your existing decor.
Step 4: Cutting the Wood
Once you have selected the appropriate wood for your shot glass shelf, it’s time to cut the wood to the desired dimensions. Follow these steps to ensure precise cutting:
- Measure and mark: Using a measuring tape and pencil, measure and mark the necessary dimensions on the wood. Double-check your measurements to avoid any errors.
- Select the appropriate saw: Depending on your experience and comfort level, choose either a handsaw or a power saw for the cutting process. Ensure that the selected saw is suitable for the thickness and type of wood you are working with.
- Secure the wood: Use clamps or secure the wood to a stable surface to ensure stability and safety during the cutting process.
- Follow the marked lines: Carefully align the saw blade with the marked lines on the wood, and make slow and precise cuts. If using a power saw, follow the manufacturer’s instructions for proper usage and safety precautions.
- Take breaks if needed: Cutting wood can be physically demanding. Take breaks if necessary to prevent fatigue and maintain focus.
- Smooth the edges: After cutting, use sandpaper to smooth out any rough or uneven edges. This will help create a polished and professional-looking finish.
- Wipe away sawdust: Use a clean cloth to wipe away any sawdust from the wood. This will ensure a clean surface for the next steps in the construction process.
Always prioritize safety when cutting wood. Wear protective goggles and gloves to protect your eyes and hands from potential injury. If you are unfamiliar with cutting wood, consider seeking guidance from a professional or experienced individual.
By cutting the wood accurately, you are one step closer to bringing your shot glass shelf to life. A precisely cut piece of wood will ensure that your shelf is sturdy, functional, and visually pleasing.
Step 5: Sanding and Smoothing the Surface
After cutting the wood for your shot glass shelf, the next step is to sand and smooth the surface to create a polished and professional finish. Follow these steps to achieve a smooth surface:
- Gather the necessary materials: You will need sandpaper with a medium to fine grit, a sanding block or sanding sponge, and a clean cloth.
- Begin with coarse sandpaper: Start by using a coarse-grit sandpaper to remove any rough surfaces, splinters, or imperfections on the wood. Sand evenly in the direction of the grain to avoid creating uneven patches.
- Switch to finer sandpaper: Gradually switch to finer-grit sandpaper to achieve a smoother surface. This will help eliminate any remaining roughness and refine the finish.
- Use a sanding block or sponge: To ensure even and consistent sanding, wrap the sandpaper around a sanding block or use a sanding sponge. This will help maintain a flat and uniform surface.
- Pay attention to edges and corners: Be thorough when sanding the edges and corners of the wood. These areas are prone to sharp edges and roughness, so take extra care to smooth them out.
- Check the smoothness: After sanding, run your hand along the surface to ensure it feels smooth to the touch. If you notice any rough spots or imperfections, continue sanding until the surface is uniformly smooth.
- Remove excess sawdust: Use a clean cloth or a tack cloth to wipe away any sawdust or debris left on the surface. This will ensure a clean and pristine surface for the next steps.
Remember to wear a mask and safety goggles to protect yourself from dust particles while sanding. Work in a well-ventilated area to prevent the buildup of dust.
Sanding and smoothing the surface of the wood is an essential step in creating a high-quality shot glass shelf. This process not only enhances the visual appearance of the wood but also creates a refined and enjoyable tactile experience for both you and your guests.
Step 6: Applying a Finish
Applying a finish to your shot glass shelf is a crucial step that not only protects the wood but also enhances its appearance. Follow these steps to achieve a beautiful and long-lasting finish:
- Choose the right finish: Consider the look you want to achieve and the level of protection required. Options include paint, stain, varnish, or a combination of these. Research each finish type to understand their pros and cons.
- Prepare the surface: Ensure the wood is clean and free of any dust or debris from the sanding process. Use a clean cloth or tack cloth to wipe the surface down, ensuring a smooth and even base for the finish.
- Apply the finish: Follow the manufacturer’s instructions for the chosen finish. Use a paintbrush or a clean cloth to evenly coat the wood. Apply the finish in thin, even layers, allowing each layer to dry completely before applying the next.
- Sand between coats: After each layer of finish has dried, lightly sand the surface with a fine-grit sandpaper. This helps create a smooth and seamless finish and promotes better adhesion between coats.
- Repeat the process: Apply additional coats of finish until you achieve the desired depth and sheen. Each new coat adds more protection and enhances the visual appeal of the wood.
- Allow for adequate drying time: Follow the manufacturer’s instructions for the recommended drying time between coats. Rushing this step may lead to a subpar finish.
- Final sanding: Once the final coat has dried, lightly sand the surface one last time with a fine-grit sandpaper. This ensures a smooth finish and removes any imperfections that may have occurred during the finishing process.
- Seal the finish: If desired, apply a clear sealant or top coat to protect the finish and add an extra layer of durability.
Remember to work in a well-ventilated area and wear appropriate protective gear, such as gloves and a mask, when applying finishes. Always follow the safety instructions provided by the manufacturer.
Applying a finish to your shot glass shelf not only enhances its appearance but also protects the wood from moisture, scratches, and other potential damage. Take your time with this step to ensure a flawless and long-lasting finish that will showcase your shot glass collection beautifully.
Step 7: Marking and Drilling Holes for Mounting Brackets
Once you have finished applying the finish to your shot glass shelf, the next step is to mark and drill holes for the mounting brackets. This is an important step in ensuring a secure and stable installation. Follow these steps for accurate hole placement:
- Position the shelf: Determine the desired height and position of the shelf on the wall. Use a level to ensure it is straight and aligned with your measurements from earlier steps.
- Mark the hole locations: Hold the mounting bracket against the back of the shelf and use a pencil to mark the positions for the screw holes. Make sure the brackets are evenly spaced and aligned.
- Double-check the markings: Before proceeding with drilling, double-check the accuracy of your markings. Measure and verify the distances between the holes to ensure they are consistent.
- Prepare the drilling area: Place a piece of scrap wood behind the area where you will be drilling to prevent splintering or damage to the back of the shelf.
- Choose the right drill bit: Select a drill bit that matches the diameter of the screws you will be using. This ensures a snug fit and secure attachment of the mounting brackets.
- Drill pilot holes: Using a power drill, carefully drill pilot holes at the marked locations. Start with a low drill speed and gradually increase as you penetrate the wood. This helps prevent splitting or cracking.
- Counterbore if necessary: If you are using screws with counterbore heads, drill shallow counterbore holes on the surface of the wood to allow the screw heads to sit flush.
- Clean up the drilling area: Use a soft cloth or brush to remove any wood shavings or debris from the drilling process. This will ensure proper screw installation.
Always exercise caution when drilling into wood to avoid injury. Wear safety goggles and work in a well-lit area, preferably with a stable workbench or surface to support the shelf during the drilling process.
By accurately marking and drilling the holes for the mounting brackets, you will be one step closer to securely installing your shot glass shelf. This step ensures a stable and reliable attachment to the wall, allowing you to confidently display your prized shot glass collection.
Step 8: Installing Mounting Brackets
After drilling the holes for the mounting brackets, the next step is to install them onto your shot glass shelf. Follow these steps to ensure a secure and stable installation:
- Prepare the mounting brackets: Ensure that the mounting brackets are clean and free of any debris. If necessary, wipe them down with a cloth to remove any dirt or dust.
- Align the brackets with the holes: Position the mounting brackets against the back of the shelf, aligning them with the pre-drilled holes. Double-check their alignment to ensure they are positioned correctly.
- Insert screws through the brackets: Insert the appropriate screws through the brackets and into the pre-drilled holes. Use a screwdriver or a drill with a screwdriver bit to tighten the screws. Take care not to overtighten, as it can damage the wood.
- Check for stability: After the first bracket is attached, check the stability of the shelf. If it feels secure, proceed with attaching the remaining brackets in the same manner.
- Ensure even spacing between brackets: As you install each bracket, ensure they are evenly spaced along the back of the shelf. This helps distribute the weight of the shot glasses and maintains balance.
- Level the shelf: Use a level to ensure that the shelf is straight and level on the wall. Make any necessary adjustments to the positioning of the brackets if needed.
- Securely tighten the screws: Once all the brackets are attached and the shelf is level, go back and securely tighten all the screws. This will ensure that they are firmly secured to the shelf.
It’s important to use the appropriate screws for your mounting brackets and the type of wall you are installing the shelf on. Consult with a hardware professional if you have any doubts about the suitability of the screws.
By properly installing the mounting brackets, you will have a sturdy and reliable support system for your shot glass shelf. This step is crucial to ensure that the shelf is securely attached to the wall and can safely display your cherished shot glass collection.
Step 9: Attaching the Shelf
With the mounting brackets securely in place, it’s time to attach the shot glass shelf to the wall. Follow these steps to ensure a proper and secure attachment:
- Prepare the wall: Clean the wall surface to ensure it is free of dust and debris. If necessary, use a stud finder to locate the studs or use wall anchors for added support.
- Position the shelf: Hold the shelf against the wall, aligning the brackets with the pre-drilled holes or screws in the wall. Make sure the shelf is level and positioned correctly.
- Secure the shelf to the wall: Insert the screws through the mounting brackets and into the wall at the appropriate locations. Use a screwdriver or drill with a screwdriver bit to firmly attach the shelf to the wall. Ensure that the screws are securely tightened.
- Check for stability: After attaching the shelf, give it a gentle shake or push to ensure it is stable and securely attached. Make any necessary adjustments or tighten the screws further if needed.
- Verify the levelness: Use a level to recheck the levelness of the shelf once it is attached to the wall. Make any slight adjustments if necessary to ensure that the shelf is straight and aligned.
- Double-check the weight-bearing capacity: Before placing shot glasses on the shelf, double-check the weight-bearing capacity of the mounting brackets and shelf. Ensure that they can support the anticipated weight without compromising stability.
Keep in mind the type of wall you are attaching the shelf to and adjust your installation method accordingly. For example, if you have drywall, consider using wall anchors for added support, especially if you have a substantial collection of shot glasses.
By following these steps, you will have successfully attached your shot glass shelf to the wall, creating a sturdy and visually appealing display for your collection. Ensure that the shelf is securely attached before proceeding to the next steps in the construction process.
Step 10: Adding Decorative Elements
Now that your shot glass shelf is securely attached to the wall, it’s time to add decorative elements to enhance its visual appeal. Follow these steps to personalize and beautify your shelf:
- Choose a color scheme: Consider the existing decor and color scheme of your space. Select colors that complement or accentuate the overall theme.
- Paint or stain the shelf: If desired, consider painting or staining the shelf to match your preferred color scheme. Apply the paint or stain in thin, even coats, allowing each layer to dry before applying the next.
- Add stencils or decals: For added visual interest, consider using stencils or decals to create patterns, designs, or artwork on the back or sides of the shelf. This can be a fun and creative way to personalize the shelf.
- Attach hooks or pegs: If you want to hang shot glasses or decorative items, consider attaching hooks or pegs to the underside of the shelf. This provides a functional and visually appealing way to display additional items.
- Integrate lighting: Consider incorporating lighting elements, such as LED strips or small battery-operated lights, to highlight your shot glass collection. This adds a touch of ambiance and creates a striking visual display.
- Showcase souvenirs or memorabilia: If you have shot glass-related souvenirs or memorabilia, such as shot glass holders, display them alongside your shot glass collection to add personality and depth to the shelf.
- Experiment with arrangement: Have fun arranging your shot glasses in different ways to create a visually appealing display. Consider grouping them by size, color, or theme, or arrange them in a way that tells a story or evokes a specific ambiance.
Remember to keep a balance between decorative elements and the functionality of the shelf. Be mindful not to overcrowd the shelf, as it may distract from the main focus – your shot glass collection.
By adding decorative elements, you can transform your shot glass shelf into a unique and personalized showcase that reflects your style and creativity. Let your imagination guide you as you infuse your own personal touch into the final design.
Step 11: Cleaning and Preparing the Shot Glasses
Before placing your shot glasses on the newly constructed shelf, it’s essential to clean and prepare them properly. Follow these steps to ensure that your shot glasses are sparkling clean and ready for display:
- Gather the necessary supplies: Prepare a clean sink or basin, mild dish soap, a soft sponge or cloth, and a lint-free towel.
- Inspect the shot glasses: Carefully examine each shot glass for any dirt, dust, or residue that may be present.
- Rinse the shot glasses: Rinse each shot glass under warm water to remove any loose debris.
- Wash with mild dish soap: Apply a small amount of mild dish soap to a soft sponge or cloth. Gently scrub the shot glasses, paying attention to areas with stubborn residue or stains.
- Rinse thoroughly: Rinse the shot glasses under warm water to remove all traces of soap. Make sure no soap residue remains.
- Dry the shot glasses: Use a lint-free towel to carefully dry each shot glass. Ensure that they are completely dry before placing them on the shelf to prevent water spots or other damage.
- Polish if necessary: If your shot glasses have become dull or have minor scratches, you can use a glass or metal polish to restore their shine. Follow the instructions on the polish and use a soft cloth to gently polish each shot glass.
- Inspect for any imperfections: After cleaning and drying, examine each shot glass for any lingering marks, scratches, or imperfections. Remove any remaining residue or correct minor imperfections before placing them on the shelf.
It’s crucial to handle shot glasses with care during the cleaning process to avoid accidentally breaking or damaging them. Take your time, and be thorough in cleaning each shot glass to ensure they look their best on the shelf.
By cleaning and preparing your shot glasses, you can proudly display your collection on the newly constructed shelf. Regularly dust and clean the shot glasses to maintain their pristine appearance and keep them looking their best.
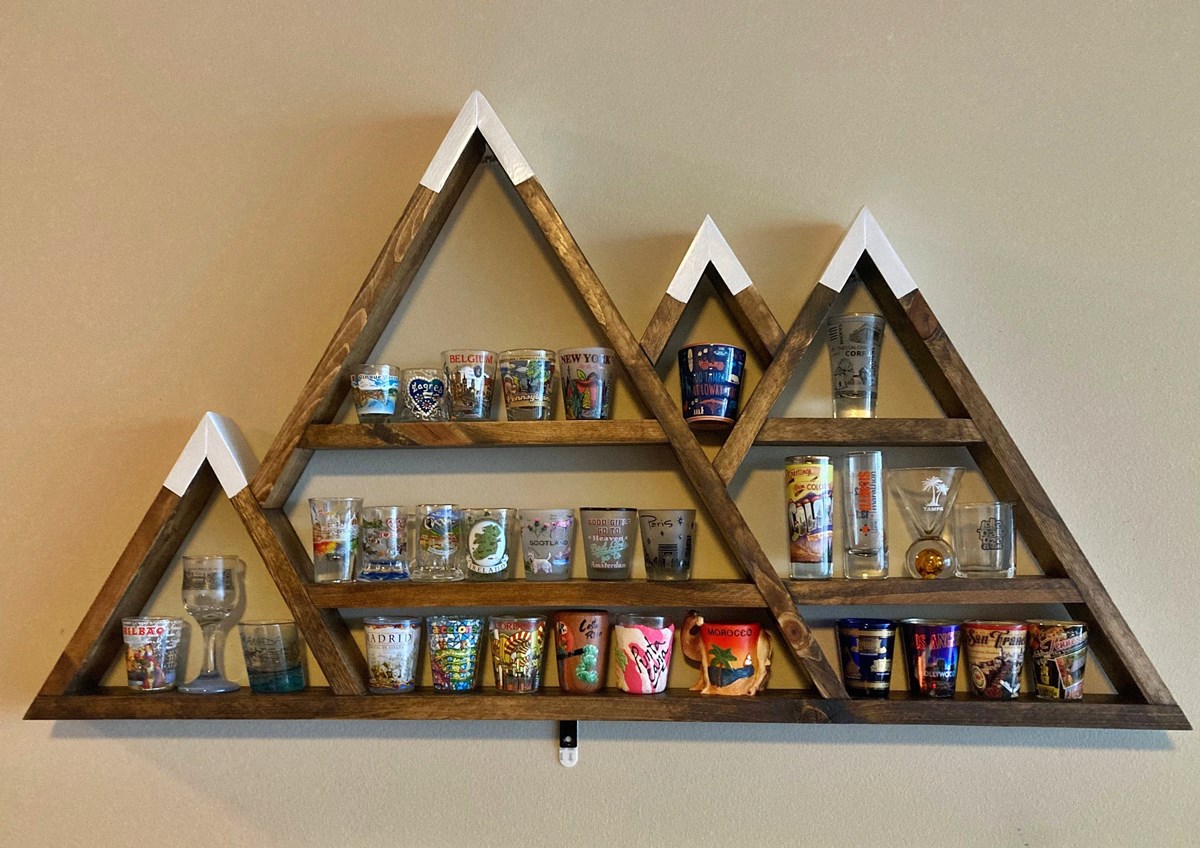
Step 12: Arranging the Shot Glasses on the Shelf
Now that your shot glasses are clean and the shelf is ready, it’s time to arrange them in an organized and visually appealing manner. Follow these steps to create an attractive display:
- Plan your arrangement: Decide how you want to arrange your shot glasses. You can group them by theme, color, or size, or create a visually balanced display by alternating taller and shorter glasses.
- Consider focal points: Choose a focal point or feature shot glass to draw attention. Place it at the center or in a prominent spot on the shelf.
- Utilize space: Make optimal use of the available space on the shelf. Leave enough room between the shot glasses to prevent them from feeling overcrowded, and consider using risers or display stands to add depth and variation to the arrangement.
- Vary shot glass angles: Experiment with different angles to add visual interest. Tilt some shot glasses slightly forward or backward to create depth and dimension in the display.
- Balance the arrangement: Maintain a sense of balance by distributing shot glasses evenly across the shelf. If necessary, adjust the placement to achieve symmetry or asymmetry, depending on the desired aesthetic.
- Add decorative elements: Enhance the display by incorporating decorative items such as small figurines, plants, or string lights. Keep these additions minimal so that they complement rather than distract from the shot glasses.
- Step back and assess: Once you’ve arranged the shot glasses, take a step back and evaluate the overall appearance. Make any necessary adjustments to achieve the desired look and ensure that the display is visually appealing from multiple angles.
Remember, the arrangement of your shot glasses can evolve over time. Feel free to change and experiment with different layouts to keep the display fresh and engaging.
By thoughtfully arranging your shot glasses on the shelf, you can create a visually striking display that showcases your collection beautifully. Take pride in your arrangement and enjoy the sight of your cherished shot glasses beautifully showcased for all to see.