
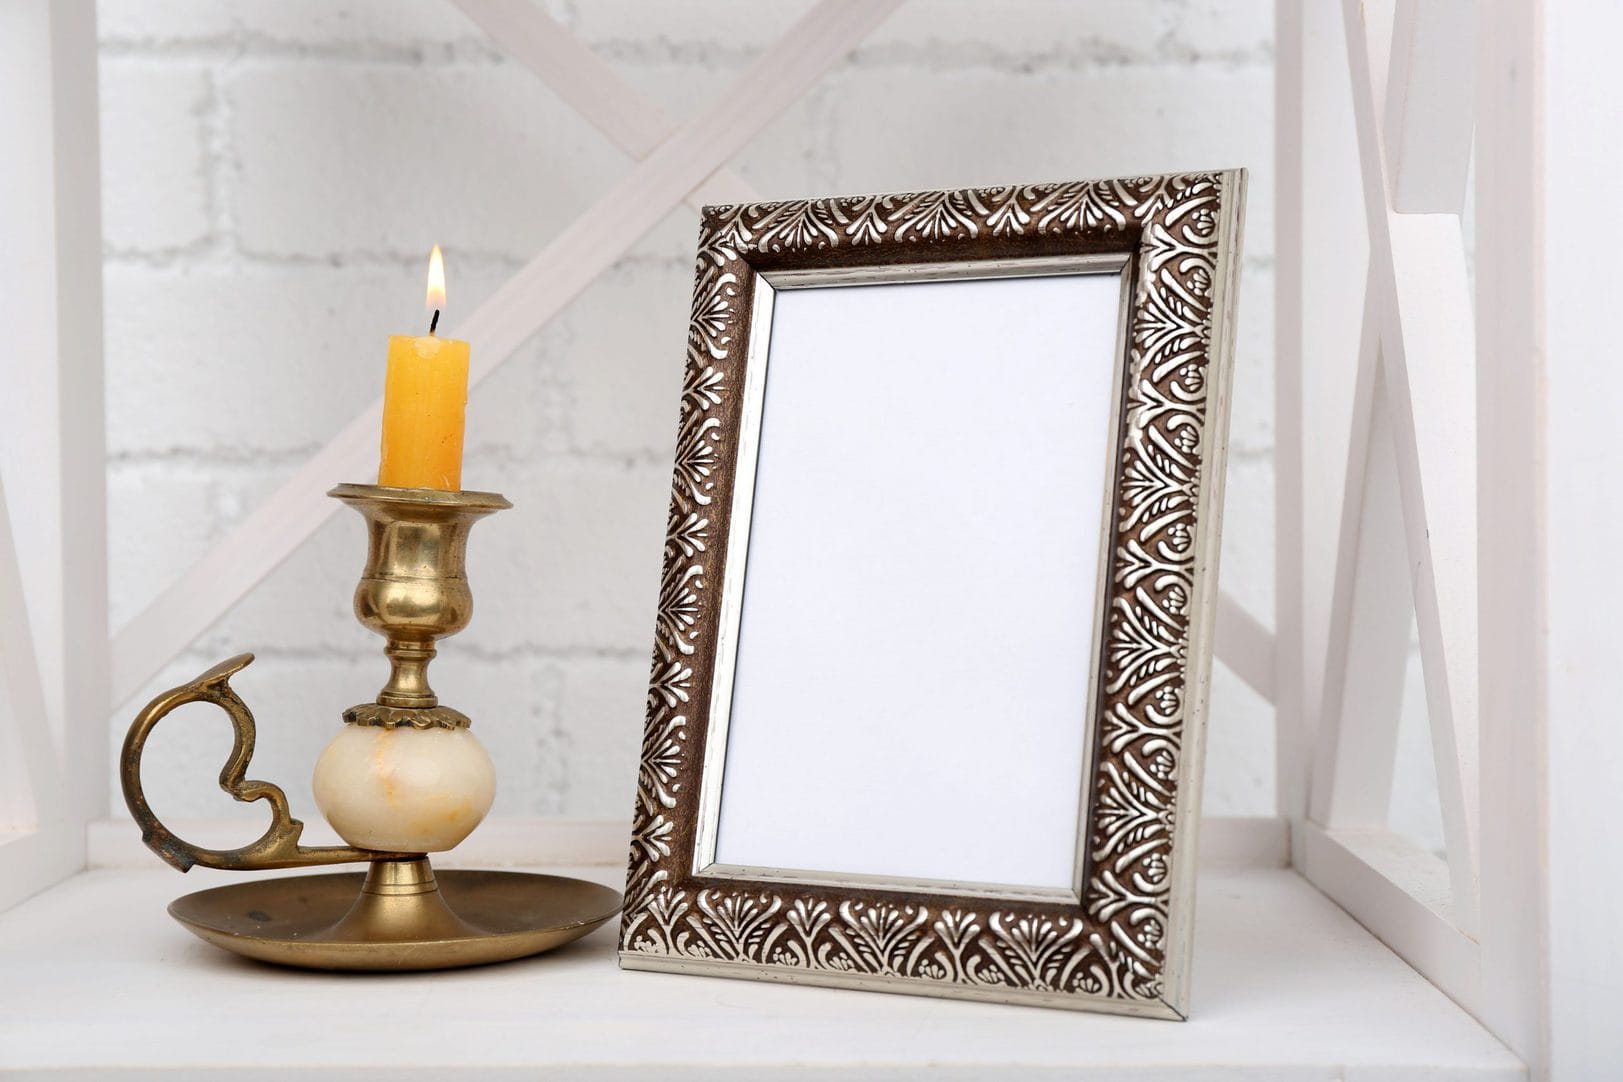
Choosing the Right Picture Frame
When it comes to making a picture frame look antique, the first step is to choose the right frame. The frame you select will play a crucial role in achieving the desired vintage appearance. Here are some key factors to consider when choosing the right picture frame:
- Material: Opt for frames made of wood, as they are more likely to give you the antique look you desire. Avoid frames made of plastic or metal, as they tend to have a more modern or contemporary aesthetic.
- Style: Look for frames with ornate designs or intricate detailing. Vintage frames often feature carved patterns, filigree work, or embossed motifs. These decorative elements will contribute to the antique feel of the final product.
- Size: Consider the size of your artwork or photograph and choose a frame that complements it. Vintage frames typically come in standard sizes, so it shouldn’t be too difficult to find one that fits your needs.
- Color: Opt for frames with muted or earthy tones. Antique frames often have distressed or faded finishes in colors like ivory, beige, or aged wood tones. Avoid frames with bright or vibrant colors, as they can detract from the vintage aesthetic.
- Condition: Look for frames with signs of wear and tear or patina. Small scratches, dents, or chipped paint can add character and authenticity to the antique look you are trying to achieve.
By carefully considering these factors, you can select a picture frame that is well-suited for creating an antique appearance. Remember that the frame should complement the artwork or photograph it will hold, so it’s essential to strike a balance between vintage charm and the overall aesthetic appeal of the piece.
Gathering the Supplies
Before you can begin the process of making a picture frame look antique, it’s essential to gather all the necessary supplies. Having everything ready will help streamline the project and ensure a smoother execution. Here is a list of supplies you will need:
- Picture frame: Start with a frame that you have selected for the antique makeover.
- Paint: Choose a base color for the frame. Opt for a chalk paint or a matte-finish paint for a more authentic antique look.
- Sandpaper: Select a medium-grit sandpaper to distress the frame and create a weathered appearance.
- Paintbrushes: Have a variety of brushes on hand, including a smaller brush for intricate detailing.
- Antiquing glaze: This is used to add an aged patina and enhance the antique look of the frame.
- Decorative elements: Optional embellishments such as stencils, decorative knobs, or vintage-style appliques can be added to enhance the antique aesthetic.
- Clean cloth: Use a soft cloth to clean the frame and remove any dust or debris before starting the painting process.
- Drop cloth or newspaper: Use these to protect your workspace from paint splatters and spills.
- Protective gloves: Wear gloves to prevent any paint or chemicals from coming into direct contact with your skin.
By having these supplies prepared and within reach, you can proceed with the antique transformation without any interruptions or delays. Ensure that the workspace is well-ventilated and properly protected to avoid any unwanted mess or accidents. With everything in place, you’ll be ready to embark on the journey of making your picture frame look beautifully antique.
Preparing the Frame
Before you can start painting and distressing your picture frame to achieve the antique look, it is crucial to properly prepare the frame surface. Here are the steps to follow:
- Clean the frame: Use a clean cloth to wipe down the frame and remove any dirt, dust, or debris. This will ensure that the paint adheres smoothly to the surface.
- Remove any hardware: If your frame has any knobs, hangers, or other hardware attached, carefully remove them with a screwdriver or pliers. This will make it easier to paint and distress the frame.
- Fill any imperfections: Inspect the frame for any cracks, dents, or holes. Use wood putty or filler to fill in these imperfections and create a smooth surface. Allow the putty to dry completely, and then sand it down until it is flush with the frame.
- Lightly sand the frame: Use a medium-grit sandpaper to lightly sand the entire frame surface. This will help the paint adhere better and create a rougher texture that will contribute to the antique look. Be sure to sand in the direction of the grain for a more natural finish.
- Wipe away the dust: After sanding, use a clean, dry cloth to wipe away any dust created. This will ensure a clean surface for painting.
By taking the time to properly prepare the frame, you are setting the foundation for a successful antique makeover. Cleaning the frame, removing hardware, filling imperfections, and sanding the surface will help create a smooth and primed canvas for the subsequent steps. Remember to work carefully and patiently to ensure the best results.
Applying a Base Coat of Paint
After preparing the frame, the next step in making a picture frame look antique is applying a base coat of paint. This base coat will serve as the foundation for the distressed and weathered finish that will give the frame its antique charm. Here’s how to apply the base coat:
- Select your desired base color: Choose a paint color that aligns with the antique look you want to achieve. Opt for muted or earthy tones, such as ivory, beige, or soft pastels, as they are commonly associated with vintage aesthetics.
- Prepare your workspace: Lay down a drop cloth or newspaper to protect your work surface from paint spills or splatters.
- Dip your brush into the paint: Dip your paintbrush into the base color paint, ensuring that it is evenly coated but not dripping. If needed, you can use a small tray or palette to hold the paint.
- Apply the base coat: Begin applying the paint to the frame, starting from one corner and working your way across. Use even strokes, applying a thin layer of paint. Let the first coat dry completely before applying a second coat, if necessary.
- Consider adding texture: To enhance the vintage look, you can use a dry brush technique or a rag to create subtle texture by lightly dabbing or dragging the paintbrush over the frame surface. This technique can mimic the natural wear and distressing of an antique frame.
- Clean your brushes: Once you have finished applying the base coat, clean your brushes thoroughly to prevent the paint from drying and ruining them. Use soap and water for water-based paints or an appropriate solvent for oil-based paints.
Applying a base coat of paint is a crucial step in the antique transformation process. The base color will provide the backdrop for the subsequent distressing techniques and layers of paint, adding depth and character to your frame. Take your time and ensure that the paint is applied evenly for a professional-looking base coat.
Creating a Distressed Look
One of the key steps in making a picture frame look antique is creating a distressed look. This technique adds a well-worn and aged appearance to the frame, giving it that authentic antique charm. Here’s how to achieve a distressed look:
- Select the areas to distress: Decide which areas of the frame you want to distress. Typically, you would focus on the edges, corners, and areas that would naturally experience wear and tear over time.
- Use sandpaper or a sanding block: Take a medium-grit sandpaper or sanding block and gently rub it over the selected areas in a back-and-forth motion. Apply varying levels of pressure to create different degrees of distressing. This will remove some of the paint and expose the wood or previous layers of paint beneath.
- Focus on high-traffic areas: Concentrate on spots that would naturally get more wear and tear, such as edges that might have rubbed against walls or corners that might have bumped into furniture.
- Vary your technique: Experiment with different sanding techniques to achieve the desired distressed effect. You can also try using techniques like scraping or tapping the frame with a hammer or chain to create unique patterns and textures.
- Step back and assess: As you distress the frame, step back and examine your progress frequently. This will help you gauge whether you have achieved the desired level of distressing or if you need to add more.
- Remove any residual dust: After distressing, use a clean cloth to wipe away any dust or debris created by the sanding process. This will prepare the frame for the next steps.
Creating a distressed look is an artful process that requires a balance of precision and creativity. By strategically distressing specific areas and experimenting with various techniques, you can achieve a beautifully weathered appearance that evokes the charm of an antique frame. Remember to practice patience and step back periodically to admire your work and make adjustments if necessary.
Sanding the Surface
Once you have applied the base coat of paint and created a distressed look, the next step in making a picture frame look antique is sanding the surface. Sanding helps to further enhance the weathered and worn appearance of the frame. Here’s how to effectively sand the surface:
- Select the appropriate sandpaper: Choose a fine-grit sandpaper, such as 220-grit, for this stage. A fine-grit sandpaper will help in smoothing out the surface while retaining the distressed look.
- Gently sand the entire frame: Using the fine-grit sandpaper, lightly sand the entire surface of the frame. Apply even pressure and move the sandpaper in smooth, circular or back-and-forth motions to achieve a consistent texture. Pay special attention to the distressed areas you created earlier to blend them seamlessly with the rest of the frame.
- Sand strategically: If you desire a more pronounced distressed look, you can focus on sanding specific areas, such as edges, corners, and areas that would naturally experience more wear and tear.
- Check your progress: Periodically stop and wipe away the sanding dust to check your progress. This will allow you to see if you have achieved the desired level of distressing and smoothness. If necessary, continue sanding until you are satisfied with the overall appearance.
- Remove residual dust: Once you have finished sanding, use a clean, dry cloth or a lightly dampened cloth to remove any remaining dust or debris from the frame surface.
Sanding the surface of the frame is a critical step in creating an authentic antique look. It helps to further enhance the distressed effect, giving the frame a beautifully worn and weathered appearance. Remember to approach sanding with a gentle touch and to check your progress frequently to ensure that you achieve the desired outcome. With patience and attention to detail, you can transform your picture frame into a stunning antique piece.
Adding Decorative Details
To truly make a picture frame look antique, incorporating decorative details can enhance its vintage charm. These details can add character and uniqueness to the frame, making it a standout piece. Here are some ideas for adding decorative details:
- Stenciling: Use stencils to add intricate patterns or designs to the frame. Consider vintage-inspired motifs, such as damask, fleur-de-lis or floral patterns. Apply the stencil to the desired area and use a small brush or sponge to carefully fill in the design with a contrasting color.
- Appliques: Vintage-style appliques or resin embellishments can be a beautiful addition to your antique frame. These decorative elements can be attached using strong adhesive or even small nails for a more secure hold. Choose appliques with ornate designs that complement the frame’s overall aesthetic.
- Decorative knobs or pulls: Replace standard screws or nails with decorative knobs or pulls. Opt for antique-inspired designs, such as porcelain, glass, or brass knobs, to enhance the vintage feel. These additions can elevate the overall appearance of the frame and add a touch of elegance.
- Aged patina: Create an aged patina effect by adding layers of paint in different colors. Apply a contrasting or complementary shade over the base coat and then gently sand through to expose the underlying layers. This technique gives the frame an authentic, weathered look.
- Crackle finish: If desired, you can achieve a crackle finish by using special crackle mediums or paints. Apply a base coat, allow it to dry, and then apply the crackle medium. Once the medium has dried, apply a topcoat color. As the topcoat dries, it will crack and expose the base coat, creating an antiqued crackle effect.
- Gilding: For an elegant touch, consider adding gilding to the frame. Apply gold or silver leaf using adhesive and carefully pat it onto the frame’s surface. Use a soft brush to remove any excess and gently buff the areas to achieve a beautiful metallic sheen.
By adding these decorative details, you can further enhance the antique aesthetic of your picture frame. Experiment with different techniques and elements to find the perfect combination that reflects your personal style and the era you wish to evoke. Remember that attention to detail and precision are key to achieving a truly authentic antique look.
Applying a Second Coat of Paint
After distressing the frame and adding decorative details, the next step in making a picture frame look antique is applying a second coat of paint. This coat will add depth and richness to the frame, enhancing its vintage appeal. Here’s how to apply a second coat of paint:
- Choose the second coat color: Select a paint color that complements the base coat and enhances the antique vibe. Consider using a slightly darker or contrasting color to create a layered effect.
- Prepare your workspace: Ensure that your work area is protected with a drop cloth or newspaper to catch any paint spills or drips.
- Dip your brush into the paint: Dip a clean paintbrush into the second coat color, making sure the bristles are evenly coated but not overloaded with paint.
- Apply the second coat: Starting from one corner, carefully apply the paint to the frame, using smooth and even brush strokes. Cover the entire surface, ensuring that the second coat is evenly distributed.
- Consider layering and blending techniques: For a more complex and authentic appearance, experiment with layering and blending techniques. You can lightly dry brush a different shade over the second coat to create texture and depth. Alternatively, you can use a damp cloth or sponge to gently blend the colors together.
- Allow the paint to dry: Follow the paint manufacturer’s instructions for drying time. Ensure that the frame is completely dry before proceeding to the next step.
Applying a second coat of paint adds richness and dimension to your picture frame, enhancing its antique look. The layering of different colors and the use of blending techniques can create a beautifully worn and aged appearance. Be mindful of the drying time to avoid smudges or damage to the freshly painted frame. With a second coat of paint, your frame will start to truly resemble an authentic antique piece.
Applying Antiquing Glaze
To add the final touch of aging and depth to your antique picture frame, applying an antiquing glaze is essential. The antiquing glaze will settle into the crevices, highlighting the distressed areas and accentuating the vintage charm. Here’s how to apply antiquing glaze:
- Choose the right antiquing glaze: Select an antiquing glaze that complements the color palette of your frame and enhances the antique look. Consider using a brown or sepia-toned glaze for a warm and authentic effect.
- Prepare your workspace: Make sure your work area is clean and well-ventilated. Protect your workspace with a drop cloth or newspaper to catch any drips or spills.
- Apply the glaze: Using a soft brush or a lint-free cloth, apply a small amount of antiquing glaze onto the frame. Work in small sections, applying the glaze to the distressed areas and any crevices or details in the frame design.
- Blend and wipe away excess: After applying the glaze, use a clean cloth or brush to gently blend it into the frame. The glaze should settle into the distressed areas, giving them an aged appearance. Wipe away any excess glaze from the flat areas of the frame, allowing the glaze to remain in the recessed areas.
- Continue the process: Work your way around the entire frame, applying and blending the antiquing glaze until you achieve the desired level of antiquing.
- Allow the glaze to dry and cure: Follow the manufacturer’s instructions for drying and curing time. Ensure that the frame is completely dry before handling or displaying it.
Applying antiquing glaze adds depth, character, and an overall aged look to your picture frame. The glaze settles into the distressed areas, enhancing the antique charm and giving the frame an authentic vintage appearance. Take your time to blend the glaze effectively and to wipe away any excess for a seamless finish. With the application of the antiquing glaze, your picture frame will truly capture the essence of an antique treasure.
Finishing Touches
Now that you have transformed your picture frame into a beautiful antique piece, it’s time to add those final finishing touches that will complete the vintage look. Here are some ideas to consider:
- Seal the frame: To protect the paint and glaze, consider applying a clear, matte sealant. This will help preserve the finish and ensure that your antique frame withstands the test of time.
- Clean up any imperfections: Take a close look at the frame and make any necessary touch-ups. Use a small brush or sponge to fix any areas where paint might have chipped off or where the distressing needs to be adjusted.
- Add a patina or wax: For an extra touch of authenticity and to further enhance the antique look, consider applying a patina or wax. This can be done by lightly brushing or rubbing it onto the frame to create subtle aging or a soft sheen.
- Replace the backing and glass: If the frame originally came with a backing or glass, check if they are suitable for the antique look you desire. Consider replacing them with materials that align with the vintage aesthetic, such as aged paper for the backing or old-fashioned glass.
- Display with complementary elements: Complement the antique frame by displaying it with other vintage or classic elements. Arrange it with aged photographs, vintage paintings, or other antique-inspired décor to create a cohesive and nostalgic display.
- Protect and care for the finished frame: Once your antique frame is complete, handle it with care to avoid scratching or damaging the finish. Regularly dust the frame using a soft cloth or a feather duster to keep it looking its best.
By adding these finishing touches, your antique picture frame will become a stunning centerpiece that exudes timeless elegance. Take the time to ensure that every detail is polished and aligned with the vintage aesthetic you have created. With the final touches in place, you can proudly showcase your finished antique frame and enjoy its charm for years to come.