
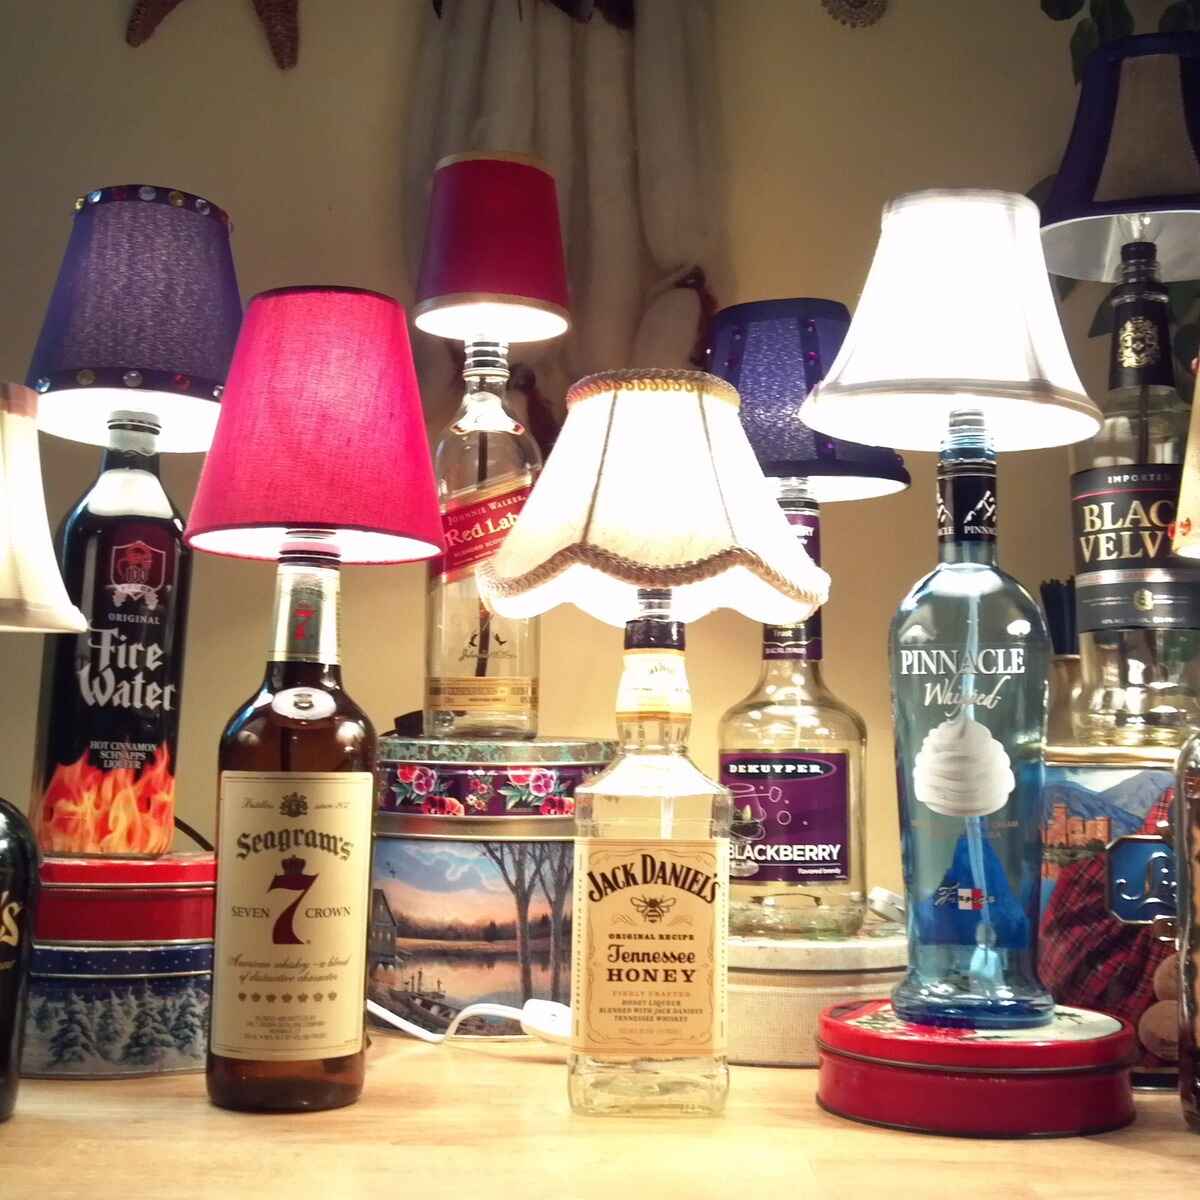
Choosing the Right Bottle
When creating a liquor bottle lamp, one of the most important factors to consider is choosing the right bottle. The bottle you select will not only determine the overall appearance of the lamp but also its stability and functionality. Here are some key points to keep in mind when selecting your bottle:
- Size and Shape: Consider the size and shape of the bottle based on your desired lamp design. Tall and slender bottles work well for table lamps, while wider bottles may be better suited for floor lamps.
- Stability: Ensure that the bottle has a sturdy base to provide stability for the lamp. Bottles with uneven bottoms or narrow necks may not be suitable for conversion into lamps as they may be prone to tipping over.
- Transparency: Decide whether you want a clear or opaque bottle. Clear bottles can showcase the contents of the lamp, such as colored liquid or decorative elements, while opaque bottles can be used to create a more diffused glow.
- Theme or Brand: Consider using a bottle that aligns with a specific theme or brand. For example, a bottle from a favorite whiskey or tequila brand can lend a unique touch and personalized feel to the lamp.
- Bottle Condition: Ensure that the bottle is clean, free from cracks or chips, and in good condition. Avoid using bottles with labels that can’t be easily removed, as they may hinder the overall appearance of the lamp.
Take some time to browse through your collection or visit local liquor stores to find the perfect bottle for your lamp project. Remember, the bottle you choose will play a significant role in enhancing the aesthetic appeal of your liquor bottle lamp.
Cleaning and Preparing the Bottle
Before you begin transforming your liquor bottle into a lamp, it’s important to thoroughly clean and prepare the bottle. Follow these steps to ensure the bottle is ready for the conversion process:
- Remove Labels: Start by removing any labels or stickers from the bottle. Soak the bottle in warm, soapy water for a few minutes to loosen the adhesive. Gently scrub the label with a sponge or scrub brush to remove any residue. For stubborn labels, you can use adhesive removers or a mixture of baking soda and oil.
- Clean the Interior: If the bottle previously contained alcohol or any other liquid, clean the interior thoroughly. Rinse the bottle with warm water to remove any residue. You can also add a small amount of dish soap and use a bottle brush to scrub the interior, paying particular attention to the bottom and corners.
- Dry the Bottle: After cleaning, allow the bottle to air dry completely. Placing the bottle upside down on a clean towel can help expedite the drying process.
- Smooth Rough Edges: Check the edges of the bottle opening for any sharp or uneven edges. If necessary, use sandpaper or a sanding block to smooth the edges carefully. This will ensure a safe and secure fit for the lamp components.
- Inspect for Cracks or Chips: Carefully inspect the bottle for any cracks, chips, or imperfections. If you notice any, it’s best to choose another bottle to ensure the durability and safety of your lamp.
A clean and well-prepared bottle will not only enhance the final appearance of your liquor bottle lamp but also ensure that it functions properly and is safe to use. Taking the time to properly clean and prepare the bottle will set a solid foundation for the rest of the conversion process.
Drilling a Hole in the Bottle
Once you have chosen and cleaned your liquor bottle, the next step in creating your bottle lamp is drilling a hole in the bottle. This hole will be used to pass the electrical cord and wire through. Follow these guidelines to safely and effectively drill a hole in the bottle:
- Mark the Drill Point: Decide where you want the hole to be drilled on the bottle. It is usually best to choose a spot on the lower side or base of the bottle for stability. Use a marker or tape to mark the precise point where you will drill.
- Secure the Bottle: To prevent the bottle from slipping or rolling during drilling, it is important to secure it properly. One method is to use a bottle vice or clamp to hold the bottle steady. Alternatively, you can create a makeshift support using foam or a towel to prevent rolling.
- Prepare the Drill and Bit: Select a drill bit suitable for drilling through glass or ceramics. A diamond or carbide-tipped bit works best for this purpose. Make sure the bit is securely attached to the drill and tighten it properly.
- Start Drilling: Begin drilling at a slow speed to prevent cracking or shattering the glass. Apply light pressure and let the drill bit do the work. Use a constant and steady motion and periodically apply a small amount of water to lubricate the drill bit.
- Monitor the Progress: Keep a close eye on the drilling progress to ensure the hole is forming evenly. Adjust the drill speed and pressure if needed. Take breaks to allow both the drill and the bottle to cool down to prevent overheating.
- Finish and Smooth the Hole: Once the hole is drilled, stop the drill and carefully remove any glass fragments or debris. Use sandpaper or a diamond file to gently smooth the edges of the hole. Be cautious not to apply too much pressure to avoid damaging the bottle.
Drilling a hole in a liquor bottle may require practice and patience. Remember to wear protective goggles and gloves during the drilling process to prevent any potential accidents. Always take your time and pay close attention to ensure the hole is drilled accurately and safely.
Wiring the Lamp Kit
After drilling the hole in your liquor bottle, the next step in creating your bottle lamp is wiring the lamp kit. The lamp kit will provide the necessary components for powering and illuminating your bottle lamp. Follow these steps to properly wire the lamp kit:
- Gather the Lamp Kit Components: Ensure that you have all the components of the lamp kit, including the socket, cord, plug, and switch. Check that everything is in good condition and free from any damage.
- Thread the Cord Through the Hole: Insert the cord through the hole in the bottle, starting from the inside. Gently push the cord through until it comes out from the outside of the bottle. Take care not to strain or damage the cord while threading it through.
- Attach the Socket: Follow the instructions provided with the lamp kit to attach the socket to the end of the cord inside the bottle. Secure the socket in place according to the manufacturer’s guidelines.
- Wire the Socket: Carefully strip the insulation from the end of the cord wires. Attach the exposed wires to the appropriate terminals on the socket, following the color-coding or instructions provided with the lamp kit. Securely tighten the wire connections.
- Install the Switch and Plug: If your lamp kit includes a switch, follow the instructions to install it on the cord. Position the switch at a convenient location along the cord, typically near the plug. Attach the plug to the end of the cord, ensuring a secure connection.
- Test the Wiring: Before proceeding, double-check all the connections to ensure they are properly secured. Once confirmed, plug the lamp into a power source and test the wiring by turning the switch on and off. Ensure that the lamp functions correctly.
Wiring the lamp kit requires attention to detail and following the manufacturer’s instructions. If you are uncertain about any aspect of the wiring process, consult a professional electrician to ensure your safety and the proper functioning of your bottle lamp.
Assembling the Lamp
Once you have wired the lamp kit, the next step in creating your liquor bottle lamp is assembling all the components together. Follow these steps to safely and effectively assemble your bottle lamp:
- Secure the Socket: Ensure that the socket is securely attached to the inside of the bottle according to the manufacturer’s instructions. Tighten any screws or fittings as needed to keep the socket in place.
- Position the Cord: Arrange the cord neatly inside the bottle, ensuring that it doesn’t get tangled or interfere with the other components. Make sure the cord is properly aligned with the drilled hole to avoid strain.
- Fit the Bottle Cap: If your liquor bottle came with a screw-on cap, place it back on the bottle. This will help to stabilize the socket and provide a finished look to the lamp.
- Secure the Lampshade: Depending on your lamp design, attach the lampshade to the socket using the appropriate method. This could involve using a harp, a fitter, or a clip-on mechanism. Follow the instructions provided with the lampshade and make sure it is securely in place.
- Arrange the Cord: Once all the components are assembled, arrange the cord neatly along the base of the lamp or use a cord cover to conceal it. This will give your liquor bottle lamp a polished and professional appearance.
- Test the Lamp: Before using the lamp, ensure that all the connections are secure and that the lampshade is not touching the bulb. Plug in the lamp, turn it on, and confirm that it is functioning properly.
Assembling the lamp should be done with care to ensure the stability and safety of the final product. Take your time to ensure that all the components are properly secured and aligned. When done correctly, your liquor bottle lamp will be ready to illuminate your space with its unique and personalized charm.
Adding a Bulb and Lampshade
After assembling the basic structure of your liquor bottle lamp, it’s time to add a bulb and a lampshade to complete the look and functionality. Follow these steps to properly add a bulb and lampshade to your bottle lamp:
- Choose the Right Bulb: Select a bulb that fits the socket and complements the overall style and ambiance you want to create. Consider the wattage and the type of bulb, such as incandescent, LED, or CFL, based on your preferences and energy-saving goals.
- Insert the Bulb: Ensure that the lamp is unplugged before inserting the bulb. Align the bulb’s base with the socket and gently twist it in a clockwise direction until it is securely in place. Be careful not to overtighten or force the bulb.
- Check the Lampshade Fit: If your lampshade uses a harp or fitter, attach it to the socket following the instructions provided. Make sure the lampshade fits securely and is evenly balanced. Adjust the position of the harp or fitter if necessary.
- Test the Lighting: Plug in the lamp and turn it on to test the lighting. Ensure that the bulb illuminates properly and that the lampshade casts a desirable and suitable amount of light. Make any adjustments needed to achieve your desired lighting effect.
- Consider Lampshade Position: Experiment with positioning the lampshade to achieve the desired direction of light and overall appearance. Adjust the harp, fitter, or lampshade angle until you achieve your desired aesthetic and functionality.
- Personalize with Lampshade: Consider adding a decorative lampshade that complements the style of your liquor bottle lamp. Whether you choose a classic, modern, or whimsical design, the lampshade can add an extra touch of personality and flair to your lamp.
- Ensure Safety: Regularly check that the bulb is securely in place and not touching the lampshade to avoid overheating and potential fire hazards. Additionally, be mindful of the wattage recommendations for your lamp to avoid strain on the electrical components.
By carefully selecting the right bulb and lampshade and following these steps, you can customize the lighting and style of your liquor bottle lamp to suit your preferences. Take the time to ensure that everything is properly installed and functioning before enjoying the warm glow of your unique creation.
Decorating and Personalizing Your Lamp
Once you have assembled the basic components of your liquor bottle lamp, it’s time to let your creativity shine by decorating and personalizing it. Here are some ideas to help you make your lamp truly unique:
- Add Decorative Elements: Consider embellishing your lamp with decorative elements such as ribbons, beads, charms, or twine. These can be wrapped around the neck of the bottle or attached to the lampshade to add a touch of charm and individuality.
- Apply Paint or Stickers: Use acrylic paint or adhesive stickers to add designs, patterns, or messages to the bottle. You can create anything from simple stripes or polka dots to intricate designs that reflect your personal style or complement your home decor.
- Apply Decoupage: Decoupage allows you to adhere decorative paper, fabric, or napkins to the surface of the bottle. Choose patterns or images that resonate with you and apply them using decoupage glue or medium. Finish with a sealant to protect the design.
- Showcase Memorabilia: If you have special mementos or trinkets that hold sentimental value, incorporate them into your lamp design. Consider placing them inside the bottle or attaching them to the lampshade for a personalized touch.
- Create a Themed Lamp: Choose a theme that reflects your interests or a specific room decor. For example, you can create a rustic-inspired lamp with twigs and burlap, or a coastal-themed lamp with shells and netting. Let your imagination guide you.
- Explore Lighting Effects: Consider adding unique lighting effects to your lamp. Use colored or specialty bulbs to create different moods or experiment with string lights or fairy lights inside the bottle to create an enchanting glow.
- Add a Custom Lampshade: If you have a talent for crafting, create a custom lampshade that complements your bottle lamp. Use fabric, paper, or other materials to craft a one-of-a-kind lampshade that truly reflects your style.
Remember, the goal of decorating and personalizing your liquor bottle lamp is to make it a reflection of your personal taste and style. Let your creativity guide you as you experiment with different elements and techniques to make your lamp truly unique and eye-catching.
Safety Precautions and Tips
While creating and enjoying your liquor bottle lamp, it’s essential to prioritize safety. Follow these precautions and tips to ensure a safe and secure experience:
- Use Proper Wiring Equipment: Use only lamp kits specifically designed for bottle lamps. Make sure the wiring, socket, and plug are in good condition, and follow the manufacturer’s instructions for installation.
- Be Mindful of Heat: Liquor bottle lamps can generate heat. Choose a bulb with a wattage that is appropriate for the lamp and allow enough ventilation to prevent overheating. Avoid placing flammable objects near the lamp.
- Inspect the Electrical Components: Regularly check the socket, cord, plug, and switch for any signs of damage. If you notice frayed wires, loose connections, or other issues, discontinue use and repair or replace the damaged components.
- Position the Lamp Safely: Place the lamp on a stable surface to prevent accidental tipping. Avoid placing it near curtains, bedding, or other flammable materials. Keep it out of reach of children and pets to prevent accidents.
- Avoid Overloading Power Outlets: Do not overload electrical outlets by plugging in too many appliances or lamps. Follow the recommended wattage for your lamp and distribute the load evenly across outlets.
- Never Leave the Lamp Unattended: Always switch off the lamp and unplug it when leaving the room or going to bed. This helps prevent electrical hazards and reduces the risk of fire.
- Handle the Bottle with Care: Be cautious when handling the liquor bottle, especially if it has sharp edges from drilling. Use gloves when necessary and keep the lamp out of reach from children to prevent accidents.
- Follow Local Electrical Codes: Familiarize yourself with the electrical codes and regulations specific to your area. If you are unsure about any aspect of creating or wiring your lamp, consult a professional electrician for guidance.
By following these safety precautions and tips, you can enjoy your liquor bottle lamp with peace of mind, knowing that you have taken the necessary steps to ensure a safe and secure lighting experience.
Troubleshooting Common Issues
While creating and using your liquor bottle lamp, you may encounter some common issues. Here are a few troubleshooting tips to help you address these problems:
- Lamp Not Turning On: Double-check that the lamp is plugged in properly and that the switch is in the “on” position. Ensure that the bulb is securely screwed into the socket. If the problem persists, check the wiring connections to ensure they are properly made.
- Flickering or Dim Light: If the light from your lamp is flickering or dim, there may be a loose connection or a bulb issue. Check the wiring connections to ensure they are secure. If the problem persists, try replacing the bulb with a new one of the appropriate wattage.
- Bulb Burning Out Quickly: If you find that the bulb in your liquor bottle lamp is burning out frequently, it could be due to excessive wattage or heat build-up. Make sure you are using the correct wattage bulb and consider using LED bulbs, which generate less heat and have a longer lifespan.
- Lampshade Slipping or Unstable: If your lampshade keeps slipping or appears unstable, check to ensure that it is properly attached to the harp, fitter, or clip-on mechanism. Adjust the attachment if needed or consider using adhesive felt pads to provide better grip between the lampshade and the socket.
- Strange Odor or Smoke: If you notice a strange odor or see smoke coming from your liquor bottle lamp, immediately switch it off and unplug it. The issue may be due to a wiring problem or other electrical faults. Discontinue use and consult a professional to inspect and repair the lamp.
- Stained or Cloudy Bottle: Over time, the inside of the liquor bottle may become stained or cloudy due to the heat generated by the bulb. To remove stains, try using a mixture of warm water and vinegar or a specialized glass cleaner. For cloudy bottles, consider using a bottle polishing kit to restore the clarity.
If you encounter any issues with your liquor bottle lamp that you are unable to resolve on your own, it is advisable to seek assistance from a professional electrician or lamp repair expert. They can provide expert guidance and address any underlying problems to ensure safe and optimal functioning of your lamp.
Frequently Asked Questions
Here are some frequently asked questions about creating and using liquor bottle lamps:
- Can any type of liquor bottle be used for a lamp?
Yes, you can use various types of liquor bottles for your lamp, such as wine, whiskey, or vodka bottles. Just ensure that the chosen bottle is clean, in good condition, and has a stable base. - Do I need any special tools to drill a hole in the bottle?
Yes, you will need a diamond or carbide-tipped drill bit suitable for drilling through glass or ceramics. It’s important to use proper safety equipment like gloves and goggles while drilling. - What type of bulb should I use for my liquor bottle lamp?
The type of bulb will depend on personal preference and the effect you want to achieve. Ensure that the bulb is not too high in wattage and consider using LED bulbs for energy efficiency and longer lifespan. - Can I customize the appearance of my liquor bottle lamp?
Absolutely! You can personalize your lamp by adding decorations, paints, stickers, or decoupage. Feel free to get creative and make your lamp unique to your style and preferences. - Is it safe to leave the liquor bottle lamp on for extended periods of time?
It is not recommended to leave the lamp on for extended periods unattended. Always switch it off and unplug it when not in use or when leaving the room to ensure safety and conserve energy. - How do I clean my liquor bottle lamp?
To clean the exterior of the lamp, use a soft cloth and mild glass cleaner. Avoid immersing the lamp or electrical components in water, as this can damage them. If the lampshade is detachable, follow the manufacturer’s cleaning instructions. - Can I convert any bottle into a lamp?
While liquor bottles are commonly used due to their aesthetics, stability, and availability, you can convert other types of bottles into lamps as well. Just ensure that the bottle has a stable base and the necessary modifications can be made to accommodate the lamp kit.
If you have any other questions or concerns about creating or using a liquor bottle lamp, it is advisable to consult relevant tutorials, guides, or seek advice from professionals who specialize in DIY lamp projects to ensure a successful and enjoyable experience.