
Materials Needed
Before you embark on making your own canvas picture frame, it’s important to gather all the necessary materials. Here is a list of items you will need:
- Wooden boards – Choose sturdy and durable wood, such as pine, that is at least 1 inch thick.
- Saw – Opt for a miter saw or a hand saw to accurately cut the wood to the desired lengths.
- Sandpaper – Use sandpaper with different grits, such as 80, 120, and 220, to smooth the wood surfaces.
- Wood glue – Select a strong wood adhesive to securely join the frame pieces together.
- Staple gun – Get a reliable staple gun to attach the canvas to the back of the frame.
- Canvas fabric – Choose a high-quality canvas material that is larger than the opening of the frame.
- Backing material – Opt for a sturdy material, such as foam board or cardboard, to support the canvas.
- Hanging hardware – Purchase D-ring hangers and picture wire to securely hang the frame on the wall.
- Finishing supplies (optional) – If desired, you can use paint, stain, or varnish to add a personalized finish to the wood frame.
Make sure to gather all these materials before you start your project. Having everything on hand will make the process smoother and more enjoyable. Once you have everything you need, you can move on to the next step of measuring and cutting the wood for your canvas picture frame.
Step 1: Measuring and Cutting the Wood
Getting the correct measurements and making precise cuts is crucial for a well-fitting canvas picture frame. Follow these steps to measure and cut the wood:
- Measure the dimensions: Start by measuring the size of the artwork or picture you want to frame. Add an extra 1 to 2 inches to each side to allow for the frame’s edge.
- Mark the measurements: Use a pencil to mark the measurements on the wooden boards. Make sure to mark both the length and width on each piece.
- Cut the wood: Using a saw, carefully cut the wooden boards according to your measurements. Remember to follow the marked lines precisely for accurate cuts.
- Miter the corners (optional): To create a more professional-looking frame, you can miter the corners. This involves cutting the ends of each board at a 45-degree angle. Make sure to align the angles correctly for a seamless joint.
- Sand the edges: After cutting the wood, use sandpaper to smooth the edges of the boards. This will remove any roughness and ensure a clean finish.
It’s important to take your time and double-check your measurements before making any cuts. Precision is key when creating a custom canvas picture frame. Once you have measured and cut the wood, you can move on to the next step of sanding the wood to prepare it for assembly.
Step 2: Sanding the Wood
Sanding the wood is an essential step in preparing the surface of the frame for assembly. Follow these steps to properly sand the wood:
- Start with rough grit sandpaper: Begin by using rough grit sandpaper, such as 80 or 120, to remove any roughness, splinters, or imperfections on the surface of the wood. Move the sandpaper back and forth in the direction of the wood grain to achieve an even finish.
- Transition to finer grit sandpaper: Once the surface is smooth and any imperfections are removed, switch to finer grit sandpaper, such as 220. This will help achieve a finer finish and ensure the wood is ready for painting or staining, if desired.
- Sand the edges and corners: Pay special attention to sanding the edges and corners of the frame. These areas may be rougher and require extra sanding to achieve a seamless and professional look.
- Clean the wood: After sanding, use a clean cloth to wipe away any dust or particles on the wood. This will ensure a clean surface for the next step of assembly.
Sanding the wood not only smooths the surface but also allows for better adhesion of paint, stain, or varnish, if you plan to apply a finish. It’s important to take your time and sand all surfaces thoroughly to achieve the desired result.
Once you have completed the sanding process, you are ready to move on to the next step of assembling the frame.
Step 3: Assembling the Frame
With the wood cut and sanded, it’s time to assemble the frame for your canvas picture. Follow these steps to securely join the frame pieces together:
- Arrange the pieces: Lay out the cut wooden boards on a flat surface to ensure they are aligned correctly. Double-check that the corners are positioned properly for a seamless joint.
- Apply wood glue: Apply a generous amount of wood glue to the ends of the wood, where they will be joined together. Make sure to spread the glue evenly for optimal adhesion.
- Join the corners: Align the corners of the frame and press them firmly together. Use clamps or masking tape to hold the pieces in place while the glue dries. Wipe off any excess glue that squeezes out.
- Reinforce with nails or screws (optional): For added strength and stability, you can reinforce the frame by inserting nails or screws through the joints. Pre-drill holes to prevent splitting the wood, and carefully insert the fasteners.
- Allow the glue to dry: Follow the manufacturer’s instructions for drying time. It’s important to let the glue fully cure before moving on to the next step.
During the assembly process, make sure to check that the frame is square by measuring diagonally from corner to corner. If the measurements are equal, it indicates a properly aligned frame.
Once the glue has dried and the frame is securely assembled, you can proceed to the next step of attaching the canvas to the frame.
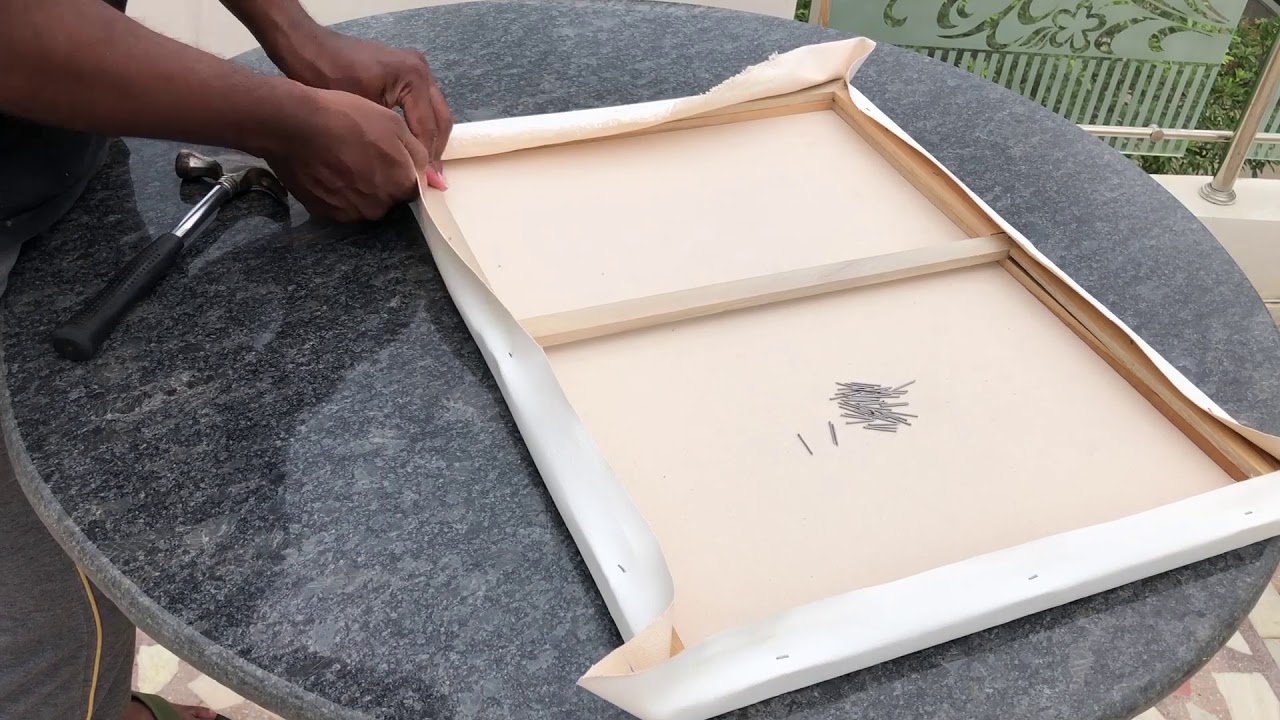
Step 4: Attaching the Canvas
Now that the frame is assembled, it’s time to attach the canvas to create your beautiful picture frame. Follow these steps to ensure a secure attachment:
- Position the canvas: Lay your canvas fabric over the frame, ensuring that it extends beyond the edges of the frame by a few inches on all sides.
- Fold and staple one side: Begin by folding one side of the canvas over the frame edge. Secure it in place with a staple gun, placing the staples about an inch apart. Start at the center and work towards the corners.
- Repeat for remaining sides: Move to the opposite side of the frame and fold the canvas over, pulling it taut. Staple it in place, again starting at the center and working towards the corners. Repeat this process for the remaining two sides.
- Tighten the canvas: Once all sides are stapled, check that the canvas is stretched evenly across the frame. Adjust as needed and add additional staples to ensure a tight, smooth surface.
- Trim excess canvas: Use scissors to trim any excess fabric from the back of the frame. Be careful not to cut too close to the staples or the canvas itself.
With the canvas securely attached, take a moment to inspect the frame and canvas for any loose staples or areas that may need reinforcement. Make any necessary adjustments before moving on to the next step.
Now that the canvas is successfully attached, it’s time to add the backing for additional support and protection.
Step 5: Adding the Backing
In this step, we will add a backing to our canvas picture frame to provide support and protect the back of the artwork. Here’s how to go about it:
- Cut the backing material: Measure and cut a piece of sturdy backing material, such as foam board or cardboard, to the size of your frame. Make sure it fits snugly inside the frame without overlapping the edges.
- Position the backing: Place the cut piece of backing material on the back of the frame, aligning it with the edges.
- Secure the backing: Use a staple gun to attach the backing material to the frame. Start by stapling one corner and then move to the opposite corner to ensure even tension. Continue stapling along the edges, spacing the staples about 2 inches apart.
- Reinforce the corners: To provide additional durability, add extra staples to reinforce the corners of the backing material. This will help keep it securely in place.
Adding a backing to your canvas picture frame not only provides structural support but also helps protect the artwork from dust, dirt, and moisture from the back. It ensures that your picture remains in excellent condition for years to come.
Once the backing is securely attached, you can move on to the next step of securing the picture within the frame.
Step 6: Securing the Picture
Now that the frame and backing are in place, the next step is to secure the picture within the canvas picture frame. Follow these steps to ensure a secure and professional display:
- Position the picture: Carefully place your artwork or picture face down on a clean surface. Make sure it is centered within the frame and aligned to your desired orientation.
- Attach the picture to the backing: Use acid-free framing tape or adhesive tabs to secure the picture to the backing. Apply the tape or tabs along the top edge of the picture, ensuring it is securely adhered to the backing material.
- Ensure proper alignment: Check that the picture is straight and aligned within the frame. Make adjustments if needed to ensure it is perfectly positioned.
Securing the picture within the frame ensures that it stays in place and doesn’t move or shift over time. Additionally, it helps maintain the picture’s integrity by preventing it from sagging or getting damaged.
Take a moment to inspect the frame and picture, ensuring that everything is aligned and securely attached. This will ensure a professional and visually appealing finished product.
With the picture securely in place, it’s time to move on to the next step of hanging your canvas picture frame.
Step 7: Hanging the Frame
After completing all the previous steps, it’s time to hang your newly crafted canvas picture frame. Follow these steps to securely hang your frame on the wall:
- Choose the placement: Decide where you want to hang your frame. Consider factors such as eye-level height and the surrounding decor.
- Mark the wall: Use a pencil to mark the desired position on the wall for the top corners of the frame.
- Install D-ring hangers: Attach D-ring hangers to the back of the frame, one on each side near the top edge. Make sure they are level and securely attached.
- Measure and mark hanging points: Measure the distance between the D-ring hangers and transfer that measurement to the wall, marking the corresponding spots.
- Install picture wire or hanging hardware: Attach picture wire or hanging hardware to the wall, using the marked spots as a guide. Make sure it is securely fastened to provide proper support for the frame.
- Hang the frame: Lift the frame and hook the D-rings or hanging hardware onto the picture wire or hooks installed on the wall. Adjust the frame to ensure it is level and positioned to your liking.
Once the frame is securely hanging on the wall, step back and check for any adjustments needed. Ensure that the frame is level and centered in its desired location.
Properly hanging your canvas picture frame allows you to showcase your artwork or memories and adds a stylish touch to any space.
Congratulations! You have successfully hung your canvas picture frame. If desired, you can move on to the optional step of applying a finish to the wood for added protection and aesthetic appeal.
Step 8: Optional: Applying a Finish
Applying a finish to your canvas picture frame can add a personal touch and enhance its overall appearance. Here’s how you can apply a finish:
- Choose your finish: Decide whether you want to paint, stain, or varnish the wood frame. Consider the style and color scheme you want to achieve.
- Prepare the surface: If you decide to paint or stain the frame, lightly sand the wood to create a smooth surface. Wipe away any dust or debris before proceeding.
- Apply the finish: Use a brush, roller, or cloth to apply the chosen finish to the wood frame, following the manufacturer’s instructions. Apply thin, even coats, allowing each coat to dry before applying the next.
- Repeat if necessary: Depending on the desired appearance, you may need to apply multiple coats. Make sure to let each coat dry completely and lightly sand between coats if needed.
- Protect the finish: If you used paint or stain, consider applying a clear topcoat or varnish to protect the finish and provide added durability. Follow the instructions on the product for application.
Applying a finish allows you to customize the look of your canvas picture frame to match your decor or highlight specific details. It also helps protect the wood from wear and tear over time.
Once you have completed the application of the finish and it has dried, your canvas picture frame is now ready to be displayed and admired.