
Materials Needed
To successfully transform a cabinet into a trash can, you will need a few essential materials. Gather the following items before getting started:
1. Cabinet: Choose a cabinet that is no longer needed for its original purpose. Make sure it is in good condition and large enough to accommodate your desired trash can size.
2. Trash Can: Select a trash can that fits comfortably inside the cabinet. Consider the capacity and dimensions to ensure it will meet your needs.
3. Measuring Tape: Accurate measurements are crucial to ensure the cabinet and trash can fit together seamlessly. Have a measuring tape handy to measure the cabinet’s dimensions and the trash can’s width and height.
4. Marker or Pencil: Use a marker or pencil to mark the areas where you will cut the cabinet and attach the trash can.
5. Saw or Jigsaw: Depending on the cabinet material, you may need a saw or jigsaw to cut out an opening for the trash can. Ensure you have the appropriate tool for the job and follow safety precautions.
6. Sandpaper: After cutting the cabinet, sand any rough edges to create a smooth surface. Sandpaper with different grits (medium and fine) will be useful.
7. Paint or Stain: If desired, paint or stain the cabinet to match your decor. Choose a paint color or stain that is suitable for the cabinet material.
8. Paintbrushes or Rollers: To apply the paint or stain, you will need paintbrushes or rollers. Select the appropriate tools based on the size and type of the cabinet.
9. Screws or Adhesive: Depending on the design, you may need screws or adhesive to secure the trash can in place. Choose the appropriate fasteners for the cabinet material.
10. Optional: Lid or Decals: To further customize your trash can cabinet, you can add a lid for concealment or decals for decoration. Consider these optional additions based on your preferences.
With these materials gathered and ready, you’ll be well-prepared to begin transforming your cabinet into a functional and stylish trash can.
Step 1: Remove Cabinet Doors and Shelves
The first step in transforming a cabinet into a trash can is to remove the doors and shelves. This process will create an open space for the trash can to fit inside. Follow these steps:
1. Clear the cabinet: Remove any items stored in the cabinet and set them aside in a safe place.
2. Unscrew the cabinet doors: Most cabinet doors are attached with screws. Use a screwdriver or drill to carefully unscrew and remove the doors. Place the screws in a small container or bag to keep them organized for later use.
3. Remove the shelves: If the cabinet has shelves, take them out as well. Depending on the cabinet design, the shelves may slide out or be secured with screws or brackets. Remove any attachments and carefully lift the shelves out of the cabinet.
4. Clean the cabinet: With the doors and shelves removed, take the opportunity to clean the interior of the cabinet. Wipe down the surfaces with a damp cloth or use a mild cleaning solution for tougher stains or residue. Allow the cabinet to dry before proceeding to the next step.
By removing the cabinet doors and shelves, you create an open area that can accommodate the trash can. This step sets the foundation for the transformation process.
Step 2: Measure and Mark the Cabinet
In order to ensure a precise fit for the trash can inside the cabinet, accurate measurements and markings are essential. Follow these steps to measure and mark the cabinet:
1. Measure the interior space: Use a measuring tape to determine the dimensions of the cabinet’s interior space where the trash can will be placed. Measure the width, depth, and height to identify the size requirements for the trash can.
2. Mark the measurements: Once you have determined the dimensions, use a marker or pencil to mark the corresponding measurements on the interior walls of the cabinet. Make clear and visible markings that will guide you during the cutting and installation stages.
3. Consider clearance space: Take into account any necessary clearance space for the trash can to fit comfortably inside the cabinet. Ensure that the dimensions you mark allow for easy insertion and removal of the trash can without any obstructions.
4. Double-check the measurements: Before proceeding to the next step, double-check your measurements to ensure accuracy. Make any necessary adjustments or corrections to the markings if needed.
Accurate measurements and markings are crucial to the success of the project. Taking the time to measure and mark the cabinet correctly will result in a seamless and well-fitting trash can installation.
Step 3: Cut an Opening in the Cabinet
Now that you have measured and marked the cabinet, it’s time to cut an opening for the trash can. Follow these steps to safely and accurately create the opening:
1. Gather the necessary tools: Depending on the material of your cabinet, you will need a saw or jigsaw. Ensure that you have the appropriate tool and wear appropriate safety gear, including safety goggles and gloves, before proceeding.
2. Follow the markings: Use your markings as a guide to cut the opening. Begin by making small pilot holes at the corners of the marked area. This will help create a starting point for the saw or jigsaw.
3. Cut the opening: With the pilot holes made, carefully cut along the marked lines using the saw or jigsaw. Take your time and use steady, controlled movements to ensure clean and straight cuts. If you’re using a jigsaw, consider using a fine-toothed blade for more detailed cuts.
4. Smooth the edges: After cutting the opening, use sandpaper to smooth any rough edges. Sand in a gentle, circular motion until the edges are smooth and free from splinters or sharp edges. This will help prevent any accidents or injuries when inserting and removing the trash can.
5. Clean the cabinet: Once you have finished cutting and sanding, thoroughly clean the cabinet to remove any dust or debris. A clean workspace will make the next steps of the transformation process easier and more efficient.
By following these steps, you will successfully create an opening in the cabinet that perfectly accommodates the trash can. The careful cutting and smoothing of the edges ensure a safe and functional space for the trash can installation.
Step 4: Sand and Paint the Cabinet
After cutting the opening in the cabinet, it’s time to prepare the surface for painting and enhance its appearance. Follow these steps to sand and paint the cabinet:
1. Sand the cabinet: Use sandpaper, starting with a medium grit and gradually moving to a finer grit, to smooth the surface of the cabinet. Sand in the direction of the wood grain or use gentle circular motions for other materials. This step will remove any imperfections, rough edges, or leftover residue from the cutting process.
2. Clean the cabinet: Once you have finished sanding, wipe down the cabinet with a damp cloth to remove any dust or debris. Ensuring a clean surface will help the paint adhere properly.
3. Choose a paint color: Select a paint color that complements your decor and personal preferences. Consider using a paint specifically designed for the cabinet material, such as latex or oil-based paint for wood cabinets.
4. Apply a primer (optional): If your cabinet requires extra preparation, such as covering a dark or glossy finish, applying a primer before the paint can improve adhesion and provide a smoother finish. Follow the manufacturer’s instructions for the primer application.
5. Paint the cabinet: Using a paintbrush or a roller, apply the paint evenly to the cabinet surfaces, including the interior and newly cut edges. Start with thin layers and allow each coat to dry before applying the next one. Follow the paint manufacturer’s instructions for drying and recoating times.
6. Add additional coats (if necessary): Depending on the desired coverage and the type of paint you’re using, you may need to apply multiple coats. Allow each coat to dry completely before deciding if additional coats are needed.
7. Let the paint cure: Once you have finished painting the cabinet, allow the paint to cure fully. Follow the recommended drying time provided by the paint manufacturer to ensure the paint hardens and becomes durable.
By sanding and painting the cabinet, you not only improve its appearance but also protect it from potential damage. The freshly painted surfaces will give your transformed trash can cabinet a polished and finished look.
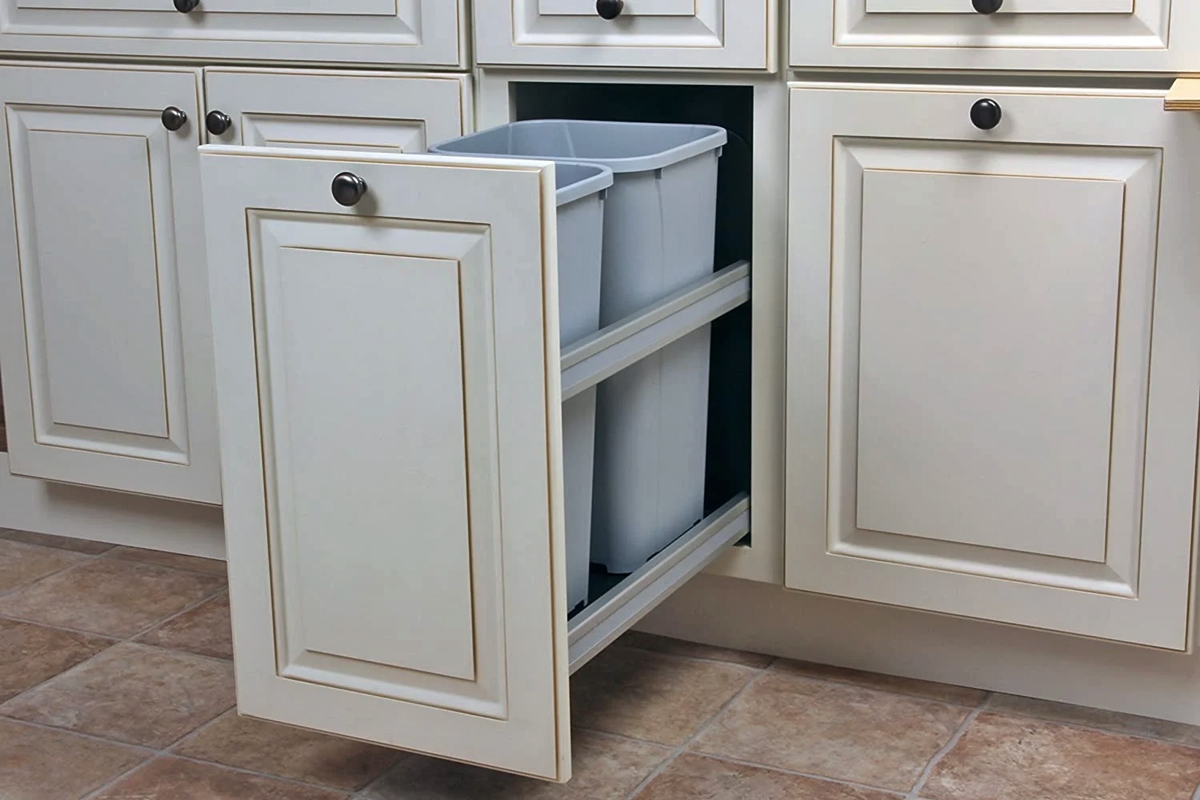
Step 5: Insert the Trash Can
With the cabinet prepared and painted, it’s time to insert the trash can into its designated space. Follow these steps to properly insert the trash can:
1. Position the trash can: Place the trash can into the opening you created in the cabinet. Ensure that it fits securely and aligns with the markings you made earlier.
2. Test the fit: Push the trash can further into the cabinet, checking that it moves smoothly and sits evenly within the space. Ensure that the lid or opening of the trash can is easily accessible for convenient use.
3. Make adjustments if needed: If the trash can doesn’t fit properly or is misaligned, carefully remove it from the cabinet and make any necessary adjustments. Use a measuring tape to ensure equal spacing around the trash can and reassess the fit before proceeding.
4. Consider stability: If the trash can feels unstable or wobbly inside the cabinet, use additional support methods. This can include adding filler material around the trash can to secure it in place or using brackets fastened to the cabinet walls for added stability.
5. Double-check clearance: Confirm that there is enough clearance for the trash can lid or opening to open and close freely without any obstructions. Make any necessary adjustments to ensure easy access to the trash can when needed.
By properly inserting the trash can, you are ensuring its functionality and practicality within the cabinet. Take the time to make any necessary adjustments or enhancements to guarantee a secure and accessible fit.
Step 6: Secure the Trash Can
Securing the trash can inside the cabinet is vital to prevent tipping or movement when in use. Follow these steps to ensure the trash can remains securely in place:
1. Determine the best method: Assess the type of cabinet and trash can you are using to determine the most suitable method for securing the trash can. Common options include using screws, adhesive, or brackets.
2. Screw method: If using screws, position the trash can in the desired location and mark the areas where the screws will be inserted. Use a drill or screwdriver to secure the trash can by attaching screws through the cabinet walls into the trash can’s designated holes or mounting brackets.
3. Adhesive method: For cabinets that cannot be easily drilled into or if a more temporary solution is preferred, use adhesive. Apply a strong adhesive, such as industrial-strength adhesive or heavy-duty double-sided tape, to the bottom of the trash can. Press the trash can firmly against the cabinet’s interior, ensuring proper alignment and holding it in place until the adhesive sets.
4. Bracket method: If your trash can and cabinet design allow for it, consider using brackets for added stability. Attach brackets to the cabinet walls and secure the trash can in place by sliding it into the brackets. Ensure a snug fit and test the stability of the trash can before proceeding.
5. Test the security: After securing the trash can, give it a gentle shake and test its stability. Ensure that it remains firmly in place and does not wobble or move excessively. Make any necessary adjustments to the securing method if needed.
6. Reassess periodically: Over time, check the security of the trash can periodically to ensure that screws remain tight or adhesive remains strong. Make any necessary adjustments or reapply adhesive as needed to maintain the secure positioning of the trash can.
Securing the trash can inside the cabinet will provide peace of mind knowing that it will stay in place during everyday use. Take the appropriate measures to prevent any accidents or damage caused by an unsecured trash can.
Step 7: Attach a Cabinet Door or Cover the Opening
Once the trash can is securely in place, it’s time to decide whether you want to attach a cabinet door or cover the opening. This step will help conceal the trash can and maintain the aesthetic appeal of the cabinet. Follow these steps to complete this final touch:
1. Attach a cabinet door: If you prefer a more traditional look, you can attach a cabinet door to cover the opening. Measure the dimensions of the opening and select a door that matches the style and material of the existing cabinet doors. Attach hinges to the door and cabinet, aligning them properly. Secure the hinges in place using screws, ensuring the door opens smoothly and closes securely.
2. Cover the opening: If you prefer a contemporary or minimalist look, you can choose to cover the opening without a traditional cabinet door. Options include using a decorative panel or fabric that matches the cabinet’s design. Measure the dimensions of the opening and cut the panel or fabric to fit. Attach it to the cabinet using adhesive, screws, or other appropriate fasteners that won’t interfere with the trash can’s functionality.
3. Test functionality: Regardless of the option you choose, test the functionality of the cabinet door or cover. Open and close it to ensure it moves smoothly without hindering access to the trash can. Make any necessary adjustments to guarantee a seamless operation.
4. Consider additional features: Depending on your preferences, you may choose to add additional features to enhance the functionality or appearance of the cabinet. This can include installing a soft-close mechanism for the cabinet door or incorporating decorative elements that match your interior design.
By attaching a cabinet door or covering the opening, you can maintain the cohesive appearance of your cabinet while discreetly concealing the trash can. Choose the option that best suits your style and needs, ensuring it doesn’t interfere with the ease of accessing and using the trash can.
Step 8: Test and Adjust the Trash Can
After completing the transformation of your cabinet into a trash can, it’s important to thoroughly test and make any necessary adjustments to ensure the functionality and convenience of the trash can. Follow these steps to test and adjust the trash can:
1. Test the trash can’s movement: Open and close the cabinet door or cover to assess the ease of accessing the trash can. Make sure the door or cover operates smoothly without any obstructions. Adjust the hinges or fasteners if needed to improve the movement.
2. Check for proper fit: Confirm that the trash can fits securely within the cabinet and there is no excess movement or instability. If you notice any issues, reassess the securing method or make adjustments to improve the fit.
3. Ensure smooth operation: Test the trash can’s functionality by inserting waste or trash bags into the canister. Check if the trash can closes properly and securely without any interference or jamming. If there are any issues, examine the placement of the trash bags or consider modifications to the trash can or its positioning within the cabinet.
4. Assess accessibility: Evaluate the ease of removing and replacing the trash can liner or bag. Ensure that there is enough room to comfortably lift the bag out of the cabinet and replace it as needed. If necessary, make adjustments to improve the accessibility, such as opting for a smaller trash can size or repositioning the trash can within the cabinet.
5. Make any necessary adjustments: Based on the testing and observations, make any additional adjustments or modifications to the trash can or cabinet. This may include adding additional support, altering the positioning of the trash can, or making changes to the cabinet door or cover to enhance the user experience.
By thoroughly testing the trash can and making necessary adjustments, you can ensure that it operates smoothly and efficiently within the cabinet. Take the time to fine-tune the setup to achieve maximum convenience and functionality.
Step 9: Optional: Add a Lid or Decals
At this stage of transforming your cabinet into a trash can, you have the option to add additional features for customization and personalization. Consider incorporating a lid or decals to enhance the functionality and appearance of the trash can:
1. Add a lid: Adding a lid to the trash can provides several advantages. It helps contain odors, keeps pests away, and provides a neater appearance. Choose a lid that fits securely on top of the trash can and consider options with features like a pedal for hands-free operation or a soft close mechanism for a quiet closing action.
2. Apply decals: Decals can add a touch of personality or serve a practical purpose. Use decals to label the trash can for proper waste separation or to indicate recycling or composting areas. Alternatively, opt for decorative decals that match your kitchen or room decor. Ensure the decals are waterproof and of high quality to withstand regular cleaning and use.
3. Ensure lid functionality: If adding a lid, ensure that it opens and closes smoothly without any obstructions. Test its functionality and make any necessary adjustments to guarantee seamless operation.
4. Apply decals accurately: When applying decals, carefully clean the surface of the trash can to ensure proper adhesion. Follow the instructions provided by the decal manufacturer for the best application results.
5. Consider maintenance: Take into account the lid or decals’ maintenance requirements. Make sure they are easy to clean and won’t hinder the regular maintenance of the trash can. Select materials that are durable and resistant to wear and tear.
Adding a lid or decals is optional but can significantly enhance the functionality and aesthetics of your transformed trash can. Assess your needs and personal preferences to determine if these additions would be beneficial and complement the overall look of the cabinet.
Step 10: Final Touches and Cleanup
As you near the completion of transforming your cabinet into a trash can, it’s time to focus on the final touches and ensure a clean and organized finish. Follow these steps to add the final touches and complete the project:
1. Check for any loose screws or fasteners: Go through the cabinet and check for any screws or fasteners that may have come loose during the transformation process. Tighten them as necessary to ensure everything is secure.
2. Clean up any dust or debris: Thoroughly clean the cabinet and surrounding area, removing any dust, debris, or leftover materials from the transformation. Use a damp cloth or vacuum to ensure a tidy finish.
3. Inspect the overall appearance: Take a step back and inspect the finished transformation. Ensure that everything looks visually appealing and functions properly. Make any final adjustments or touch-ups required to achieve the desired outcome.
4. Organize and store any leftover materials: If you have leftover materials, such as screws, adhesive, or paint, properly organize and store them for future use. Label them clearly for easy identification and keep them in a safe and accessible place.
5. Dispose of waste responsibly: Dispose of any waste materials properly, following local recycling or disposal guidelines. Separate and recycle any materials that can be recycled, and dispose of the rest in appropriate waste containers.
6. Maintain and care for your transformed trash can: Regularly clean and maintain your trash can to ensure its longevity and cleanliness. Remove any stains, odors, or buildup as needed, and regularly replace trash can liners or bags to keep it hygienic.
By focusing on the final touches and conducting a thorough cleanup, you’ll be able to fully appreciate your transformed cabinet and enjoy its functionality as a trash can. Take pride in your accomplishment and maintain it properly for long-lasting use.