
Choosing the Right Bread
When it comes to making a bread bowl, selecting the right type of bread is crucial. The bread you choose will ultimately determine the taste, texture, and overall enjoyment of your dish. Here are some factors to consider when choosing the perfect bread for your bread bowl!
1. Firmness: Opt for a bread that is sturdy and has a thick crust. This will ensure that the bread bowl holds its shape and doesn’t become too soggy when filled with delicious toppings.
2. Size: Choose a loaf of bread that is large enough to form a substantial bread bowl. A round or oval-shaped loaf works best, as it provides ample space for a generous amount of filling.
3. Flavor: Consider the flavor profile of your desired dish and select a bread that complements the ingredients you plan to use as a filling. For example, a hearty sourdough or a rustic French loaf can add a depth of flavor to savory fillings like soups, stews, or creamy dips.
4. Texture: The texture of the bread is equally important. A bread with a soft interior and a slightly chewy crust is ideal for creating a bread bowl. It should be able to hold up well when scooping out the center and withstand the weight of the filling.
5. Personal Preference: Ultimately, your choice of bread should align with your personal taste preferences. If you prefer a lighter bread, opt for a white or multigrain loaf. On the other hand, if you enjoy a heartier and more robust flavor, consider whole wheat or rye bread.
Remember, the key to a successful bread bowl lies in selecting a bread that can withstand the filling while providing a delicious and satisfying eating experience. Experiment with different bread varieties to find the perfect match for your desired dish!
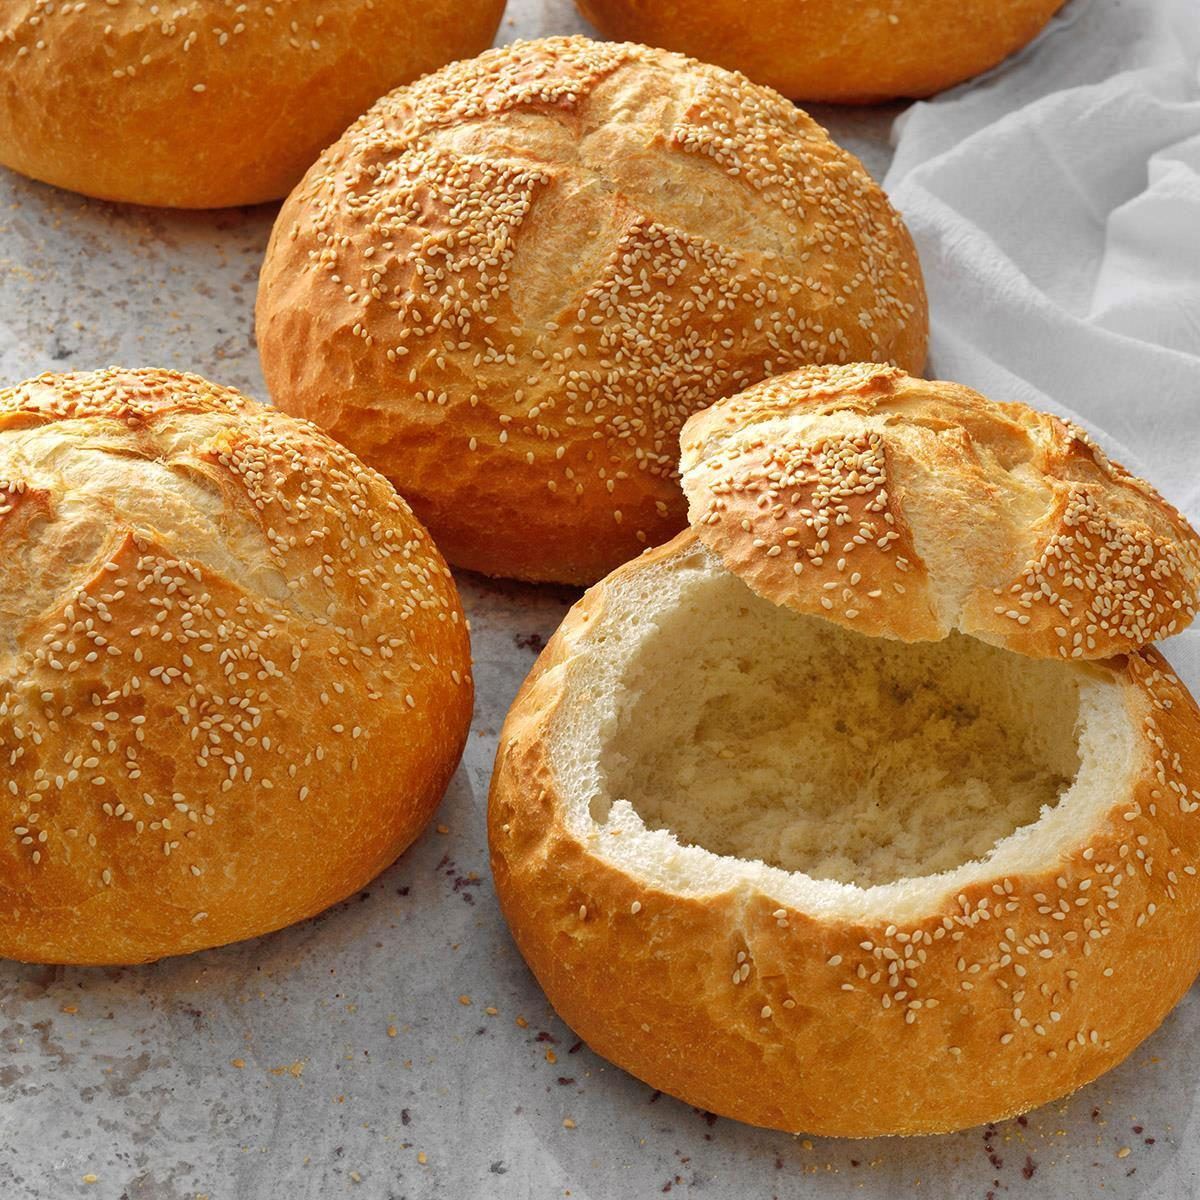
Hollowing out the Bread
Once you have chosen the right type of bread for your bread bowl, the next step is to hollow it out. Hollowing out the bread is essential to create a cavity that can hold your desired fillings. Here’s a step-by-step guide to help you hollow out the bread effectively:
1. Slice off the Top: Start by slicing off the top of the bread loaf. Set the top aside as it can be used later as a lid to cover the filled bread bowl.
2. Remove the Interior: Gently pull out the soft interior of the bread, leaving about a 1-inch thickness all around the edges. Be careful not to remove too much bread, as this may weaken the structure of the bread bowl.
3. Save the Bread Pieces: Don’t discard the bread you removed! Instead, tear the pieces into smaller chunks and save them to serve alongside your filling. This way, you can still enjoy the delicious bread, but in bite-sized pieces.
4. Create a Sturdy Base: Ensure that the bottom of the bread bowl is slightly thicker than the sides. This will prevent any seepage of liquid fillings and maintain the integrity of the bread bowl while you enjoy your dish.
5. Trim the Edges (Optional): If you prefer a neater presentation, you can trim the edges of the hollowed-out bread to create a smoother surface. This step is not necessary but can add a polished touch to your bread bowl.
That’s it! With these simple steps, you can successfully hollow out your bread bowl and prepare it for filling. Remember to handle the bread with care to avoid any unnecessary breakage. Now, you’re ready to move on to the next step of making your bread bowl irresistible – making it edible!
Making the Bread Bowl Edible
Once you have hollowed out your bread, it’s time to make the bread bowl edible and enhance its flavor. By following these steps, you can transform the bread bowl into a delectable part of your dish:
1. Brush with Oil or Butter: To add a layer of richness and prevent the bread from becoming dry, brush the interior and exterior of the bread bowl with olive oil or melted butter. This will also help create a crisp and golden crust when baking.
2. Toast in the Oven: Preheat your oven to a moderate temperature and place the bread bowl on a baking sheet. Bake it for a few minutes until the bread becomes lightly toasted. This step adds a satisfying crunch and enhances the overall flavor of the bread bowl.
3. Season with Herbs and Spices: For an extra punch of flavor, sprinkle some herbs and spices on the interior of the bread bowl. This can include dried oregano, garlic powder, paprika, or any other seasonings that complement your chosen fillings.
4. Add Cheese (Optional): If you’re a cheese lover, consider filling the bread bowl with a layer of grated or sliced cheese before adding the main fillings. As the bread bowl bakes, the cheese will melt and create a gooey and irresistible layer that adds a delicious cheesy element to your dish.
5. Seal the Gaps: To prevent your fillings from leaking out during baking, seal any gaps or openings in the bread bowl with a small piece of bread or aluminum foil. This will ensure that the filling stays contained and the bread bowl remains intact.
6. Keep Fillings Moist: If you’re using a filling that has a tendency to dry out, such as a creamy soup or dip, consider adding a layer of cream cheese, sour cream, or mayonnaise to the bottom of the bread bowl. This will help keep the fillings moist and prevent them from becoming too dry when baked.
With these steps, you can transform your bread bowl into a flavorful and edible vessel that enhances the overall taste of your dish. The bread will become a delightful component to enjoy along with the fillings. Now, it’s time to move on to the exciting part – filling the bread bowl!
Filling the Bread Bowl
Now that your bread bowl is ready to be filled, it’s time to get creative and choose the perfect combination of fillings. The filling options are virtually limitless, allowing you to cater to various tastes and preferences. Here are some delicious ideas to inspire you:
1. Soup: A classic choice for a bread bowl is to fill it with a warm and comforting soup. Creamy tomato bisque, chowder, or a hearty stew are all excellent options. Ladle the soup into the bread bowl, allowing it to soak into the bread and adding extra flavor and texture.
2. Dips and Spreads: Fill the bread bowl with a creamy or cheesy dip, such as spinach and artichoke dip, buffalo chicken dip, or a savory cheese spread. Pair it with an assortment of bread chunks or vegetable sticks for a crowd-pleasing appetizer.
3. Salads: Turn your bread bowl into a unique salad presentation by filling it with a variety of fresh and colorful ingredients. You can create a classic Caesar salad, a caprese salad with fresh mozzarella and tomatoes, or a Mediterranean-inspired salad with mixed greens, olives, feta cheese, and a tangy dressing.
4. Pasta Dishes: Fill the bread bowl with a delectable pasta dish. Layer cooked pasta, your favorite sauce, and a mixture of cheese on top. Bake it in the oven until the cheese is melted and bubbling, creating a satisfying and indulgent meal.
5. Breakfast Options: Don’t limit yourself to savory options – consider filling the bread bowl with a delightful breakfast filling. Scrambled eggs, bacon, cheese, and vegetables make a delicious morning treat.
6. Sweet Treats: For a twist, fill the bread bowl with a sweet treat like a fruit salad, ice cream, or bread pudding. The combination of the sweet filling and the bread bowl creates a delightful contrast of flavors.
Remember, the filling options are only limited by your imagination. Feel free to experiment with different ingredient combinations and flavors to create a unique and appetizing dish. Once you have filled the bread bowl, it’s time to bake it to perfection and serve it to eager diners.
Baking and Serving the Bread Bowl
After you have filled your bread bowl with delicious ingredients, the final step is to bake it to achieve a warm and golden exterior. Follow these steps to ensure that your bread bowl is baked to perfection:
1. Preheat the Oven: Set your oven to the appropriate temperature as per the recipe or filling you have chosen. It is usually recommended to bake the bread bowl at around 350°F (175°C) to ensure even cooking and a crispy exterior.
2. Cover with Foil (Optional): If you want to retain more moisture in the filling or prevent the bread from becoming too crunchy, you can cover the bread bowl loosely with aluminum foil during the initial stages of baking. This will help create a steaming effect and keep the interior soft.
3. Bake Until Golden: Place the filled bread bowl on a baking sheet and transfer it to the preheated oven. Bake for about 15-20 minutes, or until the bread is golden brown and the filling is heated through. Keep an eye on it to prevent over-baking or burning.
4. Check Doneness: To ensure that the bread bowl is fully baked, check the doneness by tapping the bottom of the bread. If it sounds hollow, it indicates that the bread is cooked thoroughly and ready to be served.
5. Let it Rest: Allow the bread bowl to cool slightly before serving. This will make it easier to handle and prevent any burned fingers. The cooling process also helps the flavors meld together for a more enjoyable dining experience.
6. Serve and Enjoy: Place the bread bowl on a serving platter or individual plates, and bring it to the table with pride. Encourage your guests to tear into the bread bowl, combining the flavors of the filling with the crusty bread. It’s a satisfying and interactive way to enjoy a meal.
7. Don’t Waste the Bread Bowl: Remember to scoop out the remaining bread from the bowl as it is still edible. The combination of the crispy crust and the flavorful fillings makes for a delightful bite.
Whether you’re serving a soup, dip, salad, or any other filling, baking the bread bowl adds that extra touch of warmth and provides a wonderful contrast in textures. It’s a visually appealing and delicious way to present your dish.