
Choosing the Right Book
Choosing the right book is the crucial first step in creating a stunning book sculpture. Here are some key factors to consider:
- Size: Select a book that has a size and thickness that matches your desired sculpture dimensions. Keep in mind that larger books will provide more material to work with, while smaller books may be easier to handle.
- Subject Matter: Look for a book with a subject that resonates with your creative vision. Whether it’s a favorite novel, a non-fiction work, or a thematic book related to your intended design, the subject matter can add depth and meaning to your sculpture.
- Condition: Evaluate the condition of the book to ensure its suitability for sculpting. While old and worn books can add character, make sure the binding and pages are reasonably intact and not falling apart.
- Visual Appeal: Consider the visual elements of the book, such as its cover design, font style, and illustrations. These features can contribute to the overall aesthetic of your sculpture, adding an extra layer of visual interest.
- Theme: If you have a specific theme or message in mind for your sculpture, look for a book that aligns with that theme. For example, if you’re creating a nature-inspired sculpture, a book about plants or wildlife could be an ideal choice.
Remember, the book you choose will be the foundation of your sculpture, so take your time and carefully consider these factors. Finding the perfect book will not only enhance the finished sculpture but also add a personal touch to your creative expression.
Gathering the Necessary Materials
Before embarking on your book sculpture journey, it’s essential to gather all the necessary materials. Here are the items you’ll need:
- A Book: Select the book that you have chosen for your sculpture from the previous step. Ensure it is in good condition and matches the desired size and subject matter.
- Sharp Craft Knife or Scalpel: Invest in a high-quality craft knife or scalpel with a sharp blade. This tool will be used for cutting and sculpting the book pages, so precision is key.
- Brush: Have a small soft-bristled brush on hand to remove any debris or loose paper bits that may accumulate during the sculpting process.
- Clamps or Binder Clips: These tools can be used to hold the pages of the book together tightly while cutting, ensuring stability and preventing unintentional movement.
- Protective Gloves: Considering the potential sharp edges of the craft knife and the possibility of paper cuts, wearing protective gloves is advisable. Choose gloves that allow for dexterity while providing adequate protection.
- Tweezers: A pair of tweezers can be helpful for delicately manipulating small paper pieces and adding intricate details to your sculpture.
Make sure to have all these materials on hand before you begin working on your book sculpture. This will help ensure a smooth and uninterrupted creative process, allowing you to fully focus on bringing your vision to life.
Selecting a Design
When it comes to selecting a design for your book sculpture, the possibilities are endless. Here’s how you can choose a design that best suits your artistic vision:
- Research and Inspiration: Start by conducting research and gathering inspiration from various sources. Browse through art books, visit galleries or exhibitions, explore online platforms, and even look for book sculpture tutorials. This will give you a better idea of different styles, techniques, and design possibilities.
- Consider the Book’s Subject: Take into account the subject matter of the book you’ve selected. Is there a specific scene, character, or theme that stands out? Use the content of the book as a starting point to brainstorm design ideas that are relevant and meaningful.
- Visualize the Sculpture: Picture how you want your sculpture to look. Consider the overall shape, texture, and detail. Sketch rough outlines or make a simple mockup to help visualize your design concept before you start cutting into the book.
- Personalize and Add Uniqueness: Infuse your own creativity and personality into the design. Think about elements that reflect your individual style or a personal connection to the book. Adding unique touches will make your sculpture truly one-of-a-kind.
- Simplicity vs. Complexity: Decide whether you want a simple, minimalist design or a more intricate and complex sculpture. Keep in mind your skill level, patience, and the time you can allocate to the project. Choose a design that is challenging but still achievable.
- Experiment and Adapt: Be open to experimentation and adapt your design as you go along. Sometimes, the best ideas emerge during the creative process itself. Allow yourself the freedom to make changes and adjustments to achieve the desired outcome.
Remember, selecting a design is a creative process, and there are no right or wrong choices. Trust your instincts and choose a design that excites you and pushes your artistic boundaries. This will make the journey of creating your book sculpture all the more fulfilling and enjoyable.
Preparing the Book
Preparing the book is an important step in the book sculpture process. It involves making sure the book is ready for sculpting and ensuring its stability throughout the creation process. Follow these steps to properly prepare the book:
- Clean the Book: Begin by gently cleaning the book cover and pages. Use a soft, lint-free cloth to remove any dust or debris that may have accumulated over time. This will ensure a clean working surface and prevent any particles from interfering with the sculpting process.
- Remove Dust Jackets: If the book has a dust jacket, carefully remove it before starting the sculpting process. Dust jackets are typically made of delicate materials and can easily tear or get damaged during handling and sculpting.
- Secure Loose Pages: Check for any loose pages or sections within the book. If you come across any, use a small amount of acid-free glue to reattach them to the book’s binding. This will help maintain the book’s structure and prevent pages from falling out during sculpting.
- Strengthen the Binding: If the book’s binding feels weak or loose, apply a thin layer of archival bookbinding glue along the spine. Gently press the book to ensure the glue adheres properly. This will help stabilize the book and prevent pages from loosening or coming apart during the sculpting process.
- Consider Reinforcements: For larger or thicker books, it may be necessary to reinforce the spine and outer edges of the book with strips of acid-free tape or bookbinding cloth. This will provide added support and prevent the book from opening up or getting damaged during the sculpting process.
- Allow the Book to Settle: After making any necessary preparations and repairs, allow the book to settle and dry for a sufficient amount of time. This will ensure that any applied glue or reinforcements have fully adhered and that the book is ready for the sculpting process.
By properly preparing the book, you are ensuring its longevity, stability, and structural integrity throughout the book sculpture creation process. This step will set the foundation for a successful and visually appealing sculpture.
Marking the Outline
Once you have prepared the book, the next step in creating a book sculpture is marking the outline. This involves mapping out the areas you will be cutting and sculpting, ensuring precision and guiding your creative process. Follow these steps to effectively mark the outline:
- Choose the Starting Point: Decide where you want to begin marking the outline. Typically, it’s recommended to start at the top or bottom of the book, but you have the freedom to choose based on your design concept.
- Create Reference Points: Use a pencil or light-colored pen to lightly mark reference points or lines along the edges of the book pages. These marks will serve as guidelines for your cutting and sculpting, helping you maintain consistency and accuracy throughout the process.
- Map Out the Design: Based on your chosen design, sketch the major features or shapes onto the surface of the book pages. This will give you a visual representation of the final sculpture and help guide your cutting and sculpting process.
- Consider Symmetry: If your design involves symmetrical elements, ensure that you mark both sides of the book pages accordingly. Use a ruler or straight edge to maintain straight lines and consistent measurements, enhancing the overall symmetry of the sculpture.
- Pay Attention to Details: If your design includes intricate details or smaller elements, mark them carefully to ensure precision. Take your time and double-check your markings to avoid mistakes and unnecessary carving or cutting.
- Keep Experimenting: As you mark the outline, don’t hesitate to make adjustments and experiment. Sometimes, ideas or improvements may arise during this process. Embrace the creative journey and trust your instincts to make necessary changes along the way.
By marking the outline, you are setting the foundation for the sculpting process. The outlined areas will guide your cutting and carving, allowing you to bring your design to life while maintaining control and precision throughout the book sculpture creation.
Cutting and Sculpting the Pages
With the outline of your book sculpture marked, it’s time to bring your design to life by cutting and sculpting the pages. This step requires careful precision and attention to detail. Follow these steps to effectively cut and sculpt the pages:
- Secure the Book: Begin by clamping or using binder clips to hold the book tightly together. This will prevent any movement or shifting of pages while you work, ensuring stability and accuracy during the sculpting process.
- Start Cutting: Using a sharp craft knife or scalpel, cut along the marked outline of the design. Begin with the outermost lines and gradually work your way towards the finer details, making precise cuts as needed. Take your time and be patient, focusing on maintaining the integrity of the pages.
- Remove Cut Pages: After cutting along the outline, carefully remove the cut pages using a pair of tweezers or your fingers. Take extra caution to avoid tearing or damaging adjacent pages as you remove the cut sections. If necessary, use the craft knife to make small incisions to help separate the pages cleanly.
- Create Depth and Layers: To add dimension to your sculpture, consider cutting different layers of pages at varying depths. This can be achieved by gradually cutting deeper into certain sections or leaving some pages partially intact. Experiment with different cutting techniques to create visual interest and depth in your design.
- Smooth Rough Edges: As you cut the pages, rough edges may occur. Use a sanding block or fine-grit sandpaper to carefully smooth these edges. Gently sand the cut areas in a sweeping motion until they are smooth to the touch. Be cautious not to sand too vigorously, as it might damage the remaining pages or weaken the structure of the sculpture.
- Refine and Adjust: Continuously step back and assess your progress as you cut and sculpt. Make any necessary refinements or adjustments to ensure the desired shape and appearance of the sculpture. Remember, the process is iterative, and you have the creative freedom to modify and adapt the design as you go along.
Cutting and sculpting the pages of the book is where your design truly takes form. Exercise caution, patience, and precision, and allow your creativity to guide you as you transform the book into a unique and captivating sculpture.
Carving the Design
Now that you have cut and sculpted the pages of the book, it’s time to take the next step: carving the design. This process involves adding intricate details and fine-tuning the sculpted areas to bring your book sculpture to life. Follow these steps to effectively carve the design:
- Choose your Tools: Select the appropriate tools for carving, such as a small chisel, a craft knife with a thin blade, or even a toothpick. Consider the level of detail and the size of the sculpture when choosing the carving tools.
- Refine the Sculpted Areas: Assess the sculpted areas and determine any additional alterations or refinements needed. Carefully carve away excess material, smooth rough edges, or reshape areas to enhance the overall form and accuracy of the design.
- Add Texture and Depth: Use the carving tools to add texture and depth to the sculpted areas. Carve fine lines, shapes, or patterns to create visual interest and enhance the overall visual appeal of the sculpture. Pay attention to subtleties in the design and incorporate textures that highlight the subject matter or theme you are portraying.
- Create Shadows and Highlights: Carve gentle grooves or indentations to create shadows and highlights within the design. By strategically carving deeper or shallower areas, you can add depth and dimensionality to the sculpture, making it visually dynamic and engaging.
- Emphasize Details: Focus on the finer details of the design, such as facial features, intricate patterns, or delicate shapes. Take your time to carve these details meticulously, ensuring precision and accuracy. Consider using magnifying glasses or a well-lit workspace to aid in carving intricate elements.
- Step Back and Assess: Periodically step back and look at the sculpture from different angles to evaluate your progress. This will help you identify any areas that may require further refinement or adjustment. Don’t be afraid to make tweaks and modifications as needed to achieve your desired outcome.
- Exercise Patience: Carving the design can be a time-consuming process. Exercise patience and focus, taking breaks when needed to prevent fatigue. Remember that the quality of your craftsmanship is just as important as the final result.
Carving the design is a delicate and intricate part of the book sculpture process. It requires meticulous attention to detail and a steady hand. Carefully sculpt and refine the carved areas to bring your design to its full potential and create a truly impressive and stunning book sculpture.
Adding Details and Finishing Touches
As your book sculpture nears completion, it’s time to focus on adding details and applying those final finishing touches. These steps will elevate your sculpture to the next level, ensuring its uniqueness and enhancing its overall aesthetic appeal. Follow these guidelines to effectively add details and apply finishing touches:
- Paint or Stain: Consider adding color to specific areas of your book sculpture. Acrylic paints or wood stains can be used to enhance certain elements or highlight key features. Use a small brush and practice precision to achieve the desired effect without overpowering the sculpture’s intricate design.
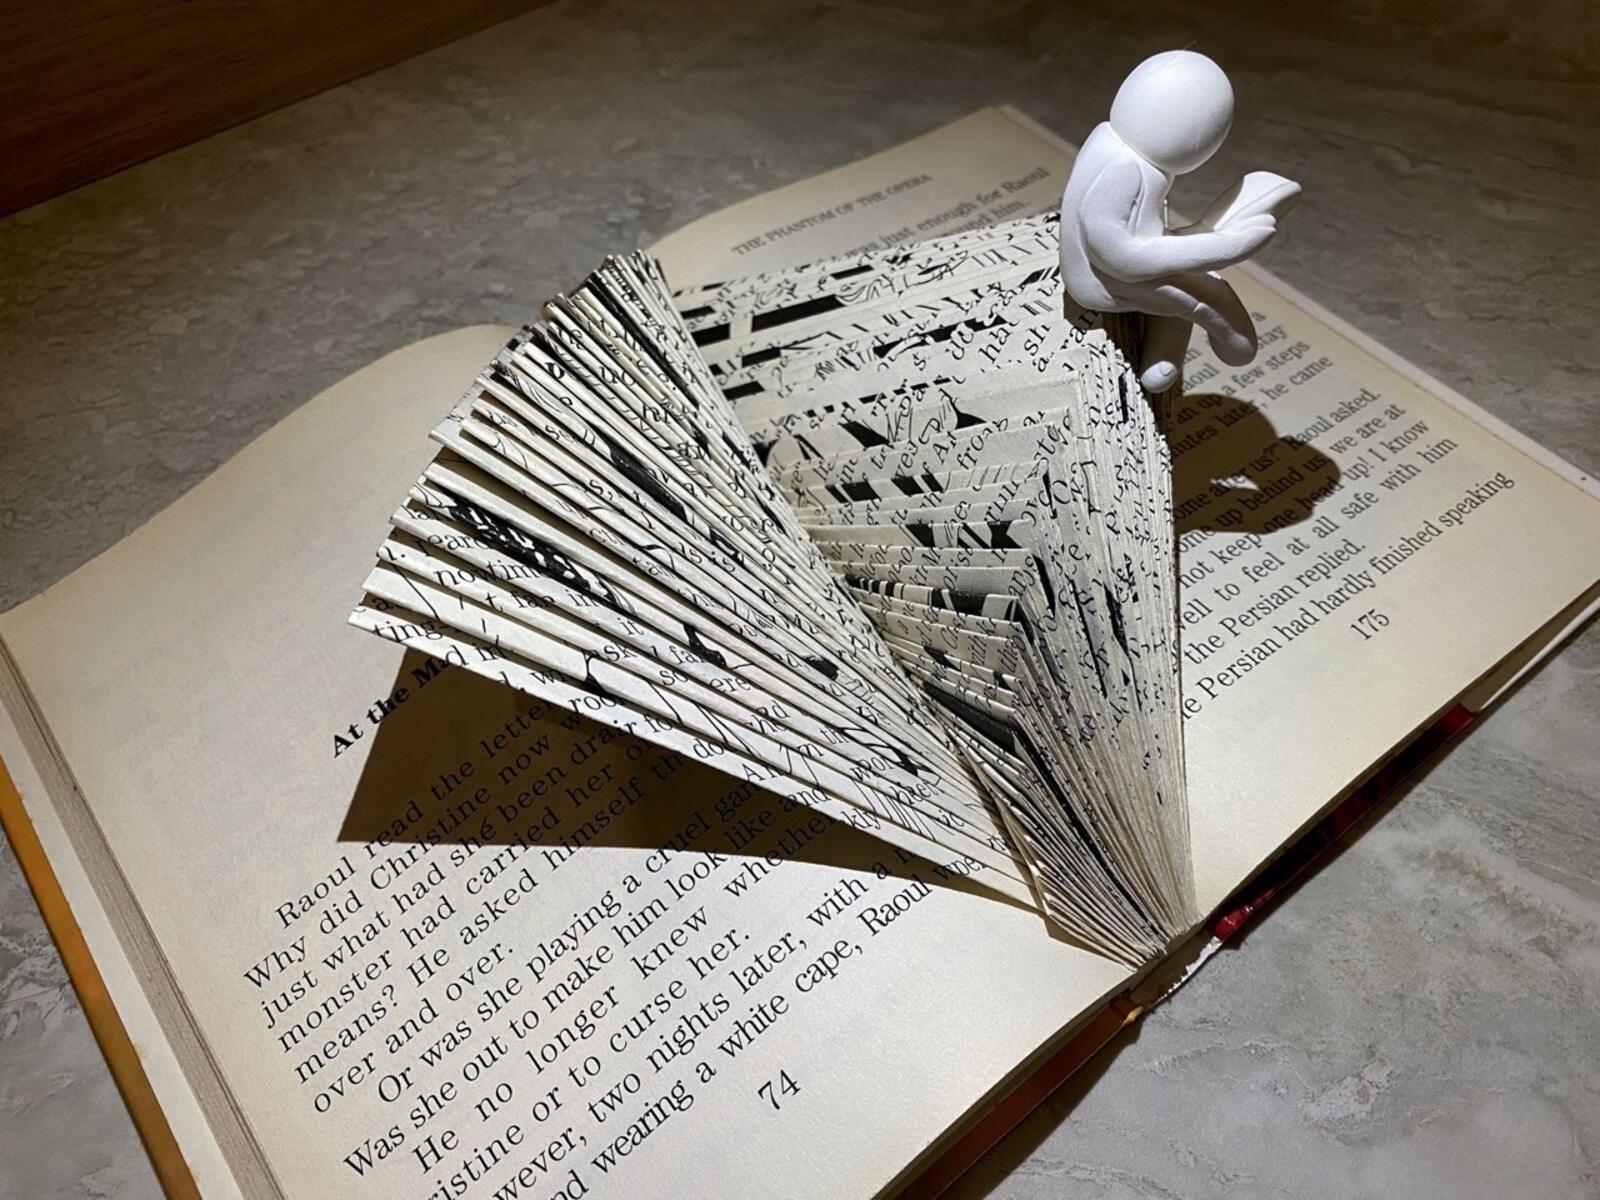
- Mixed Media Elements: Explore the possibility of incorporating additional materials into your book sculpture. Consider adding small objects, snippets of fabric, or even tiny figurines that align with your design concept. These mixed media elements can add depth, texture, and additional visual interest to your sculpture.
- Embellishments: Use small decorative elements such as beads, sequins, or buttons to embellish your sculpture. These can be strategically placed to enhance certain details and create unique focal points. Experiment with different materials and textures to find the perfect embellishments that complement the overall design.
- Highlighting with Gold or Silver Leaf: Adding a touch of gold or silver leaf can add a luxurious and sophisticated element to your sculpture. Apply the leaf carefully to specific areas using a soft brush or specialized adhesive, ensuring precision and creating captivating highlights.
- Contrasting Materials: Consider incorporating contrasting materials into your sculpture’s design. This could involve attaching small pieces of leather, fabric, or even metal to create intriguing juxtapositions that add visual interest and enhance the overall aesthetic appeal.
- Polish and Protect: Once you are satisfied with the details and finishing touches, take the time to gently polish the sculpture. Use a soft cloth to remove any fingerprints or smudges and bring out the sculpture’s shine. Additionally, consider applying a protective sealant or varnish to preserve the sculpture’s integrity over time.
Adding details and applying finishing touches is a crucial step in realizing the full potential of your book sculpture. These extra embellishments and careful refinements will ensure that your sculpture stands out and becomes a remarkable piece of art, showcasing your creativity and attention to detail.
Sealing and Preserving the Sculpture
Once you have completed your book sculpture and added all the necessary details, it’s important to take steps to seal and preserve the artwork. Sealing the sculpture will help protect it from environmental factors and ensure its longevity. Follow these guidelines to effectively seal and preserve your book sculpture:
- Choose a Sealant: Select a sealant that is suitable for the materials used in your book sculpture. Opt for an archival-quality, non-yellowing, and acid-free sealant to prevent any damage or discoloration to the artwork. Spray sealants or brush-on sealants can both work, depending on your preference.
- Test in a Small Area: Before applying the sealant to the entire sculpture, conduct a small test patch in an inconspicuous area. This will allow you to ensure that the sealant does not cause any adverse effects or undesirable changes to the appearance of the sculpture.
- Cover the Pages: If you want to protect the pages of the book from further deterioration, consider applying a clear adhesive or archival-quality glue along the page edges to keep them intact. This will provide an extra layer of protection and help prevent any potential tearing or fraying.
- Apply the Sealant: Follow the manufacturer’s instructions for applying the sealant. Use even strokes and make sure to cover all exposed areas of the sculpture. Take care not to oversaturate the book or allow the sealant to pool in the crevices. Allow the sealant to dry completely before moving on to the next step.
- Reinforce Weak Areas: If there are any delicate or fragile parts of the sculpture, consider reinforcing them with a small amount of archival glue or adhesive. This will help strengthen these areas and prevent any potential damage or breakage in the future.
- Store Properly: Once the sealant has dried completely, store your book sculpture in a safe and clean environment. Avoid exposing it to direct sunlight, extreme temperatures, or excessive humidity, as these conditions can deteriorate the materials over time. Display the sculpture in an area where it will be protected and admired.
Sealing and preserving your book sculpture is essential to keep it looking its best for years to come. By taking the necessary steps to protect and preserve your artwork, you ensure that it will continue to be enjoyed and appreciated for its artistic value and craftsmanship.
Displaying and Caring for Your Book Sculpture
Once you have successfully sealed and preserved your book sculpture, it’s important to display it in a way that showcases its beauty and protects it from potential damage. Additionally, proper care and maintenance will help ensure the longevity of your sculpture. Follow these guidelines to effectively display and care for your book sculpture:
- Choose a Sturdy Base: Select a stable and appropriate base to display your book sculpture. Consider using a clear acrylic stand, a decorative platform, or a custom-made display case. Ensure that the base provides adequate support and does not put any undue pressure on the sculpture.
- Position Away from Direct Sunlight: Place your book sculpture away from direct sunlight or sources of intense heat. Prolonged exposure to UV rays can cause fading and damage the materials of the sculpture. Instead, opt for a location that has indirect or diffused lighting to showcase the details of the artwork.
- Prevent Dust Accumulation: Regularly dust the book sculpture using a soft, dry microfiber cloth or a feather duster. Avoid using any harsh chemicals or abrasive materials, as they can damage the artwork. Dusting on a weekly basis will help prevent build-up and keep the sculpture looking pristine.
- Handle with Care: When moving or handling the book sculpture, always do so with clean and dry hands. Avoid grasping or gripping the delicate parts of the sculpture to prevent accidental damage. Take extra precautions, such as wearing cotton gloves, when necessary
- Monitor Temperature and Humidity: Keep an eye on the environmental conditions of the display area. Avoid placing the sculpture in excessively humid or dry areas, as fluctuations in humidity can cause damage to the materials. Maintain a stable humidity level (around 40-50%) to ensure the longevity of your book sculpture.
- Regularly Inspect and Maintain: Periodically inspect the book sculpture for any signs of damage or deterioration. Pay close attention to fragile areas and ensure that any repairs or touch-ups are promptly addressed. If necessary, consult with a professional conservator to ensure proper restoration and maintenance.
Displaying and caring for your book sculpture requires careful attention and maintenance. By following these guidelines, you can protect your artwork, preserve its integrity, and enjoy its beauty for years to come. Treat your book sculpture with the respect it deserves, and it will continue to be a cherished piece of art in your collection.